VFRDiscussion ARCHIVE / READ-ONLYREAD-ONLY

Starter Valve Syncronization - VTEC

25 posts Started 29 Jan 2005 Last recovered post 20 Jul 2010 Wayback Machine snapshot 1 Jan 2011

#1
[image: Posted Image]
  • VTEC Starter Valve Synchronization
  • K&N filter Install
  • Airbox snorkel modification
Preparation

Remove the tank screws and prop up the tank. Unscrew the 7 screws on the top of the airbox, remove the tube to the flapper.


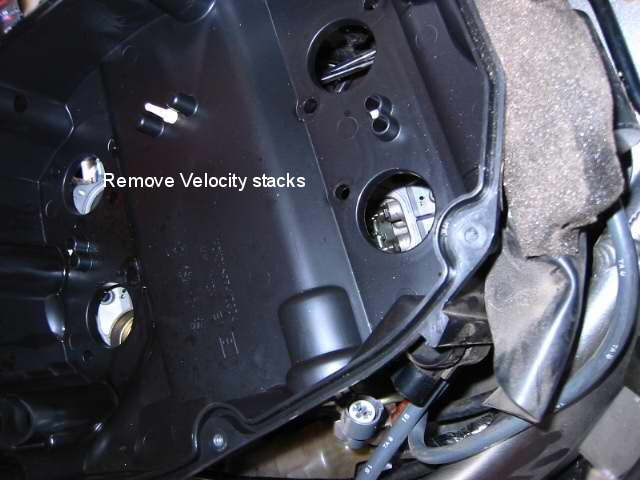
Remove the airfilter and unscrew the 8 screws on the velocity stacks, lift the airbox out of the way. I had to remove the wire to the flapper solenoid to accomplish this but I did not have to remove any other tubes or wires to lift the airbox up out of the way.

Remove the velocity stacks notice that the stacks are different sizes, they are offset so that the short ones are on the inside and the tall ones are outside. Front tall on the left short on right, back short on the left tall on the right.
Posted Image

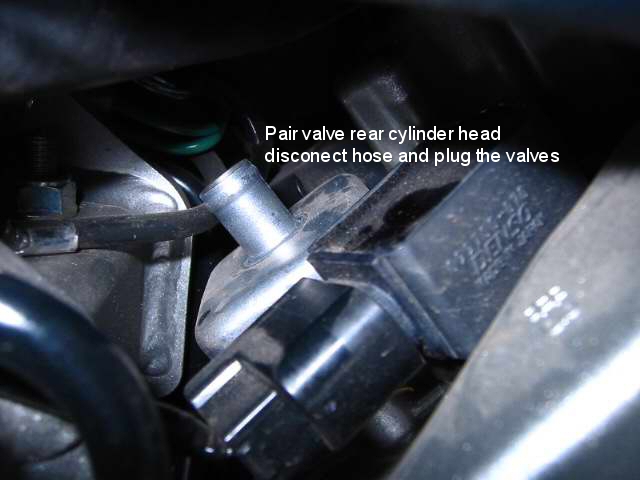
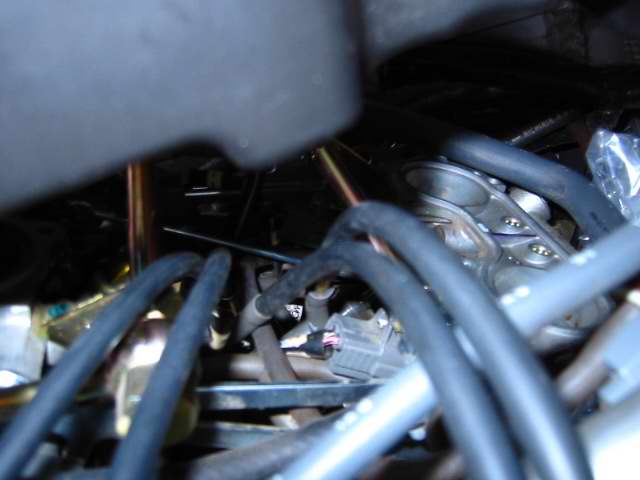
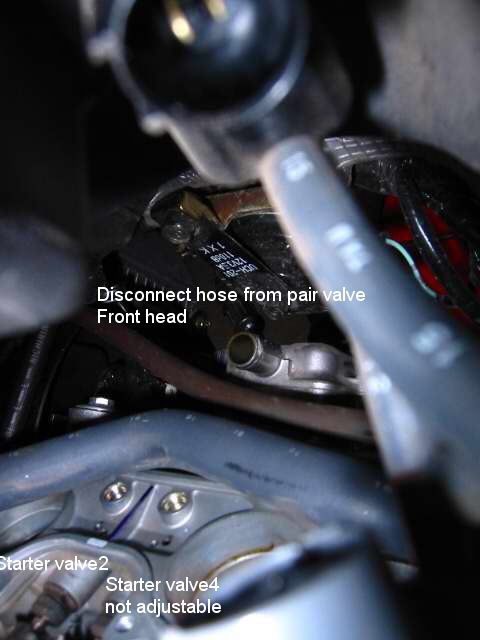
Disconnect the hoses to the PAIR Valves front and back
Posted Image

Back
Posted Image

If you have a rubber cap plug up the open ends of the PAIR valve tubes, we did not so we stuffed in a plastic bag.
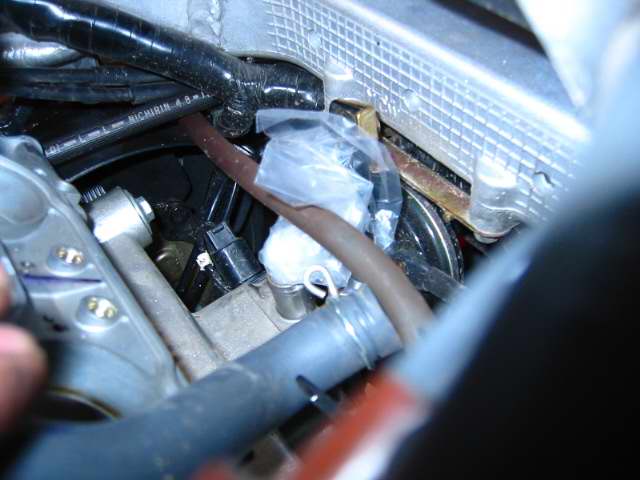
Posted Image

There are 4 starter valves connected to a 5 way tube connector, they take air from the airbox and bypass it into the intake manifold in place of a choke. They must be balanced by equalizing the vacuum pressure so they run evenly and run smoothly.
[image: Posted Image]

Here is a clear view of the 5 way connector
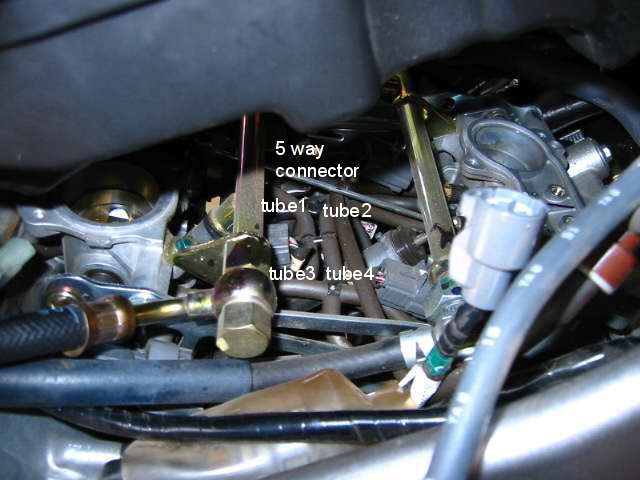
Posted Image

another view
[image: Posted Image]

Remove the 4 tubes from the 5 way connector and connect them to your a 4 way vacuum tester, I use a motion pro mercury tool
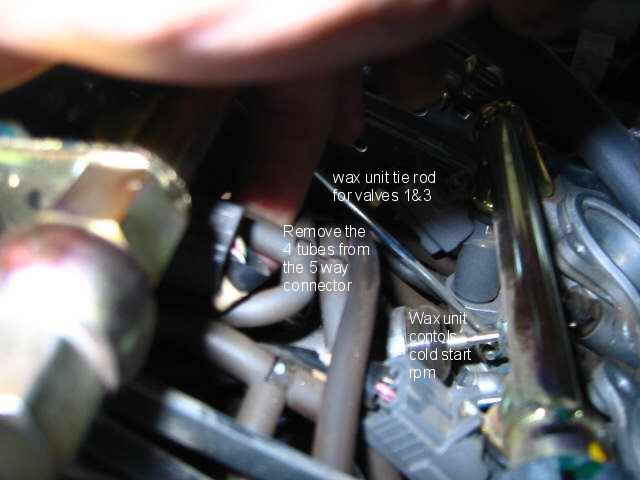
Posted Image

They are difficult to reach and if you lose them you have to fish them out
[image: Posted Image]

make note of the tubes in relation to the starter valve location as they are related. connect the tubes to the number on the vacuum tool
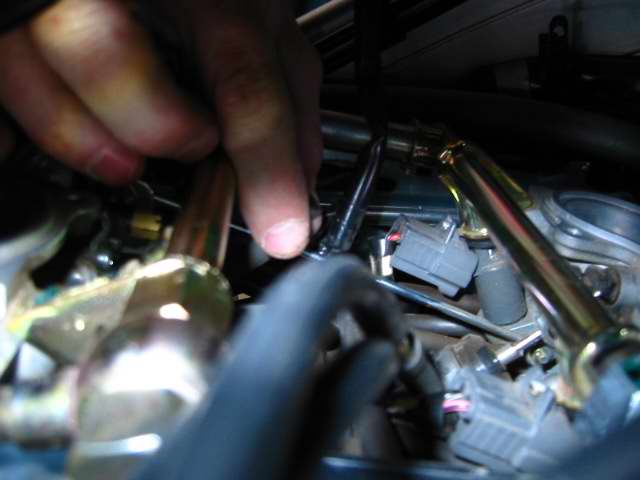
Posted Image

Here they all are connected
Posted Image

Connect an electronic Tachometer

I have a multi use tool that has a built in tachometer
[image: Posted Image]

The ECM computer has a tach lead wire that gives off pulses that an electronic tachometer can read, I just shoved the lead in behind the connector, it is the yellow and green wire on the gray connector, and set the tool to 4 cyclinder.
[image: Posted Image]

Ground the tool anywhere on the frame
[image: Posted Image]

Start up the bike and warm it it up to operating temp. Then set the idle speed to 1200 rpm, Craig's bike was only at 1050 when first measured. The idle adjustment is on the right side
[image: Posted Image]

Begin balancing the valves, They are numbered #1 left rear, #2 left front, #3 right rear, and a non adjustable #4 valve at the right front side. turn the valves one at a time to get them all even with #4 and adjust the idle to 1200 until they are all even, clockwise to lower and counter to increase the vacuum pressure.

[image: Posted Image]

Remove the tools and reconnect the 5 way connector, replace the airbox and reinstall the velocity stacks.

K&N filter install
Remove the rubber gaskets in the groves of the top and bottom of the airfilter

[image: Posted Image]

The K&N has a built in gasket just set it into the groove.
[image: Posted Image]

Snorkel Modification

I also have a K&N on my VFR, I was cleaning it last month and found that the filter was dirty only on one side so I cut away a portion of the snorkel to get a more even distribution of air and still get the laminar flow.

I cut the rubber at the first ridge and left the top of the snorkel material, cutting at an angle.
[image: Posted Image]

The modification increased my normal tank mileage by 20 miles to a tank of gas extra. But I did not notice a loss of torque at low rpm and a slight increase in power.
#2
Hi folks, I recently did my starter valve synchronisation on my '02 and have some notes to add.

First up, when I did this initially two weeks ago it coincided with my Stator frying itself and my main fuse B holder melting, so I was somewhat distracted.
Anyway when I fixed all that up and took the bike for a ride it was running like a bag of spanners - it wouldn't hold a steady idle, the idle speed was ALL over the place, and eventually it was jerky and snatchy like never before - picture the usual VTEC surging and multiply that by ten and you'll know what I mean.

I thought that being distracted by the Stator problem had made me sync the bike incorrectly, but what had actually happened was one of the vacuum lines had slipped off the number three intake tract! The MAP sensor must have been getting completely crazy readings and causing the ECU to go completely nuts. This explained why the bike was crap at small throttle openings, and OK at WOT; the MAP sensor is not used by the ECU for large throttle values.

After fixing that with some new vacuum hose cut to length and hooked up, I thought I was a real smart bloke by hooking my MAP sensor up to the flapper valve vacuum hose so that the MAP sensor was working while I was doing the valve sync (and therefore not giving me any FI codes).

Folks, it turns out that's a bad idea. You CANNOT sync the starter valves when the MAP sensor is connected and working! As you adjust the starter valves, the vacuum reading changes and the ECU starts messing with the idle speed, which messes with the vacuum readings, which causes you to twiddle with the start valves, which causes the vacuum reading to change, which causes the ECU to mess with the idle speed again! An endless loop of misery...

In short, disconnect your MAP sensor vacuum hose, plug the flapper valve vacuum hose with something, and just let the ECU go into open loop mode. Then, and only then will you be able to have the bike hold an idle you set it while you adjust the starter valves! And when you're done, check to make sure the vacuum hoses to the intakes are taught and not able to slip off easily. If they do, replace them with some new vacuum hose.

The other thing to note is that if you start the bike with the MAP sensor electrically connected, but not to a vacuum hose, the bike will not want to run. You have to start the bike with the throttle cracked a bit and keep it cracked for up to 15 seconds until the ECU goes open loop. I think if you don't connect the MAP sensor to its electrical plug, this problem goes away. Regardless, you will get ECU error codes stored in diagnostic memory which you need to clear out after the job is done. This is needed because the error codes are errors which you are basically creating on purpose. If you have real problems later, you don't want red herrings in the system!
#3

[image: View Post]kaldek, on 01 May 2010 - 01:00 AM, said:

You CANNOT sync the starter valves when the MAP sensor is connected and working!

NO - If you do the procedure as laid out in the manual you will have no trouble adjusting idle. If the manometer balance is off for the 4 starter valves when you first hook it up you just set them equal to the non adjustable valve, the idle speed will fluctuate as you do this YES. The basic balance will be preserved as long as you dont go banging around too much. The problem lies with trying to adjust balance and idle speed at the same time, if your trying to get the idle set at the same time your adjusting each starter vavle indivdually of course it will be difficult.


SO Start with the recommended idle speed, next adjust the vavles till they balance, THEN reset the idle again and your done. They wont go out of balance after you adjust the idle unless you are trying to do both at the same time. Do one thing at a time here, so yes the idle speed will change when your adjusting each of the valves to balance, leave the idle screw alone till you get them in balance and ignore the wild changes in idle speed, once they are balanced then adjust the idle one last time to the correct speed.
#4
Nice write up, I like what you did with the snorkel. When I did mine at 4000 miles, the only things that changed was a smoother idle and a less radical VTEC transition. Did you notice the same changes?
#5
Does one really need an electronic tach...?? You can't just use the one on the console??

I'm hoping to do this maintenance soon.. together with new thermostat, new stator (2nd one fried) and new chain and sprocket kit...
#6

[image: View Post]Auspa�ol, on 01 May 2010 - 11:02 AM, said:

Does one really need an electronic tach...?? You can't just use the one on the console??

I'm hoping to do this maintenance soon.. together with new thermostat, new stator (2nd one fried) and new chain and sprocket kit...

No the tach on the dash is not accurate to 300rmp
#7

[image: View Post]HispanicSlammer, on 01 May 2010 - 09:25 AM, said:

[image: View Post]kaldek, on 01 May 2010 - 01:00 AM, said:

You CANNOT sync the starter valves when the MAP sensor is connected and working!

NO - If you do the procedure as laid out in the manual you will have no trouble adjusting idle. If the manometer balance is off for the 4 starter valves when you first hook it up you just set them equal to the non adjustable valve, the idle speed will fluctuate as you do this YES. The basic balance will be preserved as long as you dont go banging around too much. The problem lies with trying to adjust balance and idle speed at the same time, if your trying to get the idle set at the same time your adjusting each starter vavle indivdually of course it will be difficult.


Hang on a second - what vacuum line is your MAP sensor connected to while you're doing the adjustment? The MAP sensor connects to a 5-way joint, and you remove all four feeds from that joint to hook into the balancer/manometer.
#8

[image: View Post]kaldek, on 02 May 2010 - 07:32 PM, said:

Hang on a second - what vacuum line is your MAP sensor connected to while you're doing the adjustment? The MAP sensor connects to a 5-way joint, and you remove all four feeds from that joint to hook into the balancer/manometer.

Ok I quoted the wrong part of your orginal post, the part where you hooked up the map sensor back up to a different line..ala not by the book as it were. I have to admit there are parts of the vtec that are easier to do than the 5th gen but hooking up the manometer is not one of them. I like how you just equalize them rather then set one at such and such pressure then drop it for the next two like the 5th gen, I always ignored that anyway.

I was more tempted just to get the manometer close to equal then tweak them till the bike ran smoother and idled best, that seems more important than what the insturment says in the final conclusion of the work. You can hear and feel a smoother idle as you tweek the SV's seem to me on my 5th gen the more I went by spec the worse the lump got on the idle I was better off equalizing them and then tweeking here and there till it was idling smoothest.
#9
Last time I did my starter valve sync, I connected up everything I could including the IAT and MAP sensors (but blocked of the PAIR) and seemed to be able to sync them quite well. So what is the consensus here regarding the MAP sensor? Connect it or disconnect it for starter valve sync? For my homemade manometer (post about starter valve sync with homemade manometer), I have a tee installed in one of the lines so I can connect up all the throttle bodies AND the MAP sensor all at the same time. Seemed to work for me. Thoughts?
#10
I really need to try this one day on my 75k mile 02! Good write-up btw!

ps my manoneter has lost all it's fluid, whats a decent replacement?

BR
#11

[image: View Post]BaileyRock, on 15 July 2010 - 04:26 PM, said:

ps my manoneter has lost all it's fluid, whats a decent replacement?
BR


I use ATF in my homemade manometer (description) because:
- It has a high viscosity so it moves slowly and acts as a natural damper
- it is red so it is very visible
- it won't likely harm the throttle body or engine if it accidentally gets sucked in (not likely anyway with the long hoses I use
- it's cheap and readily available
#12

[image: View Post]BaileyRock, on 15 July 2010 - 04:26 PM, said:


ps my manoneter has lost all it's fluid, whats a decent replacement?

BR


You're manoneter lost all it's fluid! Isn't that more of an issue for a doctor and not a mechanic? :laughing6-hehe:
#13

[image: View Post]choco, on 16 July 2010 - 09:38 AM, said:

[image: View Post]BaileyRock, on 15 July 2010 - 04:26 PM, said:


ps my manoneter has lost all it's fluid, whats a decent replacement?

BR


You're manoneter lost all it's fluid! Isn't that more of an issue for a doctor and not a mechanic? :laughing6-hehe:


Some women like the idea of shooting blanks!

Not that I am! :goofy:

Thanks on the ATF Bart!
#14

[image: View Post]Bartmaneh, on 16 July 2010 - 07:52 AM, said:

[image: View Post]BaileyRock, on 15 July 2010 - 04:26 PM, said:

ps my manoneter has lost all it's fluid, whats a decent replacement?
BR


I use ATF in my homemade manometer (description) because:
- It has a high viscosity so it moves slowly and acts as a natural damper
- it is red so it is very visible
- it won't likely harm the throttle body or engine if it accidentally gets sucked in (not likely anyway with the long hoses I use
- it's cheap and readily available


Well ATF doesn't work in the Motion Pro tool like HS used, it just gets sucked out of the tubes! :blink:
I saved enough mercury from the tool and put it back in and it works pretty good now.
Actually attempting a Started valve synk now and having a few problems!
Idle adjustment cable broke! :dry:
My RPM function doesn't work on my Multi tool! :mad:
All cyls fluctuate except #2 which is rock steady.
Not really sure what should or should Not be connected to do these adjustments! (Map, vacuum lines, sensors, etc.)?

:lurk:
#15
Need a different mamometer, mine is junk! :dry:
#16

[image: View Post]BaileyRock, on 18 July 2010 - 04:27 PM, said:

All cyls fluctuate except #2 which is rock steady.


Yeah, sounds like your manometer isn't damping the pulsing well - maybe only on the cyl #2 line. You should make one, it's not so hard.
#17

[image: View Post]BaileyRock, on 18 July 2010 - 09:18 PM, said:

Need a different mamometer, mine is junk! :dry:

ON SALE AT BIKE BANDIT $91.76 Motion Pro
#19

[image: View Post]BaileyRock, on 18 July 2010 - 09:18 PM, said:

Need a different mamometer, mine is junk! :dry:


Did you keep the mercury?? I wonder if mine is low or something. I seem to get air bubbles while running. If I shut it off, then back on, it is a solid column, then starts to get air pockets again. :angry:
#20

[image: View Post]wera803, on 19 July 2010 - 01:59 PM, said:

[image: View Post]BaileyRock, on 18 July 2010 - 09:18 PM, said:

Need a different mamometer, mine is junk! :dry:


Did you keep the mercury?? I wonder if mine is low or something. I seem to get air bubbles while running. If I shut it off, then back on, it is a solid column, then starts to get air pockets again. :angry:


Originally I though all the mercury was gone, but found some in the chamber which I poured out into a container. then cleaned it up and added ATF which was a major failure as it was just sucked up into the engine no matter what I did! :dry:
Then I thought WTH I'll try the mercury again and bingo it worked pretty decent, but ATF and other crap got all mix in and messed up it's performance! I plan to drain the merc again and try a re-clean to see what happens. :blush:

BR
#21

[image: View Post]wera803, on 19 July 2010 - 01:59 PM, said:

Did you keep the mercury?? I wonder if mine is low or something. I seem to get air bubbles while running. If I shut it off, then back on, it is a solid column, then starts to get air pockets again. :angry:

If you're getting air bubbles, my experience tells me that you have a leak. In the first version of my homemade manometer, I got streams of air bubbles because of leaks around the T's. I don't know how repairable your manometer is though.
#22

[image: View Post]BaileyRock, on 19 July 2010 - 05:46 PM, said:

[...]Originally I though all the mercury was gone, but found some in the chamber which I poured out into a container. then cleaned it up and added ATF which was a major failure as it was just sucked up into the engine no matter what I did! :dry: [...]
BR

BaileyRock, dude... Sorry if I misled you to a small disaster with the ATF suggestion. Works great in homemade manometers. I didn't know you had Motion Pro.
#23

[image: View Post]kaldek, on 01 May 2010 - 01:00 AM, said:

[...] I thought I was a real smart bloke by hooking my MAP sensor up to the flapper valve vacuum hose so that the MAP sensor was working while I was doing the valve sync (and therefore not giving me any FI codes) [...]

Now see? I have a real problem with all this. First of all, hooking up the MAP sensor to the flapper vacuum line is probably not going to work because that vacuum line is controlled by a solenoid that is RPM based. I haven't thought is through but it's possible that there's no vacuum on that line at idle and that's why the MAP sensor wasn't happy.

I've always done my starter valve sync with the MAP sensor connected and have always managed to get what I thought was a good sync alignment. I should clarify and point out that with my homemade manometer setup, I have an extra T so I can hook up all 4 cyl's and the MAP sensor simultaneously. It's getting real system vacuum and maybe that's why it works for me. The "book" may say to leave the MAP sensor disconnected because they know that the standard manometer jig only has 4 ports and doesn't allow the MAP to be hooked up and get al system vacuum.

I've also never used an electronic tach - it couldn't possibly matter that much. Furthermore, I want the sync perfect where my idle normally is which is a bit higher than 1200 and more like 13-1400 to help with throttle response etc.

So, like BR, I'm looking for some consensus here about whether to keep sensors hooked up or to go "by the book" and keep some disconnected like the MAP sensor. After all, the book's not perfect or at least not very complete in the story it tells.
#24

[image: View Post]Bartmaneh, on 19 July 2010 - 06:17 PM, said:

[image: View Post]BaileyRock, on 19 July 2010 - 05:46 PM, said:

[...]Originally I though all the mercury was gone, but found some in the chamber which I poured out into a container. then cleaned it up and added ATF which was a major failure as it was just sucked up into the engine no matter what I did! :dry: [...]
BR

BaileyRock, dude... Sorry if I misled you to a small disaster with the ATF suggestion. Works great in homemade manometers. I didn't know you had Motion Pro.


No Worries Whatsoever! It was worth a try! :fing02:

I ended up blowing up the tool with compressed air during a second clean out attempt, so it's toast now! :blush:
#25
You cant even buy the mercury type manometer anymore - illegal in most states now. Along with lead wheel wieghts also now illegal. I have my pos mecury motion pro tool. I lost one of the damper inserts so one sight glass goes nuts while the others are calmer. I suppose you can make a new one out of pressure gauges, or staple up 4 clear tubes up to a long board of plywood - a few old carb jets and you got a homemade manometer.
End of thread · 25 posts recovered Wayback Machine snapshot 1 Jan 2011