One modification I would like to undertake is making my front turn signals less noticeable. Some very creative and unique examples are shown on this site. I feel that as I am trying to mod my bike as inexpensively as possible that the method I will be chosing to do is painting the cases from the inside reflector back to not eliminate but reduce the visual obtrusiveness of these signals.
However, not being one for paint and body (I am more of a wrench and screwdriver type) I have a few question for those that have done this mod and are more knowledgeable in the process.
1) What prep needs to be done to the surface that will be painted?
2) What is the best (albiet still cost efficient) paint to use that can be picked up easily?
I am looking to do this but in the 2001 Red color.
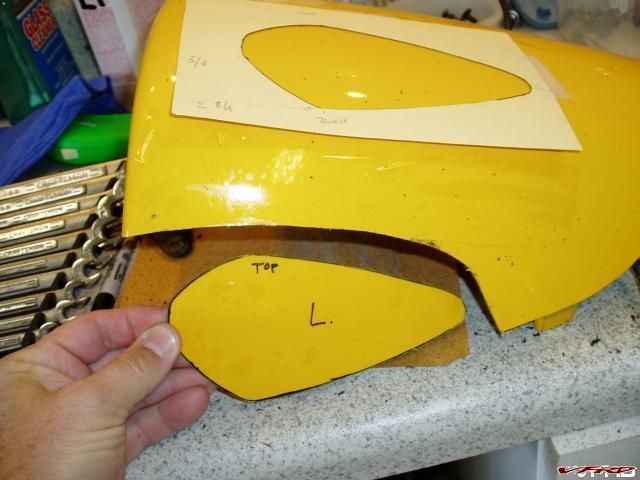
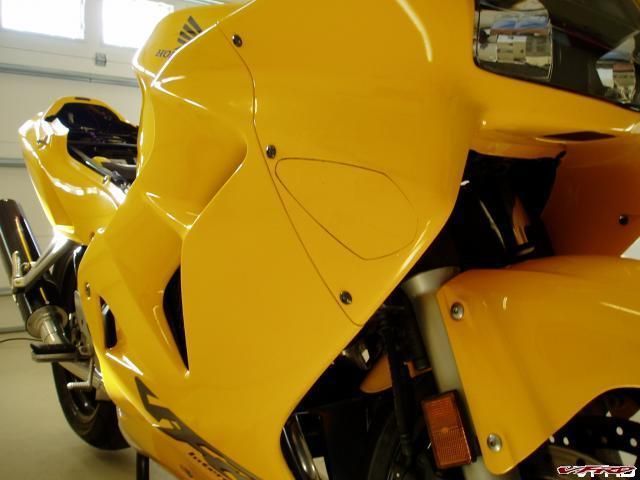
I am also willing to try the de-dumboing mod and insert smaller flush mount signals BUT do not have the know-how to simply make an insert with the 2001 red plastic. However, if anyone out there already has a mutilated 2001 red passenger cowling that they wouldn't mind cutting 2 more blanks out of and sending them my way I would happily pay a reasonable fee for that service. Here are some pics of what I believe to be the cleanest install of a homemade blank from a seat cowl.
Thanks to the original authors whose pics I photo jacked from other threads to provide visual aides to my topic.
Ps. how are the yellow blanks attached to the fairing above. I have seen other installs that appear to be screwed in to something BUT the above example is very clean. Would love to know how this install is done. There is a great write up on how to do the whole fiberglassing and re-paint and do all that extra work on here BUT I was unable to come across the how to install a blank with flush mounts write up. Just pictures of bikes that had it done before and after BUT not a real step-by-step guide.
Thank-you one and all for advice and input.
However, not being one for paint and body (I am more of a wrench and screwdriver type) I have a few question for those that have done this mod and are more knowledgeable in the process.
1) What prep needs to be done to the surface that will be painted?
2) What is the best (albiet still cost efficient) paint to use that can be picked up easily?
I am looking to do this but in the 2001 Red color.
I am also willing to try the de-dumboing mod and insert smaller flush mount signals BUT do not have the know-how to simply make an insert with the 2001 red plastic. However, if anyone out there already has a mutilated 2001 red passenger cowling that they wouldn't mind cutting 2 more blanks out of and sending them my way I would happily pay a reasonable fee for that service. Here are some pics of what I believe to be the cleanest install of a homemade blank from a seat cowl.
Dumbo Ear blanking plates
De-Dumboed
![[image: Posted Image]](http://a999.ac-images.myspacecdn.com/images01/126/l_de26c31e8338cf2877e4287028646c16.jpg)
Thanks to the original authors whose pics I photo jacked from other threads to provide visual aides to my topic.
Ps. how are the yellow blanks attached to the fairing above. I have seen other installs that appear to be screwed in to something BUT the above example is very clean. Would love to know how this install is done. There is a great write up on how to do the whole fiberglassing and re-paint and do all that extra work on here BUT I was unable to come across the how to install a blank with flush mounts write up. Just pictures of bikes that had it done before and after BUT not a real step-by-step guide.
Thank-you one and all for advice and input.
![[image: Posted Image]](http://i127.photobucket.com/albums/p127/TracyValsi/DumboPlateswcowl.jpg)
![[image: Posted Image]](http://i127.photobucket.com/albums/p127/TracyValsi/DumboPlatesCutDetail.jpg)
![[image: Posted Image]](http://i127.photobucket.com/albums/p127/TracyValsi/DumboPlatesCloseup.jpg)
![[image: Posted Image]](http://i127.photobucket.com/albums/p127/TracyValsi/BikewithPalm005.jpg)
![[image: Posted Image]](http://i127.photobucket.com/albums/p127/TracyValsi/DragonSideshot.jpg)
![[image: Posted Image]](http://homepages.ihug.co.nz/~cam4/nc_34ths.jpg)