After reading all the various headlight mod threads, most particularly Fixers(may he be banned for all time as needed) version, I decided to make the jump and upgrade my headlight...utilizing the unused High Beam filament in the 2002+ assembly. As with all mods I do, I like to stay 100% plug and play, and if possible make it easy to replicate (or for sale....).
I won't bore you with pictures of the Nose Fairing removal....just a warning that this mod took 3 weeks and isn't done....my side fairings have been off so long I am getting tickets for indecent exposure. Not all pictures will be used, but you can check them out here Wiremybike Headlight Mod Slideshow
HL = HeadLight
LB = Low Beam
HB = High Beam
LB-LB/HB = Low Beam or Low Beam AND High Beam
First thing to do is decide...do you want to go from LB-LB/HB to LB-HB/HB or LB-LB/HB/HB (6 filaments).....Having 6 filaments going in high beam can be a bit of a stress, about 8 more amps worth. As this would only be when you are using High Beams it should not be an issue....but it is YOUR choice.
I chose to go for the LB-HB/HB option...which you would think would be easier/cheaper than the 6 filament option, but it isn't. It requires a different HB relay. Not a problem, I have dozens of them from the VFRness/Auxiliary Fuse Panel kit building. My Garage is NOT neat/clean/eat off the floor worthy(not that I haven't at times), but I like it....I call it my Mad Scientist shop:
[image: Posted Image]
On to the actual modding....First thing I did was blatently take the work of others and apply it to my situation. In this case banned! created a mod, it was lost some time ago, and Darth Bling recreated it here: Original Head Light Mod Thead I liked his Schematic...which I am terribly at drawing:
[image: Posted Image]
From this I determined I needed:
SPDT headlight capable relay...check
Wire...Check
Connectors...Check....errr...not all of them
I had to special order from overseas the HL Terminals. I bought enough for 15 HL upgrade harnesses...I will get more when/if needed. Working backwards the finished result is this:
Headlight Mod, 2002+ allowing High Beam in all 4 bulbs on high:
[image: Posted Image]
This same kit, minus the Red wire and Relay bits allows 6 filaments on High Beam....LOTS of light:
[image: Posted Image]
To install is just a matter of undoing and redoing the wiring loom. First locate the HB and LB relays....they are here (far right is LB, far left is HB..this is post install so the HB relay is different):
[image: Posted Image]
Remove the tape from the LB and HB relays, and from the HL connectors(Low Beam only)
[image: Posted Image]
We start with the HB relay...remove it and it's rubber overcoat from the bike, and disconnect it:
[image: Posted Image]
next remove the wires from the connector...sounds simple doesn't it??? well first I made this little shim, from a piece of a computer power supply casing. You could probably use something else....jewelers screwdriver perhaps:
[image: Posted Image]
Simply slide it down the back side of the terminal, where the catch is, and pull the wire out. Don't force it, things don't go well when you do that. Trust me:
http://wiremybike.com/Slideshows/VFR%20200...g_terminals.jpg
After all are removed, toss the relay and connector aside....you can keep them for spare somethings later...now you have wires like this:
[image: Posted Image]
See that Red w/black wire? That connectors your LB and HB relays. We don't want it to do that, so we clip off the LB side of the wire (double check, then check again)
[image: Posted Image]
Next disconnect the LB relay, and remove the other end of that Red w/black wire. Discard it as well, we won't be needing it anymore.
From here on my pictures, and my kit are not 100% the same, as I was not afraid to solder connectors right on my bike, especially as I had to be at work and needed lights.....but you get the same place either way....
Now we need to start connecting stuff back together. First we install the OEM wires into the included relay connector:
Red w/black(that we cut the one wire off) goes to pin #30 (power in)
OEM blue wire goes to pin 86 (this is from the HB switch)
Green goes to pin 85 (ground)
Red wire from kit goes to pin 87A (Low Beam on standard)
Blue wire with pigtail goes to in 87 (high beam)
The original Blue w/Black wire then plugs into the pigtail.
Red wire from kit(other end) plugs into the LB relay, and plug it back in.
Using double sided tape already on Relay, mount it where the OEM HB relay was located.
Route the new Blue wire along the LB harnesses, shorter side is for the LH side of the bike(if sitting on it, not when looking at the relays) Re-tape the harness to make it pretty, using Electrical tape (not Duct/Galfers tape, not matter how much you love it).
Unwrapped left side:
[image: Posted Image]
Next open the little tabs on the LB headlight connectors...see the empty spot?:
[image: Posted Image]
Thats where our new Blue wire goes:
[image: Posted Image]
I had to use pliars to adjust the terminal just a bit so it would fit in, then to seat it as well:
[image: Posted Image]
[image: Posted Image]
Once finished, repeat with the other side, finished result should look like this:
[image: Posted Image]
From here on its a cake walk....just button everything back up, and enjoy your now Modded lights.
This MOD is NOT reversible without some electrical knowledge, but has no reason to BE reversed either. I have not yet worked out how to make the LB-LB/HB/HB or LB-HB/HB option user selectable with a switch, but it could be done to invoke the extra 2 filaments only when desired. Wouldn't be hard, just not done yet.
This mod is for sale, if you don't wish to repeat the build process.
$20 for the LB-HB/HB mod, $15 for the 6 filament mod, plus shipping of course.
Click here to buy
I won't bore you with pictures of the Nose Fairing removal....just a warning that this mod took 3 weeks and isn't done....my side fairings have been off so long I am getting tickets for indecent exposure. Not all pictures will be used, but you can check them out here Wiremybike Headlight Mod Slideshow
HL = HeadLight
LB = Low Beam
HB = High Beam
LB-LB/HB = Low Beam or Low Beam AND High Beam
First thing to do is decide...do you want to go from LB-LB/HB to LB-HB/HB or LB-LB/HB/HB (6 filaments).....Having 6 filaments going in high beam can be a bit of a stress, about 8 more amps worth. As this would only be when you are using High Beams it should not be an issue....but it is YOUR choice.
I chose to go for the LB-HB/HB option...which you would think would be easier/cheaper than the 6 filament option, but it isn't. It requires a different HB relay. Not a problem, I have dozens of them from the VFRness/Auxiliary Fuse Panel kit building. My Garage is NOT neat/clean/eat off the floor worthy(not that I haven't at times), but I like it....I call it my Mad Scientist shop:
[image: Posted Image]
![[image: Posted Image]](http://wiremybike.com/Slideshows/VFR%202002%20Headlight%20Mod/images/hl_mod_mad_scientist_station.jpg)
On to the actual modding....First thing I did was blatently take the work of others and apply it to my situation. In this case banned! created a mod, it was lost some time ago, and Darth Bling recreated it here: Original Head Light Mod Thead I liked his Schematic...which I am terribly at drawing:
[image: Posted Image]
![[image: Posted Image]](http://i6.photobucket.com/albums/y215/dennytim/ModifiedHeadlight2.jpg)
From this I determined I needed:
SPDT headlight capable relay...check
Wire...Check
Connectors...Check....errr...not all of them
I had to special order from overseas the HL Terminals. I bought enough for 15 HL upgrade harnesses...I will get more when/if needed. Working backwards the finished result is this:
Headlight Mod, 2002+ allowing High Beam in all 4 bulbs on high:
[image: Posted Image]
![[image: Posted Image]](http://wiremybike.com/Slideshows/VFR%202002%20Headlight%20Mod/images/headling_mod___trunk_install___tensioner_056.jpg)
This same kit, minus the Red wire and Relay bits allows 6 filaments on High Beam....LOTS of light:
[image: Posted Image]
![[image: Posted Image]](http://wiremybike.com/images/2002%20up%206%20beam%20kit_0.jpg)
To install is just a matter of undoing and redoing the wiring loom. First locate the HB and LB relays....they are here (far right is LB, far left is HB..this is post install so the HB relay is different):
[image: Posted Image]
![[image: Posted Image]](http://wiremybike.com/Slideshows/VFR%202002%20Headlight%20Mod/images/hl_mod_finished_relays.jpg)
Remove the tape from the LB and HB relays, and from the HL connectors(Low Beam only)
[image: Posted Image]
![[image: Posted Image]](http://wiremybike.com/Slideshows/VFR%202002%20Headlight%20Mod/images/hl_mod_runwrapping.jpg)
We start with the HB relay...remove it and it's rubber overcoat from the bike, and disconnect it:
[image: Posted Image]
![[image: Posted Image]](http://wiremybike.com/Slideshows/VFR%202002%20Headlight%20Mod/images/hl_mod_hb_relay_removal.jpg)
next remove the wires from the connector...sounds simple doesn't it??? well first I made this little shim, from a piece of a computer power supply casing. You could probably use something else....jewelers screwdriver perhaps:
[image: Posted Image]
![[image: Posted Image]](http://wiremybike.com/Slideshows/VFR%202002%20Headlight%20Mod/images/hl_mod_terminal_removal_tool.jpg)
Simply slide it down the back side of the terminal, where the catch is, and pull the wire out. Don't force it, things don't go well when you do that. Trust me:
http://wiremybike.com/Slideshows/VFR%20200...g_terminals.jpg
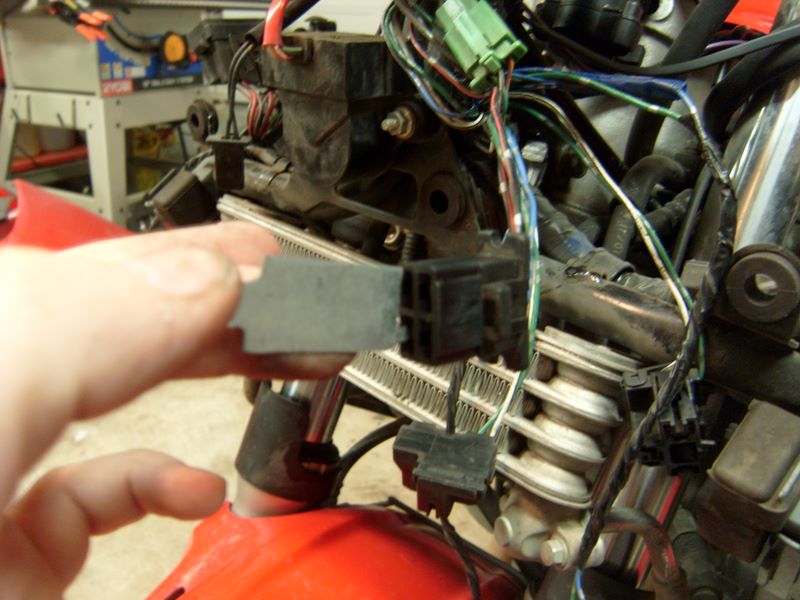
After all are removed, toss the relay and connector aside....you can keep them for spare somethings later...now you have wires like this:
[image: Posted Image]
![[image: Posted Image]](http://wiremybike.com/Slideshows/VFR%202002%20Headlight%20Mod/images/hl_mod_hb_relay_wires_off.jpg)
See that Red w/black wire? That connectors your LB and HB relays. We don't want it to do that, so we clip off the LB side of the wire (double check, then check again)
[image: Posted Image]
![[image: Posted Image]](http://wiremybike.com/Slideshows/VFR%202002%20Headlight%20Mod/images/hl_mod_removing_lb_connection.jpg)
Next disconnect the LB relay, and remove the other end of that Red w/black wire. Discard it as well, we won't be needing it anymore.
From here on my pictures, and my kit are not 100% the same, as I was not afraid to solder connectors right on my bike, especially as I had to be at work and needed lights.....but you get the same place either way....
Now we need to start connecting stuff back together. First we install the OEM wires into the included relay connector:
Red w/black(that we cut the one wire off) goes to pin #30 (power in)
OEM blue wire goes to pin 86 (this is from the HB switch)
Green goes to pin 85 (ground)
Red wire from kit goes to pin 87A (Low Beam on standard)
Blue wire with pigtail goes to in 87 (high beam)
The original Blue w/Black wire then plugs into the pigtail.
Red wire from kit(other end) plugs into the LB relay, and plug it back in.
Using double sided tape already on Relay, mount it where the OEM HB relay was located.
Route the new Blue wire along the LB harnesses, shorter side is for the LH side of the bike(if sitting on it, not when looking at the relays) Re-tape the harness to make it pretty, using Electrical tape (not Duct/Galfers tape, not matter how much you love it).
Unwrapped left side:
[image: Posted Image]
![[image: Posted Image]](http://wiremybike.com/Slideshows/VFR%202002%20Headlight%20Mod/images/hl_mod_right_side_lb_wires_unwrapped.jpg)
Next open the little tabs on the LB headlight connectors...see the empty spot?:
[image: Posted Image]
![[image: Posted Image]](http://wiremybike.com/Slideshows/VFR%202002%20Headlight%20Mod/images/hl_mod_inside_connector_pre_mod.jpg)
Thats where our new Blue wire goes:
[image: Posted Image]
![[image: Posted Image]](http://wiremybike.com/Slideshows/VFR%202002%20Headlight%20Mod/images/hl_mod_terminal_in_2.jpg)
I had to use pliars to adjust the terminal just a bit so it would fit in, then to seat it as well:
[image: Posted Image]
![[image: Posted Image]](http://wiremybike.com/Slideshows/VFR%202002%20Headlight%20Mod/images/hl_mod_adjusting_terminal_.jpg)
[image: Posted Image]
![[image: Posted Image]](http://wiremybike.com/Slideshows/VFR%202002%20Headlight%20Mod/images/hl_mod_high_beam_terminal_in.jpg)
Once finished, repeat with the other side, finished result should look like this:
[image: Posted Image]
![[image: Posted Image]](http://wiremybike.com/Slideshows/VFR%202002%20Headlight%20Mod/images/hl_mod_finished_low_beam_connectors.jpg)
From here on its a cake walk....just button everything back up, and enjoy your now Modded lights.
This MOD is NOT reversible without some electrical knowledge, but has no reason to BE reversed either. I have not yet worked out how to make the LB-LB/HB/HB or LB-HB/HB option user selectable with a switch, but it could be done to invoke the extra 2 filaments only when desired. Wouldn't be hard, just not done yet.
This mod is for sale, if you don't wish to repeat the build process.
$20 for the LB-HB/HB mod, $15 for the 6 filament mod, plus shipping of course.
Click here to buy