VFRDiscussion ARCHIVE / READ-ONLYREAD-ONLY

Faq: Low-budget Fixes

71 posts Started 12 Oct 2005 Last recovered post 11 Mar 2016 Wayback Machine snapshot 25 Jun 2021

#1

I just got my '02 VTEC for a song, and was able to pay cash, but not much left for mods right now. Great bike, but definitely could use some improvements, especially in the FI and suspension. I've been searching the forum, but thought it'd be cool to have a list of little to no cost mods to improve the bike, with comments on their benefits. Should be a good FAQ once compiled, and my bike is bone stock now, so I'm willing to be a guinea pig. Mostly looking for improved driveability and suspension performance, also aesthetic (visual and/or aural). I think weight reduction would be another good catagory. By low-budget, I mean: free, using (adjusting, modifying, or removing) stock parts (or used parts from other models) if possible or worthwhile, or the most cost-effective aftermarket options. For example, a new Ohlins USD fork would be nice, but Race Tech springs, gold valves, and rebound pistons and adjuster caps from an F4, while not free, would be more cost-effective for the majority of riders.

Please add comments, links to how-to threads, and any new mods. I'll compile and edit as we go along, and add my impressions as I perform the mods. Feel free to PM me, or just reply.

Let's go!

-David

INTAKE SYSTEM

Mod: Flapper valve disable

Benefits: Smoother acceleraton through 5k rpm??? Sound enhancement at low rpms?

How to: Lift fuel tank, pull vacuum hose off of flapper control valve diaphram on top of air box, plug hose with bolt, secure with zip tie (optional).

How it works: Disconnecting the vacuum hose will keep the flapper valve from closing the second intake opening under the control valve.

Time: 5 minutes

Cost: $0

Permanance: Completely reversible.

Help: got to http://www.vfrdiscussion.com/forum/index.php?page=parts

click on "Air Cleaner" for drawing

Mod: Remove intake snorkel

Benefits: Sound enhancement at WOT, possible performance benefit due to less restriction.

How to: Lift fuel tank, pull snorkle out of right front of airbox lid.

Time: 5 minutes

Cost: $0

Permanance: Completely reversible.

Help: got to http://www.vfrdiscussion.com/forum/index.php?page=parts

click on "Air Cleaner" for drawing

EXHAUST SYSTEM

Mod: De-baffle stock exhaust

Benefits: Sound enhancement, possible performance benefit due to less restriction.

How to:

Time:

Cost: $0

Permanance: Not reversible without buying another stock exhaust.

FUEL SYSTEM

Mod: Adjustable fuel pressure regulator (FPR)

Benefits: Improve drivability by reducing lean running conditions

How to:

Time:

Cost: $130 (retail)

Permanance: Completely reversible.

Mod: Dynojet Power Commander (PCIII)

Benefits: Improve drivability by modifying fueling maps

How to:

Time:

Cost:

Permanance: Completely reversible.

FRONT SUSPENSION

Mod: Heavier fork oil

Benefits: Increased compression and rebound damping with stock internals

How to:

Time:

Cost:

Permanance: Completely reversible.

Mod: Raise forks in triple-clamps

Benefits: Improved handling due to steeper head angle, reduced trail

How to:

Time: 20 minutes

Cost: $0

Permanance: Completely reversible.

Mod: Replace fork springs with Race Tech appropriate for rider weight and use

Benefits: Improved handling, reduced brake dive. Stock springs are too soft.

How to:

Time:

Cost: $110 (retail)

Permanance: Completely reversible.

Help: got to http://www.racetech.com/evalving/SpringRat...SpringType=Fork to choose your rate, or direct (15% discount for VFRDG) or through your favorite vendor

REAR SUSPENSION:

Mod: Increase rear ride height by shimming under top shock mount

Benefits: Improved handling due to steeper head angle, reduced trail, increased cornering clearance

How to: Add approximately 4mm of shims under top shock mount to raise ride height ~12mm.

Time:

Cost: $0

Permanance: Completely reversible.
#2

Don't let the LSFD kill me, but don't forget fender removal or cutting off.

Also wheel striping and polishing. Cost of paint stripper and sore hands.

#3
chris2992Don't let the LSFD kill me, but don't forget fender removal or cutting off.

Also wheel striping and polishing. Cost of paint stripper and sore hands.

<{POST_SNAPBACK}>

LSFD? Sorry, I'm new. My bike came with a $130 fender eliminator "kit", but I definitely would've just chopped it up, myself. Nothing like a good hack job.

Yep, I'm definitely going to strip the outer rims, maybe the next rainy day here (I'm in the PNW, it's coming!). I think it looks awesome with the contrast. Doing the whole wheel would be too hard to keep clean IMO.

There's no "edit" button on my post, maybe becuase I posted from another computer?

BTW, I got a good ride in at lunch, and I'm very pleased with the flapper valve and de-snorkle-ization mods. Nice low rumble, and definitely smoothed things out a bit below the VTEC range. Sometimes you really can get something for nothing! Would be interesting to put a vacuum gage on the hose and see when the solenoid tells it to open and close. I had drilled a ton of 1" holes in my Hawk GT airbox lid which made a big difference in that bike (after re-jetting), I bet it would sound sweet on the veefer.

-David

#4

:D

FOOTPEGS:

Mod: Buell XB9 footpegs

Benefits: Lowers footpegs by 1 inch.

How to: Grind down the excess metal on the Buell footpegs, create some spacers, and install.

Time: 30-60 mins

Cost: $15 - $30 for the Buell pegs, maybe 50? for the spacers

Permanance: Completely reversible.

Help: installing Buell footpegs thread

#5
MFP-2241:D

FOOTPEGS:

Mod: Buell XB9 footpegs

Benefits: Lowers footpegs by 1 inch.

How to: Grind down the excess metal on the Buell footpegs, create some spacers, and install.

Time: 30-60 mins

Cost: $15 - $30 for the Buell pegs, maybe 50? for the spacers

Permanance: Completely reversible.

Help: installing Buell footpegs thread

<{POST_SNAPBACK}>

Sounds good! I've actually got a 38"+ inseam, so that would be a nice comfort increase for me (hard to believe I could ride my Hawk!). I'll add a catagory for "ERGONOMICS".

-David

#6

Lower forks in tripple clamps & raise rear ride hight 12mm, bloody hell how fast do you want your bike to steer. I feel this is not a good thing as it really is to much & upsets balance of bike way to much from design (with link brakes your rear will lock up way to much).

I think lowering forks in tripple clamps is bad for 1 main reason ground clearance, I scrap RHS lower link pipe with reworked standard suspenion which has rear raised 6mm & there is a trade off even there due to less loading rear I spin up the rear wheel alot more.

Due to so much front loading with your mods you would have to do springs & increase fork oil to 15 weight to cope. (fitting the right profile tyre will also speed up steering like a pilot race or diablo corsa)

The rear shock is weakest link in system even when reworked because being a emulsion unit, the problems with temperature and cavitation related dramas will always exist. (I'm just about to upgrade to a penske 3 clicker & yes I know its not a cheep mod)

Edited October 14, 2005 by zRoYz
#7
zRoYzLower forks in tripple clamps & raise rear ride hight 12mm, bloody hell how fast do you want your bike to steer. I feel this is not a good thing as it really is to much & upsets balance of bike way to much from design (with link brakes your rear will lock up way to much).

I think lowering forks in tripple clamps is bad for 1 main reason ground clearance, I scrap RHS lower link pipe with reworked standard suspenion which has rear raised 6mm & there is a trade off even there due to less loading rear I spin up the rear wheel alot more.

Due to so much front loading with your mods you would have to do springs & increase fork oil to 15 weight to cope. (fitting the right profile tyre will also speed up steering like a pilot race or diablo corsa)

The rear shock is weakest link in system even when reworked because being a emulsion unit, the problems with temperature and cavitation related dramas will always exist. (I'm just about to upgrade to a penske 3 clicker & yes I know its not a cheep mod)

<{POST_SNAPBACK}>

Thanks for the tips. Right now I have the forks raised 6mm, and have not changed the shock length. I didn't notice a real significant difference, but I'm new to the bike, so I'm still adapting to it every ride (probably best not to fiddle too much, but that's a lot of the fun for me). I plan to get some spacers for the shock, and will probably drop the forks back down at that point, to maintain about the same balance with increased clearance.

#8

I just had a buddy help me measure static sag, I'm OK in the rear with preload on "4", but I have 2" (50mm) of front sag with the preload cranked all the way in, and I'm only 190 lb! So, I think I will go with 0.95 or 1.0 kg fork springs. The front end will be quite a bit higher, so I expect I'll want to raise the rear end and leave the forks at 6-10mm up. If the springs aren't going to be available for a while, I might throw some more preload spacers in.

#9

other people maybe diff but i've found 10 weight & 30-35mm static sag is spot on, but my fork springs had to be upgraded.

its ok to add spacers to standard springs but you need to make sure your still using 2/3rds of travel or front will be to stiff & ride every bump.

#10

10w fork oil is standard for the 5th and 6th gen vfr, I actually use 5w oil now with stiffer springs, the springs dont need as much damping action so a lighter wieght oil is better.

#11

Fallzboater

I had the same condition, preload cranked all the way to get desired sag setting. Disassembled forks, check spring free length (within spec) reassembled with 10 wt synthetic amsoil now have 3 lines showing with 35mm sag :goofy:

I would suggest doing the measurement from top of cap to oil level rather than the oil measurement method as some oil will remain in cartridge unless you do a total disassemble which i didnt.

#12
fallzboater

INTAKE SYSTEM

Mod: Flapper valve disable

Benefits: Smoother acceleraton through 5k rpm??? Sound enhancement at low rpms?

How to: Lift fuel tank, pull vacuum hose off of flapper control valve diaphram on top of air box, plug hose with bolt, secure with zip tie (optional).

How it works: Disconnecting the vacuum hose will keep the flapper valve from closing the second intake opening under the control valve.

Time: 5 minutes

Cost: $0

Permanance: Completely reversible.

Help: got to http://www.vfrdiscussion.com/forum/index.php?page=parts

click on "Air Cleaner" for drawing

Mod: Remove intake snorkel

Benefits: Sound enhancement at WOT, possible performance benefit due to less restriction.

How to: Lift fuel tank, pull snorkle out of right front of airbox lid.

Time: 5 minutes

Cost: $0

Permanance: Completely reversible.

Help: got to http://www.vfrdiscussion.com/forum/index.php?page=parts

click on "Air Cleaner" for drawing

Which two hose on the diagram are you refering to? Would like to do this, but want to make sure that I get the right hoses. I am thinking #24 for the first and #4 for the second. Is that right?

Thanks!

#13
HispanicSlammerI actually use 5w oil now with stiffer springs, the springs dont need as much damping action so a lighter wieght oil is better.

<{POST_SNAPBACK}>

Actually the stiffer the spring action the more dampening it will take to control it... I'd

recommend trying a 10 weight over the 5 weight HS... you may favor the more control

feel the extra dampening will afford...

#14

Raise the rear to increase the ground clearance you just lost by raising the forks in the clamps. The VFR is way stable stock, and is still very stable by raising the rear/raising the forks. I did this to my 94 and had zero handling problems. It turned in much quicker, nice, but did make it squirly at under 10 mph. Not a good mod for those vertically challenged.

#15
BusyLittleShopActually the stiffer the spring action the more dampening it will take to control it... I'd

recommend trying a 10 weight over the 5 weight HS... you may favor the more control

feel the extra dampening will afford...

When I put in the stiffer springs I used the standard 10w oil withthe standard oil measurement. Ride was harsh and bumpy, with the front wheel hopping out of bumps much too stiff. I figure the extra stiffness of the springs take more energy to move so less damping is needed, the rider was the same and the bike was the same so the stiff springs made it too stiff. I found 5 wight gave it a much more compliant ride than the 10w for a guy of my wieght (230lbs). Not too much difference from the racetech valves and oil combo I am using now. Its slightly more compliant now, but with suspension a little goes a long way its perfect now.

#16
RatpackWhich two hose on the diagram are you refering to?  Would like to do this, but want to make sure that I get the right hoses.  I am thinking #24 for the first and #4 for the second.  Is that right?

Thanks!

<{POST_SNAPBACK}>

Almost. Unplug hose #24 from diaphragm #8 and plug the hose with a bolt or something. That will keep the flapper valve open.

The snorkle is #8. It comes out with a bit of squeezing.

Nice (yet subtle) noises!

#17
dudeFallzboater

I had the same condition, preload cranked all the way to get desired sag setting. Disassembled forks, check spring free length (within spec) reassembled with 10 wt synthetic amsoil now have 3 lines showing with 35mm sag :beer:

I would suggest doing the measurement from top of cap to oil level rather than the oil measurement method as some oil will remain in cartridge unless you do a total disassemble which i didnt.

<{POST_SNAPBACK}>

I don't see how this could've had such an effect. If your oil level is now much higher than before it would tend to make your spring rate more progressive since the air volume is less. However, the air volume (unless very small) should have a near-negligeable effect on your sag.

I'm ordering some 0.95 or 1.0 kg/mm Race Tech springs tomorrow. No matter how far off my oil level may (or may not) be, it can't bring me from 50+ mm of sag with full preload, to 35 mm of sag with very little preload (preferable).

#18

Fallsboater,

I am not sure how or why you have so much sag at just 190lbs. I am 260, fully cranked on the front and mine are only at 40mm of sag. Too much I agree but total suspension re do is in the spring.

In the rear I am fully cranked and have 32mm sag.

#19
HispanicSlammer 

  I figure the extra stiffness of the springs take more energy to move so less damping is needed, the rider was the same and the bike was the same so the stiff springs made it too stiff. 

<{POST_SNAPBACK}>

Extra stiff springs due take more energy to compress and they also rebound with a lot

more energy as well... consequently compression dampening needs to be greater to

slow the compression of the extra stiff spring and then rebound dampening also needs

to greater to slow the rebound of the spring...

I would check the forks for abnormal stiction... do you know how that's done???

#20

Stiction is measured by doing multiple sag measurements and then comparing them, if there is a lot of difference then you probably need to replace your seals, and check the tubes.

From what I learned rebound control is strictly a function of the spring stiffness while compression is related to the wieght of the rider, spring stiffness, and flow properties of the valves in the oil. So yea you need more rebound control with a stiffer spring but at the same time less compression cause your not compressing the springs as fast. bottom line to get back on track here - I think adding 20 wieght oil to a stock fork is a big mistake and it will ruin your ride. If you add stiffer springs and 20 w fork oil its gonna be like welding the fork tubes together.

#21
HispanicSlammerStiction is measured by doing multiple sag measurements and then comparing them, if there is a lot of difference then you probably need to replace your seals, and check the tubes. 

<{POST_SNAPBACK}>

That's one way but I think stiction is best felt with the hand...

First raise the bike enough to free the front suspension...

Then turn both fork caps until they're free from the fork tubes...

Finally grasp front wheel and raise and lower suspension 3 to 4 inches and note if

you feel abnormal amounts of stiction... basically your front suspension should free

fall with gravity...

If it doesn't free fall then unloosen axle pinch bolts and check free fall again...

Still not free falling??? Next check fork tube alignment by unloosing the left and right

two bottom pinch bolts on the lower triple clamp only... check free fall...

Once you have eliminated the axle and fork alignment then it time to go inside the

fork...

Check the upper and lower precision rolled copper bearings and not if any of the

gray Teflon is rubbed down to the copper... replace as needed...

Edited October 17, 2005 by BusyLittleShop
#22
fallzboaterI don't see how this could've had such an effect.  If your oil level is now much higher than before it would tend to make your spring rate more progressive since the air volume is less.  However, the air volume (unless very small) should have a near-negligeable effect on your sag.

I'm ordering some 0.95 or 1.0 kg/mm Race Tech springs tomorrow.  No matter how far off my oil level may (or may not) be, it can't bring me from 50+ mm of sag with full preload, to 35 mm of sag with very little preload (preferable).

<{POST_SNAPBACK}>

Just reporting what it did for me fallzboater.

#23
BusyLittleShopThat's one way but I think stiction is best felt with the hand... 

First raise the bike enough to free the front suspension...

Then turn both fork caps until they're free from the fork tubes...

Finally grasp front wheel and raise and lower suspension 3 to 4 inches and note if

you feel abnormal amounts of stiction... basically your front suspension should free

fall with gravity... 

If it doesn't free fall then unloosen axle pinch bolts and check free fall again...

Still not free falling??? Next check fork tube alignment by unloosing the left and right

two bottom pinch bolts on the lower triple clamp only...  check free fall...

Once you have eliminated the axle and fork alignment then it time to go inside the

fork...

Check the upper and lower precision rolled copper bearings and not if any of the

gray Teflon is rubbed down to the copper... replace as needed...

<{POST_SNAPBACK}>

Good post. Have you, or anyone else here, done much significant suspension development work? I have a buddy a block from my house who does a lot of high-end motocross (and Baja) suspension work, and has done development work with a few of the suspension manufacturers as well. He's definitely available to work on my forks (or rear shock), and I'd love to get the suspension really dialled in. Unfortunately, I haven't ridden enough different bikes, and I'm not experienced enough of a rider, to really know what the bike should (or could) feel like, or which way to go with the different parameters. My buddy doesn't ride street-bikes, and he's a good bit lighter than me. So if I could tell him "it's too harsh on high-speed compression" or "I need 30% more low-speed rebound control", I think he could work with that, but I'm just not sure which way to go, or how much. He'll give me decent pricing, but I still don't want to go through too many iterations (too much down time!). He can either start with Gold Valves, or work with the stock internals. I should have my RT 0.95 springs later this week (I'm 190 lb w/o gear). I'd much prefer to work with him than send my forks off in the mail somewhere.

Any particular tips for working with the stock forks? Any good references, or is it mostly trade secrets?

As far as stiction, my buddy says the fit and finish of the tubes, bushings, etc. are pretty important, and that's a lot of what you get with nice parts like Ohlins. Also the ports are better shaped to minimize cavitation and hydraulic lock, the tubes are butted (variable thickness) for stiffness, etc. A lot of this is probably more important in moto-cross, but I imagine most of it applies to the road and track as well.

#24
fallzboaterGood post.  Have you, or anyone else here, done much significant suspension development work? 

<{POST_SNAPBACK}>

I've done all my own suspension work... including making my own internal shock

parts... to revalving... to servicing my own rear shock fluids...

fallzboaterAny particular tips for working with the stock forks?  Any good references, or is it mostly trade secrets?

<{POST_SNAPBACK}>

VFRD members can advise you better than I on a number of shock shops that have

brought them joy on their VFRs... I will say that to improve the smoothness of a

fork's action and to minimize stiction there are a number of ways offered to a tuner...

Ti Ni(Titanium Nitride gold coating)...

BDC (Black Diamond Carbon)...

GOFHP (Good Old Fashion Hand Polishing)...

fallzboaterAs far as stiction, my buddy says the fit and finish of the tubes, bushings, etc. are pretty important, and that's a lot of what you get with nice parts like Ohlins. 

<{POST_SNAPBACK}>

As far as stiction goes your buddy is right... fit and finish are paramount... I spent a

couple of days sanding and polishing my stock RC45 fork legs to reduce stiction... I

pull the forks apart and chucked the leg up in the Lathe... I employed a 600

crankshaft polish strap around the leg... got the leg wet with Acetone and spun it at

750 rpm's... I worked the strap evenly up and down the leg until all the marks were

gone... I was mindful not to go below the surface hardness of chrome... I was

successful in establishing a smooth uniform finish over the length of the leg...

[image: RC45ForkSanding.JPG] border='0' alt='user posted image' />

I removed a number of scuff marks...

[image: RC45ScuffMarks.JPG] border='0' alt='user posted image' />

I decided to go it alone and tackle the polishing job by hand with the

help of the Lathe... I use Nevr-Dull magic wadding under a trimmed down

section of black PVC... in about a day I had one leg polished up real nice...

[image: gallery_3131_51_4019.jpg] border='0' alt='user posted image' />

In conclusion... I estimate a 25% drop in stiction as a reward for my hours of labor...

I still got hammered as a result of race track ready suspension settings but now to a

lesser degree... I can't cry about it as I prefer to sacrifice a bit of comfort for a

volume of control... that all change for the better after I swapped the stock forks for

for a set of R/T Ohlins... currently I have more control and much much more

comfort... well my version of comfort that is...

[image: gallery_3131_51_121200.jpg] border='0' alt='user posted image' />

Edited October 18, 2005 by BusyLittleShop
#25

Shouldn't this topic be in the mods forum? Why limit it to 6th gen only? The best cheap mods work on most any bike; fer instance....

Pair valve mod. You can buy block off plates ($$) or you can remove the hose from the pipe on the valve cover, plug pipe with an appropriate sized cork, and refit hose. Done.

FYI, the pair valves admit additional air (oxygen) to the exhaust for improved emissions but adds pops/unbalanced sound to the exhaust on trailing throttle.

#26

Good Stuff

#27

INTAKE SYSTEM

Mod: Flapper valve disable

Benefits: Smoother acceleraton through 5k rpm??? Sound enhancement at low rpms?

How to: Lift fuel tank, pull vacuum hose off of flapper control valve diaphram on top of air box, plug hose with bolt, secure with zip tie (optional).

How it works: Disconnecting the vacuum hose will keep the flapper valve from closing the second intake opening under the control valve.

Time: 5 minutes

Cost: $0

Permanance: Completely reversible.

Help: got to http://www.vfrdiscussion.com/forum/index.php?page=parts

click on "Air Cleaner" for drawing

Mod: Remove intake snorkel

Benefits: Sound enhancement at WOT, possible performance benefit due to less restriction.

How to: Lift fuel tank, pull snorkle out of right front of airbox lid.

Time: 5 minutes

Cost: $0

Permanance: Completely reversible.

Help: got to http://www.vfrdiscussion.com/forum/index.php?page=parts

click on "Air Cleaner" for drawing

I can see the snorkel as making a difference without too much negative things, Just wondering what the downside is of the flapper valve? Obviously honda put it there for a reason? and does it make that much difference? Keen to hear peoples thought before i do it?

One other thing, anybody think it would be of any benifit to make 2 - 3 mm spacers to sit under the stock handle bars? Thinking of doing it as a cheaper alternative to aftermarket bars?

Thanks for your help!

#28
wallace_18I can see the snorkel as making a difference without too much negative things, Just wondering what the downside is of the flapper valve? Obviously honda put it there for a reason? and does it make that much difference? Keen to hear peoples thought before i do it?

One other thing, anybody think it would be of any benifit to make 2 - 3 mm spacers to sit under the stock handle bars? Thinking of doing it as a cheaper alternative to aftermarket bars?

Thanks for your help!

<{POST_SNAPBACK}>

There has been a lot of discussion about the flapper. I'm sure there were some dissenting opinions, but I believe the consesus was that the flapper is a sound control device. So, if you dissable the flapper, you'll get a little more intake noise, which some of us like, but you won't likely get any performance gain without other tuning.

You can raise the bars a bit, but the pegs that limit their movement should still engage the slots on the upper triple-clamp. However, I've had aftermarket clipons on other bikes that didn't have this peg, so I don't think it's critical unless you're in the habbit of leaving the clamp bolts loose. Same thing with the wire rings that clip into the grooves on the top of the fork tubes, just a safety feature in case things come loose due to improper torquing. Obviously, there isn't much room to raise the bars before you get to the top of the fork tubes, anyway.

#29

i was also thinking of making a new spacer with the locking pin moved and another groove to relocate the original pin, so as to lift the bar and also turn them out to be closer to horizontal across the bar. Thoughts?

#30
fallzboaterREAR SUSPENSION:

Mod:  Increase rear ride height by shimming under top shock mount

Benefits:  Improved handling due to steeper head angle, reduced trail, increased cornering clearance

How to:  Add approximately 4mm of shims under top shock mount to raise ride height ~12mm.

Time: 

Cost:  $0

Permanance:  Completely reversible.

<{POST_SNAPBACK}>

Could anyone help me find anymore information regarding this mod of shimming the top shock mount? My searches are coming up empty...

#31

Hi all,

My first post here and instead of firing a load of questions, I'll start with some pics of how I'm trying to protect my bike if it would fall ... again! <_<

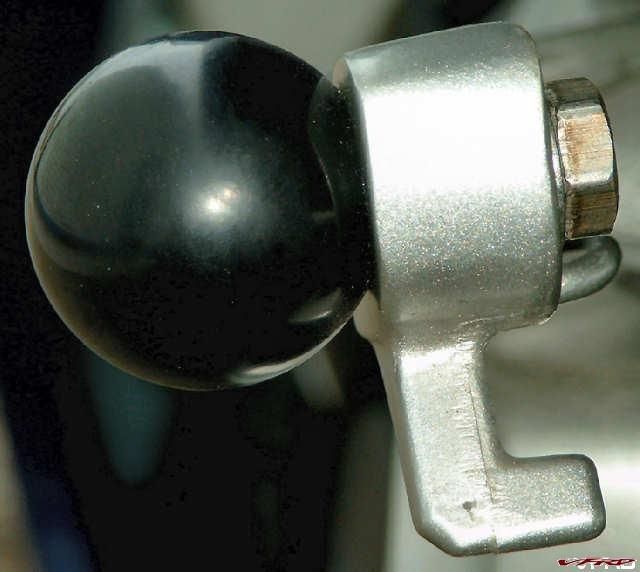
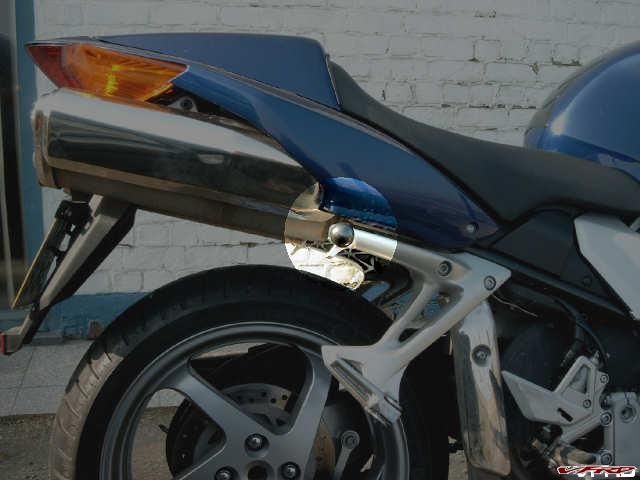
I just put two round shaped black ball's in the hole's of the frame that supports the foot peg's of the passenger.

(Sorry for the strange way I talk, I'm from Belgium and can't always explain the way I want to)

Very simple, cost's almost nothing, these ball's are knobs from a standing drill handle.

I put a little glue on the thread, so they would not get loose.

With this I hope to protect the exhausts somewhat.

I made some pics, but it was dark, so I'll have to redo that in daylight, sorry for the waiting, so much for starting with pics huh? :pissed:

?art

#32

Finally took pictures:

gallery_6978_1272_4405.jpg border='0' alt='user posted image' />

gallery_6978_1272_30753.jpg border='0' alt='user posted image' />

The bolt was something that I had laying around, will change it to a nice round headed bolt.

Diameter of the ball is 32mm (1?inch)

#33
wallace_18i was also thinking of making a new spacer with the locking pin moved and another groove to relocate the original pin, so as to lift the bar and also turn them out to be closer to horizontal across the bar. Thoughts?

<{POST_SNAPBACK}>

Dont'cha know there's nothing new in this world mate ?

Rod

Edited March 17, 2006 by Rogue
#34
?art West-VL.Finally took pictures:

gallery_6978_1272_4405.jpg border='0' alt='user posted image' />

gallery_6978_1272_30753.jpg border='0' alt='user posted image' />

The bolt was something that I had laying around, will change it to a nice round headed bolt.

Diameter of the ball is 32mm (1?inch)

<{POST_SNAPBACK}>

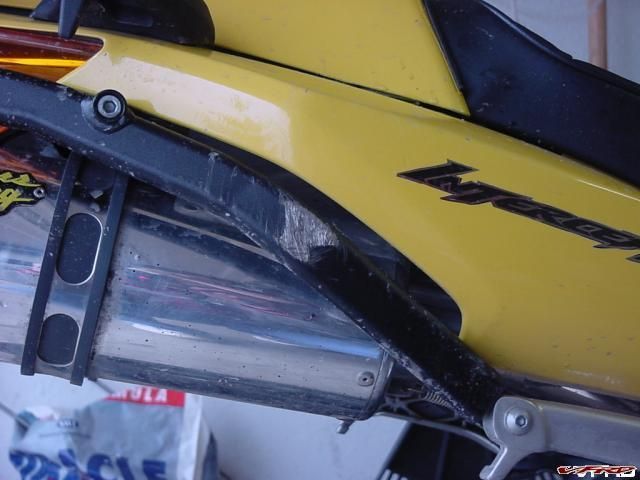
Did you highside or flip or something? My bike the lower part of the rear pegs toucheddown and a little on the rear fairing, didn't seem to come close to the exhaust.

I am guessing you also got frame sliders for the front of the bike.

#35

jeremy556,

Sorry about the cropped picture, here's a wider angle picture.

The way I figured it (theoretically):

The 1?inch should be enough to protect the plastic fairing, just above that ball and the exhaust to (if the fairing would get ripped off in the slide), since the bike will balance towards the front, so the exhaust will tilt a bit upwards.

This way I'm hoping that the bike will slide on the passenger foot peg + the small ball + the front slider (yet to be made)

All this, of-course, on a flat surface.

The front sliders are not yet made.

Yes, I'm making them myself and no, there will be no drilling into the water tank, not even in the fairings!

All for free and will post how I did it.

This should be next weekend if all go's well.

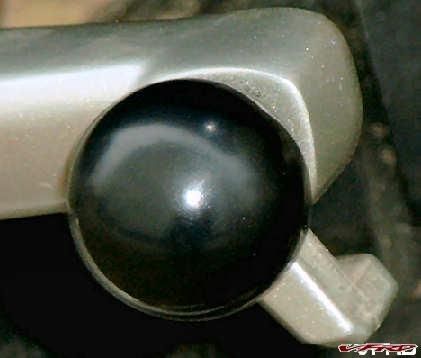
gallery_6978_1272_18477.jpg border='0' alt='user posted image' />

Sexy ball, ain't it? :unsure:

Anyway, I figure it's better then that ugly hole in the flat end of that part.

- Still working on getting that chicken trail wider... :D

Edited March 18, 2006 by ?art West-VL.
#36

Good luck on the front sliders, but I doubt it is possible to have front sliders that would be strong enough to withstand a crash without cutting anything. You must also keep in mind balance points, and if a location would lever, for example the front end into the ground, etc, etc.

#37

The front sliders are very simple.

Just so you guys wouldn't have to wait a whole week, here a little explanation:

Just next to where the sliders normally go, more to the backside, there is a screw and behind that there is a bracket that's about 44mm (1-3/4inch) toward the frame.

I replaced this bracket with the same one I made myself, but thicker and without the cutout hole, so this part is already done.

Once the sliders are made, they are simply screwed on to the reinforced brackets.

I do realize that it's all theoretical and I WILL have damage to the bike, if it would fall (again sad.gif )

But I'm trying to do this as cheap as possible and still trying to get good results that are not ugly.

Yes, I'm a cheap bastard :D

#38

Finally had some time to reply with the result of the DIY sliders.

All opinions and questions are welcome!

[image: gallery_6978_1272_9457.jpg] border='0' alt='user posted image' />

[image: gallery_6978_1272_12259.jpg] border='0' alt='user posted image' />

[image: gallery_6978_1272_37.jpg] border='0' alt='user posted image' />

#39

Good to hear that you beefed up the bracket so it doesn't fold under the impact.

#40
jeremy556Good luck on the front sliders, but I doubt it is possible to have front sliders that would be strong enough to withstand a crash without cutting anything. You must also keep in mind balance points, and if a location would lever, for example the front end into the ground, etc, etc.

<{POST_SNAPBACK}>

Just to stir the pot, HPS markets a set of sliders that don't require you to cut the fairing:

Search for #24912 on the webpage:

http://www.bikehps.com/acatalog/BikeHPS_On...r_Honda_19.html

We had a discussion over at the VFR mailing list about these about a year ago.

Those who didn't have them thought that the would end up damaging your radiators.

A couple of owners that *did* have them said that they had proven to be crash-worthy:

https://lists.cs.wisc.edu/archive/vfr/2005-.../msg00353.shtml

VFR world used to have pictures of an installation, but since the site revamp, I can't find the article.

#41

I think they look good. As for the balls on the passenger brackets, they just might work. My bike slid on the rear pegs and my Givi rack up near the tail piece. The rack obviously saved the rear from touching the ground.

gallery_3392_431_122228.jpg border='0' alt='user posted image' />

DSC04621.JPG

If nothing else the little balls will give you a good place to hook some bungee cords.

#42

With so many posts about suspension it makes me think there must be alot of you that are track riding alot. I am 6'4" 220 pounds. I increased my front preload halfway from standard setting to full hard. I changed the rear preload from 2 (standard) to 5, and the rear rebound closer to hard. In my opinion this helped alot. I didnt think the suspension was bad before but did notice the improvement. I am 36 years old and have been riding on the street since 18 years old. Fortunately I live very close to Angeles Crest Hwy, and Azusa Canyon. There are usually a huge number of riders at these areas when I ride there on the weekends on every make and model of sportbike. I either pass or leave behind 9 out of 10 riders on bikes that are faster and handle better than my 02 VFR. Please keep in mind that in my opinion I am not pushing the VFR that hard. Also I ride the bike in town alot, on the freeway for good distances. I'm sure I will receive alot of guff about this post but truthfully I dont understand the reason for so much talk about suspension mods unless its just to spruce up the bikes with some cool new stuff, that I understand. But for my weight and size I have no complaints about the suspension from in town to smoking Ducati's and R1's all day long so not sure why anyone else would!

#43

Well, my ball's are gone :huh: , have a Givi rack now, they wouldn't do anything anymore when the bike drops.

theoxmoleAs for the balls on the passenger brackets, they just might work.  My bike slid on the rear pegs and my Givi rack up near the tail piece.  The rack obviously saved the rear from touching the ground.

If nothing else the little balls will give you a good place to hook some bungee cords.

<{POST_SNAPBACK}>

#44
drbWith so many posts about suspension it makes me think there must be alot of you that are track riding alot. I am 6'4" 220 pounds. I increased my front preload halfway from standard setting to full hard. I changed the rear preload from 2 (standard) to 5, and the rear rebound closer to hard. In my opinion this helped alot. I didnt think the suspension was bad before but did notice the improvement. 

I either pass or leave behind 9 out of 10 riders on bikes that are faster and handle better than my 02 VFR.

<{POST_SNAPBACK}>

I am 6'1" 215 and recently put the 1.0 Race Tech springs in the forks, then raised the oil level a little. My rear preload is maxed at 5 as well. I also dropped the forks 8mm.

Huge difference for very little money. I didn't realize how bad it was until feeling it now. Of course this makes me want to upgrade even more.... the rear shock is next on the list. Your sag should be pretty far off with the stock springs at 220#. With the right setup it sounds like you could be passing 10 of 10 riders!

#45

The rear at 5 is not maxed out, max is 7. I'm sure that almost anything can be improved if you want to spend the money! I'm just saying that unless your a professional racer spending money on suspension isnt going to make anyone a faster or better rider. In my opinion its kind of like new tennis shoes, they always make you run faster if you believe they do. With my weight the sag should be way off and there shouldnt be enough rebound and compression dampening! If that is true why am I just as fast or faster than everyone else? Why do I think the bike is so comfortable and well handling the way it is? Its not from lack of experience! I just got rid of a 2005 CBR1000RR the changes that I made to suspension settings made a night and day difference. Again I'm just saying that in my opinion the VFR's suspension is better than adequate for any riding except possibly a very advanced rider at the track!

#46
drbThe rear at 5 is not maxed out, max is 7.

Mine must be set at 7 then, I maxxed it out after one ride on the bike.

I'm just saying that unless your a professional racer spending money on suspension isnt going to make anyone a faster or better rider.

It has nothing to do with the speed of the rider, correct suspension settings will only make for a safer, more stable and comfortable bike... I personally didn't enjoy the nose dives when squeezing on the binders or the wallowing when settling into a turn. It seems you would understand this from the night and day difference you felt on the CBR1K.

With my weight the sag should be way off and there shouldnt be enough rebound and compression dampening! If that is true why am I just as fast or faster than everyone else?

It is true, your sag is way off at 200+ lbs, the tape measure doesn't lie! Hopefully you will lining up on the grid for the Moto GP at Laguna Seca if you are as fast as you say... I hear there is a ton of money to be made!

Again I'm just saying that in my opinion the VFR's suspension is better than adequate for any riding except possibly a very advanced rider at the track!

I will agree that it is adequate stock, but that it also can be made more than adequate for a 200+ rider with just a few quick adjustments and small amount of money. This thread is titled "Low-Budget Fixes". smile.gif

#47

Since I dont intend on taking apart half my bike (front wheel calipers handle bars, forks etc.....) its not a small amount of money unless someone wants to come over and help me do it. This is only a low budget fix if you are a pretty competent mechanic and plan on doing all yourself!

#48

Anyone else having a problem accessing the pages for the different mods?

Tried numerous times and still nothing. Can't locate it with the search either. <_<

#49

Please add comments, links to how-to threads, and any new mods. I'll compile and edit as we go along, and add my impressions as I perform the mods. Feel free to PM me, or just reply.

Here's few that will do wonders in the looks department and save you some weight:

1. Remove the passenger pegs/brackets

2. Remove the rear fender - the plate can be remounted between the stock pipes using a piece of 3/4x3/4 aluminum 'L' from the hardware store, and the stocke fender mounting holes. And you can bend the newly formed bracket easily to angle the plate to your liking. I have a hugger on my '04 and this looks really cool with the rear pags gone. When I went to an after market exhaust I did have to reposition it slightly furtur back.

3. remove the charcoal canister. This saves weight and the thing only gets in your way during oil filter changes.

All are free ($2.00 for the aluminum) and all reversable.

#50
FactoryRC46Please add comments, links to how-to threads, and any new mods. I'll compile and edit as we go along, and add my impressions as I perform the mods. Feel free to PM me, or just reply.

Here's few that will do wonders in the looks department and save you some weight:

1. Remove the passenger pegs/brackets

2. Remove the rear fender - the plate can be remounted between the stock pipes using a piece of 3/4x3/4 aluminum 'L' from the hardware store, and the stocke fender mounting holes. And you can bend the newly formed bracket easily to angle the plate to your liking. I have a hugger on my '04 and this looks really cool with the rear pags gone. When I went to an after market exhaust I did have to reposition it slightly furtur back.

3. remove the charcoal canister. This saves weight and the thing only gets in your way during oil filter changes.

All are free ($2.00 for the aluminum) and all reversable.

You can even save on the brackets. I used the brackets from the front reflectors. Just flattened them out in vise and the offset lined up exactly with exisiting mounts.

#51
FactoryRC463. remove the charcoal canister. This saves weight and the thing only gets in your way during oil filter changes.

And it is to be found where, exactly? :goofy:

#52
PorradaVFR
FactoryRC463. remove the charcoal canister. This saves weight and the thing only gets in your way during oil filter changes.

And it is to be found where, exactly? :goofy:

To the right of your oil filter. It looks like a big black painted apple juice can.

#53
TufelhundenAnyone else having a problem accessing the pages for the different mods?

Tried numerous times and still nothing. Can't locate it with the search either. <_<

same here. anybody can help ?

#54
redrocket800
PorradaVFR
FactoryRC463. remove the charcoal canister. This saves weight and the thing only gets in your way during oil filter changes.

And it is to be found where, exactly? :blink:

To the right of your oil filter. It looks like a big black painted apple juice can.

What is the purpose of this black apple juice can? Will it hurt anything to remove it?

#55
HeadhunterWhat is the purpose of this black apple juice can? Will it hurt anything to remove it?

It's to capture gasoline fumes when the engine is stopped so that it doesn't vent to the environment, then reuse it the next time the engine runs.

Eenh, I'd say keep it.

#56

Just occurred to me that the ball thing would make a nice RAM mount if the size is similar. Hello rear-facing footage! :thumbsup:

#57

Anyone remove the metal heat shield behind the right drivers peg? If so any adverse affects? Might look better without it and it can't provide that much heat protection.

What about removing the lower chain guide/guard. Also doesn't look like it does much and will look cleaner without it.

#58
SixD7Anyone remove the metal heat shield behind the right drivers peg? If so any adverse affects? Might look better without it and it can't provide that much heat protection.

What about removing the lower chain guide/guard. Also doesn't look like it does much and will look cleaner without it.

Been done. Gives a hot foot.

Chainguard done too. Not sure where the threads are.

#59
SixD7Anyone remove the metal heat shield behind the right drivers peg? If so any adverse affects? Might look better without it and it can't provide that much heat protection.

What about removing the lower chain guide/guard. Also doesn't look like it does much and will look cleaner without it.

are you talking about the guard on the up pipe? Or attached to the peg? I bought my bike with Micron exhaust already on it and it didn't have the heat sheild on the up pipe. 17k miles later still no problems with that. And I do like the looks of the pipe that way.

If you're talking about the little wing shaped guard on your footpeg? ... well, ya need that buddy. For the twisties! :fing02:

#60
achfly
SixD7Anyone remove the metal heat shield behind the right drivers peg? If so any adverse affects? Might look better without it and it can't provide that much heat protection.

What about removing the lower chain guide/guard. Also doesn't look like it does much and will look cleaner without it.

are you talking about the guard on the up pipe? Or attached to the peg? I bought my bike with Micron exhaust already on it and it didn't have the heat sheild on the up pipe. 17k miles later still no problems with that. And I do like the looks of the pipe that way.

If you're talking about the little wing shaped guard on your footpeg? ... well, ya need that buddy. For the twisties! :fing02:

No he is talking about the black piece of tin behind the peg. With it off you can see the pipes and it looks good. I bet it blocks more heat than you think.

#61
ProMed
fallzboaterREAR SUSPENSION:

Mod:  Increase rear ride height by shimming under top shock mount

Benefits:  Improved handling due to steeper head angle, reduced trail, increased cornering clearance

How to:  Add approximately 4mm of shims under top shock mount to raise ride height ~12mm.

Time: 

Cost:  $0

Permanance:  Completely reversible.

<{POST_SNAPBACK}>

Could anyone help me find anymore information regarding this mod of shimming the top shock mount? My searches are coming up empty...

I think you just needs some M10 washers....I found this

http://www.nabble.com/rear-shock-question-td2715158.html

and am considering trying this myself.

#63

The small section talking about that can by the oil filter, does it sit on the from lower part of the motor under the front part of the header. I think the manual says something about being part of the california model or something. Is that needed?

#64
WhiteChocolateThe small section talking about that can by the oil filter, does it sit on the from lower part of the motor under the front part of the header. I think the manual says something about being part of the california model or something. Is that needed?

Noooo, don't touch that can or the "g-men" will be on your back lickety split, sending you to the slammer for breaking EPA laws!! :huh: ........BTW, it's there to capture polluting "farts" from your gas tank :laugh: .

Beck

95 VFR

#65
fallzboater

I just got my '02 VTEC for a song, and was able to pay cash, but not much left for mods right now. Great bike, but definitely could use some improvements, especially in the FI and suspension. I've been searching the forum, but thought it'd be cool to have a list of little to no cost mods to improve the bike, with comments on their benefits. Should be a good FAQ once compiled, and my bike is bone stock now, so I'm willing to be a guinea pig. Mostly looking for improved driveability and suspension performance, also aesthetic (visual and/or aural). I think weight reduction would be another good catagory. By low-budget, I mean: free, using (adjusting, modifying, or removing) stock parts (or used parts from other models) if possible or worthwhile, or the most cost-effective aftermarket options. For example, a new Ohlins USD fork would be nice, but Race Tech springs, gold valves, and rebound pistons and adjuster caps from an F4, while not free, would be more cost-effective for the majority of riders.

Please add comments, links to how-to threads, and any new mods. I'll compile and edit as we go along, and add my impressions as I perform the mods. Feel free to PM me, or just reply.

Let's go!

-David

INTAKE SYSTEM

Mod: Flapper valve disable

Benefits: Smoother acceleraton through 5k rpm??? Sound enhancement at low rpms?

How to: Lift fuel tank, pull vacuum hose off of flapper control valve diaphram on top of air box, plug hose with bolt, secure with zip tie (optional).

How it works: Disconnecting the vacuum hose will keep the flapper valve from closing the second intake opening under the control valve.

Time: 5 minutes

Cost: $0

Permanance: Completely reversible.

Help: got to http://www.vfrdiscussion.com/forum/index.php?page=parts

click on "Air Cleaner" for drawing

Mod: Remove intake snorkel

Benefits: Sound enhancement at WOT, possible performance benefit due to less restriction.

How to: Lift fuel tank, pull snorkle out of right front of airbox lid.

Time: 5 minutes

Cost: $0

Permanance: Completely reversible.

Help: got to http://www.vfrdiscussion.com/forum/index.php?page=parts

click on "Air Cleaner" for drawing

EXHAUST SYSTEM

Mod: De-baffle stock exhaust

Benefits: Sound enhancement, possible performance benefit due to less restriction.

How to:

Time:

Cost: $0

Permanance: Not reversible without buying another stock exhaust.

FUEL SYSTEM

Mod: Adjustable fuel pressure regulator (FPR)

Benefits: Improve drivability by reducing lean running conditions

How to:

Time:

Cost: $130 (retail)

Permanance: Completely reversible.

Mod: Dynojet Power Commander (PCIII)

Benefits: Improve drivability by modifying fueling maps

How to:

Time:

Cost:

Permanance: Completely reversible.

FRONT SUSPENSION

Mod: Heavier fork oil

Benefits: Increased compression and rebound damping with stock internals

How to:

Time:

Cost:

Permanance: Completely reversible.

Mod: Raise forks in triple-clamps

Benefits: Improved handling due to steeper head angle, reduced trail

How to:

Time: 20 minutes

Cost: $0

Permanance: Completely reversible.

Mod: Replace fork springs with Race Tech appropriate for rider weight and use

Benefits: Improved handling, reduced brake dive. Stock springs are too soft.

How to:

Time:

Cost: $110 (retail)

Permanance: Completely reversible.

Help: got to http://www.racetech.com/evalving/SpringRat...SpringType=Fork to choose your rate, or direct (15% discount for VFRDG) or through your favorite vendor

REAR SUSPENSION:

Mod: Increase rear ride height by shimming under top shock mount

Benefits: Improved handling due to steeper head angle, reduced trail, increased cornering clearance

How to: Add approximately 4mm of shims under top shock mount to raise ride height ~12mm.

Time:

Cost: $0

Permanance: Completely reversible.

Any chance to get the broken links fixed? I'm about to do a search, but for the ease of other newcomers it would be nice to have the links work again. These just take me to the homepage. :warranty:

#66

Remove the stickers on the fuel tank

- Use only unleaded fuel

- Always wear protective gear

Improves the look and lower the weight with up to .5 g.

#67
ThomasNielsen

Remove the stickers on the fuel tank

- Use only unleaded fuel

- Always wear protective gear

Improves the look and lower the weight with up to .5 g.

Got any great advice about removing the stickers from the tank without messing up the finish?

#68
PlayWithGravity
ThomasNielsen

Remove the stickers on the fuel tank

- Use only unleaded fuel

- Always wear protective gear

Improves the look and lower the weight with up to .5 g.

Got any great advice about removing the stickers from the tank without messing up the finish?

Goo Gone.

#69

Broken links do need to be fixed... :)

#70

I did the PAIR, flapper, and snorkel mod and noticed a 1 to 2 MPG better gas mileage on average. That's over the last 2,000 miles. Happy so far.

#71
Cogs69
'fallzboater

I just got my '02 VTEC for a song, and was able to pay cash, but not much left for mods right now. Great bike, but definitely could use some improvements, especially in the FI and suspension. I've been searching the forum, but thought it'd be cool to have a list of little to no cost mods to improve the bike, with comments on their benefits. Should be a good FAQ once compiled, and my bike is bone stock now, so I'm willing to be a guinea pig. Mostly looking for improved driveability and suspension performance, also aesthetic (visual and/or aural). I think weight reduction would be another good catagory. By low-budget, I mean: free, using (adjusting, modifying, or removing) stock parts (or used parts from other models) if possible or worthwhile, or the most cost-effective aftermarket options. For example, a new Ohlins USD fork would be nice, but Race Tech springs, gold valves, and rebound pistons and adjuster caps from an F4, while not free, would be more cost-effective for the majority of riders.

Please add comments, links to how-to threads, and any new mods. I'll compile and edit as we go along, and add my impressions as I perform the mods. Feel free to PM me, or just reply.

Let's go!

-David

INTAKE SYSTEM

Mod: Flapper valve disable

Benefits: Smoother acceleraton through 5k rpm??? Sound enhancement at low rpms?

How to: Lift fuel tank, pull vacuum hose off of flapper control valve diaphram on top of air box, plug hose with bolt, secure with zip tie (optional).

How it works: Disconnecting the vacuum hose will keep the flapper valve from closing the second intake opening under the control valve.

Time: 5 minutes

Cost: $0

Permanance: Completely reversible.

Help: got to http://www.vfrdiscussion.com/forum/index.php?page=parts

click on "Air Cleaner" for drawing

Mod: Remove intake snorkel

Benefits: Sound enhancement at WOT, possible performance benefit due to less restriction.

How to: Lift fuel tank, pull snorkle out of right front of airbox lid.

Time: 5 minutes

Cost: $0

Permanance: Completely reversible.

Help: got to http://www.vfrdiscussion.com/forum/index.php?page=parts

click on "Air Cleaner" for drawing

EXHAUST SYSTEM

Mod: De-baffle stock exhaust

Benefits: Sound enhancement, possible performance benefit due to less restriction.

How to:

Time:

Cost: $0

Permanance: Not reversible without buying another stock exhaust.

FUEL SYSTEM

Mod: Adjustable fuel pressure regulator (FPR)

Benefits: Improve drivability by reducing lean running conditions

How to:

Time:

Cost: $130 (retail)

Permanance: Completely reversible.

Mod: Dynojet Power Commander (PCIII)

Benefits: Improve drivability by modifying fueling maps

How to:

Time:

Cost:

Permanance: Completely reversible.

FRONT SUSPENSION

Mod: Heavier fork oil

Benefits: Increased compression and rebound damping with stock internals

How to:

Time:

Cost:

Permanance: Completely reversible.

Mod: Raise forks in triple-clamps

Benefits: Improved handling due to steeper head angle, reduced trail

How to:

Time: 20 minutes

Cost: $0

Permanance: Completely reversible.

Mod: Replace fork springs with Race Tech appropriate for rider weight and use

Benefits: Improved handling, reduced brake dive. Stock springs are too soft.

How to:

Time:

Cost: $110 (retail)

Permanance: Completely reversible.

Help: got to http://www.racetech.com/evalving/SpringRat...SpringType=Fork to choose your rate, or direct (15% discount for VFRDG) or through your favorite vendor

REAR SUSPENSION:

Mod: Increase rear ride height by shimming under top shock mount

Benefits: Improved handling due to steeper head angle, reduced trail, increased cornering clearance

How to: Add approximately 4mm of shims under top shock mount to raise ride height ~12mm.

Time:

Cost: $0

Permanance: Completely reversible.

Any chance to get the broken links fixed? I'm about to do a search, but for the ease of other newcomers it would be nice to have the links work again. These just take me to the homepage. :warranty:

It may be that those posts have been purged. Going to the end of the modifications section, there's only a handful prior to 2006. The generations sections were recently purged to no more than 600 days old, so many links there are no longer working, either.

End of thread · 71 posts recovered Wayback Machine snapshot 25 Jun 2021