VFRDiscussion ARCHIVE / READ-ONLYREAD-ONLY

Rc51 Front End Swap

70 posts Started 30 Dec 2006 Last recovered post 16 Mar 2010 Wayback Machine snapshot 4 Apr 2021

#1

OK, due to popular demand, and for the information of Mad VFR Scientists everywhere, here we go again......

{repost of 2005 thread after forum crash(es) for those who aren't aware}

----------------------------------------------------------------------------------------------------------------------------------------------------------------------------------------------------

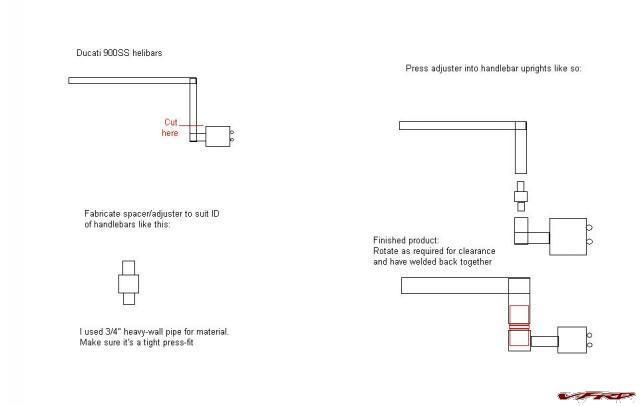
So tonight, I take hacksaw in hand and cut apart a perfectly brand-new $239 (US) set of Ducati 900SS Helibars.

[image: gallery_554_564_9154.jpg]

Why? Why not? I needed a jumping-off point, and this was it.

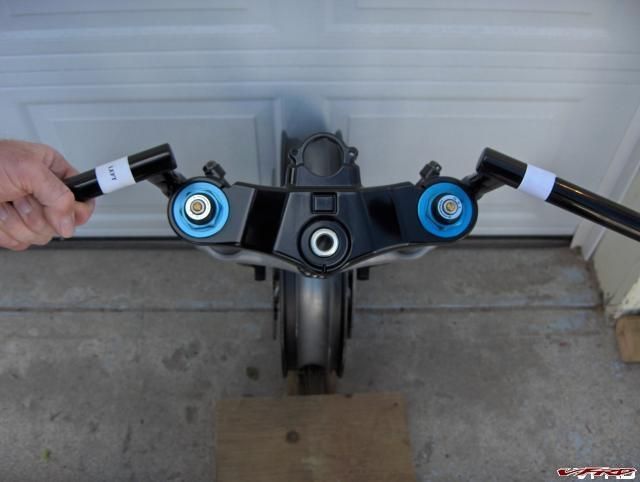
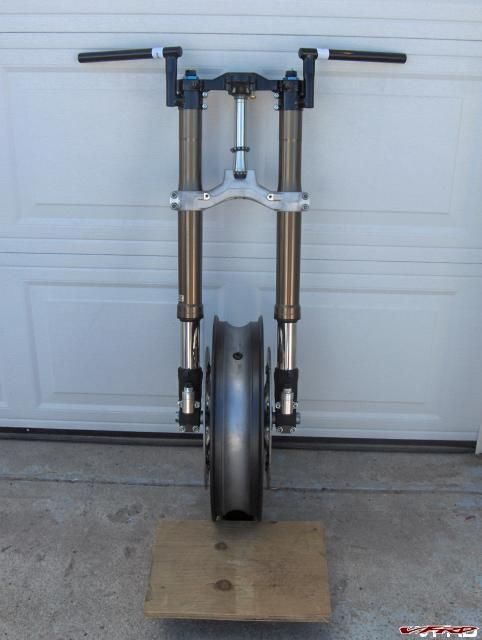
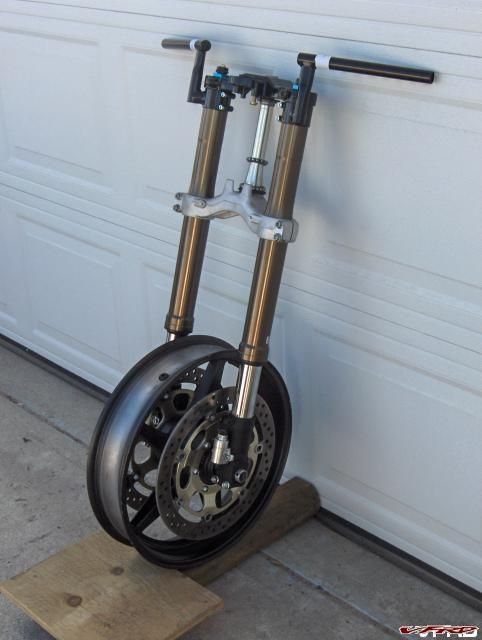
EDIT: I abandoned the plan of mounting the handlebars BELOW the RC51 triple clamp due to the bars fouling the inner fairings, so I will only post one pic here to show what the first pass of the modded bars looked like. I had to dismantle them and cut down the custom extensions to allow mounting ON TOP OF the 954 upper triple, which allows clearance for the bars at all angles of travel.

[image: gallery_554_564_58876.jpg]

And here is the RC51 front end mocked together before installation:

gallery_554_564_972090.jpg

gallery_554_564_408963.jpg

gallery_554_564_1076091.jpg

gallery_554_564_375232.jpg

#2

Well, on the weekend, I stripped the Viffer down in preparation for the fork swap.

First off, I removed the rear wheel so I could jack the bike and block it up high enough off the ground to do some good.

[image: gallery_554_564_56621.jpg]

Then I started stripping off the bodywork.

[image: gallery_554_564_42022.jpg]

At this point, I pumped the brake system out so as to avoid a mess later on when disassembling the LBS plumbing. The fluid still looked very clean from last year's flushing and bleeding regimen.

[image: gallery_554_564_36622.jpg]

I also took some detail photos of my dual Fiamm horns. I'm probably going to have to figure out where to relocate them later on.

[image: gallery_554_564_63868.jpg]

Here's a shot of my airbox mod where I removed the flapper valve entirely and the actuator plus desnorkelled it. I was without snorkel for quite a few years now, but the flapper mod was done last winter. Bike runs great and sounds wicked.

[image: gallery_554_564_41062.jpg]

And another unrelated mod where I drilled my rear disc last winter just because I could. I enlarged all the stock holes to 1/2" as an experiment. Brakes seem to be the same as always, no noticeable loss in braking power or feel. I used a drill press of course. It was slow going but if you didn't know otherwise, you'd swear it was factory.

[image: gallery_554_564_39367.jpg]

Here, I am measuring the distance between the frame and the front axle using a fibreglass rod. 20 and 5/16" was what I got. That is my reference dimension for the overall unladen length of the stock fork setup.

[image: gallery_554_564_17328.jpg]

You can see the dark line on the fibreglass rod right at the centerline of the axle. Rubbing it on the axle makes a perfect mark so I can get accurate, repeatable dimensions.

This shows exactly how I had butted it up against the steering neck portion of the frame.

[image: gallery_554_564_116506.jpg]

#3

Divorcing the rear brakes from the front. I have removed all this plumbing now.

I plan to run all three pistons in the rear, more pics of that plumbing later.

[image: gallery_554_564_122650.jpg]

I may wind up using a 14mm CBR600F4i master cylinder for the back caliper if it becomes necessary. I've got one on the workbench waiting it's turn. The VFR rear master is 17mm.

OK, rip and tear is complete. Here is the front end pruned of all it's appendages.

You can see the triple-row oil cooler I mounted up back in 2001. It's still going strong, no leaky-leaky.

[image: gallery_554_564_2913.jpg]

First problem fitting the RC lower: the steering stops have to go. They foul the mounting bracket for the instruments and fairing.

[image: gallery_554_564_62640.jpg]

So I taped off the lower part of the stem, clamped the beast to the picnic table and brought out the Binford 6000 Grind-O-Matic. Arrrrrrrrh, arrrrh, arrr.

[image: gallery_554_564_100602.jpg]

Here's one of the steering stops that was lopped off.

[image: gallery_554_564_79856.jpg]

It looked a bit ratty, so some filing and sanding were required to clean things up a bit.

[image: gallery_554_564_95974.jpg]

Ahhh, better:

[image: gallery_554_564_70476.jpg]

#4

Now it fits without fouling anything.

[image: gallery_554_564_48733.jpg]

Next hurdle was the lower bearing. The VFR uses a 30x55x17 bearing whereas the RC51 uses a 35x55x14 bearing. Right away, there is a 3mm difference in height, so a possibility exists of the top surface of the lower triple rubbing on the bottom of the frame's steering neck. Plus, the RC steering stem is a tad longer and you don't want it riding too high in the frame with the upper bearing not able to seat fully in it's race race due to the machined step on the upper part of the steering stem. The RC51 and the VFR both use the same top steering bearing so I'm reusing my upper tapered bearing. It's only been on for one season and is in excellent shape.

So, my solution was to use snap rings of the correct diameters to space the bearing on the top and bottom. Final height = 17mm plus about one thousand of an inch. I can buy that.

Spacing the bearing off the triple:

[image: gallery_554_564_96980.jpg]

[image: gallery_554_564_186653.jpg]

Spacing the race lower in the frame. Plenty of seating room afterwards. Sits at the same depth as the original.

[image: gallery_554_564_136131.jpg]

Here you can see the difference of height of the old and new races:

[image: gallery_554_564_20116.jpg]

And with the snap ring underneath they are within a hair:

[image: gallery_554_564_61923.jpg]

It all worked very well and the installed height is perfect. Clearance from the top of the triple to the frame is more than adequate and the total boltup to the top of the upper triple clamp including the top nut is excellent with just a thread or two sitting proud of the top nut with everything hand tight. I'll have to disassemble it all and grease/torque/set all the bearings, etc later. This is just to prove the assembly and get all the dimensions set up.

Here's the forks set in the triples.

[image: gallery_554_564_51566.jpg]

#5

View from the cockpit, no handlebars yet!

[image: gallery_554_564_98299.jpg]

Side view:

[image: gallery_554_564_17964.jpg]

I took the same installed measurement from the bottom of the steering neck to the centreline of the axle as before, using the fibreglass rod trick and found I was 1 and 1/16" LONGER than stock. This is due to having the fork tops flush with the 954 gullwing triple. Not good measurements. Must change this.

At this juncture, I decide to play around with the RC51 upper triple that I just happened to have laying around.

[image: gallery_554_564_60333.jpg]

By raising the forks so that the first line is showing above the upper triple, I install the fork retaining rings in their grooves, slip the forks down so the rings lightly contact the upper triple and snug a bolt on each side to hold it all together temporarily. Whaddya know? I'm now 1/16" shorter than stock. Hmmm, good starting point with plenty of room to slide the forks up more. There are several little graduated marks on the forks for this purpose and with the retaining rings, it's foolproof to get both forks exactly the same.

This is where I left off, I've got some food for thought for a couple days, plus I'm back at work, so I'll tackle it again next weekend and juggle some more things to see where I arrive.

Here it is with the RC51 upper triple, forks set to within a sixteenth of an inch of stock plus the front wheel slid into place on the axle:

[image: gallery_554_564_86621.jpg]

#6

To do list:

Still need to shim the ignition lock down away from the upper triple clamp to get the steering lock to function, fab some steering stops based on the steering lock indexing and plumb the front brakes with custom Galfer SS lines and CBR600 5/8" master cylinder. That, plus index the handlebars for clearance to tank/fairing, remove them and weld the modded bars back together.

Rear brakes have been divorced from the fronts, but the rears are not hooked to the rear master cyl just yet. Still have to remove the proportioning valve and reroute the OE (rubber) rear center piston brake line down to the rear master cylinder. Should be the perfect length to reach.

Then, upon the first test-ride, I'll know if I need to downsize the rear master cylinder to the 14mm CBR unit I have on the bench.

Probably another update next week after more progress is made.

#7

So I got to do a bit of work on the rear brakes this weekend.

First off, after removing the LBS plumbing to and from the front end, I took out the front/rear proportioning valve.

[image: gallery_554_564_170867.jpg]

This is also where the main ground from the battery is connected, so I had to reattach the ground cable to the frame afterwards using a much shorter bolt. You can see the ground cable hanging out in the breeze in the pic above.

Next, I took the original line to the center rear piston from it's location at the proportioning valve and moved it down to the rear master cylinder. This will accomplish the actuation of all three rear brake pistons from the rear brake pedal alone. I still need to road test it and see of the brakes will be powerful enough or if I need to downsize the master cylinder from the original 17mm to something smaller like the CBR F4i unit I have on hand.

[image: gallery_554_564_67453.jpg]

I tied the lines together using a double bleeder bolt, but the stock bolt would have done as well and probably saved me $26. It does look trick though. I have another for the front brakes whick will be custom plumbed by me using Galfer bulk braided stainless line. I'll go with a two-line setup, one for each caliper straight from the master cylinder, no splitter block.

[image: gallery_554_564_71132.jpg]

And I also got the steering lock to function by spacing the mechanism downwards, away from the triple clamp using a washer on each bolt. Simple but effective.

[image: gallery_554_564_137065.jpg]

Still have to grease and torque the head bearings, install the bodywork, clearance the handlebars and have them welded plus install the brakes, fab the brake lines and bleed same.

#8

Well, not much progress, but I'll recap what did get done.

I made up custom steering stops using 8x30mm allen head bolts threaded right through the lower triple, held in place by a locking nut and plenty of blue locktite. They strike the pads on the frame that are there for the original steering stops. The steering lock functions properly on both sides and the fabbed stops contact the frame just a couple of millimeters later.

[image: gallery_554_564_43676.jpg]

No interference between the lower triple and the radiator hoses whatsoever with these stops in place. I should have just as much steering lock as stock, so U-turns will not be a problem.

I also greased the steering head bearings and installed the triple tree and stem.

Here's a shot of how my homemade steering head socket interfaces perfectly with the special Honda bearing nut.

[image: gallery_554_564_123001.jpg]

The next thing I did was reinstall the forks and handlebars (with the controls on the bars) plus the upper triple. After that, I installed the gauge cluster surround, the upper fairing, windscreen and the left and right inner fairing panels.

Afterwards I played around with the handlebar sweep and riser position to try and get clearance for all the necessary bits to coexist peacefully.

After much testing and trying, it became apparent that the riser portion of the bars where it is welded to the fork clamp wants to hit the inner fairing panels when the bars are turned to either extreme. I was able to adjust them in toward the center, but that seems to put the handlebars too close together and also, my Electronic Cruise Control touchpad hits the tank with the bars in close like that.

I considered trimming the inner fairing panels, but there's too much interference plus there's also a bracket that attaches to the coils. This bracket is the mounting point for a couple of fairing fasteners and there's no way to lose that support, it needs to stay.

Sooooo, many steps forward, only to arrive back at square 1.

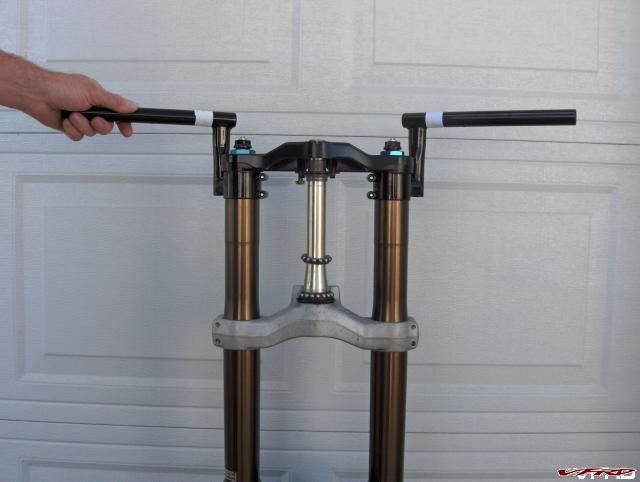
The 954 upper triple MUST be used, and the custom handlebar extensions I had made at work MUST be trimmed down substantially on the lathe to allow mounting the bars ABOVE the triple clamps.

There's just not enough room inside the VFR's fairing to mount them below without serious compromises being made, and I ain't going there.

The handlebars needed to be cut whether or not they were to be mounted above or below, so that's not an issue. It's just the height of the custom risers that is in question. AND, it's easy to make the existing ones shorter, just a few more turns on the lathe and trim the overall length.

The reason the bars wouldn't work as they were supplied is that the 50mm Duc 900SS Helibars had their upright risers located at approximately 10:00 and 2:00 when viewed from above, whereas the 41mm VFR800 Helibars had their risers clocked at maybe closer to 7:30 and 4:30. So in order to rotate them downwards, they had to be cut and rewelded no matter what.

Either that, or the reach to the bars would require arms like an Orangutan and there's likely to be issues with the master cylinders stroking the windscreen. I want to mimic the previous riding position as closely as possible, and I still have all my VFR bits in one assembly to take measurements from. Hence the need to cut and rotate them.

At work tonight I'll chuck the pieces back up and cut them down and report back later .
#9

Alrighty. I've just refitted the 954 upper triple and clearanced the bars/controls.

This shot shows where the handlebar uprights were previously fouling the inner fairing when mounted -->below<-- the RC51 triple:

[image: gallery_554_564_65527.jpg]

That's why I had to abandon that and went with the -->above<-- mounting method instead.

Here's a shot of the bars from above:

[image: gallery_554_564_40429.jpg]

There's now adequate clearance between the cruise touchpad and the tank:

[image: gallery_554_564_79139.jpg]

And no problem with the windscreen on either side:

[image: gallery_554_564_94761.jpg]

Now I need to mark the position of the bars, remove them and have them welded together solidly. I'll shoot a bit of spraypaint over the welded area for the moment, but this winter I'll take them off, sandblast them at work and get them powdercoated along with the upper triple and the front wheel.

Here's the bar modification that allows me to position the controls for proper clearance. I can rotate the clamps around the forks, then tighten and pull the bars fore or aft depending on what is needed to obtain clearance. It's the area that's free of paint. I sandblasted it as the welder is not going to want any paint near the weld area, plus it would get burned off anyhow.....

gallery_554_564_14894.jpg

[image: gallery_554_564_186788.jpg]

Overall, the riding position is practically identical to the VFR Helis I had on before with the stock forks. These bars are about .75" taller, but the 954 triple is about .61 lower due to the gullwing shape, so the bars are just a shade higher and it's pretty much unnoticeable. (I'm pulling the numbers from memory, but they're close)

One hiccup is that the VFR's front brake lever is not compatible with the CBR600F4i master cylinder. It bolts on just fine, but the plunger mechanism that actuates the master cylinder piston is entirely different. So, I have to buy a correct front brake lever as well. I guess that detail slipped past. Monday, I'll order one up.

Here's a shot of the cockpit before I got the brake lines sorted:

[image: gallery_554_564_1019018.jpg]

#10

After getting the handlebars welded in their final position, I set about sizing and cutting the Galfer bulk stainless steel lines to suit. I also got the new front brake lever that I needed. I really really wanted a set of CRG levers, but costs were beginning to get up there, so 26 bucks for a brand new OE lever seemed more reasonable for the pocketbook.

Here's the dual line setup with bleeder bolt at the master cylinder:

[image: gallery_554_564_387074.jpg]

And the corresponding run to each caliper:

[image: gallery_554_564_495587.jpg]

[image: gallery_554_564_756993.jpg]

I got the lines all bled out, but it took awhile. Lots of fiddling as I haven't got a Mity-Vac or similar. Just the old timer's method of pumping the lever. After quite awhile, I got real good flow and was able to chase out every last air bubble. The brakes are rock solid and boy oh boy is there a lot of stopping power with the 4 piston calipers and 320mm rotors! :eek:

#12

Here's my riding impression from the first brief test-ride:

Well, I took the newly-christened GL800RR-SP2 out for it's maiden voyage today. It was $hitty cold, as in just above freezing, and the streets were quite dusty & dirty, but nevertheless, I went.

The front brakes are marvellous, insane stopping power and easy to modulate. DAYUM are they loud though. The EBC HH pads go ZZZZZZZZZTT every time you squeeze the lever.

The rear brake is going to need some work. As I suspected, the VFR's 17mm rear master cylinder is too large to effectively actuate the 3 pistons on the rear caliper. There isn't enough braking force available, or conversely, the lever effort is too high for the amount of braking given. I've got a 14mm master cyl off an F4i that I'm going to slide on there next chance I get.

As for handling, the front end definetly feels more taut and rigid, better suspension action. It's more compliant and firmer all at the same time.

Initial turn-in is slightly slower than with the original forks, but the wider Duc Helibars seem to almost cancel that out. Although I didn't get a chance to really charge any serious corners given the weather conditions plus the brand new front tire, I'd say that with a little more tuning, I can have the turn-in rate pretty much the same as before. Keep in mind that I've got two mismatched tires, a fresh P-road out front and a B'stone 020 in the rear that's just getting down to the wear bars. I may go to a 170/60-17 P-road out back to help quicken the steering even more, we'll see.

#13

Well, I finally got around to reconfiguring the rear brakes with the 14mm F4i master cylinder.

It actually went on quite easily with only 3 mods to the CBR M/cyl itself, and none to the Viffer.

Firstly, there was a nub on the top that located the CBR brake line. It was going to be in the way, so I lopped it off:

[image: gallery_554_564_573450.jpg]

I removed the right footpeg bracket to make it easier to access the VFR master and remove it. Thank goodness the swingarm pivot nut was on the right hand side so I didn't have to drop the pivot bolt right out:

[image: gallery_554_564_527970.jpg]

When I got both of them side by side, I realized that the CBR unit mounted differently than the VFR's. The CBR part has threaded mounting holes, and the VFR does not:

[image: gallery_554_564_591320.jpg]

I was able to use this to my advantage by bolting them together temporarily in order to take some measurements. The CBR unit has a much longer threaded pushrod and it needed to be drastically shortened. As they were bolted together solidly at the mounting points, it was super-easy to find the needed length:

[image: gallery_554_564_126164.jpg]

After cutting the pushrod to the required length, I drilled the mounting points of the CBR master to exactly match the VFR master:

[image: gallery_554_564_817651.jpg]

Now that it's drilled, it'll slide right into place with the VFR mounting bolts:

[image: gallery_554_564_387333.jpg]

After that, it was a matter of refitting the M/cyl and bleeding the brakes. Here's the CBR master all flanged up in it's new home:

[image: gallery_554_564_625346.jpg]

Happily, the plastic elbow that feeds brake fluid from the reservior to the M/cyl on both bikes was identical, so I retained the VFR reservior, hose and elbow. The CBR reservoir was quite a bit smaller, and the hose was all wrong, so it was the path of least resistance to use the VFR bits.

#14

I took it out for a run afterwards and the rear brakes are quite a bit more powerful. I can lock the rear brake if I desire, whereas the 17mm VFR master required a LOT of effort on the pedal to do the same.

Brake feel is good, and lever effort is very reasonable. The pedal travel had increased slightly, but it's certainly not objectionable.

#16

Well, winter is fast approaching here, temps are never getting any higher than about 10'C during the mid-afternoon, and down as low as -10'C at night. :cold:

Nevertheless, I had the GL800RR-SP2 out on the highway this past week in some +6C weather (after about 60 km of earlier in-town, low speed riding to famiarize myself with the new setup).

I had brought the bike back into the garage after the initial trial runs about town, checked and rechecked all the critical fasteners' torque and then decided it was time to explore the upper reaches of the speed scale.

I started out on a lonely stretch of highway and began coaxing the bike from 100km/hr up to ~160 or so, and back down again. The bike was dead stable, the front end soaked up all the pavement irregularities far better than the original 41mm fork did. Did a few medium-hard braking exercises at this speed level to see how things went. Marvellous they were!

Also did quite a few extended side-to side weaves at around the 100k speed limit, left-right-left-right, again and again. The slightly slower turn-in I'd felt around town seems to lessen with increased speed and the bike responded to the weaving much like the stocker did in terms of heeling over from the one extreme to the other and back again. I wasn't close to scraping the pegs at all, what with the still new-ish front tire and the cold temps, I didn't want to get the bike quite over to the very edge. Still, I estimate I was roughly 90% into what I'd term "full lean" for my own riding ability/comfort level and on a bike that I have to PAY FOR if I wad it up. No dramas found, so on we go to the next level.

The next foray was up to ~200km/hr which I held steady for quite awhile, doing some looong sweeping turns and the bike tracked just perfectly. I could certainly feel that the rear shock is now the "turd in the punchbowl" in terms of ride quality, but it doesn't do anything uncertain or scary, just not as precise as I'd like it to be feeling. The ride quality is nowhere near what the front is. Next season, it'll be shock time.

Finally, I ventured up to 240km/hr and the results were predictable; utterly composed, totally precise and no drama whatsoever.

The brakes are absolutely astounding, scrubbing off speed like you'd tossed a tethered Steinway out of your pocket! Something to be said for 24mm larger rotors and 2 extra brake pistons out front. :eek: I like 'em! :unsure:

There's still more work to be done to get the bike 'exactly' where I want it, and certainly a new rear tire is in order as I'm about 1mm off the wear indicators in the center right now. That should go a long way towards improving the low-speed turning manners. That, and the new rear shock that's on the drawing board. I'm wanting one with adjustable ride height so I can further tune the chassis attitude as desired.

Short version: it all works, I didn't get chucked off, brakes are like a brick wall and it rails around high speed sweepers like never before.

#18

Well, I got my front wheel back from the powdercoaters. Had it done silver to match the rear.

I also picked up one of these:

[image: TR215l.jpg]

Probably going to have it black anodized to match the rest of the bike. :cool:

#20

Well, it isn't a "Performance upgrade" but why start an entirely new thread, Eh?

Got the fuel cap powdercoated black to match the handlebars and the upper triple clamp:

[image: gascap.jpg]

#21

Final pictures, now that spring has sprung, and the front wheel has been powdercoated, etc.

Also, there's a Fireblade shock buried in the rear somewhere.

[image: 01.jpg]

[image: 02.jpg]

[image: 03.jpg]

Now I just need a new rear tire and to have my remaining Ariete' 90' valvestem installed at the same time. :cool:

#22

Yes the forum has lost allot of stuff due to the problems, great stuff veefer800canuck

Just a little update on my setup, I had my SP1 forks valving adjusted to suit 5 weight oil (standard is 8) & had the dumb built in 10mm of static sag before forks are even loaded the SP1 forks have fixed (with my preloads would all the way in I could still only get 40mm static). The 9.5 standard springs are perfect for my weight, the static is just a design fault within the forks as the froks where designed by 2 different eng, 1 did valving, the other did the rest so somewhere along the line they didn't really match each others data.

Did it make a difference will be the question, well if you think the SP1 forks standard make a big difference mine now are again another level up from that :thumbsup:

I now have 35mm static sag with just 1 position preload & the hyd responce is so good now the front feels like it is sucking the tar out of the road. It also helped I found a suspension guy who really knows his stuff & if your not happy he will keep doing adjustments till you are happy at no extra cost, he will even go out to the track with you to further sort things at no extra cost.

Edited December 30, 2006 by zRoYz
#24

This is one of those threads that keep coming back to life, LOL!

I'm in the middle of my own RC 51 front-end swap and need a part number for a TAPERED roller bearing for the 2001 RC 51 top steering stem, to match a tapered roller bearing already installed on the lower triple clamp. I understand that the RC 51 top steering stem bearing won't fit in the VFR headstock.

Anyone has the part number readily available? TIA. smile.gif

Edited January 7, 2008 by Throttlestop
#25

umm, you dont need a top bearing for an RC51 for your front end swap, you need the VFR one.

I have a SP1 steering stem in my set up, I have a lower tapered roller bearing for an SP1, and a upper tapered roller bearing for a 99 VFR. Just in the lower you need the circlip thingys as described by Rob a few pages up there ^^^

#26

umm, you dont need a top bearing for an RC51 for your front end swap, you need the VFR one.

I have a SP1 steering stem in my set up, I have a lower tapered roller bearing for an SP1, and a upper tapered roller bearing for a 99 VFR. Just in the lower you need the circlip thingys as described by Rob a few pages up there ^^^


Thanks, AB. I am quite familiar with your set-up, as I'm using your previous thread (as well as veefer800canuck's) as a guide. They have been quite indispensible, I might add. http://www.vfrdiscus...tyle_emoticons/default/smile.gif

I have the VFR part number, but that is for a plain roller bearing. I suppose the tapered roller stuff will sport a different part number, and I need this to place an order.

The SP1 forks and steering stem came with a tapered lower bearing, but without the outer race, that goes into the lower headstock. I will have to get that one too.

Again, any help will be appreciated. http://www.vfrdiscus...tyle_emoticons/default/smile.gif

I have all the parts. I'm just waiting on the front fender, axle spacers and the rotors that are in the post, before I bolt everything together.
#27
Give All Balls racing a call and tell them you need the two bearings from the different applications.

RC51 SP1 lower and VFR800 upper. They will fix you up.

That's where I got mine from. Actually, I already had the VFR tapered bearings on my bike for a season, so I already owned the upper. I merely sourced the RC51 SP1 lower bearing from them.


But they won't sell you just the race, you have to buy the entire bearing. They're cheap though.......
#28
Thanks!

I'll get it from them.

http://www.vfrdiscussion.com/forum/public/style_emoticons/default/smile.gif
#29
Ahh, I see you just needed the race... looking forward to seeing some pix...

About the only thing I think I need to do to mine is get a CF front fender, spotted some on fleabay for $149 usd, $35usd post to Oz. The one I have now is a red one with a slight battle scar from when I bought it.
#30

Ahh, I see you just needed the race... looking forward to seeing some pix...

About the only thing I think I need to do to mine is get a CF front fender, spotted some on fleabay for $149 usd, $35usd post to Oz. The one I have now is a red one with a slight battle scar from when I bought it.


You probably already know this but, the 929, 954 and RC51 all use the same front fender.

Just to help expand your search. :thumbsup:
#31

Ahh, I see you just needed the race... looking forward to seeing some pix...

About the only thing I think I need to do to mine is get a CF front fender, spotted some on fleabay for $149 usd, $35usd post to Oz. The one I have now is a red one with a slight battle scar from when I bought it.


You probably already know this but, the 929, 954 and RC51 all use the same front fender.

Just to help expand your search. :thumbsup:

Got that. Thanks.

And yes, pics will surely follow once I get underway, in a few weeks. The forks are already at the suspension shop, getting a thorough inspection, new seals and oil. The rear Ohlins is also on order. http://www.vfrdiscus...tyle_emoticons/default/smile.gif

It should be quite a handler. And future-proofed. http://www.vfrdiscus...tyle_emoticons/default/smile.gif
#32
You can't buy just a race, and even if you could, you wouldn't want to...

I've never purchased these from Honda, but the Honda part number I've got in my files is 91015-425-832, which is supposedly for a 26 47 15 upper tapered roller bearing and race. Didn't know Honda fit tapered rollers to the RC51? Look like ball bearings on the fiche to me...

Ciao,
#33

You can't buy just a race, and even if you could, you wouldn't want to...

I've never purchased these from Honda, but the Honda part number I've got in my files is 91015-425-832, which is supposedly for a 26 47 15 upper tapered roller bearing and race. Didn't know Honda fit tapered rollers to the RC51? Look like ball bearings on the fiche to me...

Ciao,


Thanks. But I need a VFR 800 upper, not an RC 51.
#34

Thanks. But I need a VFR 800 upper, not an RC 51.

You're welcome. But if a VTEC uses a 47mm OD x 26mm ID x 15mm D bearing, that may be your part number!

Ciao,
#35
I'm kind of stuck in the middle of my own 5th Gen RC51 front end swap. The rotors and axle spacer plus fender never arrived from the lass I bought them from in the US, although she did ship me the forks and triples.

Do any of you know if a set of rotors off a newer CBR 1000 or the older 954/929 will fit the RC 51 SP2 (2002 upwards) front wheel? I also need the OEM spacers on the axle (I have the axle though).

Anyone?
#36
Try a PM to zRoYz. He has done the SP1 mod and has a 954.
#37
Thanks, Phantom.

I'll do a search before I PM him.
#38

I'm kind of stuck in the middle of my own 5th Gen RC51 front end swap. The rotors and axle spacer plus fender never arrived from the lass I bought them from in the US, although she did ship me the forks and triples.

Do any of you know if a set of rotors off a newer CBR 1000 or the older 954/929 will fit the RC 51 SP2 (2002 upwards) front wheel? I also need the OEM spacers on the axle (I have the axle though).

Anyone?


Yes, those rotors (1000RR, 929, 954) will bolt onto a RC51 (SP1 and SP2) front wheel. Of course, just because they physical bolt on doesn't mean they'll actually work (without some mods anyway). The 929/954 rotors are 330mm and the 1000RR and RC51 use 320mm rotors. So, if you use 929/954, you'll need to shim the calipers out somehow.

And, you'll definitely want to check to see if the rotor offset on the 1000RR is the same as the RC51. The 1000RR uses radial brakes, so they're may be some alignment issues. I haven't heard of anybody performing this swap yet (nor have I heard of anybody swapping an 1000RR wheel into a pair of 929/954/RC51 forks either), so I can't confirm if it'll even work (it may not even bolt on, who knows). The newer CBR600RR might also work too since it shares many parts with its bigger 1000cc brother.
#39
Much appreciated, Darth. That's good info you posted.

I think I'll stick to RC 51 rotors, to avoid the alignment and position issues. They're just a little more difficult to source 2nd hand. If I don't succeed on Ebay, I will get a brand new pair of Galfer rotors.

Thanks again.
#40

Much appreciated, Darth. That's good info you posted.

I think I'll stick to RC 51 rotors, to avoid the alignment and position issues. They're just a little more difficult to source 2nd hand. If I don't succeed on Ebay, I will get a brand new pair of Galfer rotors.

Thanks again.

Ok, just did a search and this is what I've found...

Yes, 06-07 (probably 08 too) CBR1000RR rotors will fit on the RC51 rim.

929 (00-01)....................330mm
954 (02-03)....................330mm
RC51 (00-06)..................320mm
600rr (03-08)..................310mm
1000rr (04-05)................310mm
1000rr (06-07)................320mm

Offsets and bolt patterns are the same. The only differences are rotor thinkness and rotor diameter.

It is my understanding that the 929/954/1000 rims are all interchangable. The RC51 has a different axle diameter (22mm vs 25mm on the 929/954/1000), so you'll need to install RC51 wheel bearings and have custom axle spacers made if you want to use a 929/954/1000 wheel in the RC51 forks.
#41

Much appreciated, Darth. That's good info you posted.

I think I'll stick to RC 51 rotors, to avoid the alignment and position issues. They're just a little more difficult to source 2nd hand. If I don't succeed on Ebay, I will get a brand new pair of Galfer rotors.

Thanks again.

Ok, just did a search and this is what I've found...

Yes, 06-07 (probably 08 too) CBR1000RR rotors will fit on the RC51 rim.

929 (00-01)....................330mm
954 (02-03)....................330mm
RC51 (00-06)..................320mm
600rr (03-08)..................310mm
1000rr (04-05)................310mm
1000rr (06-07)................320mm

Offsets and bolt patterns are the same. The only differences are rotor thinkness and rotor diameter.

It is my understanding that the 929/954/1000 rims are all interchangable. The RC51 has a different axle diameter (22mm vs 25mm on the 929/954/1000), so you'll need to install RC51 wheel bearings and have custom axle spacers made if you want to use a 929/954/1000 wheel in the RC51 forks.

Whoa! This information should be pinned, Darth. Its a worthy addition to the already huge store of know-how for would be 5th and 6th Gen Frankenviffers like me.

A huge thunb's up for your effort in posting this up. Thanks!
#42
It also looks like the 600RR (03-06) also used a 22mm axle just like the RC51. In fact, the Honda part numbers are the same between the 600RR and RC51 for the wheel bearings and inner spacers. I've read of one guy putting an RC51 front wheel on his 600RR, so it's definitely doable.

I'd imagine you'd have to have axle spacers made to make sure the 600RR wheel fit correctly in the RC51 forks. Plus, you'd have to put 320mm rotors onto the rims too. The nice thing about this swap is you wouldn't have to swap the bearings out.

Rims from a newer 600RR (07+) may work too. I believe the axle diameter is also 22mm, but the fork legs are closer together. This makes it pretty much impossible to put an RC51 or an older 600RR wheel onto a newer 600RR, but the reverse wouldn't be true. :rolleyes:
#43
Here is another variation on this theme...

Kudos to zRoYz who did all the work. All I did was collect a few parts then stand back and admire the maestro at work.

Especially pleased with the Powerbronze front fender which is an absolutely top notch piece of kit. Woo, gold bits :D

[image: Posted Image]
front.jpg

[image: Posted Image]
forks2.jpg

[image: Posted Image]
forks.jpg

[image: Posted Image]
back.jpg
#44
well done Mr. Bling, cant wait to see it next week.
I think we'll have 4 frankenviffers and 1 frankenbird on the one ride http://www.vfrdiscus...tyle_emoticons/default/smile.gif
#45
We have a mate with an RC51 front end on his SuperBlackbird (CBR1100XX)... actually we have two mates with that combo...
#46

We have a mate with an RC51 front end on his SuperBlackbird (CBR1100XX)... actually we have two mates with that combo...


Yep we do & I installed them all except AB's but think sent him so many how too emails you could say I helped with that install as well.
List:
My VFR vtec installed SP1 front end.
BB (AQ) installed SP1 front end.
Sold my SP1 front end & installed on BB (Birdman)
My VFR vtec installed R1 front end.
Kirby VFR vtec installed SP2 front end.
My sold VFR750 installed F4I front end.
VFR800 (Beasty) installed my vtec front end (simple upgrade to 43mm forks from standard 41mm).

I'm trying to stay out of my garage for awhile & haven't even had time to install my HIDS on my vtec :-( Kirby bike has worn me out for awhile as was alittle more than just front end with full valve service & 100 other things to a bike that a mechanical numpty doesn't notice. I did however just install new chain & sprockets on my bike & the Blue chain looks bling hehe, yes I'm a blue freak.

I can just taste all those Turkeys I'm going to make Kirby buy me at SinS (summer in the snowy) ride next week because he is going to be so happy he wont know he is buying them, the Motard headers with Staintunes sound mean really mean.
#47

[image: Posted Image]
front.jpg


Nice ride Kirbster! :thumbsup:
#48
Hi guys, been looking around on these front-end swap threads for the diamater of the front fork tubes on the VTECker... is it 41 or 42mm??? Anyone?? (I measured mine but I don't trust my caliper to be very accurate, 2-bob el-cheapo job... oh yeah and while I'm at it... what's the diamater on the 4th gen??

Thanks in advance.
#50

VTEC = 43mm


43mm!!! :rolleyes: :fing02:

...we are talking about the same thing right? The fork pipes/tubes which the clip-ons clip onto up the top... the part which slides up and down inside the cartridges... the part which goes into the triple trees... right? Hmmm 43mm, so the clip-ons off a VTEC aren't a direct swap for a 4th gen... which I believe (with more certainty) are 41mm
#51
Yessir, 43mm. The 5th gen is 41mm, not sure about the older gens.
#52

Yessir, 43mm. The 5th gen is 41mm, not sure about the older gens.

Gen 3 & 4 are 41mm also. Also the VF1000's. Not sure on the others.
#53

Much appreciated, Darth. That's good info you posted.

I think I'll stick to RC 51 rotors, to avoid the alignment and position issues. They're just a little more difficult to source 2nd hand. If I don't succeed on Ebay, I will get a brand new pair of Galfer rotors.

Thanks again.


I used 330mm 954 rotors on my RC51 wheel. The nice part about the RC forks is the caliper hangers are removable. I simply free handed a set out of aluminum, cost me 20 bucks for the aluminum. Shown here...ummm....disregard any unsightly fork oil....long story...
[image: Posted Image]
Broke Bike Mountain!
#55
Auspanol, waddayagotinmind?

If you want lower bars on a Vtec, CBR1100XX (SuperBlackbird) bars go on and are maybe 3/4" to an inch lower.

Later CBR600s (F4 I think) went from 41mm to 43mm so they too are an option. The first Gen CBR600RR also had 43mm forks (the one with conventional brake calipers; the second Gen radial brake CBR600RR has USD forks).
#56

The first Gen CBR600RR also had 43mm forks (the one with conventional brake calipers; the second Gen radial brake CBR600RR has USD forks).

Bzzzzzt! 45mm, mate. Got a set in the garage, as I'd coveted that model's pretty blue annodised fork caps for my ST1300...

Ciao,
#57
Oh man.... what a terrible, terrible thread......! :blink:

It makes me want to do terrible, terrible, expensive things to "Big Red".....! :dry:

Thanks for all the great info, step-by-step, and pics!
I may have a winter project if I can stop riding my viffer long enough. :^)

Cheers! E-Ticket
#58

Oh man.... what a terrible, terrible thread......! :blink:

It makes me want to do terrible, terrible, expensive things to "Big Red".....! :dry:

Thanks for all the great info, step-by-step, and pics!
I may have a winter project if I can stop riding my viffer long enough. :^)

Cheers! E-Ticket


Well, if you hated this thread so much, you're DEFINETLY not going to like this one: http://www.vfrdiscus...1 triple clamps
#59

Oh man.... what a terrible, terrible thread......! :cool:

It makes me want to do terrible, terrible, expensive things to "Big Red".....! :dry:

Thanks for all the great info, step-by-step, and pics!
I may have a winter project if I can stop riding my viffer long enough. :^)

Cheers! E-Ticket


Well, if you hated this thread so much, you're DEFINETLY not going to like this one: http://www.vfrdiscus...1 triple clamps


And you were right ..... you heartless bastage...!! :blink:

cheers! E-Ticket
#60
Hi,

I own a Vtec 2002 and want to use a CBR929 fork (330mm)
Is it possible to use CBR929 brake-discs and Blackbird calipers together with the original wheel ?
Or should I have a CBR929 wheel alike also ? and how about the calipers
Or what is the best solution for this combination

Well just figured out that I need the cbr929 front wheel, so there's only one question left now;
Does a vfr caliper fits on the cbr929 fork?
#61

No. The VFR have a different mounting scheme, so it wouldn't be a bolt on game. On benefit of these swaps is getting better braking performance. Are you trying to keep the linked brakes or ABS? Perhps getting your current forks reworked or going full out and getting AK-20 cartridges.


No more DBCS (unfortunately) and I didn't have ABS original so the end result will be CBR929 calipers together with VFR's master cylinder.Maybe when I'll find a secondhand set I will replace them.
And probably a longer gas throttle set (ST1100)
#62
CBR900RR (929) master cylinder is 19mm
VFR800 VTEC master cylinder is 14mm

To explain the implication of this very clearly, using the VFR m/c with the 929 calipers will see the brake lever hitting the bar, most likely... :warranty:

Ciao,
#63
I've got a few nice condition CBR master cylinders kicking around in my shop, send me a PM if you need one(sounds like you do!).
#64

CBR900RR (929) master cylinder is 19mm
VFR800 VTEC master cylinder is 14mm

To explain the implication of this very clearly, using the VFR m/c with the 929 calipers will see the brake lever hitting the bar, most likely... :beatdeadhorse:

Ciao,

Where can you look up the MC specs? I am specifically looking for data on the 5th gen and the VF1000R.
#65

Where can you look up the MC specs? I am specifically looking for data on the 5th gen and the VF1000R.


Look on the master itself. The numbers are cast into a circle on one side of the master. As stated above, I have a few - if you're in need, let me know.
#66

CBR900RR (929) master cylinder is 19mm
VFR800 VTEC master cylinder is 14mm

To explain the implication of this very clearly, using the VFR m/c with the 929 calipers will see the brake lever hitting the bar, most likely... :beatdeadhorse:

Ciao,


Ok I thought it was possible using the cbr929 calipers with the VFR master because KEITH17 also posted a pic on previous page 3 with the VFR masters using a CBR929 fork?????? Or maybe his VFR is not a VTEC ?
#67


Where can you look up the MC specs? I am specifically looking for data on the 5th gen and the VF1000R.


Look on the master itself. The numbers are cast into a circle on one side of the master. As stated above, I have a few - if you're in need, let me know.
5G - 1/2"
1000R - 5/8"

I've got a spare 1KR MC I'll try tomorrow on the R, if that's no good I'll be looking for another that will work.
#68


Where can you look up the MC specs? I am specifically looking for data on the 5th gen and the VF1000R.


Look on the master itself. The numbers are cast into a circle on one side of the master. As stated above, I have a few - if you're in need, let me know.
5G - 1/2"
1000R - 5/8"

I've got a spare 1KR MC I'll try tomorrow on the R, if that's no good I'll be looking for another that will work.
The "spare" worked out fine, I should have used that one first before trying two others. :fing02:

It's leaking from the plunger...back to the drawing board.. :pinocchio:
#69


CBR900RR (929) master cylinder is 19mm
VFR800 VTEC master cylinder is 14mm

To explain the implication of this very clearly, using the VFR m/c with the 929 calipers will see the brake lever hitting the bar, most likely... :biggrin:

Ciao,


Ok I thought it was possible using the cbr929 calipers with the VFR master because KEITH17 also posted a pic on previous page 3 with the VFR masters using a CBR929 fork?????? Or maybe his VFR is not a VTEC ?

the VFR ones where only there for fitting , i changed to firestorm ones finally ... but the VFR ones worked fine they just didn't look right because they sat at the wrong angle
#70
Thank you Keith, thats what I wanted to hear.

Soon I'll open a new topic for my "project" and thanks to Canuck for letting me use his topic :rolleyes:
End of thread · 70 posts recovered Wayback Machine snapshot 4 Apr 2021