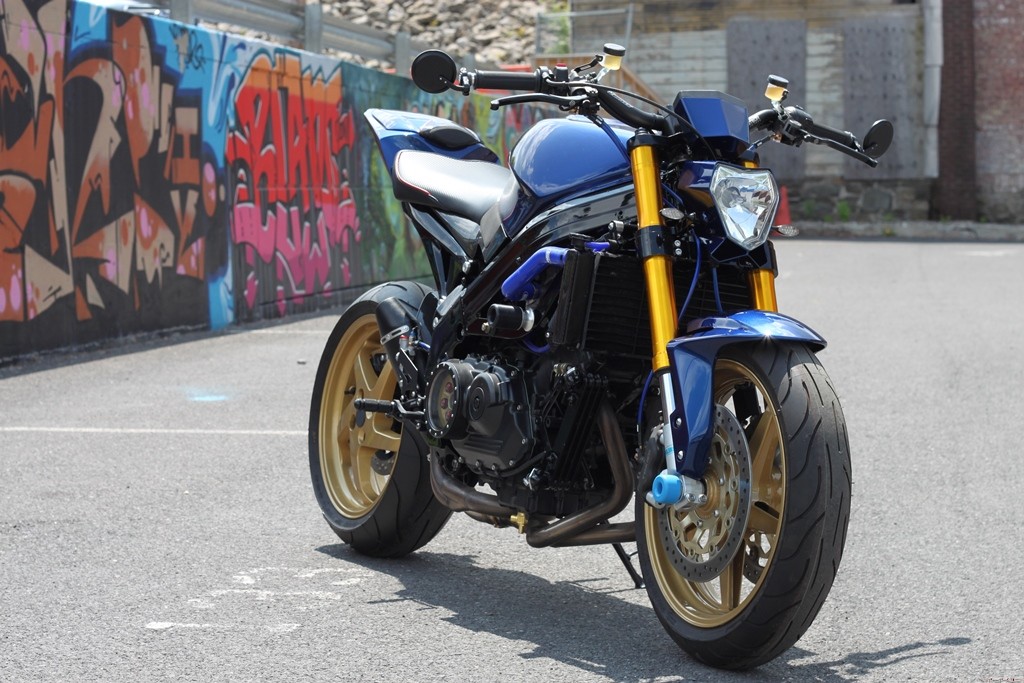
This has been a long time coming... I started this about 6 years ago, with the intention of just tossing together a cool looking, naked, parts bin VFR. Some years went by and the project evolved into much, much more than I imagined in the first place. Having purchased some larger pieces of equipment (lathe, mill, and tig welder) have allowed me to really up the ante on my projects.
After dragging out my 83 VF750F build thread for years and still not finishing it, I decided I wouldn't post anything about this bike until it was done. Then Andy posted his beauty... and with a twinge of "dammit, he beat me to it", I really just sat back and took a bit more time on everything to make it tip-top.
I have about 1000 pics documenting the whole build, and matched that in 2 days on a recent photo shoot.
I will work on posting a lot of it here along with the full story over the next few days. You'll have to forgive me if I savor the moment a bit, after waiting 6 years... :wink:
[image: IMG_5336_zpsezqat7hg.jpg]
![[image: IMG_5336_zpsezqat7hg.jpg]](http://i8.photobucket.com/albums/a49/SEBSPEED2003/IMG_5336_zpsezqat7hg.jpg)
[image: 20150516_163448_zps3nt10chf.jpg]
![[image: 20150516_163448_zps3nt10chf.jpg]](http://i8.photobucket.com/albums/a49/SEBSPEED2003/20150516_163448_zps3nt10chf.jpg)
[image: teaser2_zpsilxwr27k.png]
![[image: teaser2_zpsilxwr27k.png]](http://i8.photobucket.com/albums/a49/SEBSPEED2003/teaser2_zpsilxwr27k.png)
[image: 20150516_163413_zpspcxfim7x.jpg]
![[image: 20150516_163413_zpspcxfim7x.jpg]](http://i8.photobucket.com/albums/a49/SEBSPEED2003/20150516_163413_zpspcxfim7x.jpg)
[image: 20150516_163249-1_zps45j9c16m.jpg]
![[image: 20150516_163249-1_zps45j9c16m.jpg]](http://i8.photobucket.com/albums/a49/SEBSPEED2003/20150516_163249-1_zps45j9c16m.jpg)
[image: IMG_5597_zps8y3uxfst.jpg]
![[image: IMG_5597_zps8y3uxfst.jpg]](http://i8.photobucket.com/albums/a49/SEBSPEED2003/IMG_5597_zps8y3uxfst.jpg)
[image: IMG_5425_zpsxxamiq9a.jpg]
![[image: IMG_5425_zpsxxamiq9a.jpg]](http://i8.photobucket.com/albums/a49/SEBSPEED2003/IMG_5425_zpsxxamiq9a.jpg)
[image: IMG_5462_zpsrd5mqmia.jpg]
![[image: IMG_5462_zpsrd5mqmia.jpg]](http://i8.photobucket.com/albums/a49/SEBSPEED2003/IMG_5462_zpsrd5mqmia.jpg)
[image: IMG_5488_zpsfq2ejgfs.jpg]
![[image: IMG_5488_zpsfq2ejgfs.jpg]](http://i8.photobucket.com/albums/a49/SEBSPEED2003/IMG_5488_zpsfq2ejgfs.jpg)
Click this link for sound clip:
http://vid8.photobucket.com/albums/a49/SEBSPEED2003/20150521_204122_zpspzhd1bh8.mp4
This is what started it all... a spare motor obtained in October of 2009...
![[image: 11-28-09001.jpg]](http://i8.photobucket.com/albums/a49/SEBSPEED2003/1996%20VFR%201/11-28-09001.jpg)
By December 09 it had gone through a couple iterations...
![[image: 12-4-09018.jpg]](http://i8.photobucket.com/albums/a49/SEBSPEED2003/1996%20VFR%201/12-4-09018.jpg)
I originally saw it having clip ons and being more of a track animal
By January I had changed my mind a couple more times...
![[image: 1-8-2010016.jpg]](http://i8.photobucket.com/albums/a49/SEBSPEED2003/1996%20VFR%201/1-8-2010016.jpg)
![[image: 1-9-2010021.jpg]](http://i8.photobucket.com/albums/a49/SEBSPEED2003/1996%20VFR%201/1-9-2010021.jpg)
That evolved into a bit of rolling my own
![[image: 1-17-2010024.jpg]](http://i8.photobucket.com/albums/a49/SEBSPEED2003/1996%20VFR%201/1-17-2010024.jpg)
![[image: 1-22-2010017.jpg]](http://i8.photobucket.com/albums/a49/SEBSPEED2003/1996%20VFR%201/1-22-2010017.jpg)
![[image: 1-22-2010015.jpg]](http://i8.photobucket.com/albums/a49/SEBSPEED2003/1996%20VFR%201/1-22-2010015.jpg)
[image: 1-22-2010modded016.jpg]
![[image: 1-22-2010modded016.jpg]](http://i8.photobucket.com/albums/a49/SEBSPEED2003/1996%20VFR%201/1-22-2010modded016.jpg)
![[image: 1-22-20100102.jpg]](http://i8.photobucket.com/albums/a49/SEBSPEED2003/1996%20VFR%201/1-22-20100102.jpg)
![[image: PICT1182.jpg]](http://i8.photobucket.com/albums/a49/SEBSPEED2003/1996%20VFR%201/PICT1182.jpg)
Yoshi helped clean the carbs
![[image: 1-30-2010009.jpg]](http://i8.photobucket.com/albums/a49/SEBSPEED2003/1996%20VFR%201/1-30-2010009.jpg)
Got some schmancy controls
![[image: PICT1174.jpg]](http://i8.photobucket.com/albums/a49/SEBSPEED2003/1996%20VFR%201/PICT1174.jpg)
I modified an RC51 SP2 front wheel to fit in the CBR forks
![[image: 2-5-2010006.jpg]](http://i8.photobucket.com/albums/a49/SEBSPEED2003/1996%20VFR%201/2-5-2010006.jpg)
![[image: 2-5-2010007.jpg]](http://i8.photobucket.com/albums/a49/SEBSPEED2003/1996%20VFR%201/2-5-2010007.jpg)
Added some PAIR block off plates - Hayabusa parts from ebay fit perfectly
![[image: 6-4-10006.jpg]](http://i8.photobucket.com/albums/a49/SEBSPEED2003/1996%20VFR%201/6-4-10006.jpg)
Sold the FOX shock I had and picked up a nice Wilbers 641 with a fresh rebuild
![[image: 6-4-10008.jpg]](http://i8.photobucket.com/albums/a49/SEBSPEED2003/1996%20VFR%201/6-4-10008.jpg)
It was around this time that I changed from clip ons to dirt bike bars
![[image: 8-14-10006.jpg]](http://i8.photobucket.com/albums/a49/SEBSPEED2003/1996%20VFR%201/8-14-10006.jpg)
In September 2010, (my now good friend) Brian aka midlifevfr informed me that he picked up a 96 parts bike, and as it had lower mileage than the one I had, we negotiated a deal for the motor. Easiest way to drop 30k miles... the "new" lump has only 14,093 miles on it.
![[image: 9-10-10012.jpg]](http://i8.photobucket.com/albums/a49/SEBSPEED2003/1996%20VFR%201/9-10-10012.jpg)
I decided that I wanted to paint the motor black. To accomplish this, I started by degreasing and washing the motor. I followed that with a soda blast, primer, and high temp ceramic black engine paint.
![[image: 9-11-10002.jpg]](http://i8.photobucket.com/albums/a49/SEBSPEED2003/1996%20VFR%201/9-11-10002.jpg)
I am going to end up skipping around a bit in the timeline. The project took a bit of a turn 2 years ago after I was hit by a "lethal lefty" on my maiden voyage with my CB900F. That accident really messed with my head as I had put a lot of effort into that bike and it was difficult to see it laying on its side within 2 hours of putting the license plate on it.
It greatly influenced some decisions regarding this project - mainly the rear bodywork. I was planning to make a big deal out of creating some one-off bodywork, and I decided against this in favor of parts that I could adapt to the bike, and therefore also replace with relative ease if the worst case were to repeat itself.
Along the way, I found some rocking horse poop... Two Brothers full system!
![[image: 10-9-10013.jpg]](http://i8.photobucket.com/albums/a49/SEBSPEED2003/1996%20VFR%201/10-9-10013.jpg)
This photo marks the end of the "make everythign from scratch" phase, and the beginning of the evolution into the bike you see at the top of the page.
![[image: 10-16-10003.jpg]](http://i8.photobucket.com/albums/a49/SEBSPEED2003/1996%20VFR%201/10-16-10003.jpg)
With the freshly painted motor ready, and a spare swingarm that I sent out for powdercoat, I set about rearranging parts.
![[image: 10-22-10001.jpg]](http://i8.photobucket.com/albums/a49/SEBSPEED2003/1996%20VFR%201/10-22-10001.jpg)
![[image: 10-22-10004.jpg]](http://i8.photobucket.com/albums/a49/SEBSPEED2003/1996%20VFR%201/10-22-10004.jpg)
![[image: 10-23-10002.jpg]](http://i8.photobucket.com/albums/a49/SEBSPEED2003/1996%20VFR%201/10-23-10002.jpg)
![[image: 10-23-10004.jpg]](http://i8.photobucket.com/albums/a49/SEBSPEED2003/1996%20VFR%201/10-23-10004.jpg)
Another fork in the road... frame in hand, about to install on the freshly painted motor... leave it stock, or do something different with it?
Hmm...
Something different it is!!
![[image: 11-2-10002-1.jpg]](http://i8.photobucket.com/albums/a49/SEBSPEED2003/1996%20VFR%201/11-2-10002-1.jpg)
At this time I also had some neat ideas for the forks. Knowing they were super short, I rebuilt them with heavier springs for my weight, and lengthened them internally by about 1/2". I also rebuilt the compression shim stack to my liking, and prepped them for paint.
![[image: 10-25-10011.jpg]](http://i8.photobucket.com/albums/a49/SEBSPEED2003/1996%20VFR%201/10-25-10011.jpg)
![[image: messybench.jpg]](http://i8.photobucket.com/albums/a49/SEBSPEED2003/1996%20VFR%201/messybench.jpg)
While the carbs were still off, I opened them up to install new rubber and a Factory Pro jet kit.
![[image: 11-2-10006-1.jpg]](http://i8.photobucket.com/albums/a49/SEBSPEED2003/1996%20VFR%201/11-2-10006-1.jpg)
![[image: 10-20-10001.jpg]](http://i8.photobucket.com/albums/a49/SEBSPEED2003/1996%20VFR%201/10-20-10001.jpg)
I had a set of Vortex frame sliders kicking around from my CBR600, so I modified them to fit the VFR frame
![[image: 10-23-10008.jpg]](http://i8.photobucket.com/albums/a49/SEBSPEED2003/1996%20VFR%201/10-23-10008.jpg)
Tasty
![[image: 11-3-10007.jpg]](http://i8.photobucket.com/albums/a49/SEBSPEED2003/1996%20VFR%201/11-3-10007.jpg)
With visions of John Player Special livery dancing in my head, I set about dosing the CBR forks with some House of Kolors magic...
![[image: 11-2-10003-1.jpg]](http://i8.photobucket.com/albums/a49/SEBSPEED2003/1996%20VFR%201/11-2-10003-1.jpg)
![[image: goldforks1.jpg]](http://i8.photobucket.com/albums/a49/SEBSPEED2003/1996%20VFR%201/goldforks1.jpg)
![[image: 11-12-10002.jpg]](http://i8.photobucket.com/albums/a49/SEBSPEED2003/1996%20VFR%201/11-12-10002.jpg)
![[image: 47d55bae.jpg]](http://i8.photobucket.com/albums/a49/SEBSPEED2003/1996%20VFR%201/47d55bae.jpg)
Pagan Gold Kandy on the sliders, Orion silver on the bottoms. Custom decals by Throttlepimp (Kevin Sigler @ Switchblade Designs) - he is my go-to guy for custom graphics and he's been great for years!
Wheels were sent out to a V4bbs forum member who totally botched them, then they were re-done by a semi-local shop.
![[image: sfwheelsbare.jpg]](http://i8.photobucket.com/albums/a49/SEBSPEED2003/1996%20VFR%201/sfwheelsbare.jpg)
I attempted to wrap the tank with black fiberglass, but that was a miserable failure.
![[image: 11-27-10009.jpg]](http://i8.photobucket.com/albums/a49/SEBSPEED2003/1996%20VFR%201/11-27-10009.jpg)
Luckily, I was able to realize my error quickly, and peeled it back off before it really turned into a lot of work.
![[image: 11-30-10001.jpg]](http://i8.photobucket.com/albums/a49/SEBSPEED2003/1996%20VFR%201/11-30-10001.jpg)
A bit of reassembly to cheer me up
![[image: 12-04-10007.jpg]](http://i8.photobucket.com/albums/a49/SEBSPEED2003/1996%20VFR%201/12-04-10007.jpg)
![[image: 255b27ba.jpg]](http://i8.photobucket.com/albums/a49/SEBSPEED2003/1996%20VFR%201/255b27ba.jpg)
Rear down tubes were wrapped with black header wrap and stainless ties
![[image: 87a0a861.jpg]](http://i8.photobucket.com/albums/a49/SEBSPEED2003/1996%20VFR%201/87a0a861.jpg)
It took a bit of fanagling to get those tubes in place properly
![[image: f44d6694.jpg]](http://i8.photobucket.com/albums/a49/SEBSPEED2003/1996%20VFR%201/f44d6694.jpg)
Then this crazy idea happened... CRF250R exhaust can
![[image: 1ae906d5.jpg]](http://i8.photobucket.com/albums/a49/SEBSPEED2003/1996%20VFR%201/1ae906d5.jpg)
Then another (much more infamous) idea:
![[image: 2fb52e2b.jpg]](http://i8.photobucket.com/albums/a49/SEBSPEED2003/1996%20VFR%201/2fb52e2b.jpg)
Raw cover and primered tank:
![[image: 19ce0fe3.jpg]](http://i8.photobucket.com/albums/a49/SEBSPEED2003/1996%20VFR%201/19ce0fe3.jpg)
Made up some front brakes lines using Earl's hose and fittings. These were later replaced for cosmetic reasons, but they worked well.
![[image: 9c505af7.jpg]](http://i8.photobucket.com/albums/a49/SEBSPEED2003/1996%20VFR%201/9c505af7.jpg)
![[image: a592c3be.jpg]](http://i8.photobucket.com/albums/a49/SEBSPEED2003/1996%20VFR%201/a592c3be.jpg)
How I made the tiny exhaust fit the bike...
![[image: 5aa7292d.jpg]](http://i8.photobucket.com/albums/a49/SEBSPEED2003/1996%20VFR%201/5aa7292d.jpg)
![[image: 0739b25c.jpg]](http://i8.photobucket.com/albums/a49/SEBSPEED2003/1996%20VFR%201/0739b25c.jpg)
![[image: 627a4d6d.jpg]](http://i8.photobucket.com/albums/a49/SEBSPEED2003/1996%20VFR%201/627a4d6d.jpg)
![[image: 1e7d1de3.jpg]](http://i8.photobucket.com/albums/a49/SEBSPEED2003/1996%20VFR%201/1e7d1de3.jpg)
![[image: f7741fbf.jpg]](http://i8.photobucket.com/albums/a49/SEBSPEED2003/1996%20VFR%201/f7741fbf.jpg)
I opened the top of the can by chucking a mill cutter in my drill press... not the smartest thing, but it was kinda sorta necessary. It slipped out of my hand, and I had to touch up a few "chew" marks...
![[image: 3b51c40b.jpg]](http://i8.photobucket.com/albums/a49/SEBSPEED2003/1996%20VFR%201/3b51c40b.jpg)
![[image: beb3ce51.jpg]](http://i8.photobucket.com/albums/a49/SEBSPEED2003/1996%20VFR%201/beb3ce51.jpg)
Packed with ceramic blanket (thank you Travis!)
![[image: 94d33db4.jpg]](http://i8.photobucket.com/albums/a49/SEBSPEED2003/1996%20VFR%201/94d33db4.jpg)
I liked how the Honda dirt bike rear masters had integrated reservoirs, and I also didn't like the cost of billet parts... so I bought a CRF rear master, and reamed it out to fit the larger VFR brake piston parts. VFR is 1/2" vs CRF 3/8".
![[image: 86dcdb00.jpg]](http://i8.photobucket.com/albums/a49/SEBSPEED2003/1996%20VFR%201/86dcdb00.jpg)
![[image: 0db36e7b.jpg]](http://i8.photobucket.com/albums/a49/SEBSPEED2003/1996%20VFR%201/0db36e7b.jpg)
A little polish and paint, plus a pressure switch for the brake light, good to go.
![[image: f3130348.jpg]](http://i8.photobucket.com/albums/a49/SEBSPEED2003/1996%20VFR%201/f3130348.jpg)
Bar end mirrors needed solid mounts not provided by the dirt bike bar, so parts had to be made.
![[image: 831ee5fb.jpg]](http://i8.photobucket.com/albums/a49/SEBSPEED2003/1996%20VFR%201/831ee5fb.jpg)
They are retained with set screws hidden under the grips
![[image: 68b8f2f8.jpg]](http://i8.photobucket.com/albums/a49/SEBSPEED2003/1996%20VFR%201/68b8f2f8.jpg)
Use of the oil cooler mounted in a vertical position meant the fittings had to be reworked - more on this later
![[image: 66517b8e.jpg]](http://i8.photobucket.com/albums/a49/SEBSPEED2003/1996%20VFR%201/66517b8e.jpg)
The HRC 600RR quick turn throttle was coupled with a custom length throttle cable... and by custom, I mean that I cut a ST1100 cable to length, and soldered on a new brass end that I cut from a wood screw...
![[image: 7dbd10a6.jpg]](http://i8.photobucket.com/albums/a49/SEBSPEED2003/1996%20VFR%201/7dbd10a6.jpg)
I came across a build on customfighters.com where a member had used a KTM dirtbike headlight on a build. I really liked the look and shape of the light, I just had to have one and do my own take on it.
I started with the light, a sketch, and some cardboard, then replicated it in aluminum.
![[image: ce8ce291.jpg]](http://i8.photobucket.com/albums/a49/SEBSPEED2003/1996%20VFR%201/ce8ce291.jpg)
![[image: fd0f9459.jpg]](http://i8.photobucket.com/albums/a49/SEBSPEED2003/1996%20VFR%201/fd0f9459.jpg)
[image: IMG_4906_zps0dba47e0.jpg]
![[image: IMG_4906_zps0dba47e0.jpg]](http://i8.photobucket.com/albums/a49/SEBSPEED2003/1996%20VFR%201/IMG_4906_zps0dba47e0.jpg)
[image: IMG_4908_zps19479042.jpg]
![[image: IMG_4908_zps19479042.jpg]](http://i8.photobucket.com/albums/a49/SEBSPEED2003/1996%20VFR%201/IMG_4908_zps19479042.jpg)
![[image: 0d379eca.jpg]](http://i8.photobucket.com/albums/a49/SEBSPEED2003/1996%20VFR%201/0d379eca.jpg)
Around the same time, I found that I really preferred the shape of the 3rd gen 90-93 tank, the straight line vs the knee pocket really drew me in.
I think it transformed the entire build!
![[image: 93426fae.jpg]](http://i8.photobucket.com/albums/a49/SEBSPEED2003/1996%20VFR%201/93426fae.jpg)
Fitting the tank wasn't all peaches and cream, I had to cut the rear mount off and replace it with the mount from the 4th gen.
![[image: 4eeb799d.jpg]](http://i8.photobucket.com/albums/a49/SEBSPEED2003/1996%20VFR%201/4eeb799d.jpg)
![[image: ebec68af.jpg]](http://i8.photobucket.com/albums/a49/SEBSPEED2003/1996%20VFR%201/ebec68af.jpg)
![[image: 20150527_132240_zpsu5yk9x3y.jpg]](http://i8.photobucket.com/albums/a49/SEBSPEED2003/20150527_132240_zpsu5yk9x3y.jpg)
![[image: 8BBE6DF2-4A5D-45F2-870F-D78E3189023F-184]](http://i8.photobucket.com/albums/a49/SEBSPEED2003/1996%20VFR%201/8BBE6DF2-4A5D-45F2-870F-D78E3189023F-1841-00000215D54F1977_zps461369a2.jpg)
![[image: 74881BE1-9B24-4999-AC14-79D6FE3B21CE-374]](http://i8.photobucket.com/albums/a49/SEBSPEED2003/1996%20VFR%201/74881BE1-9B24-4999-AC14-79D6FE3B21CE-3746-00000499B7704F31_zps88586d51.jpg)
![[image: D84E950F-20ED-401B-B2C9-423E0C4D614E-374]](http://i8.photobucket.com/albums/a49/SEBSPEED2003/1996%20VFR%201/D84E950F-20ED-401B-B2C9-423E0C4D614E-3746-00000499AD01E44E_zpsa9134693.jpg)
![[image: 3D9B5FA4-D908-453A-B908-83FC59B1E4A8-374]](http://i8.photobucket.com/albums/a49/SEBSPEED2003/1996%20VFR%201/3D9B5FA4-D908-453A-B908-83FC59B1E4A8-3746-000004999F756A43_zps8463420c.jpg)
![[image: IMG_4909_zpsd64c9a06.jpg]](http://i8.photobucket.com/albums/a49/SEBSPEED2003/1996%20VFR%201/IMG_4909_zpsd64c9a06.jpg)
![[image: CA649CB2-47EF-4D7F-B6F4-E8F2F1BB6B42-645]](http://i8.photobucket.com/albums/a49/SEBSPEED2003/1996%20VFR%201/CA649CB2-47EF-4D7F-B6F4-E8F2F1BB6B42-6459-000008D7E6ECD29C_zps0ea0b568.jpg)
![[image: 662C1803-1DA3-4302-AE8B-869877F15498-645]](http://i8.photobucket.com/albums/a49/SEBSPEED2003/1996%20VFR%201/662C1803-1DA3-4302-AE8B-869877F15498-6459-000008D7EEC66DAF_zpsce49016a.jpg)
![[image: 2d0b17c3.jpg]](http://i8.photobucket.com/albums/a49/SEBSPEED2003/1996%20VFR%201/2d0b17c3.jpg)
![[image: 8858D9F9-6E72-484D-BEE5-0059C191E137-394]](http://i8.photobucket.com/albums/a49/SEBSPEED2003/1996%20VFR%201/8858D9F9-6E72-484D-BEE5-0059C191E137-3947-000005FFB03AC749_zps4a46f541.jpg)
![[image: 98A90D25-6A89-4F15-ADDD-3A4E78F0AB73-394]](http://i8.photobucket.com/albums/a49/SEBSPEED2003/1996%20VFR%201/98A90D25-6A89-4F15-ADDD-3A4E78F0AB73-3947-000005FF9E65CC3A_zps72f64d57.jpg)
![[image: 1C2B3475-703D-42FD-A999-0776B1AA1942-394]](http://i8.photobucket.com/albums/a49/SEBSPEED2003/1996%20VFR%201/1C2B3475-703D-42FD-A999-0776B1AA1942-3947-000005FF977DF7E5_zps860c57a1.jpg)
![[image: BC8813E3-8A3D-49A9-B989-7303627352EA-394]](http://i8.photobucket.com/albums/a49/SEBSPEED2003/1996%20VFR%201/BC8813E3-8A3D-49A9-B989-7303627352EA-3947-000005FF90B1C89C_zps76762f8e.jpg)
![[image: A4AF3B09-6360-4F82-A43F-4E071FC8CED4-482]](http://i8.photobucket.com/albums/a49/SEBSPEED2003/1996%20VFR%201/A4AF3B09-6360-4F82-A43F-4E071FC8CED4-4828-0000075E582F28CC_zpscfa79d93.jpg)
![[image: 19DAD6C1-4136-4F5A-8336-843E1896373A-394]](http://i8.photobucket.com/albums/a49/SEBSPEED2003/1996%20VFR%201/19DAD6C1-4136-4F5A-8336-843E1896373A-3947-0000060012ACDF04_zpsf23ff3d1.jpg)
![[image: 5C0065CB-E7F6-4343-B569-A63FE9092865-394]](http://i8.photobucket.com/albums/a49/SEBSPEED2003/1996%20VFR%201/5C0065CB-E7F6-4343-B569-A63FE9092865-3947-000006002E1C396E_zps29f96e20.jpg)
![[image: 7292E0E9-2514-47D3-AFF9-4BFDD0EB77D9-394]](http://i8.photobucket.com/albums/a49/SEBSPEED2003/1996%20VFR%201/7292E0E9-2514-47D3-AFF9-4BFDD0EB77D9-3947-000006004722502B_zpsd19ebef7.jpg)
![[image: 70AFE2F1-F553-452B-B44F-1E1A58DB0E67-159]](http://i8.photobucket.com/albums/a49/SEBSPEED2003/1996%20VFR%201/70AFE2F1-F553-452B-B44F-1E1A58DB0E67-1591-000002A990E343AC_zps16725822.jpg)
![[image: 9DC3E5AD-05F7-4EBF-B097-E775A8BADB68-344]](http://i8.photobucket.com/albums/a49/SEBSPEED2003/1996%20VFR%201/9DC3E5AD-05F7-4EBF-B097-E775A8BADB68-3449-000005CB427B55FA_zpsb84b24ca.jpg)
![[image: IMG_6072_zps848c5797.jpg]](http://i8.photobucket.com/albums/a49/SEBSPEED2003/1996%20VFR%201/Seat/IMG_6072_zps848c5797.jpg)
![[image: IMG_6073_zps8735da6c.jpg]](http://i8.photobucket.com/albums/a49/SEBSPEED2003/1996%20VFR%201/Seat/IMG_6073_zps8735da6c.jpg)
![[image: IMG_6077_zpsb88c72ac.jpg]](http://i8.photobucket.com/albums/a49/SEBSPEED2003/1996%20VFR%201/Seat/IMG_6077_zpsb88c72ac.jpg)
![[image: IMG_6083_zpse747f4be.jpg]](http://i8.photobucket.com/albums/a49/SEBSPEED2003/1996%20VFR%201/Seat/IMG_6083_zpse747f4be.jpg)
![[image: IMG_6084_zps83456600.jpg]](http://i8.photobucket.com/albums/a49/SEBSPEED2003/1996%20VFR%201/Seat/IMG_6084_zps83456600.jpg)
![[image: IMG_6088_zps1e0ae933.jpg]](http://i8.photobucket.com/albums/a49/SEBSPEED2003/1996%20VFR%201/Seat/IMG_6088_zps1e0ae933.jpg)
![[image: IMG_6089_zpsc73a6c71.jpg]](http://i8.photobucket.com/albums/a49/SEBSPEED2003/1996%20VFR%201/Seat/IMG_6089_zpsc73a6c71.jpg)
![[image: IMG_6091_zps2599db23.jpg]](http://i8.photobucket.com/albums/a49/SEBSPEED2003/1996%20VFR%201/Seat/IMG_6091_zps2599db23.jpg)
![[image: IMG_6094_zpsf1cd4dbc.jpg]](http://i8.photobucket.com/albums/a49/SEBSPEED2003/1996%20VFR%201/Seat/IMG_6094_zpsf1cd4dbc.jpg)
![[image: 5772CE6B-C6A5-4ABD-BE84-CB7B40B74FFB-717]](http://i8.photobucket.com/albums/a49/SEBSPEED2003/1996%20VFR%201/Seat/5772CE6B-C6A5-4ABD-BE84-CB7B40B74FFB-7170-00000C895943BA73_zps942e28c8.jpg)
![[image: B1FED335-DD6F-4A0E-BB5D-D205292A2F2F-717]](http://i8.photobucket.com/albums/a49/SEBSPEED2003/1996%20VFR%201/Seat/B1FED335-DD6F-4A0E-BB5D-D205292A2F2F-7170-00000C895174E99F_zpsa2239403.jpg)
![[image: P2050003_zps6760d898.jpg]](http://i8.photobucket.com/albums/a49/SEBSPEED2003/1996%20VFR%201/Seat/P2050003_zps6760d898.jpg)
![[image: P2060003_zpseda0c9b8.jpg]](http://i8.photobucket.com/albums/a49/SEBSPEED2003/1996%20VFR%201/Seat/P2060003_zpseda0c9b8.jpg)
![[image: P2100001_zpsc72a5537.jpg]](http://i8.photobucket.com/albums/a49/SEBSPEED2003/1996%20VFR%201/Seat/P2100001_zpsc72a5537.jpg)
![[image: 3B8353BC-4424-470A-8337-4AA6B3420EA1-482]](http://i8.photobucket.com/albums/a49/SEBSPEED2003/1996%20VFR%201/3B8353BC-4424-470A-8337-4AA6B3420EA1-4828-0000075E795067B4_zpsf99013e8.jpg)
![[image: 3EEC9D0F-8388-40D0-887D-F4AF4E34BE78-482]](http://i8.photobucket.com/albums/a49/SEBSPEED2003/1996%20VFR%201/3EEC9D0F-8388-40D0-887D-F4AF4E34BE78-4828-0000075E71778F0B_zps562e281e.jpg)
![[image: 641736DD-7285-462B-9424-3DDF239B890C-604]](http://i8.photobucket.com/albums/a49/SEBSPEED2003/1996%20VFR%201/641736DD-7285-462B-9424-3DDF239B890C-6044-00000ACFF481A8FD_zps7988a563.jpg)
![[image: 5144C3AF-B79E-4429-A024-4B00F1F9ECA6-563]](http://i8.photobucket.com/albums/a49/SEBSPEED2003/1996%20VFR%201/5144C3AF-B79E-4429-A024-4B00F1F9ECA6-5632-000008D0B38B8C82_zps4c4bb5f5.jpg)
![[image: 63663232-3F17-40A9-AB1C-50A087F483D2-563]](http://i8.photobucket.com/albums/a49/SEBSPEED2003/1996%20VFR%201/63663232-3F17-40A9-AB1C-50A087F483D2-5632-000008D0D1FF2966_zps37a53ee2.jpg)
![[image: DDA2F420-31F7-40FA-A18C-CF238B5EC5C5-563]](http://i8.photobucket.com/albums/a49/SEBSPEED2003/1996%20VFR%201/DDA2F420-31F7-40FA-A18C-CF238B5EC5C5-5632-000008D0BA87845F_zpsd655a3c3.jpg)
![[image: 3FFDF435-C763-46BC-84FA-C1087BBD7907-463]](http://i8.photobucket.com/albums/a49/SEBSPEED2003/1996%20VFR%201/3FFDF435-C763-46BC-84FA-C1087BBD7907-4637-0000088D2E9140E7_zpsadadeff8.jpg)
![[image: 7C041DBF-118A-4ACB-AE1A-BC61E3950B85-463]](http://i8.photobucket.com/albums/a49/SEBSPEED2003/1996%20VFR%201/7C041DBF-118A-4ACB-AE1A-BC61E3950B85-4637-0000088D3B8F23F9_zps4cc2dd3f.jpg)
![[image: 4659F8D4-E317-42BB-A0F6-40A22E037F10-819]](http://i8.photobucket.com/albums/a49/SEBSPEED2003/1996%20VFR%201/4659F8D4-E317-42BB-A0F6-40A22E037F10-8195-00000CCB044D0269_zpse0800f9a.jpg)
![[image: 10A586C9-D050-49CC-94C5-83E0221A23B9-164]](http://i8.photobucket.com/albums/a49/SEBSPEED2003/1996%20VFR%201/10A586C9-D050-49CC-94C5-83E0221A23B9-164-00000033025B1A57_zpse1692411.jpg)
![[image: E259A74C-26B1-4C39-9E8E-3B5A5EBADE91-819]](http://i8.photobucket.com/albums/a49/SEBSPEED2003/1996%20VFR%201/E259A74C-26B1-4C39-9E8E-3B5A5EBADE91-8195-00000D63528C4FCC_zps34ae3615.jpg)
![[image: 46AD9FF5-A3D9-4381-AEBB-5C6957A322B5-111]](http://i8.photobucket.com/albums/a49/SEBSPEED2003/1996%20VFR%201/46AD9FF5-A3D9-4381-AEBB-5C6957A322B5-1117-0000016F7893E184_zps4798069f.jpg)
![[image: B4EB1124-29F3-4729-9B62-CE2AF440D950-578]](http://i8.photobucket.com/albums/a49/SEBSPEED2003/1996%20VFR%201/B4EB1124-29F3-4729-9B62-CE2AF440D950-5782-000008395BC2EE3F_zpsc63799b2.jpg)
![[image: 90343E5D-016A-44DD-8183-3B00C6B35F8C-578]](http://i8.photobucket.com/albums/a49/SEBSPEED2003/1996%20VFR%201/90343E5D-016A-44DD-8183-3B00C6B35F8C-5782-00000839620430AD_zps8a111e32.jpg)
![[image: 6D09E012-2C2A-4F1E-BC87-36AFF116153D-111]](http://i8.photobucket.com/albums/a49/SEBSPEED2003/1996%20VFR%201/6D09E012-2C2A-4F1E-BC87-36AFF116153D-111-0000002468DCBF7C_zps42f1e257.jpg)
![[image: E2DF634B-F431-4935-A1EA-564C3B8D63B7-111]](http://i8.photobucket.com/albums/a49/SEBSPEED2003/1996%20VFR%201/E2DF634B-F431-4935-A1EA-564C3B8D63B7-111-0000002476F7C01D_zps92f8243d.jpg)
![[image: CD9DEB00-FC6D-487D-9E10-31C8E8AF1BEF-111]](http://i8.photobucket.com/albums/a49/SEBSPEED2003/1996%20VFR%201/CD9DEB00-FC6D-487D-9E10-31C8E8AF1BEF-111-000000246FF23C1A_zps0b06ad95.jpg)
![[image: 58342ACA-32E4-4C82-93CF-B205D4E2C4AC-111]](http://i8.photobucket.com/albums/a49/SEBSPEED2003/1996%20VFR%201/58342ACA-32E4-4C82-93CF-B205D4E2C4AC-111-000000247D632225_zpsa82a6361.jpg)
![[image: 84FDEB4D-027E-41C9-BD57-DE9C5078DB86-324]](http://i8.photobucket.com/albums/a49/SEBSPEED2003/1996%20VFR%201/84FDEB4D-027E-41C9-BD57-DE9C5078DB86-3248-000004AB6CE92A71_zps96a9b235.jpg)
![[image: E65F370A-83F0-4CAE-86B4-5AD2A085C5C1-324]](http://i8.photobucket.com/albums/a49/SEBSPEED2003/1996%20VFR%201/E65F370A-83F0-4CAE-86B4-5AD2A085C5C1-3248-000004AB60D806C0_zps9f12ef46.jpg)
![[image: C4E12ACA-9BC4-4119-8477-A2D37B05092F-324]](http://i8.photobucket.com/albums/a49/SEBSPEED2003/1996%20VFR%201/C4E12ACA-9BC4-4119-8477-A2D37B05092F-3248-000004AB79723C05_zps692486b7.jpg)
![[image: 32832DF7-4131-4064-9B0A-C85E7C36D541-578]](http://i8.photobucket.com/albums/a49/SEBSPEED2003/1996%20VFR%201/32832DF7-4131-4064-9B0A-C85E7C36D541-5782-000007F32B4AB816_zps9b192a72.jpg)
![[image: 71D2E68C-9504-47D5-BBCC-B859E5499B30-578]](http://i8.photobucket.com/albums/a49/SEBSPEED2003/1996%20VFR%201/71D2E68C-9504-47D5-BBCC-B859E5499B30-5782-000007F3226456C8_zps4f5f3c7d.jpg)
![[image: 340BB5EB-46FE-447D-8423-445019438079-578]](http://i8.photobucket.com/albums/a49/SEBSPEED2003/1996%20VFR%201/340BB5EB-46FE-447D-8423-445019438079-5782-000007F331ACE853_zpsfc301153.jpg)
![[image: 589E8909-0911-46B2-85FF-10E914BBA0B9-205]](http://i8.photobucket.com/albums/a49/SEBSPEED2003/1996%20VFR%201/589E8909-0911-46B2-85FF-10E914BBA0B9-2052-000002E72FED9E49_zpsfb841c63.jpg)
![[image: 165F1010-69DE-4FDB-90FD-C0AE72BC6F51-205]](http://i8.photobucket.com/albums/a49/SEBSPEED2003/1996%20VFR%201/165F1010-69DE-4FDB-90FD-C0AE72BC6F51-2052-000002E738BD6D2E_zpsecd277e2.jpg)
![[image: 55AC5870-2FB5-4382-AB31-C3ECF2338900-205]](http://i8.photobucket.com/albums/a49/SEBSPEED2003/1996%20VFR%201/55AC5870-2FB5-4382-AB31-C3ECF2338900-2052-000002E73E6120DD_zps2985a7af.jpg)
![[image: 45DA3341-1C4D-432E-9FBA-149C26957952-205]](http://i8.photobucket.com/albums/a49/SEBSPEED2003/1996%20VFR%201/45DA3341-1C4D-432E-9FBA-149C26957952-2052-000002E7444F49D4_zpsbcfe4667.jpg)
![[image: 463A9AD6-1AE0-4A9E-A442-95A9007FD50A-227]](http://i8.photobucket.com/albums/a49/SEBSPEED2003/1996%20VFR%201/463A9AD6-1AE0-4A9E-A442-95A9007FD50A-2277-0000034E49BF1AB0_zps069d8460.jpg)
![[image: 6C07BE33-EC49-4E26-860E-9F630CB84D80-160]](http://i8.photobucket.com/albums/a49/SEBSPEED2003/1996%20VFR%201/6C07BE33-EC49-4E26-860E-9F630CB84D80-1607-0000017C20281D50_zps7bde4a1b.jpg)
![[image: BB4D5FD8-B190-4CC3-9C5C-D2A3F3CD9409-160]](http://i8.photobucket.com/albums/a49/SEBSPEED2003/1996%20VFR%201/BB4D5FD8-B190-4CC3-9C5C-D2A3F3CD9409-1607-0000017CD3FBE0C2_zps5338bbb1.jpg)
![[image: B5CCAD2B-11B2-4D66-B507-FD9D3D5564DB-934]](http://i8.photobucket.com/albums/a49/SEBSPEED2003/1996%20VFR%201/B5CCAD2B-11B2-4D66-B507-FD9D3D5564DB-9349-00000BB0B4EAD3C7_zps3f503bf9.jpg)
![[image: 554F0F6E-DD76-42C9-839C-D7757380150C-934]](http://i8.photobucket.com/albums/a49/SEBSPEED2003/1996%20VFR%201/554F0F6E-DD76-42C9-839C-D7757380150C-9349-00000BB0A833C3CE_zps17001175.jpg)
![[image: B0B28C91-B605-40D7-BF92-DC0A8C7C1FD5-530]](http://i8.photobucket.com/albums/a49/SEBSPEED2003/1996%20VFR%201/B0B28C91-B605-40D7-BF92-DC0A8C7C1FD5-530-0000009D29DB18CE_zps026b917f.jpg)
![[image: 6AF84ACB-104E-4A22-91DF-F8BA2450BE9F-214]](http://i8.photobucket.com/albums/a49/SEBSPEED2003/1996%20VFR%201/6AF84ACB-104E-4A22-91DF-F8BA2450BE9F-2149-00000276FBA78A44_zps7f76841a.jpg)
![[image: F44997B6-42D3-40E4-964F-F6052768776C-168]](http://i8.photobucket.com/albums/a49/SEBSPEED2003/1996%20VFR%201/F44997B6-42D3-40E4-964F-F6052768776C-1686-000002652D6886E3_zpsce67d9e0.jpg)
![[image: EDE114F3-4473-44A1-B59D-3EAEDAD5462D-463]](http://i8.photobucket.com/albums/a49/SEBSPEED2003/1996%20VFR%201/EDE114F3-4473-44A1-B59D-3EAEDAD5462D-4637-0000088D47C628ED_zpsc3b64d18.jpg)
![[image: 20140522_182433_zpshrl647sk.jpg]](http://i8.photobucket.com/albums/a49/SEBSPEED2003/1996%20VFR%201/20140522_182433_zpshrl647sk.jpg)
![[image: 20140522_191819_zpspl0zczcn.jpg]](http://i8.photobucket.com/albums/a49/SEBSPEED2003/1996%20VFR%201/20140522_191819_zpspl0zczcn.jpg)
![[image: 20140522_204545_zpswepkmmra.jpg]](http://i8.photobucket.com/albums/a49/SEBSPEED2003/1996%20VFR%201/20140522_204545_zpswepkmmra.jpg)
![[image: 20140523_101045_zps9d8x2dl6.jpg]](http://i8.photobucket.com/albums/a49/SEBSPEED2003/1996%20VFR%201/20140523_101045_zps9d8x2dl6.jpg)
![[image: FB_IMG_14038994425395055_zps3bsrjkph.jpg]](http://i8.photobucket.com/albums/a49/SEBSPEED2003/1996%20VFR%201/FB_IMG_14038994425395055_zps3bsrjkph.jpg)
![[image: 20140708_184601_zpsmw256hme.jpg]](http://i8.photobucket.com/albums/a49/SEBSPEED2003/1996%20VFR%201/20140708_184601_zpsmw256hme.jpg)
![[image: 20140708_191756_zpsba1wiytm.jpg]](http://i8.photobucket.com/albums/a49/SEBSPEED2003/1996%20VFR%201/20140708_191756_zpsba1wiytm.jpg)
![[image: 20140708_191826_zpsnwvawx9r.jpg]](http://i8.photobucket.com/albums/a49/SEBSPEED2003/1996%20VFR%201/20140708_191826_zpsnwvawx9r.jpg)
![[image: 20140708_193217_zpsmwqv32uy.jpg]](http://i8.photobucket.com/albums/a49/SEBSPEED2003/1996%20VFR%201/20140708_193217_zpsmwqv32uy.jpg)
![[image: 20140708_195940_zpsmqzvttki.jpg]](http://i8.photobucket.com/albums/a49/SEBSPEED2003/1996%20VFR%201/20140708_195940_zpsmqzvttki.jpg)