VFRDiscussion ARCHIVE / READ-ONLYREAD-ONLY

Buell Footpegs Modification

37 posts Started 2 Mar 2006 Last recovered post 26 Jan 2009 Wayback Machine snapshot 18 Aug 2025

#1

gallery_4208_389_217810.jpg

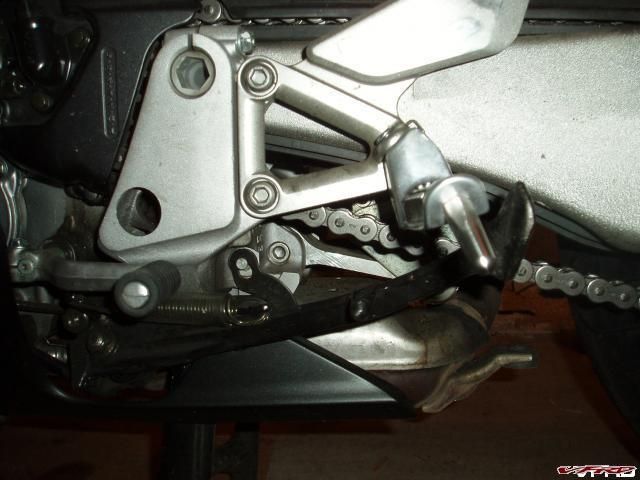
After doing some research, I decided to add some Buell footpegs to my 2002 VFR. After installing the pegs, my first impressions were very good. I can definitely feel a difference in my knees and the bike's overall feel seems less aggressive. I'm very happy with my choice. The Buell pegs are about an inch lower than stock.

If you've been thinking about adding Buell footpegs but you can't decide to take the plunge, hopefully this little write-up will help you out. I know I was hesitant to buy the pegs because I wasn't sure what needed to be done to make the Buell footpegs fit. And to make things more difficult, nobody's posted any pictures yet of how to install the footpegs. Well, let's see if we can do something about that. :D

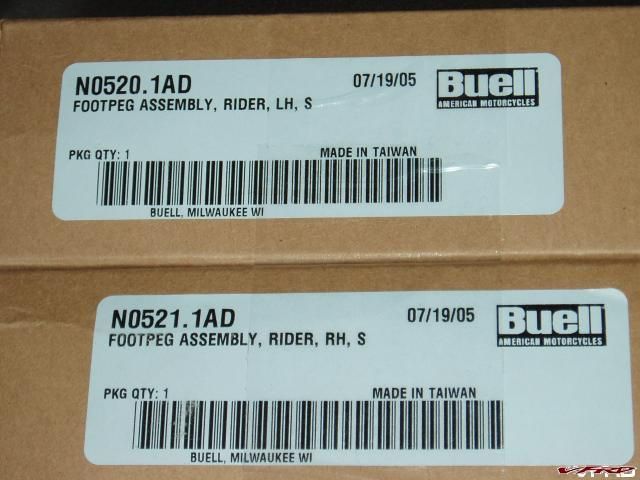
I believe the footpegs I used are for the Buell XB9S. The part numbers are N0520.1AD and N0521.1AD. The total cost was about $34 or so.

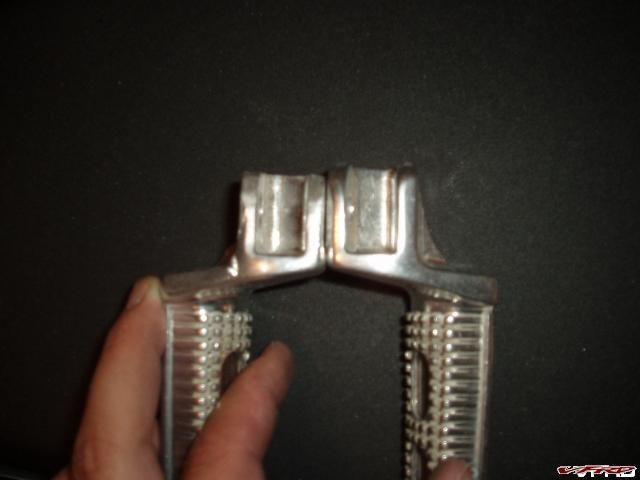
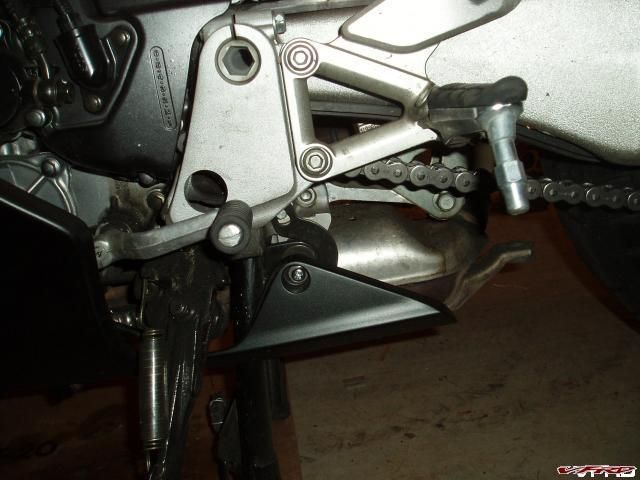
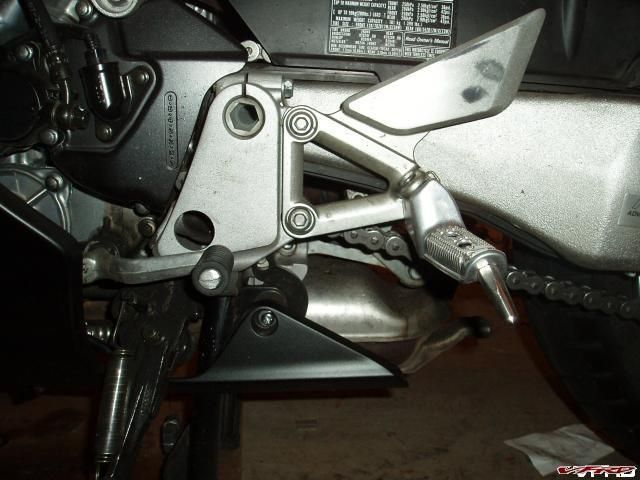
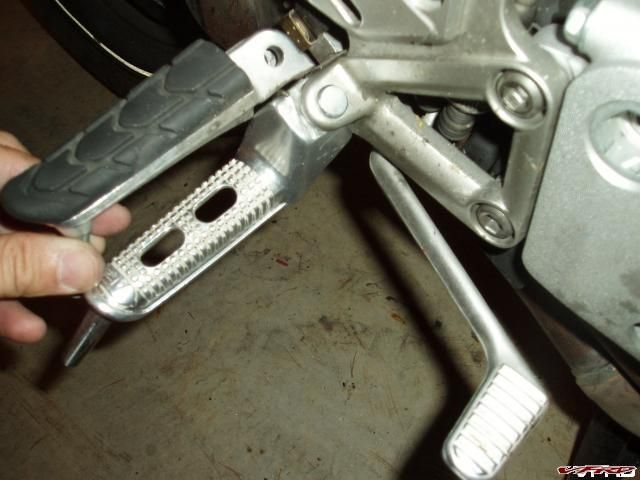
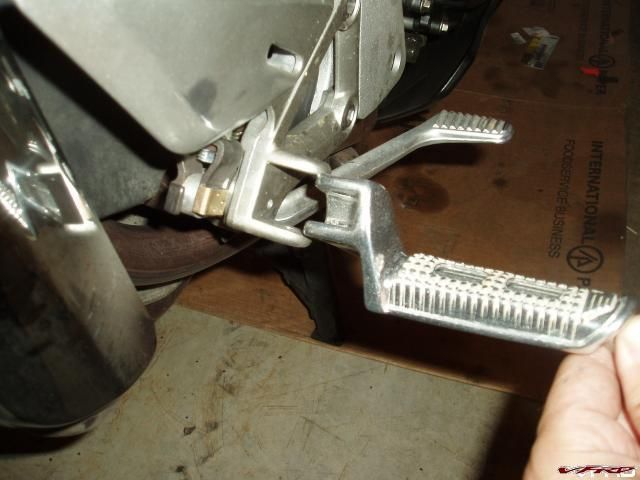
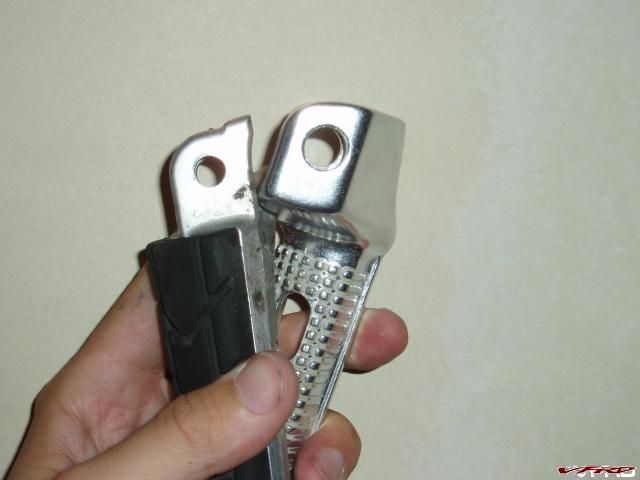
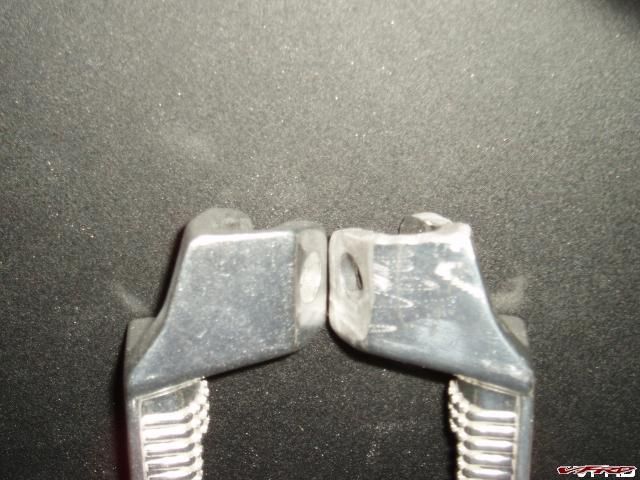
Now, the pegs are not a? perfect fit. As you can see in the first picture, they are shaped differently.
gallery_4208_389_67760.jpg

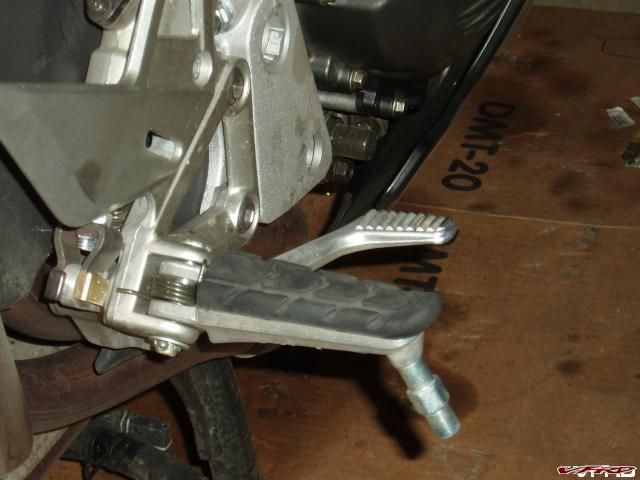
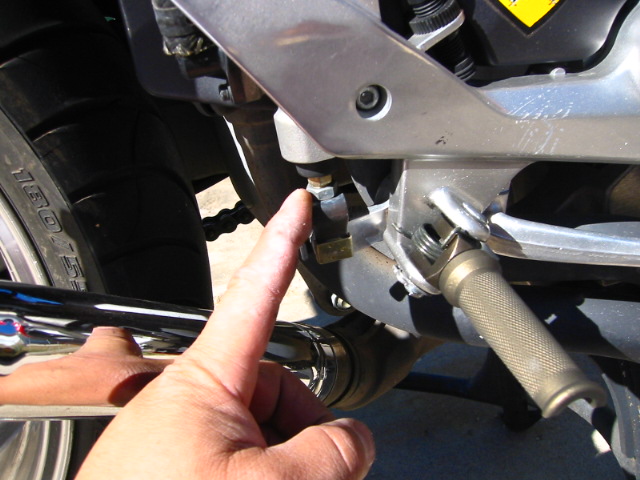
Also, you'll notice that the pegs are too tall.

gallery_4208_389_217810.jpg

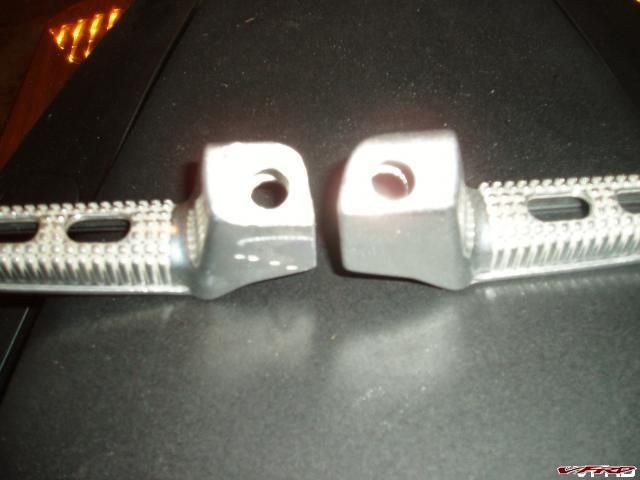
The solution: grind the excess away! You can use a Dremel, but would take quite a bit of time (3 grinding bits and 3 hours to be exact). You could probably also use a regular file to shave down the pegs too (might be even faster than the Dremal actually. Of course, if you have a real grinder, this should only take a few minutes.
gallery_4208_389_233664.jpg

gallery_4208_389_290950.jpg

gallery_4208_389_143102.jpg

Now, the stock bolts and mounting holes are 8mm. The Buell footpegs holes are 7/16 (You can see the difference in the first picture). So, you'll need to find some bushings/sleeves to fill in the gap. You have a few different options here. The easiest way would probably be to find a bushing with a 8mm inside diameter and, using power drill increase the diameter of the Buell footget to fit the bushing. Here are some before and after pictures:
gallery_4208_389_240098.jpg

Right Peg Before.JPG

gallery_4208_389_5984.jpeg

Right Peg After.JPEG

gallery_4208_389_180480.jpg

Left Peg Before.JPG

gallery_4208_389_44301.jpg

Left Peg After.JPG

gallery_4208_389_713807.jpg

Left Peg 2 Before.JPG

gallery_4208_389_340719.jpg

Left Peg 2 After.JPG

gallery_4208_389_600797.jpg

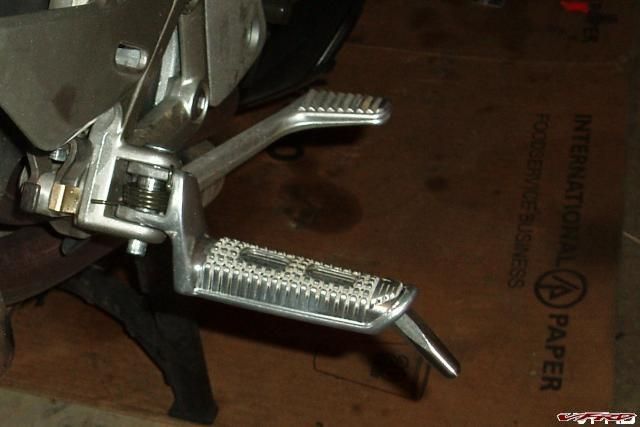
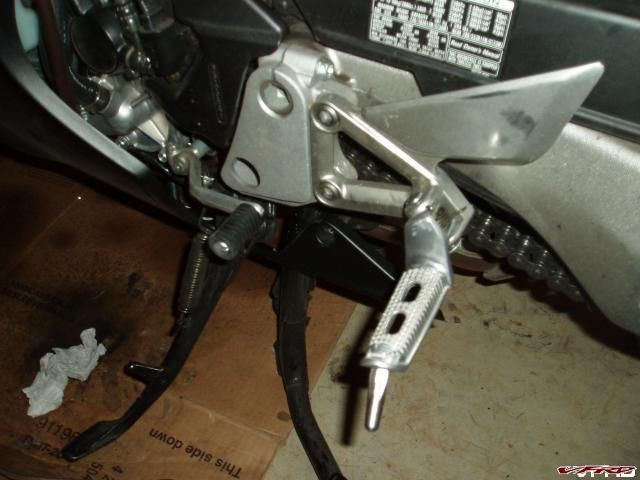
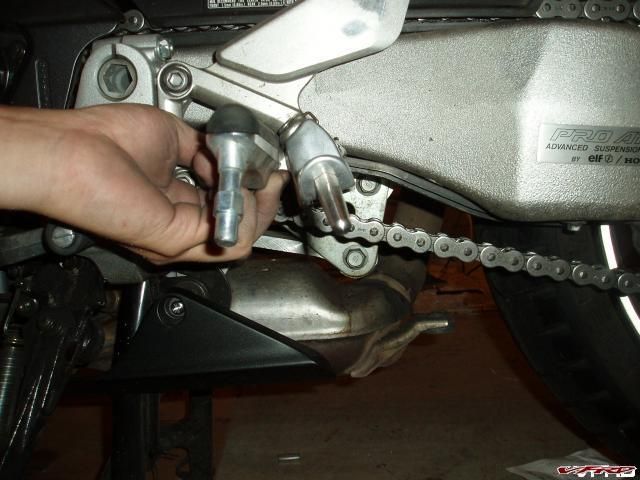
The Buell footpegs sit about an inch lower. As you can see in the next picture, the feelers on the Buell footpeg and VFR footpeg extended down to roughly the same height. Since I don't grind my pegs when I ride (I usually lean off the bike when I go around corners), I shouldn't have any ground clearance problems at all.
gallery_4208_389_8542.jpg

All that's left to do now is adjust the shifter and brake lever and we're ready to ride. The shifter is super easy to adjust. The brake lever is another matter. Since I'm not exactly sure how to adjust the brake lever and it looks like it could be messy, I left the brake lever alone (for now). Otherwise, this mod was pretty simple and straightfoward. Just be patient when grinding down the pegs, and everything should be fine. It took me about 6 hours total to install the new footpegs (using a Dremal), so it's quite possible it'll take you less time.? :P

As others noted in the original thread, a grinder or file is the best way to go. I used a Dremal and it took me hours to grind away enough metal. Others used a grinder or file and managed to grind down the pegs in only a few minutes.

Edited March 15, 2007 by MFP-2241
#2
MFP-2241 @ Sep 26 2005Here how to adjust the brake:

gallery_4208_389_144263.jpg border='0' alt='user posted image' />
Brake Lever Adjustment

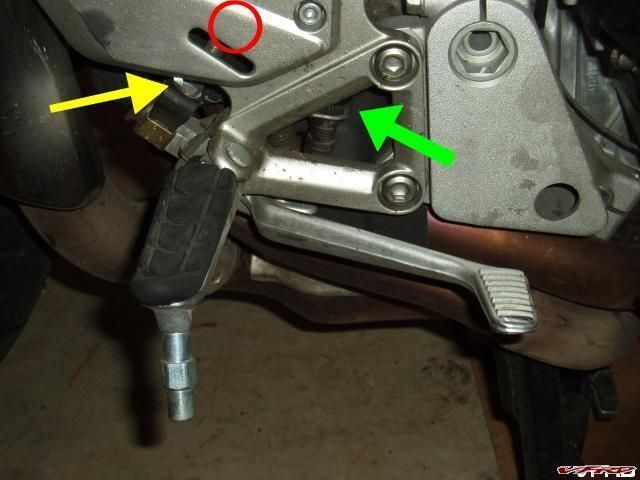
First, loosen the nut that the yellow arrow is pointing at. Then, adjust the brake lever by turning the nut that is behind the foot guide plate where the red circle is drawn. This will move adjust the lever up or down. When you're done, tighten the bottom nut (yellow arrow) back down. The green arrow points to the brake light switch adjustment dial. Because you're moving the brake lever down, the brake light will constantly be on unless the engagement point is change.

Hope this helps. I believe the bottom nut is 12mm and the top nut is 10mm.

#3
gmtech94 @ Sep 29 2005Are these part numbers correct I ordered a set from our local dealer in Canada and they came up as a straight peg not even close to what I want. Thanks in advance fro the info.

Here are the boxes my Buell pegs came in:

gallery_4208_389_151911.jpg

Part Numbers.JPG

As you can see, the part numbers are N0520.1AD and N0521.1AD. I'm thinking the dealership you went to gave you the wrong parts, or there was a mix up somewhere and the wrong pegs got put into the wrong box.

Here's where I found the part numbers for the XB9 footpegs:

http://www.suzukihayabusa.org/phpbb/viewtopic.php?t=26913

Edited August 8, 2006 by MFP-2241
#4
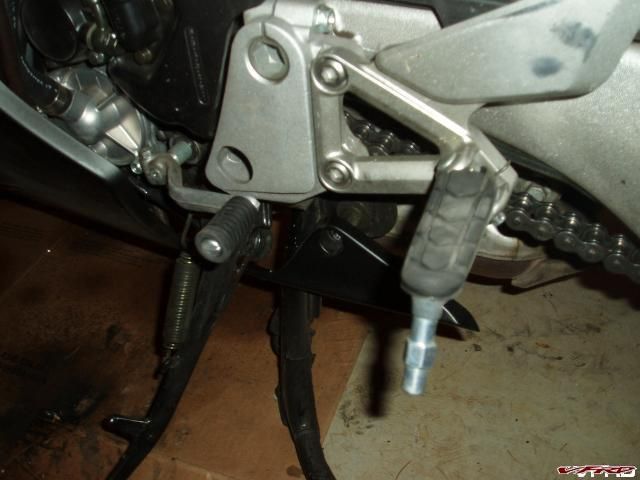
Lobster @ Sep 25 2005I may be doing this over the winter.? I was out cleaning the bike today and noticed that dropping the left footpeg ~1 inch might cause some interference with the sidestand.? Would you please comment on this?? Maybe the angle of the new peg still allows clearance?

Thanks.

gallery_4208_389_1948.jpg

Kickstand Clearance.JPG

There really isn't any clearance issues that you need to worry about, unless you're using a kickstand that's shorter than stock.

Edited August 8, 2006 by MFP-2241
#5
Lobster @ Oct 21 2005MFP,

Again, great write up. I just got finished with the mod and thought I would share a few comments. Please don't take this as a thread jack.

The part numbers you specified were spot on.

I was most concerned about the bushings, so I made my own. I got some 7/16" drill stock and drilled out the center to make the bushings. It was a little tricky, and my holes aren't perfectly centered, but they're pretty darn close (what can I say...I'm a wood worker not a machinist). I marked the center of the piece to be drilled with a centering tool and an awl. I then drilled out a 7/32" hole and then went back through with a 5/16" hole. The 8mm peg fit through the 5/16" hole so I didn't even need the 8mm drill I bought. The holes on the Buell pegs needed to be drilled with a 7/16" drill to allow the drill stock to fit properly.

Once I made the bushings, I held them in the Buell pegs as I sanded them to shape to fit in the stock location (one in the picture hasn't been sanded yet...that is why it's longer). I just used a cheap belt / disc sander combination to do all the shaping. A few sanding / shaping iterations for each peg and I was done. It feels very solid with the steel bushings.

Follow MFP's adive for adjusting the pegs. It was also spot on.

The drill stock is cheap, and I have a bunch left over. (I bought about 3 ft and used about 4 inches.) PM me if anyone wants me to send them a piece, although buying your own from a local store may be cheaper than paying shipping.

#6

Thanks for reposting this MFP. It'll certainly be a big help to some riders considering this mod. Excellent pics and descriptions BTW. :thumbsup:

Me, I'll be holding out for the Larryco lowering blocks. Then I can retain my '86 VFR footpegs which actually came off MY old '86.

I miss that bike, but at least I still have two parts off it.

#7

I ordered a set of Buell pegs to try on my bike and at only $16 each retail it's a very cheap way to try out lower pegs.

Thanks for the idea and post. :beer:

#8
MFP-2241Here are the boxes my Buell pegs came in:

gallery_4208_389_151911.jpg border='0' alt='user posted image' />

Part Numbers.JPG

Hehe, American motorcycles, japanese motorcycles, all made in Taiwan!!

(american components, russian components, ALL MADE IN TAIWAN!!)

What movie was it? :beer:

#9

For those that want to know, this mod has been done on just about every modern sport bike. I first read about it on the ZX12 forum several years ago. Most bikes need some work to adapt. How many mods cost less than $50?

#10

ive thought about this mod. but with my long legs my toes point down while on the pegs. i have the rear brake already as low as it will go. an inch lower peg and the rear brake will be unuseable for me. anyone know a work around to get me longer adjustment?

#11
767fixerive thought about this mod.  but with my long legs my toes point down while on the pegs.  i have the rear brake already as low as it will go.  an inch lower peg and the rear brake will be unuseable for me.  anyone know a work around to get me longer adjustment?

Remove one of the lock nuts on the adjuster, thats another 3/4 inch of adjustment to work with, it will be tight up against the post anyway with it out all the way.

peg04.jpg border='0' alt='user posted image' />

I removed this nut for a bit more adjustment.

#12
HispanicSlammerRemove one of the lock nuts on the adjuster, thats another 3/4 inch of adjustment to work with, it will be tight up against the post anyway with it out all the way.

peg04.jpg border='0' alt='user posted image' />

I removed this nut for a bit more adjustment.

<{POST_SNAPBACK}>

damn....never thought of that......thanks :beer:

but will i have enough brake light adjustment?

#13
SEBSPEEDHehe,  American motorcycles, japanese motorcycles, all made in Taiwan!!

(american components, russian components, ALL MADE IN TAIWAN!!)

What movie was it? :goofy:

<{POST_SNAPBACK}>

I believe it was armageddon with bruce willis

#14

Picked up the Buell pegs from the HD store, I think that was the first time I've ever walked in to a Harley Dealer. :idea3:

Everyone was pretty nice, a nice young was the first the greet me and walked me to the parts counter. The parts guy addressed me by Mr. Bailey and thank you Sir.

Maybe there all just making so much money there all happy! :P

$34.80 with tax.

#15
767fixerdamn....never thought of that......thanks :idea3:

but will i have enough brake light adjustment?

<{POST_SNAPBACK}>

I also ground about 1/8" off the threaded shaft which lowers the pedal about another 3/4". I had to "stretch" the brake switch spring IIRC.

#16
767fixerive thought about this mod.  but with my long legs my toes point down while on the pegs.  i have the rear brake already as low as it will go.  an inch lower peg and the rear brake will be unuseable for me.  anyone know a work around to get me longer adjustment?

<{POST_SNAPBACK}>

Another option is what I did to my gearlever to get it in just the right position: stick it in a vice, heat it thoroughly with a hot-air gun, then lean on it with a big wrench/gorilla/LeaningOnMofoThingo.

#17
enzed_viffera big wrench/gorilla/LeaningOnMofoThingo.

<{POST_SNAPBACK}>

Any vendor links on this? smile.gif

#18

big wrench/gorilla/LeaningOnMofoThingo.com, i think

#19
767fixerbig wrench/gorilla/LeaningOnMofoThingo.com,  i think

<{POST_SNAPBACK}>

No, actually that was three options: a big wrench OR a big gorilla OR a big LeaningOnMofoThingo. So that would be www.tools-r-us.com, www.gorillas-r-us.com, and www.bigmofoleaningonmofothingo-r-us.com

#20
enzed_vifferNo, actually that was three options: a big wrench OR a big gorilla OR a big LeaningOnMofoThingo. So that would be www.tools-r-us.com, www.gorillas-r-us.com, and www.bigmofoleaningonmofothingo-r-us.com

<{POST_SNAPBACK}>

damn...australia has the coolest stores. sad.gif

#21
767fixerdamn...australia has the coolest stores. sad.gif

<{POST_SNAPBACK}>

Those were all Murkn stores; Ozzie ones are generally (but not always) suffixed by .com.au.

Anyway, I'm from Noo Zilund, so if we had those kewl stores they'd be .co.nz, unless they went for the .com thingo. Like if they were Murkns that had moved here, or they were marketing to Murkns. Y'know how it is, eh? wink.gif

#22
enzed_vifferThose were all Murkn stores; Ozzie ones are generally (but not always) suffixed by .com.au.

Anyway, I'm from Noo Zilund, so if we had those kewl stores they'd be .co.nz, unless they went for the .com thingo. Like if they were Murkns that had moved here, or they were marketing to Murkns. Y'know how it is, eh?  wink.gif

<{POST_SNAPBACK}>

my bad. im still waiting for the .xxx web sites :blink:

#23
767fixermy bad. 

<{POST_SNAPBACK}>

Thta's alright, I fogive you. I know you Candians don't know wany better. :P

Besides, you're in the same industry as my wife (she works for AirNZ), so that makes us practically kissing cousins.

#24
enzed_vifferThta's alright, I fogive you. I know you Candians don't know wany better.? :P

Besides, you're in the same industry as my wife (she works for AirNZ), so that makes us practically kissing cousins.

<{POST_SNAPBACK}>

:blink:

Yech you guys really know how to hijack a thread

:D

Edited March 14, 2006 by Chris_VFR
#25
Chris_VFR:goofy:

Yech you guys really know how to hijack a thread

:D

<{POST_SNAPBACK}>

Cootey! 'Ow are ya? How's your kangaroo? Got heem tied down yet, Sport?

#26

enzed_viffer, on Mar 9 2006, 05:32 PM, said:

Thta's alright, I fogive you. I know you Candians don't know wany better.  :P
Besides, you're in the same industry as my wife (she works for AirNZ), so that makes us practically kissing cousins.
<{POST_SNAPBACK}>
Enzed - FIxer applied to be a Canadian once, but he really sucked at hockey, and can't hold his beer or rotgut that well, so we refused him. He's a Murkn still, but we like him for trying!!! :goofy:
#27

MFP-2241, on Mar 2 2006, 09:31 AM, said:

<{POST_SNAPBACK}>
how easy was it getting to the red one?
#28

s2kdude, on Mar 14 2006, 11:21 PM, said:

how easy was it getting to the red one?
<{POST_SNAPBACK}>
As far as I can recall, it was pretty easy actually. I was able to get a 10mm wrench on it and from behind the heel plate thingy without any trouble. You just don't have too much room too work; you know, moving the wrench 1/6 of a turn at a time.
#29
I am considering swapping my footpegs on my 99 VFR out for some Buell pegs but have a couple of questions:

1. Which Buell Pegs fit best? (From the reading I have done I think the Buell Ulysses pegs are the right ones to get but I am not "sure" so I thought I would ask. One of the listers who said he used the Uly pegs did not have to grind them to fit whereas one who used the XB9R pegs did. Which ones fit best

2. Did anyone ever come up with a brake pedal and brake light switch modification that lowered the pedal enough to work with the Buell pegs without having to "jury rig" anything?

3. How many of you who changed over to the Buell pegs have stayed with the mod? (ie. did you like the difference enough to stay with the change?)

4. Are the metal pegs without rubber like the OEM pegs comfortable? How much more vibration do you feel if any due to not having rubber pads on top?

Thanks,
Vic
#30

[image: View Post]vic28222, on Jan 25 2009, 03:51 PM, said:

3. How many of you who changed over to the Buell pegs have stayed with the mod? (ie. did you like the difference enough to stay with the change?)

4. Are the metal pegs without rubber like the OEM pegs comfortable? How much more vibration do you feel if any due to not having rubber pads on top?


#3. Yes I've had the buell mod for over a year now. I also have lowered pegs on my RC51 and getting on my RCBVFR after riding the 51, they feel "too" low. LOL

#4. 4gen comes with stock metal pegs so it was the same feel for me.
#31

4. Are the metal pegs without rubber like the OEM pegs comfortable? How much more vibration do you feel if any due to not having rubber pads on top?

Thanks,
Vic

My 4th gen does not have rubber pads on it's pegs and I never had vibration discomfort problems. But note that the later gen VFRs did have weights added on to their pegs in additon to the rubber pads to quell down vibration that might be inherent to the 800cc engine's design. The wieghts work like the handlebar end weights on our bikes to cancel out most of the vibration. So there is a possibility that you might encounter/feel more vibration with the Buel pegs, compared to the stock pegs.

Beck
95 VFR
#32
I put Buell pegs on my '98 over a year ago. They dropped the peg height a full inch. I had to do some minor grinding but, as I recall, it took less than an hour to install both sides. Inexpensive, too. I adjusted the shift lever and heated and bent the brake pedal. I've been very happy with the result.
#33

I put Buell pegs on my '98 over a year ago. They dropped the peg height a full inch. I had to do some minor grinding but, as I recall, it took less than an hour to install both sides. Inexpensive, too. I adjusted the shift lever and heated and bent the brake pedal. I've been very happy with the result.


You can save yourself $10 by getting the pegs as a package set #N0006.1AD. Also, go to your local machine shop and get a bronze valve guide. There is a common size that will adapt the peg to the bike. It will fit into the peg by heating the peg in the oven and putting the bushing in the freezer for a couple hours. I forget the size of the guide, just take the peg and pin with you, one guide cut in half will work. I did end up slightly enlarging the center of the guide. The easiest way to do this is to put the drill bit in a bench vise and chuck the guide in the drill motor, before you cut it. If you try to do it the normal way, you'll ruin the guide trying to hold it.
#34

I put Buell pegs on my '98 over a year ago. They dropped the peg height a full inch. I had to do some minor grinding but, as I recall, it took less than an hour to install both sides. Inexpensive, too. I adjusted the shift lever and heated and bent the brake pedal. I've been very happy with the result.


You can save yourself $10 by getting the pegs as a package set #N0006.1AD. Also, go to your local machine shop and get a bronze valve guide. There is a common size that will adapt the peg to the bike. It will fit into the peg by heating the peg in the oven and putting the bushing in the freezer for a couple hours. I forget the size of the guide, just take the peg and pin with you, one guide cut in half will work. I did end up slightly enlarging the center of the guide. The easiest way to do this is to put the drill bit in a bench vise and chuck the guide in the drill motor, before you cut it. If you try to do it the normal way, you'll ruin the guide trying to hold it.
I believe I paid $32.00 plus tax for the pair at the local HD dealer. I did not have to use an insert bushing. Works great without it.
#35

I put Buell pegs on my '98 over a year ago. They dropped the peg height a full inch. I had to do some minor grinding but, as I recall, it took less than an hour to install both sides. Inexpensive, too. I adjusted the shift lever and heated and bent the brake pedal. I've been very happy with the result.


You can save yourself $10 by getting the pegs as a package set #N0006.1AD. Also, go to your local machine shop and get a bronze valve guide. There is a common size that will adapt the peg to the bike. It will fit into the peg by heating the peg in the oven and putting the bushing in the freezer for a couple hours. I forget the size of the guide, just take the peg and pin with you, one guide cut in half will work. I did end up slightly enlarging the center of the guide. The easiest way to do this is to put the drill bit in a bench vise and chuck the guide in the drill motor, before you cut it. If you try to do it the normal way, you'll ruin the guide trying to hold it.
I believe I paid $32.00 plus tax for the pair at the local HD dealer. I did not have to use an insert bushing. Works great without it.
If you use the part number N0006.1AD at the HD, you get the pair together for $25.00. The valve guide gives a nice fit with no modes to the bike, using the stock pin.
#36

I put Buell pegs on my '98 over a year ago. They dropped the peg height a full inch. I had to do some minor grinding but, as I recall, it took less than an hour to install both sides. Inexpensive, too. I adjusted the shift lever and heated and bent the brake pedal. I've been very happy with the result.


You can save yourself $10 by getting the pegs as a package set #N0006.1AD. Also, go to your local machine shop and get a bronze valve guide. There is a common size that will adapt the peg to the bike. It will fit into the peg by heating the peg in the oven and putting the bushing in the freezer for a couple hours. I forget the size of the guide, just take the peg and pin with you, one guide cut in half will work. I did end up slightly enlarging the center of the guide. The easiest way to do this is to put the drill bit in a bench vise and chuck the guide in the drill motor, before you cut it. If you try to do it the normal way, you'll ruin the guide trying to hold it.
I believe I paid $32.00 plus tax for the pair at the local HD dealer. I did not have to use an insert bushing. Works great without it.
If you use the part number N0006.1AD at the HD, you get the pair together for $25.00. The valve guide gives a nice fit with no modes to the bike, using the stock pin.

The N0006.1AD package is for the XB9R and XB12R. While they work, they require some grinding to fit. One person said the Ulysses pegs fit without any grinding. Can anyone confirm this and give me the part number? It would be great if they offer the pegs as a pair at a reduced price as well.

When you say you heated and bent the brake pedal, please tell me how you did that. I have a propane torch but am not sure how hot to get the shaft, where to apply the heat, etc. I would hate to weaken the pedal and have it fail when I need it most.

Thanks,
Vic
#37

If you use the part number N0006.1AD at the HD, you get the pair together for $25.00. The valve guide gives a nice fit with no modes to the bike, using the stock pin.


That's cool, thanks. I pd the $32 paying the each price. :ph34r:

btw here's the link to the Ulysses pegs.
http://www.vfrdiscus...mp;#entry583788
End of thread · 37 posts recovered Wayback Machine snapshot 18 Aug 2025