VFRDiscussion ARCHIVE / READ-ONLYREAD-ONLY

Another Frankenviffer

178 posts Started 8 Dec 2006 Last recovered post 29 Dec 2013 Wayback Machine snapshot 15 Sep 2025

#1

Well, i still have a long row to ho. I just got a front end from a 98 Yamaha R1. Now I need to get a bottom and Top Triple Tree Clamp. I am not having any luck on Ebay. Does anyone have a good place to buy these parts? Am I thinking right, I am looking for a 2000+ CBR954 setup or a RC51 setup, is that the closest to working? Thanks I will document this well.

gallery_4783_2375_572114.jpg

IMGP0541.JPG

Edited December 8, 2006 by DonnyBallGame
#2

Need RC51 SP1 lower triple and a CBR 929 or 954 upper triple.

the RC51 SP2 lower triple won't work, the steering stem is too large in diameter.

Can you please measure the length of the R-1 forks from the center of the axle to the top of the forks, not including the adjusters and post up?

#3

You can use a 929/954 lower if you're prepared to mod or move the oil cooler.

Vfrrider is your man, he's just about got his sorted.

#4
The PhantomYou can use a 929/954 lower if you're prepared to mod or move the oil cooler.

Swiffer 'curved' his oil cooler using a press he cut out of wood. Lower triple just touches the rad hoses on 5th and 6th gen. bikes with the CBR lower triple. IIRC, Swiffer used an RC51 lower triple/CBR upper and it still touched the oil cooler on his '94.

#5
veefer800canuckNeed RC51 SP1 lower triple and a CBR 929 or 954 upper triple.

the RC51 SP2 lower triple won't work, the steering stem is too large in diameter.

Can you please measure the length of the R-1 forks from the center of the axle to the top of the forks, not including the adjusters and post up?

29.25 give or take 1/32 is what my Stanley Tape is giving me right now. The hunt continues. Thanks for the comments guys. Please keep me in mind if you see anything.

#6

Donny,

If you are using the R1 front wheel you will need to make or source spacers for the axle - the R1 tripleclamps are 210mm fork centre to fork centre, whereas the CBR/RC51 triples are 214mm.

You'll need a 2mm spacer for each side of the front wheel. The axle diameter is 22mm.

It follows that you also need to space the brake calipers* in by 2mm on each side so they line up with the rotors.

[image: R1_brakes.jpg]

* I'm using the radial brake R1 front end so I need to space the rotors rather than the calipers.

[image: 2004_Brakes_350p.jpg]

If you are using the VFR front wheel then spacers etc. are a whole new, err, ball game :lol: That's where Vfrrider might be able to help you out (I'm not sure whether he's gone for the whole R1 kit).

Rob, the 2004-06 R1 forks are 725mm, or 28 5/8". I'm pretty sure that 929/954 Helibars or ST3 bars are my only option, there won't be any fork left above the triples for clip-ons. Will know for sure tonight :thumbsup:

Edit - whoops, fixed mistake (I said Donny would have to space the calipers out, rather than in).

#7
The PhantomIf you are using the VFR front wheel then spacers etc. are a whole new ball game

If you want to use the VFR front wheel, try sourcing a set of Ducati 320 mm rotors - they can be redrilled to fit directly on the VFR wheel (see vfrmonkey for this one) - at least on the 5th/6th generation models.

As far as the bearings go, I'm pretty sure you can just change over to a different bearing size. This is what you do when putting a VFR or Marchesini front wheel with a set of RC51 forks, since the outer bearing diameter and width is the same. Then you use the correct axle for the forks and either modify or make your own inner/outer bearing spacers.

Others have taken more difficult paths before they figured out an easier way later <_<

Next you will need a single-nut Ducati rear wheel :goofy: which is a very easy mod for your bike. Imagine a set of these on your veefer !

#8

WOW, Thanks for the attention guys. I am looking at using the VFR front wheel with my conversion. I am going to start measuring and disasembling things this weekend. This is going to be a fun project.

Safe-T, Thanks for the link on the wheels, you are a bad, person for planting that seed in my head. It has always been there, but you made it grow even bigger now.

Whoa! 320 mm rotors!? Holy Crap. I am all over that. There goes my budget build. I can't wait until I get done with this.

Edited December 8, 2006 by DonnyBallGame
#9
DonnyBallGame320 mm rotors!? Holy Crap. I am all over that.

OK, but now that I read your original post again I see you are using '98 forks. I think these use 298 mm rotors. The later models used bigger ones - 310mm, then 320mm. The VFR's rotors are 296mm so you should be able to use the front wheel and rotors as-is, with spacing of the calipers/rotors as necessary.

If I remember correctly, this is what vfrrider (Larry) did on his bike.

#10
SAFE-TOK, but now that I read your original post again I see you are using '98 forks. I think these use 298 mm rotors. The later models used bigger ones - 310mm, then 320mm. The VFR's rotors are 296mm so you should be able to use the front wheel and rotors as-is, with spacing of the calipers/rotors as necessary.

If I remember correctly, this is what vfrrider (Larry) did on his bike.

Well, looks like I am back on budget. :lol: I thought I had read elsewhere that the rotors were 298mm also. Oh well, they will have to do.

#11
DonnyBallGameWell, looks like I am back on budget. :lol: I thought I had read elsewhere that the rotors were 298mm also. Oh well, they will have to do.

The R1's monoblock calipers are the shiznit. Yamaha used the same calipers on the R1, R6 and FZ1 making a used set easy to find for around $50. I particularly like the ones with the gold inserts.

#12
SAFE-TThe R1's monoblock calipers are the shiznit. Yamaha used the same calipers on the R1, R6 and FZ1 making a used set easy to find for around $50. I particularly like the ones with the gold inserts.

You are right again. I saw them on ebay. I also saw a pair that were silver, I believe they were off a V-Star Warrior. I got the blue ones for $47 + shipping on ebay. The other colors were a rairity and were going for twice the price. So far, I am watching a bottom clamp and disassembling my bike. Also on the lookout for a Top Clamp. I am going to take a look at my Clip-ons when I get them off to see if there is any room in them to take ny material out of the hole to make them work with the R1 Forks. 41mm to 50mm is "only" 4.5mm per side. If there is room i will bore them out. If it gets thin, I will not endanger myself or the public to that. Once I figure that out, I may be on the look-out for some Heli-bars.

#13

OK, the forks you have are from the 2000 era R1, and they used 300mm rotors, so the present front wheel and rotors from the VFR are possible.

Problems.

1. The axle. R1 azle is 25mm, VFR bearings are 22mm. No known bearings from 25mm ID that fit the VFR wheel. Have axle turned down to 22mm, easy for a good mechanist.

2. Spacers. I ended up with one small VFR on right and left. Added a cut down on right. Had to go back to add 1/8" spacers to each side to make a good tight fit.

3. Need to wait to last to measure and adjust calipers. May not need to do anything. I had "adjusted" mine, and now have to readjust them. Otherwise they bolt on. Should be real close stock.

4. You'll have to clearance the forks to the fairing support frame at the top. I cut some off and paite it black, looks stock.

5. Bars. Your choice, I'm running Ducati ST3 stock bars under the RC51 upper clamp. Works so far.

6. Needed longer cables and hoses. running Hayabusa master cylinders so I had to change them anyway.

7. Front fender. I used an R1 painted to match bike. Looks great.

8. Oil cooler, you have to clearance it to clear forks. I ended up with a 3 row from an 86. Looking for 2x4 oak to cut template and curve it per instructions. Should bolt right up.

Oh, length of fork is same as length from VFR upper clamp top to axle, so a toss.

Details as I get time to finish. Pics on completion. Looks bitcthin so far.

Larry

VFRrider

#14
DonnyBallGameI am going to take a look at my Clip-ons when I get them off to see if there is any room in them to take ny material out of the hole to make them work with the R1 Forks. 41mm to 50mm is "only" 4.5mm per side. If there is room i will bore them out. If it gets thin, I will not endanger myself or the public to that. Once I figure that out, I may be on the look-out for some Heli-bars.

In the immortal words of the Penguins from Madagascar:

"That's not gonna fly!"

[image: Madagascar-Penguins.jpg]

MAYBE, MAYBE, you could take them out to 43mm and use them with conventional upside-right forks like from a Blackbird or a VTEC VFR, but I'd never feel comfortable going further than that.

Look at some Helibars for a 929 or 954. They are 50mm.

The ones I used were for a Duc 900SS and I had to mod them but I chose them because they had the tallest rise of all the 50mm bars that Heli makes.

[image: gallery_554_564_9154.jpg]

#15
DonnyBallGameI am watching a bottom clamp and disassembling my bike. Also on the lookout for a Top Clamp.

I have a CBR929/954 lower triple in perfect condition. Might also be willing to part with my billet upper triple - the VFR ignition bolts right in.

Other than that I would just buy a set of 929/954 forks with triples and sell the forks. Easier than trying to find the top triple seperately these days. THIS is a good example.

vfrriderNo known bearings with 25mm ID that fit the VFR wheel.

Larry worked out the details on this setup, which I had originally planned to do on my bike. I had the same experience looking for 22x47x12 bearings for my Marchesini's - no one makes them. BUT....Honda uses 22x47x14 bearings in the RC51 - pretty much the closest thing out there and certainly would have been easier than the $60 custom spacers I had made.

I would check the sizing on a set of CBR929/954 or other Honda bearings before I turned the axle down - could be they're a fit. Larry will spit up on his computer if this is true.

#16

OK, I got my VFR Fork Ass'y off. Yah! That is the good news. After Safe-T's last post I was a little hopeful, here is why. When I got my R1 Forks, I grabbed my digital Starrett calipers and started measureing them. Here are the numbers I got.

Top Clamp: Ø49,97mm

Bottom Clamp: Ø53,94mm

Axle:Ø21.91

So, when Safe-T told me that the VFR Axle was 22mm, I was like :thumbsup: . So I got off my duff and ran out to take the front tire off and slip it into the new front end. I like to do things like that to have something to do. Anyway, I pulled out my VFR front axle to see something different. My VFR Axle is at Ø18,97 (19mm). Dang it. Oh well. Now I need to get the spec on my wheel bearing to see if I can get one with the correct OD and have a 22mm ID. And I thought this was going to be easy.

Thanks for the help guys. I am also open to any suggestions. Feel free to chime in whenever.

Edited December 10, 2006 by DonnyBallGame
#17
DonnyBallGameI need to get the spec on my wheel bearing to see if I can get one with the correct OD and have a 22mm ID.

I think you are getting me and Larry confused... :unsure: He told you the R1 axle was 25mm and the VFR's was 22mm.

Anyway...

Ducati wheel bearings are 25x47x12

RC51 wheel bearings are 22x47x14

CBR929/954 bearings 25 mm ID. No idea what their OD and widths are, but probably 47/14 or 47/12.

Unfortunately I don't keep as good track of this stuff as someone like Rob (veefer800canuck) but I do remember the Duc/RC bearing specs because I was looking for a 22x47x12 bearing to mate Ducati wheels on RC51 Ohlins forks. There is no such animal available from any manufacturer anywhere on the planet.

I don't know as much about the 4th gen front wheel, but the 5th/6th gen front wheels are the same, and since RC51 bearings fit in them, their OD must be 47mm.

So....try a set of Ducati wheel bearings. Or almost anything else that went on inverted forks, since 25mm was a fairly common size axle.

Lastly, according to this guy the front wheel bearings for the VFR750 and 800 are the same.

#18
DonnyBallGameOK, I got my VFR Fork Ass'y off. Yah! That is the good news. After Safe-T's last post I was a little hopeful, here is why. When I got my R1 Forks, I grabbed my digital Starrett calipers and started measureing them. Here are the numbers I got.

Top Clamp: Ø49,97mm

Bottom Clamp: Ø53,94mm

Axle:Ø21.91

So, when Safe-T told me that the VFR Axle was 22mm, I was like :thumbsup: . So I got off my duff and ran out to take the front tire off and slip it into the new front end. I like to do things like that to have something to do. Anyway, I pulled out my VFR front axle to see something different. My VFR Axle is at Ø18,97 (19mm). Dang it. Oh well. Now I need to get the spec on my wheel bearing to see if I can get one with the correct OD and have a 22mm ID. And I thought this was going to be easy.

Thanks for the help guys. I am also open to any suggestions. Feel free to chime in whenever.

The 5G & 6G VFR axle is 20mm and uses a standard 47x20x14 bearing available from any bearing distributor. The RC51 axle is 22mm & uses a 47x22x14 bearing which you will only get from Honda. That is what Safe-T said & it is correct. I assume the 4G axle is the same 20mm as the later bikes.

#19
SAFE-TI think you are getting me and Larry confused... :unsure: He told you the R1 axle was 25mm and the VFR's was 22mm.

Sorry for the cunfusion guys, but I am as confused as you are. It doesn't really matter thou, I have what I have, and need to get it rolling by March, so, onward and forward we go.

Safe-T, I just reread your post above about the Triple Clamps. PM me a price you are happy with and I may buy the lower from you. Does it have all the bearings? Thanks

#20

Safe-T,

WTF, Ducati bearings would work? If so, DBG will have a much earier time than me, but I did reuse the VFR spacers, kind of...

Live and learn. When we all get done, we ned to amass ay Frankenviffer database with all the pertinent data so others will have an earier time.

Who knows, maybe Honda might even rear how easy it would be to do USD to their most popular bike. Oh, forgot, discontinued in 2007 after 20+ years of success.

Larry

VFRrider

Oh, learned yesterday that after reassembling the front end, while everything is together, BUT NOT TIGHT, drop bike down on front wheel and bounced it to "seat" everything. Than tighten.

#21
vfrriderSafe-T,

WTF, Ducati bearings would work? Live and learn.

When we all get done, we need to amass a Frankenviffer database with all the pertinent data so others will have an easier time.

Found out you could use various bearings in different wheels AFTER I went to the trouble to have a custom spacer/adapter made for mine <_< Guess we're both members of the "figured out an easier way to do things after first doing it a more difficult way" club.

I must have ground through at least three sets of RC51 outer spacers trying to get mine right :huh:

#22
vfrriderWe need to amass a Frankenviffer database with all the pertinent data so others will have an easier time.

You have mail smile.gif

#23

I did my part.

Pass it around and someone start a section in the mods for this. Put a post it note for future Frankenviffer fools.

Larry

VFRrider

#24
vfrriderI did my part.

Pass it around and someone start a section in the mods for this. Put a post it note for future Frankenviffer fools.

Larry

VFRrider

'Frankenfool'....I like it :lol:

I think it should go in 'Featured Modifications' but I can't start a thread in that area. Bueller ?

#25

Wohoo, got my brakes today. 2004 R1's. I will post some pics when it gets more worth while. So far the bike is sitting with no front anyting on it. Looks pretty pitiful. The one thing that makes me mad is, I could have rode it this weekend and completed my task of "Riding in every month" this year. Dang, I guess started this too soon. Oh well, there is always next year if i get done in January.

#26
DonnyBallGameWohoo, got my brakes today. 2004 R1's.

Donny, are they radially mounted brake calipers? That's what the R1 got in 2001. If so, they can't be bolted onto the pre-2004 forks.

See the two images I posted earlier in the topic...

#27
The PhantomDonny, are they radially mounted brake calipers? If so, they can't be bolted onto the pre-2004 forks.

You might be able to put a set of '04 fork bottoms on your older R1 forks, but it would most likely be easier to either buy a set of '04 forks, or the correct calipers for the forks you already have.

:fing02: Hard to believe you can buy R1 forks for under $50....

#28

:off topic:

Guy down the street has a RC51 with Ohlins.....

reading these Franken Viffer strings always gets me thinking is he still has the original legs around.

#29
TommyHoffman:off topic:

Guy down the street has a RC51 with Ohlins.....

reading these Franken Viffer strings always gets me thinking is he still has the original legs around.

RC51 forks have gotten stupid expensive. They are the nicest option in terms of length and spring rate, and match very well cosmetically. Probably the most 'bolt-on' option, especially if you buy a complete front end.

R1 and CBR929/954 are the next best options. The R1 fork can be done with the stock VFR front wheel and rotors, and has the same spring rate as the VFR. The CBR fork is shorter so you have to look at different handlebars, or perhaps lowering the rear of the bike but definitely do-able.

#30
You might be able to put a set of '04 fork bottoms on your older R1 forks, but it would most likely be easier to either buy a set of '04 forks, or the correct calipers for the forks you already have.
I'll see what I can find about that on www.r1-forum.com if Donny confirms he has radial calipers. I have already been given some good info by the guys there.
The R1 fork can be done with the stock VFR front wheel and rotors, and has the same spring rate as the VFR.

You're referring to the pre-radial caliper R1 right? As the radial caliper R1 has rather large rotors compared to the VFR...

So do you reckon the RC51 fork prices have been driven up by Vifferatsi? Surely there's not enough of us doing these mods... maybe there's been a spate of RC51 crashes lately.

#31
The PhantomYou're referring to the pre-radial caliper R1 right? As the radial caliper R1 has rather large rotors compared to the VFR...

'98-'03 R1's used 298mm rotors - close enough that you could get away with the VFR's 296mm rotors.

'04 -'06 R1's have 320mm rotors, while '07 models will have 310mm rotors.

If you have a set of forks from an '04-'06 R1 you get radial calipers. I don't specifically know if a VFR wheel will work, but that you can put Ducati 320mm rotors on a VFR wheel....so if the spacing were to work out that might be an option.

The PhantomSo do you reckon the RC51 fork prices have been driven up by Vifferatsi? Surely there's not enough of us doing these mods...

Limited sales of RC's combined with higher-than-normal attrition on the road and on the track is my guess. After awhile the used parts market thins out. Speedzilla's Sport Twins Classifieds can be a good source of parts sometimes.

I had a very hard time finding a replacement Ducati rear caliper this summer, and wound up paying nearly $50 for a part I bought a year earlier for $10.

Parts can be scarce due to lots of things - in the summer people are busy riding and perhaps not listing what they have for sale; in the fall what is available goes fast as people buy what they want for winter projects. Right now parts are relatively cheap if you can find them as people are spending all their money on Christmas. This will continue until the end of January, after which prices will rise again until about April. Then everyone will be off riding again and so forth.

#32

Correction. My Calipers are from an R6. They bolt right up to the R1 Legs. Later on I may be interested in updating again to Radial Caipers, but these are a big enough improvement for now.

I go wheel bearings on the way and will post my findings.

#33
DonnyBallGame
veefer800canuckCan you please measure the length of the R-1 forks from the center of the axle to the top of the forks, not including the adjusters and post up?

29.25 give or take 1/32 is what my Stanley Tape is giving me right now. The hunt continues. Thanks for the comments guys. Please keep me in mind if you see anything.

Measured my RC51 forks and they are 28-7/8" So the R-1 forks ARE indeed marginally longer.

Good to know.

#34

OK, Here is what I come up with today. I checked with my local Honda/Yamaha dealer and www.allballsracing.com (great customer support :warranty: ).

98-99 R1 Bearing Specs are, Ø47mm OD x Ø22mm ID x 12mm wide

95 VFR Bearing Specs are, Ø42mm OD x Ø20mm ID x 12mm wide

2000 RC-51 Bearing Specs are, Ø47mm OD x Ø22mm ID x 12mm wide

I stopped into a bearing supplier that we use at work. He has access to all the bearings in the world. There is no such bearing that has an OD of 42mm and an ID of 22mm. So, I can either put on an RC-51 Wheel, or Polish down the front axle and sleeve the left fork tube to accept the new 20mm Axle. I think I am going to Polish the front axle. That way I can use the VFR spacers.

#35

DBG,

I did not have to sleeve the left fork as it is the one that is screwed into and very tight.

I used a small VFR spacers on both sides and another cut down one on the right plus 1/8 shims both sides. Fit it up and measure first though.

Larry

#36
DonnyBallGameOK, Here is what I come up with today.

Difficult: Unless by some chance a set of R1 rotors fits or can be made to fit the RC51 wheel, good luck with this one.

Easier: Go get yourself a VFR800 wheel and rotors (or CBR600F4 rotors), put in RC51 bearings, make/modify inner and outer spacers and you're good to go with the R1 axle unmolested.

#37
SAFE-T
DonnyBallGameOK, Here is what I come up with today.

Difficult: Unless by some chance a set of R1 rotors fits or can be made to fit the RC51 wheel, good luck with this one.

Easier: Go get yourself a VFR800 wheel and rotors (or CBR600F4 rotors), put in RC51 bearings, make/modify inner and outer spacers and you're good to go with the R1 axle unmolested.

I wouldn't machine any stock hollow axle from 22mm down to 20mm. You're losing strength there and the OE Mfgr's have analyzed that axle 7 ways from sunday with their CAD/CAM software so it's just strong enough for the job with a decent safety factor.

If you absolutely, positively have to do that, have a new 20mm axle machined from solid high quality steel bar stock and don't bore out the middle.

Then it'll be stronger than the original part and the right size you need.

Slightly heavier, but way better than a cracked/snapped axle and the resultant crash and burn scenario.

#38

This is why I post this stuff up. I like the many different ideas and welcome them all. After thinking about it a little, I think I will draw up the new axle and see about getting on made. Plus, if I get on made, I can get rid of the annoying internal hex of the Yamaha axle and maybe use and external hex. Thanks for helping think things thru Veefer800. We'll see how things play out.

#39

So, I have done a little more research on machining down the R1 Axle. Not going to happen here. The ID of the HOLLOW axle is 18mm. So doing the math gets real scary. 20mm OD and a 18mm ID equals 1mm thin wall tubing. I will be making a new one from scratch. It will be made out of Stainless Steel, then I do not need to worry about rust.

#40
DonnyBallGameSo, I have done a little more research on machining down the R1 Axle. Not going to happen here. The ID of the HOLLOW axle is 18mm. So doing the math gets real scary. 20mm OD and a 18mm ID equals 1mm thin wall tubing. I will be making a new one from scratch. It will be made out of Stainless Steel, then I do not need to worry about rust.

Stainless steel fasteners have less tensile strength than regular steel ones, so a stainless axle of the same construction would theoretically be weaker than a plain steel one.

BUT, if the SS axle is solid, not hollow, you'll be way ahead in the strength department, owing to the beefy nature of the part.

#41

Go get some Titanium bar stock... :offtopic:

#42
SAFE-TGo get some Titanium bar stock... :offtopic:

Actually a very good idea Rick!

I'm pretty certain the two spacers on my R1 front axle are titanium. A solid metal axle is going to add a good bit of weight to the front end, and lower unsprung weight is one of the bonuses of Frankenviffering so it's worth trying to preserve that.

#43
The Phantom
SAFE-TGo get some Titanium bar stock... :biggrin:

Actually a very good idea Rick!

I'm pretty certain the two spacers on my R1 front axle are titanium. A solid metal axle is going to add a good bit of weight to the front end, and lower unsprung weight is one of the bonuses of Frankenviffering so it's worth trying to preserve that.

Wow, I just priced a piece of Titanium. That stuff is pricey. Time to call in a favor from my machine shop. That is going to be a tough one to do. Maybe after I get things fit up with my SS axle. It can always be another Mod to make later.

#44
The PhantomDonny,

If you are using the R1 front wheel you will need to make or source spacers for the axle - the R1 tripleclamps are 210mm fork centre to fork centre, whereas the CBR/RC51 triples are 214mm.

You'll need a 2mm spacer for each side of the front wheel. The axle diameter is 22mm.

It follows that you also need to space the brake calipers* in by 2mm on each side so they line up with the rotors.

With the wider spacing on the RC/CBR triples, is it still possible to use the R1 axle? I'm thinking of sticking with the R1 front wheel as I might go with the radial brake front end.

What did you decide to use for bars?

Have any pics?

Thanks.

Edited December 25, 2006 by GSP
#45

So is the type of thing you do just because you can, not because you need to?

I'm not trying to piss on anyone's parade, but my revalved/resprung stock front end allows me to ride ridiculously fast. As fast as anoyne, even insane, should go on the street. The track is another story, but aside from doing it just because you can, there are probably better ways to go around a track really fast than on a VFR.

I only ask this, because when I first got my VFR, having already owned bikes with USD forks (as well as PM brakes and AP master cylinders), I thought that I would find them to be inadequate for agressive street riding. I opted for upgrading the stock forks, just because I didn't want to deal with the project.

Turns out that my suspicions were wrong, and that the stock forks are really quite good now that they are properly valved and sprung. I would go so far as to say that they are likely better than a USD fork designed for a diffent bike that has not been resprung and revalved for a VFR and the rider operating it.

Now, there is the issue of adjustability. While it's a nice feature, it's somewhat unnecessary for a street bike, and even a race bike that only sees the same track. This is because usually once you have everything set, you usually don't need to make any more adjustments.

That being said, even "non" adjustable forks are adjustable. You just have to take them apart and manually chage the valving stacks instead of turning knobs. This is only an issue when you are getting things right in the beginning, and folks like Race Tech have gotten down baseline valving and spring rates down to a science. The only thing I had to do different from their setting is run about 10mm more oil for extra bottoming resitance.

So I was just wondering. Seems pretty cool if it's just done for the challenge of it all, and that it gives the bike a "tricker" apperance. I'm just not seeing at as a performance necessity for a street bike.

Carry on gentlemen, as the detail of all this is still very interesting in regards to what is required and how it all goes.

Edited December 25, 2006 by Tyrmeltr
#46
With the wider spacing on the RC/CBR triples, is it still possible to use the R1 axle? I'm thinking of sticking with the R1 front wheel as I might go with the radial brake front end.
Yep there's lots of sleeve left on the large dia bit of the axle to accommodate the reduction in clamping area, and the axle bolt is likewise still threaded securely. The fork lower clamps use two bolts aside so there's no problem with the axle being securely located.

I'm using new rotor bolts of course, I'd like 2mm longer ones just to be on the safe side, so plan to peruse the Yamaha parts catalog to see if another model uses same.

What did you decide to use for bars?

Still a work in progress, but an OzVFR mate is milling up a pair of 50mm extensions to go between the fork clamp and the bar mount on these lovely billet 'Epro' items (Japanese company that specialises in Yamaha performance bits). Got 'em off an R1 at a bike wrecker for $200 AUD. They'll go under the top CBR929 triple and the 2" will give enough rise to clear the fairings (he wants to make two-piece extensions so I can drop it a bit for track duty but we haven't come up with the final design yet).

gallery_5581_740_24341.jpg

I haven't taken many pics yet as I'm still doing the mock-up to make sure it all goes together well.

So I was just wondering. Seems pretty cool if it's just done for the challenge of it all, and that it gives the bike a "tricker" apperance. I'm just not seeing at as a performance necessity for a street bike.

Fair question, a few years back I too thought it was fairly pointless doing this even though I've been loosely researching USD forks for 4-5 years. I can't speak for others but my bike project is as much about having a play with the bits and pieces available to me, as it is about improving its performance and looks. I completely agree that you don't need this sort of hardware to go fast and/or have fun, but updating 10-15 year old technology will definitely enhance all aspects of your riding experience. I got an Ohlins for the back to even it out :unsure:

I've ridden a 4th Gen with Eibach springs and modded shimstack and stock rear shock, against a VTR1000 with top-spec Ohlins shock and fork internals, similar riding ability between the riders, and he was no faster than me. He *may* have been a bit more relaxed at the end of each section of twisties than me though, and that's worth the price of admission.

Other benefits include lower unsprung weight (more responsive suspension and steering, very nice to have on less than perfect road surfaces), less stiction due to the more advanced materials and design, stiffer forks for improved 'feel', a wider range of performance enhancements are available to you (rotors, fork internals etc.), and good looks to boot.

The big ticket item you forgot about is the vastly superior braking you get with a late model USD front end - radial calipers and 310mm rotors for sir? yes please :thumbsup:

#47
The PhantomThe big ticket item you forgot about is the vastly superior braking you get with a late model USD front end - radial calipers and 310mm rotors for sir? yes please :thumbsup:

First off, thanks for taking the time to answer my question. I can really appreciate your perspective and I think it's cool what you're doing.

I will agree that the brakes are certainly lacking. My last three bikes had at least 4 piston calipers so the VFR braking experience has been underwhelming. HH pads, braided lines and great fluid have helped considerably, but the fact that my rotors are blue are pretty clear I'm really overworking the brakes.

Interestingly enough, the lack of power and brakes on my VFR compared to my last few bikes have re-taught me to carry more corner speed (entry, mid, and exit) and not rely on brakes and power to compensate.

My usual riding buddies are have an R6, GSX-R1000, and R1, and I have no doubt that they work much less to achieve the same results I do on the VFR, simply due to the fact that time marches on. However for a bike that even in it's time was no GSX-R, it amazingly potent to this day once properly sorted and ridden.

I have a set of '98 R1 Calipers and I'm going to have brackets made and run them on the stock rotors. That will be a vast improvment.

Anyways, thanks again for answering my question, and good luck to all of you who under take this project.

#48
TyrmeltrSo is the type of thing you do just because you can, not because you need to?

Mostly because I can. I can't leave anything alone. I also like the look of the USD Forks. I had a hard time deciding on doing this mod. The Original front end worked just fine, so why change it. I am going to keep the VFR. So I wanted to be able to make some adjustments to it as my riding needs change. I do trackdays and commute on the same bike. I also wanted better brakes.

Thanks for keeping me in check.

#49
GSP
The PhantomDonny,

If you are using the R1 front wheel you will need to make or source spacers for the axle - the R1 tripleclamps are 210mm fork centre to fork centre, whereas the CBR/RC51 triples are 214mm.

You'll need a 2mm spacer for each side of the front wheel. The axle diameter is 22mm.

It follows that you also need to space the brake calipers* in by 2mm on each side so they line up with the rotors.

With the wider spacing on the RC/CBR triples, is it still possible to use the R1 axle? I'm thinking of sticking with the R1 front wheel as I might go with the radial brake front end.

What did you decide to use for bars?

Have any pics?

Thanks.

I am getting a new axle made. With the new axle, I will be able to use my VFR wheel and rotors. It should be ready next week. Once I get the axle fitted with the rim/rotors and forks, I can measure up what I need for spacers and have them made as well. I will post a pic when it is done.

As for bars, I will probably bit the bullet and buy a pair of Helibars. Still need to make up my mind on the 929 of 954 models. Helibar list some different specs on both of them.

#50

I did a cost-benefit-analysis of three different fork mods, taking into consideration measurable things like increased performance and immeasurable things like pride of ownership.

In the end I picked the high-end route primarily because I was willing to spend the time and energy to make it as affordable as possible.

Honestly, the difference is subtle at best and really only begins to be noticeable when you rail through a big sweeper at 180 km/h+ and hit a bump. Bigger better brakes would be a plus if I actually used them but I've spent so many years riding The Pace that I doubt they actually benefit me personally. I have 320 mm rotors because that happens to be the size that fit. I've ridden other VFR's back-to-back with mine and they feel pretty much the same for my riding style at legal riding speeds. Beyond that I don't feel like experimenting with other people's property.

#51

Just want to add that I respect that this is DonnyBallGame's topic! I realise I have a lot of my own stuff in it, I'll start a separate topic this week and get some pics of mine into it.

Donny says "I am going to keep the VFR" - that's me too, and a good reason why I/we are doing this mod. I can't actually imagine a day when I'll sell it, so cost and degree of difficulty doesn't enter the equation.

Tyrmeltr, I had the same brake system mods as you do, and came to the same conclusion - and solution : ) My mates reckon they've never seen a VFR go so fast... it helps that I spent 18 months on a ZZR-250 before the VFR (due to our tiered licencing system), so corner speed was never an issue : )

#52

Got my new axle today! Man is it shiny. Below is a picture of all 3 axles lined up in the order of, Stock VFR Axle, My Axle, and Yamaha R1 Axle. Everything fit up like it should.

[image: imgp0698ms2.jpg]

Here is a shot of the Bushing that I installed into the Left fork Tube to take up the leftover space that the necked down axle required. It has an OD of 22mm and an ID of 18mm.

[image: imgp0701rf3nx8.jpg]

This is as far as I got tonite. My Triple Tree Clamp will be here soon. Then I can get the spacers made up.

[image: imgp0702tz8tm0.jpg]

#53

Sorry for the huge pictures guys. I won't do that again. If it make it any easier, you can see them on my Blogspot also.

Edited January 3, 2007 by DonnyBallGame
#54

Looking good. What front wheel/rotors are you using ? Get some specs on that front axle in case someone else wants one.

#55
DonnyBallGameSorry for the huge pictures guys. I won't do that again. If it make it any easier, you can see them on my Blogspot also.

I couldn't see the pics for some reason, perhaps Blogspot doesn't allow hotlinking?

Anyhow, I uploaded them to Imageshack and resized them, hope that's OK with you.

And the new axle looks great. Way to go.

Can't wait to see the whole thing together!

#56

You the MAN Rob! Thanks a bunch.

SAFE-T, I am using my VFR Wheel and Rotors. I have a print of the Axle that needs to be updated. I will post that as well once it is complete.

Thanks guys.

#57

Ran into a hich-up tonight. I installed my new bearing on my CBR929 Lower Clamp. Put the new races in the frame. They are fully seated. Slid the lower clamp up into position, and wammy. The upper bearing does not go on far enough. I start looking things over, and find this,

[image: t_IMGP0714i_e5aam_e655eb0f.jpg]

Is the bottom of my Lower Clamp suppose to look like this? I have a CBR900 to look at also. I got to thinking, Is the stem fully pressed into the casting that holds the forks?

The CBR900 is the on in the upper portion of the picture.

[image: t_IMGP0716i_e5aam_1065b465.jpg]

The difference you see in length is what I am short. (I know, Iknow, no jokes please.)

[[image: t_IMGP0718i_e5aam_895a052a.jpg]

Any help and Ideas are greatly appriciated. Thanks

Edited January 12, 2007 by DonnyBallGame
#58

I wonder if the CBR steering stem is not pressed up into the lower triple all the way?

Could you have them both pressed out and compare?

Maybe you could use the VFR stem in the CBR triple if the lower dimensions are the same? IE: the part that press-fits into the hole?

Anyhow, if you had both stems out, it would be a piece of cake to tell if one is shorter than the other.

And if you leave the new bearing on the CBR stem and just push the stem down, it'll come off the bearing and the triple both at the same time. Saves you trying to raise the bearing for removal prior to pressing the stem out. Easy to wreck the bearing doing that. Instead, just press the stem downwards out of both items at once.

#59

Ahh, now I see - I PM'd you regarding bearing sizes, but I think the problem is where the stem sits in the bottom triple.

Will photograph mine in a couple of hours and post the result.

#60

Wahoo! Back in business. I pressed out the stem to investigate. The Stem was not fully pressed into the casting. So I turned it over andd fully pressed it back into the hole. Thanks for the suggestions guys.

Now on to get my steering stops drilled and tapped into my frame. I will post up the pics when I am done with that.

#61

Cool, glad you got it sorted! I was just about to post pics of mine which would have just reinforced what was already suggested...

Edit: The pics in question are up in my front end swap topic.

#62

Well, I ended the day with my favorite new catch phrase,"and Bob's you uncle."

I had a good day today with good progress. I will post up pics tomorrow. Not much different from what Swiffer did with his front swap thou. I got my steering stops drill and tapped in the lower clamp today. They needed to be adjusted so that the outer portions of the clamp did not bash the Radiator. Once adjusted I checked the steering lock. Not working. After further review, I just need to tickle the holes in the frame a little bit to get the "Dead Bolt" to drop right in. I can see here where the RC51 Clamp (Since it is Gulwinged) may offer more "Lock to Lock" movement and allow the Steering Lock to work as is. Because it is lower on the ends and would not hit the Radiator as early.

I then moved on the the oil cooler. Again, thank you swiffer for the idea. I cut my pieces of wood and put a nice little bow in the cooler. Insert ,"and Bob's your Uncle" here. Mounted it back on the bike and admired my work.

Once done with the oil cooler, I decided to see what is going to happen with my clip-ons. So I inserted both fork tubes and axle. I set the dimension from the lower clamp and axle centerline. Dang, I only have 15-18mm above the CBR929 top clamp. Looks like I will be mounting the clip-ons below the top clamp. Oh well, there is no feeling like cutting into a good set of Helibars to raise them up. Wish I could find some that were all scratch up and know body to want them.

Anyway, that is that. Ended the day working on a Pinewood Derby Car. Definitely a high note.

Edited January 14, 2007 by DonnyBallGame
#63
DonnyBallGameAnyway, that is that. Ended the day working on a Pinewood Derby Car. Definitely a high note.

Oooh, such fun! I'll have to post up pics of the one my son and I made a couple of years ago. :thumbsup:

Oh, and your bike still doesn't exist because there are no pictures. :goofy:

#64
veefer800canuckOh, and your bike still doesn't exist because there are no pictures. :goofy:

Here it is in all it glory. :wub:

[image: t_IMGP0713i_e5aam_ce8ca068.jpg]

More detailed pics in the AM.

Edited January 14, 2007 by DonnyBallGame
#65

why dont you guys just relocate the oil cooler? like put it right below the radiator or something.

#66
DonnyBallGameI got my steering stops drill and tapped in the lower clamp today. They needed to be adjusted so that the outer portions of the clamp did not bash the Radiator. Once adjusted I checked the steering lock. Not working. After further review, I just need to tickle the holes in the frame a little bit to get the "Dead Bolt" to drop right in. I can see here where the RC51 Clamp (Since it is Gulwinged) may offer more "Lock to Lock" movement and allow the Steering Lock to work as is. Because it is lower on the ends and would not hit the Radiator as early.

Did you drill/tap the bottom triple itself?

I haven't checked my radiator clearance yet...

Once done with the oil cooler, I decided to see what is going to happen with my clip-ons. So I inserted both fork tubes and axle. I set the dimension from the lower clamp and axle centerline. Dang, I only have 15-18mm above the CBR929 top clamp. Looks like I will be mounting the clip-ons below the top clamp.

When you say you set the dimension from the lower clamp - do you mean you measured from where the lower triple clamps onto the fork down to the axle? Or from the 'top' of the CBR lower triple, which would equate to the 'top' of the VFR lower triple.

Great to hear you're making progress. I've been stuck with dometic chores for most of the weekend...

#67
flyguyeddywhy dont you guys just relocate the oil cooler? like put it right below the radiator or something.

I looked into that. My feelings there are that the exhaust would bake the oil rather than letting the cair cool it.

#68
The PhantomOr from the 'top' of the CBR lower triple, which would equate to the 'top' of the VFR lower triple.

You are correct. I put the axle back to the same distance from the bottom of the frame as it was before. The top of the lower triple did not move. So that is where I took my measurement from.

#69

OK, Here are the some pictures of the areas that I had to watch out for for clearance. The first one is a picture of my steering stops.

[image: t_IMGP0719i_e5aam_a4df0584.jpg]

This is showing the left side radiator clearance. You can dial in as much or as little as you would like once to put in you new bump stops.

[image: t_IMGP0720i_e5aam_1721c623.jpg]

Next is showing the Right side Radiator and Fuse Box. I had to put a step in the fuse box mounting tab to move it to the right roughly .125 of an inch.

[image: t_IMGP0723i_e5aam_96d86bcc.jpg]

Here is one showing the clearance created by bowing you oil cooler. I am happy that the newly tweaked oil cooler does not interfere with any body work. I was really worried about that.

[image: t_IMGP0741i_e5aam_1b67d78f.jpg]

And last but not least. My boys first Pinewood Derby Car. He drew the shape he wanted, I cut it out. He draw the lightning on the tape and cut it out. He started the paint, then Dad finished it. I guess it is no fun watching paint dry, go figure. We are hoping it runs as fast as it looks.

[image: t_IMGP0725i_e5aam_b5d8d59a.jpg]

Edited January 17, 2007 by DonnyBallGame
#70

Steering stops look good. I nicked a bit out of my frame on each side when I did mine so there was a bit more material around the hole; probably not necessary.

Out of curiosity, what *was* the measurement from axle to top of the lower tripleclamp?

#71

Can I get the dimensions, or a diagram of the piece of wood you used to put a gentle curve in your oil cooled? I.E. how long was the piece, and what was the radius of the curve. Did you use a 2X4? I'm no good with the whole wood shop thing, nuts and bolts are my bag (insert comments here, I deserve it...). Thanks!!!

#72
The PhantomSteering stops look good. I nicked a bit out of my frame on each side when I did mine so there was a bit more material around the hole; probably not necessary.

Out of curiosity, what *was* the measurement from axle to top of the lower tripleclamp?

My steering stops are sunk into the Lower Clamp. So there is plenty of meat there also. 20.75 is the dimension I measure before I took the old front end off. So That is where I am going to start with the new one.

As far as "How to Bend" the oil cooler. I relied on Swiifers thread. Look at the link below.

http://www.vfrdiscussion.com/forum/index.php?showtopic=10129

#74

The Hornady is cool. Thanks for sharing. I like the rear mounted bolt/balast. We need to get our car weighed in and up to weight before this weekend.

#75

What are these cool little cars used for?

#76

My boy has just started in the Cub Scouts. It is a junior version of the Boy Scout of America. The cars are built for the yearly Pinewood Derby Car race. Each car is built from the same kit. They all start out as a rectagular chunk of wood. It is up to the kids to do as much work as they can on them to get them ready to compete. It is like a miniture Soupbox Derby race.

#77
DonnyBallGameIt is up to the kids to do as much work as they can on them to get them ready to compete.

(In reality, it's really for the dads) +1.gif

#78

Cool, I was a Cub then a Scout, but we didn't have this over here.

#79
The PhantomCool, I was a Cub then a Scout, but we didn't have this over here.

Never too late to have a happy childhood Murray! :thumbsup:

http://www.pinewoodpro.com/

The cub scouts race the cars on a regulation length track, they are propelled by gravity alone.

The cars have to be a certain size and weight, but the design is up to you!

#80

Thanks for the link. There are quite a few now, and I get quite sidetracked, and forget what I was originally looking for. From that link it looks like there is a 1-2 cm bend in the oil cooler. Sound about right? Thanks again!!!

"As far as "How to Bend" the oil cooler. I relied on Swiifers thread. Look at the link below.

http://www.vfrdiscussion.com/forum/index.php?showtopic=10129"

Edited January 25, 2007 by douglasthecook
#81
douglasthecookThanks for the link. There are quite a few now, and I get quite sidetracked, and forget what I was originally looking for. From that link it looks like there is a 1-2 cm bend in the oil cooler. Sound about right? Thanks again!!!

Yah, 2cm is about right.

I got my front wheel spacers installed last night. My front fender should be on its way next week. So it will probably be after the fender install when I post pics. The spacers really aren't that special. Now the fender is another story. The bike is now standing on it's own two feet again. I can't wait to get my clip-ons and go for a ride.

#82

Cool, definately looking foward to the pics of your completed project!!! What clip-ons did you go with? It looks like I'm going to shell out the $$$ for the Cycle Cats, as I keep missing the stock 929 clip-ons that show up on Ebay. Hopefully next week I'll be ordering all the parts that I need to finish mine up.

#83
douglasthecookCool, definately looking foward to the pics of your completed project!!! What clip-ons did you go with? It looks like I'm going to shell out the $$$ for the Cycle Cats, as I keep missing the stock 929 clip-ons that show up on Ebay. Hopefully next week I'll be ordering all the parts that I need to finish mine up.

Douglasthecook,

Just so you know. I ordered my wheel spacers from www.misumi.com. They are a custom order collar. You get a choice of material. I ordered Clear Anodized Aluminum. Both side cost me 30 bucks and waited 12 days. I don't know which forks you are using, but hope it helps.

#84

I have 954 forks, and front wheel. I'm going to order a complete set of SS Braided lines, as well as wave rotors. When I ordered the wheel, it didn't come w/rotors. Figured that since I need to get some anyway, might as well get wave rotors. I can't remember if I have the stock wheel spacers or not. If not, I was going to order some from ronayers.com, as I need to order the rotor bolts, and the front fender hardware as well. I might look your place up though. It's always nice to have options! Thanks for the info!!!

DonnyBallGame
douglasthecookCool, definately looking foward to the pics of your completed project!!! What clip-ons did you go with? It looks like I'm going to shell out the $$$ for the Cycle Cats, as I keep missing the stock 929 clip-ons that show up on Ebay. Hopefully next week I'll be ordering all the parts that I need to finish mine up.

Douglasthecook,

Just so you know. I ordered my wheel spacers from www.misumi.com. They are a custom order collar. You get a choice of material. I ordered Clear Anodized Aluminum. Both side cost me 30 bucks and waited 12 days. I don't know which forks you are using, but hope it helps.

#85

Well, I just did a fit up with my newly received Cycle Cat CBR929 risers. Not good results. They hit the instrument cluster when you turn the steering. I am going to give Cycle Cat a call on monday to see if I can trade them for a set intended for the 'busa. With the experience I now have, the ones for the 'busa should work just find. I will let you all know more when I know more. :thumbsup:

#86

Ok, so how far off was the rise? I just dropped my front forks tonight. I was going to order the Cycle cats for the 954 as well, if I remember right, they had a 2.5 inch rise? How much of a rise do the ones for the 'Busa have? Did it seem that your brake, clutch, and choke cables were long enough? Ok, I think I've asked you enough ?'s for now. I am quite curious to how your transplant is going to work out, as I'm at the parts ordering stage now, and have no front forks on my VFR. If you have any pointers, or know of any parts that I should order that I might not have though of, I'd like to hear them!!!

#87
douglasthecookOk, so how far off was the rise? I just dropped my front forks tonight. I was going to order the Cycle cats for the 954 as well, if I remember right, they had a 2.5 inch rise? How much of a rise do the ones for the 'Busa have? Did it seem that your brake, clutch, and choke cables were long enough? Ok, I think I've asked you enough ?'s for now. I am quite curious to how your transplant is going to work out, as I'm at the parts ordering stage now, and have no front forks on my VFR. If you have any pointers, or know of any parts that I should order that I might not have though of, I'd like to hear them!!!

Well, I now have time to get a little more indepth. The 929/954 riser from Cycle Cat has enough rise for my liking. The cables and wires are all long enough. The issue is, the Cycle Cat risers for the 929 also move the controls forward on the bike about one inch. That makes the brake and clutch resevoirs hit the instruments. Height wise, everything clears the fairing below the windshield. I almost ordered the 'Busa kit, they have the same rise. Guess I should have. Now I get to call and talk to a rep again to see if I can work out a trade.

I may also look at puttting a RC51 Top Clamp on. Not sure yet if I want to do this or not. I 19mm of forks sticking out the top of the 929 Top Clamp. There is not enough there to mount my clip-ons, so i was thinking I would mount the clip-ons under the tree and gain some more adjustment for additional rise. We'll see what happens next week.

#88

Happen to have any pics of the current mock up? What advantage would the 'Busa risers give you if they have the same rise? I was going to order my Cycle Cats tomorrow, but it looks like I'll wait now, to see what you come up with. If I weren't in Germany, I might not wait, and try to do some of this along w/you, to compare notes. However shipping time to Germany is considerable longer than in the States. I have the front brake master cylindar from the 954, is that what you're using? I'm going to keep the stock clutch master cylindar for obvious reasons. Also if I understand you correctly, you can't mount the 954 Cycle Cats on the top of the triple tree due to the lack of availble fork tube protrusion, have you tried to mount them under the triple tree yet to see how they fit? Thanks, and sorry for all the questions, I don't have quite the quick resources available to me as you do.

Edited February 4, 2007 by douglasthecook
#89
douglasthecookHappen to have any pics of the current mock up? What advantage would the 'Busa risers give you if they have the same rise? I was going to order my Cycle Cats tomorrow, but it looks like I'll wait now, to see what you come up with. If I weren't in Germany, I might not wait, and try to do some of this along w/you, to compare notes. However shipping time to Germany is considerable longer than in the States. I have the front brake master cylindar from the 954, is that what you're using? I'm going to keep the stock clutch master cylindar for obvious reasons. Also if I understand you correctly, you can't mount the 954 Cycle Cats on the top of the triple tree due to the lack of availble fork tube protrusion, have you tried to mount them under the triple tree yet to see how they fit? Thanks, and sorry for all the questions, I don't have quite the quick resources available to me as you do.

Sorry for the lack of pictures. I do not have any. I am also using the OE Clutch Reservoir. I wanted the Brake Master to match also, so I am using one from a CBR600 F4.

The 'Busa kit is more of an "Inline" setup. Currently, the 954 kit is offset forward. Meaning the tube that the grip is on, is forward of the fork tube. The 'Busa kit brings the the Grip Tube and Fork Tube inline with each other. If you go to www.cyclecat.com, you will be able to see what I am talking about.

I did do my final mock up with the risers mounted on the bottom side of my top clamp. With them mounted on the top side, things were too tall and hitting the fairing below the windshield. Also, the clamping area on the risers themselves is 25mm, so, like you stated, I was short on room to do it right.

I don't mind answering so many questions. I like to help when I can. :thumbsup: :unsure:

#90

Ok, so there weren't any rise problems, just foward orientation problems? Thanks for you're help, it's defiantely nice to have some assistance with this. I went to the cyclecat website, and saw what you meant. Other than that, there weren't any problems with the clip-ons? And what size o rise did you go for? It looks like the 954 clip-ons have a 1.5 inch rise, and the 929 clip-ons have a 2.5 inch rise. I'll look at the 'Busa clip-ons again, and see what they have. Thanks again!!!

Edited February 4, 2007 by douglasthecook
#91
douglasthecookOk, so there weren't any rise problems, just foward orientation problems? Thanks for you're help, it's defiantely nice to have some assistance with this. I went to the cyclecat website, and saw what you meant. Other than that, there weren't any problems with the clip-ons?

No other problems. Great high quality stuff.

#92

Ok, so the 'Busa clip-ons have a 2.5 inch rise, but come with new brake lines, and a coupon for getting your throttle cables extended, but this is not required as you said that there was plenty of room with the existing clable, and lines. You can look for me on yahoo under the screen name douglasthecook, in case you get tired of answering my ?'s this way, you can always IM me.

#93
douglasthecookOk, so the 'Busa clip-ons have a 2.5 inch rise, but come with new brake lines, and a coupon for getting your throttle cables extended, but this is not required as you said that there was plenty of room with the existing clable, and lines. You can look for me on yahoo under the screen name douglasthecook, in case you get tired of answering my ?'s this way, you can always IM me.

The lines and cable extending is probably neccesary for the 'busa. I am pretty sure mine and yours are long enough. Quit laughing now.

Edited February 5, 2007 by DonnyBallGame
#94

You're too kind. Were there any parts for the steering stem that you needed to order?It looks like we can re-use our castlated nuts, but need to get a new retainer for the top nut directly under the top triple tree cover. Were you able to find anything out from Cycle Cat? I have ordered everything with the exception of the clip-ons.

#95

Could you not swap the CycleCat units Left for Right?

Or are there other factors that prevent that?

#96
douglasthecookYou're too kind. Were there any parts for the steering stem that you needed to order?It looks like we can re-use our castlated nuts, but need to get a new retainer for the top nut directly under the top triple tree cover. Were you able to find anything out from Cycle Cat? I have ordered everything with the exception of the clip-ons.

I was able to reuse all the nuts to hold the steering stem on. I even had to reuse the one to hold on the top clamp. Cycle Cat wanted a 10% restocking fee. So I ordered Just the Billet pieces for the "Busa. They should be here this week. I will post up and take picts as soon as possible. Don't make the same mistake I did by ordering the wrong ones. Now I have an extra set of billets I need to try and sell.

#97
veefer800canuckCould you not swap the CycleCat units Left for Right?

Or are there other factors that prevent that?

1) No

2) The way that they are machined and shape really forces them to be used and a left or a right, not either or.

#98
DonnyBallGame
douglasthecookYou're too kind. Were there any parts for the steering stem that you needed to order?It looks like we can re-use our castlated nuts, but need to get a new retainer for the top nut directly under the top triple tree cover. Were you able to find anything out from Cycle Cat? I have ordered everything with the exception of the clip-ons.

I was able to reuse all the nuts to hold the steering stem on. I even had to reuse the one to hold on the top clamp. Cycle Cat wanted a 10% restocking fee. So I ordered Just the Billet pieces for the "Busa. They should be here this week. I will post up and take picts as soon as possible. Don't make the same mistake I did by ordering the wrong ones. Now I have an extra set of billets I need to try and sell.

Ok. I'll wait until you have you new clip-ons to order mine to see if any compatibility issues arise. I'm sure you'll be able to find a buyer on Ebay for your 954 Clip-ons. Pics will definately be useful. I'm pretty much in a holding pattern now until all my parts come in. Everything is removed and/or accessed, just need the darn parts. Thanks again!

#99

Depending on the outcome of your clip-ons from cycle cat, I might go with these.....

http://www.oppracing.com/products.php?acti...uct&id=2301

http://www.oppracing.com/products.php?acti...uct&id=3047

Granted it'll cost me about $100.00 more than the cycle cats, but it looks like a viable option.

How do I get the rubber grips off of the handle bars? I have everything else removed, but my Clymers manual doesn't say anything about getting the grips off.

Edited February 7, 2007 by douglasthecook
#100
How do I get the rubber grips off of the handle bars?

Slide a very thin screwdriver between the bar and grip, then squirt some water in there and it will help slide it off (use soapy water if plain water doesn't work).

Another way is to blow compressed air into the gap while pulling.

The throttle grip is harder to get off, but the same techniques usually work.

Hope this helps. I'm also in a holding pattern waiting for some parts for mine...

#101

OK, so I got my replacement parts from Cycle Cat today. They were the same ones I currently have. So, I called them up and they admitted fault and are shipping out the right ones this afternoon with return shipping to send back the wrong ones. I am still in a holding pattern. i hate waiting for parts. i have a front fender sitting in Des Moines waiting to clear customs, and clip-ons in between here and there. I just can't wait until they all get to my house. The only thing keeping me sane is the now 10 inches of snow in the yard.

#102
douglasthecookDepending on the outcome of your clip-ons from cycle cat, I might go with these.....

http://www.oppracing.com/products.php?acti...uct&id=2301

http://www.oppracing.com/products.php?acti...uct&id=3047

Granted it'll cost me about $100.00 more than the cycle cats, but it looks like a viable option.

How do I get the rubber grips off of the handle bars? I have everything else removed, but my Clymers manual doesn't say anything about getting the grips off.

I will post up some pics for you to see what I see soon. I really don't think there will be room for the OPPRacing ones. You definitely have to see my pics before you decide. If I get my Cycle Cat stuff by Friday, I will be working in the garage this weekend and post up the results.

#103
How do I get the rubber grips off of the handle bars? I have everything else removed, but my Clymers manual doesn't say anything about getting the grips off.

WD-40. Stick the straw between the grip and the bar, squirt. The solvent will help loosen the adhesive.

#104
thx1139
How do I get the rubber grips off of the handle bars? I have everything else removed, but my Clymers manual doesn't say anything about getting the grips off.

WD-40. Stick the straw between the grip and the bar, squirt. The solvent will help loosen the adhesive.

I perfer using isopropyl alcohal (rubbing alcohal). It evaporates clean and doesn't leave any residue (unlike WD-40 or soapy water). Of course, if there's grip glue under there do what thx1139 recommends and use WD-40. :thumbsup:

And when it comes time to put your grips onto the bars, lube up the grip with isopropyl alcohal first. It'll slide right on very easily. Then with a can-of-air (like for your computer), stick the straw under the grip and shoot air in there. This will quickly evaporate the alcohal within a few seconds and your grips will be securely installed! :beer:

Edited February 7, 2007 by MFP-2241
#105
DonnyBallGameOK, so I got my replacement parts from Cycle Cat today. They were the same ones I currently have. So, I called them up and they admitted fault and are shipping out the right ones this afternoon with return shipping to send back the wrong ones. I am still in a holding pattern. i hate waiting for parts. i have a front fender sitting in Des Moines waiting to clear customs, and clip-ons in between here and there. I just can't wait until they all get to my house. The only thing keeping me sane is the now 10 inches of snow in the yard.

Most of my parts are on their way. The only thing that I haven't ordered are the clip-ons. I know what you mean about waiting for parts. I had to have some of my stuff shipped to my parents house, so they can forward it to me. Some companies don't ship overseas. No big deal, just adds to the time.

#106
MFP-2241
thx1139
How do I get the rubber grips off of the handle bars? I have everything else removed, but my Clymers manual doesn't say anything about getting the grips off.

WD-40. Stick the straw between the grip and the bar, squirt. The solvent will help loosen the adhesive.

I perfer using isopropyl alcohal (rubbing alcohal). It evaporates clean and doesn't leave any residue (unlike WD-40 or soapy water). Of course, if there's grip glue under there do what thx1139 recommends and use WD-40. :thumbsup:

And when it comes time to put your grips onto the bars, lube up the grip with isopropyl alcohal first. It'll slide right on very easily. Then with a can-of-air (like for your computer), stick the straw under the grip and shoot air in there. This will quickly evaporate the alcohal within a few seconds and your grips will be securely installed! :goofy:

Thanks for the tips!!! I'll try that this weekend. That's pretty much the last thing that I have to remove, then I'm just waiting for all my parts to come in......

#107

Ok thanks to you guys, I got the rubber grips off. Now how do I remove the white plastic throttle tube? That is the last thing that I need to remove. Thanks!!!

#108
douglasthecookOk thanks to you guys, I got the rubber grips off. Now how do I remove the white plastic throttle tube? That is the last thing that I need to remove. Thanks!!!

You need to remove both the screws that hold the switchbox together. Actually, after you split the switch box open, everything will slide off the end of you clip-on. You do not have to take the throttle tube out of the switch box. Just slide everything off the end.

#109

I already did that, but the plastic white tube that the rubber grip is on seems stuck. I split the case like you said, but I can't get the darn thing off!!! It just doesn't want to come off of the clip-on. What kind of adhesive do you use when you re-install the rubber grips? I'll take another look at my throttle assembly tomooorw, thanks for the assistance!

#110
douglasthecookI already did that, but the plastic white tube that the rubber grip is on seems stuck. I split the case like you said, but I can't get the darn thing off!!! It just doesn't want to come off of the clip-on. What kind of adhesive do you use when you re-install the rubber grips? I'll take another look at my throttle assembly tomooorw, thanks for the assistance!

You have to disengage the throttle cables from the tube. The switch housing needs to be opened quite a bit beyond "cracked".

Personally I've found the HondaBond grip glue to work better than most other stuff. Heard it is made by Three-Bond and their Grip Lock is the same adhesive.

Edited February 11, 2007 by thx1139
#112

Finally, after 1 month of waiting. I got my front fender in the mail today. It is only 10 ozs. Can you believe it. It makes up for the weight gain of the custom front axle. I looks better in person. Well worth the wait. The boys at www.dynomite.co.uk know what they are doing and have great cutomer service. I can't wait to get it on the bike this weekend.

[image: fimgp0743m36c9424rk3.jpg]

Edited February 14, 2007 by veefer800canuck
#113

Sorry if the image is too big for you guys. I played around and could not make it work like the pictures in the past.

#114

How much did the stock fender weigh?

#115
DonnyBallGameSorry if the image is too big for you guys. I played around and could not make it work like the pictures in the past.

I copied the picture URL and uploaded it to imageshack.us and downsized it for you.

Ther is an option during the upload process to shrink the image to various sizes.

Try it, it's free and you don't have to sign up

http://www.imageshack.us

PS: that Carbon fender is far too light. Your bike will be wheelieng all the time and that's a very bad thing.

You should box it up and send it to me right away! :thumbsup:

#116
Hobie1dogHow much did the stock fender weigh?

I don't really know. I am pretty sure it is lighter, but I am guessing mostly. I did not measure it before I shipped it out. I was referencing all the comments I got when I made the solid front axle instead of the hollow R1 axle.

#117
767fixerhad to chime in here... you really didnt expect to see how to remove your grips in the manual did you? lastly one reason you may be having trouble removing your throttle housing from the bar is that the housing has a locating pin to prevent it from spinning on the bar. you will need to seperate the switch unit further to give room for the pin to clear the bar.

your not in aircraft maintenance are you? :unsure: smile.gif

Yeah, the A.F. pays me good $$$ to fix their aircraft. The thing is, I didn't have my manual with me when I posted that (should have waited until I checked my references first). I was at work, trying to recall my difficulties. I wasn't aware of the pin, and I didn't see it in the manual either, so thanks for that tip!!!

#118

Donny, that's a pretty sweet looking CF Fender you got there. Any updates on your progress? I ordered the same Cycle Cat clip-ons as you. I was going to get the DBR13's, but they are out of stock, and Chris from Cycle Cat recommended the ones you got, plus they were in stock. Did you replace your steering stem bearings? I have new ones on the way, and was wondering if you did replace them how you seated them. The Manual says to use a bearing seater, I'm gonna see if I can find a length of pipe the right diameter, and length and see if that'll work for the bottom bearing. Here are pics of my bike in it's current state......

http://vfrworld.com/photos/showgallery.php...500/ppuser/1185

BTW where is Nashua IA? My wife is from Sioux City.

Edited February 16, 2007 by douglasthecook
#119
douglasthecookDonny, that's a pretty sweet looking CF Fender you got there. Any updates on your progress? I ordered the same Cycle Cat clip-ons as you. I was going to get the DBR13's, but they are out of stock, and Chris from Cycle Cat recommended the ones you got, plus they were in stock. Did you replace your steering stem bearings? I have new ones on the way, and was wondering if you did replace them how you seated them. The Manual says to use a bearing seater, I'm gonna see if I can find a length of pipe the right diameter, and length and see if that'll work for the bottom bearing. Here are pics of my bike in it's current state......

http://vfrworld.com/photos/showgallery.php...500/ppuser/1185

BTW where is Nashua IA? My wife is from Sioux City.

I did replace my steering stem bearings. I chose to go with tapered bearigs from www.allballsracing.com . Install went very smooth. I used a socket as a bearing driver and smacked the socket with a hammer. Everything seated into the frame fine. I did need to make a long tube for pressing the bottom bearing on to the steering stem. After that was made, I used a press to get things seated there.

When I reordered my billet chunks from Cyclecat, they made a mistake and sent me what I already had. So they told me the correct ones, includung return shipping, were on the way. 4 days go by and I decide to check in withthem to see where they are. The same gal tells me that I need to send the wrong ones back before they can ship the correct ones to me. Needless to say, i was a little frustrated that day. Hopefully I can get them today and work on the bike this weekend.

Your bike looks a lot like mine did a few weeks ago. They look pretty crappy when they are all tore down and parts laying here and there. I have got mine back together now, with exception of the clip-ons and front fender. I am hoping to get it all done this weekend.

I am in North East Iowa. 1 hour east of I-35. One the new "Avenue of the Saints", 45min north of Waterloo. We have curvy roads 1 hour east of me near the Mississippi.

#120

Ok, much thanks to 767Fixer I was able to remove the throttle assembly from the clip-on. My next question is what have you guys been usingto torque the steering stem retention nuts ( the castlated ones with the keeper under the top triple tree)? It looks like a special tool/socket is needed, and I'm not too sure if the wife will let me spend any more $$$, as I just spent a little over $2k on parts for my VFR. Any advice/guidance will be greatly appreciated. And many thanks goes out already!!!

#121

There's a topic somewhere that shows a few option (taking an anglegrinder to a big socket is one). Have a look in the Maintenance section.

#122

Found it!!!!! This site is alot bigger, and more informative that I previously thought!!!!! http://www.vfrdiscussion.com/forum/index.php?showtopic=29080

#123

Well, I think I have finally won the battle. I only have the Bar-end Mirrors to mount and apply some zip ties and powder coat an unexpected spacer. Pics to follow as soon as it is day light and I get a break from my real job.

After a month of trying, I got all my needed parts from Cycle Cat today. What a pain that was. Enough said about that. I fit the Suzuki 'Busa risers under the top triple clamp. Above was too high. If the risers would have been 25mm shorter, it might have worked on top better, but since they are what they are, under they went. Now for the unexpected spacer. I needed to raise the top clamp to get the clip-ons higher on the fork tubes for some much needed clearance between them and the dash. The cinch bolt on the clip-ons likes to hit the dash if they are not turned just right. The spacer is just a big washer I had laying around. I will get you specs when I remove it for powder coat. It is about 4 mm thick and goes on the steering stem between the top clamp and the lock nut below it.

The Cycle Cat risers work OK. They have plenty of adjustment which really helps with this application. Is there something better? Possibly. I am going to give these a try for now, but I may investigate an LSL Suberbike style setup next winter. We will have to see how things play out.

I will get some pictures of the tight quarters as soon as I can. Thanks for your patience.

#124

So, I am trying to get things all buttoned up today and discover that there is an issue with the choke cable. It is too short now. I looked into rerouting it, but no luck. Just wanted to ask anyone if they know of a cable that is 1 to 2 inches longer from another CBR-VFR that may work. Any ideas? Thanks

#125

This is definately not good news. Have you tried to contact Cycle Cat and see who they go through? I know that there are companies out there that do this. Another route would be to measure the length of the choke cable and see what else is out there. Speedzilla is a good resource that I use occasionally. I'll do some research as well, and hopefully one of us will come up with a solution. I suppose another option would be to call some dealers in your area and see if they know anything. There aren't too many english speakingdealers where i'm at currently, unfortunately.

#126
douglasthecookThis is definately not good news. Have you tried to contact Cycle Cat and see who they go through? I know that there are companies out there that do this. Another route would be to measure the length of the choke cable and see what else is out there. Speedzilla is a good resource that I use occasionally. I'll do some research as well, and hopefully one of us will come up with a solution. I suppose another option would be to call some dealers in your area and see if they know anything. There aren't too many english speakingdealers where i'm at currently, unfortunately.

I will get on the horn to my local dealer tomorrow. Contacting Cycle Cat is also an option worth trying. I will do both tomorrow and post the results.

#127

I know MotionPro sells cable in a wide assortment of sizes and lenghts so this may be another option. I treid to find the link that I had for a company that I knew of that did cable lenghtening, but I can't seem to find it. Are the throttle cables long enough? It seems (logically thinking) that if the choke cable is too short that the throttle cables may be as well. I e-mail Chris from Cycle Cat, and will check my e-mail when I get home. I'll let you know what I find out.

#128

Ohlins RC 51 forks are only 2500 dollars. Just buy some of those.....

Not a chance.

#129

Ok, this is what I got back from Cycle Cat.....

Doug,

The kit you ordered was a custom kit for a VFR I believe. There are no

cables or lines included in this kit. We recommend Speigler. Please let

me

know if there is anything more we can do for you.

Chris Calovini

Director of Business Development

Moto Millennia division, Havensmark, LLC

ph: 614.577.8080 x 102

fax: 614.577.8088

email:chris@motomillennia.com

Not too sure if you ordered a custom kit or not. I did. I'm going to look into Speigler.

#130

I contacted Motion Pro. They sent me the necessary form to get a cable lengthened. Just send them the original, and tell them how long you want it, and they will make it. $30 bucks a cable. I also talked to my Honda dealer and He told me I could come down and look through the inventory. I think I am going to send mine off to Motion Pro. I will check on the trhottle cables also.

#131

After a closer look, the throttle cables are a little snug as well. I am going to look into this idea a little more. There is some left over bar to the iside on the clutch and brake resivoirs. Almost .75 to 1 inch. I am going to slide them in as far as possible and redrill the holes in the tube for the switch boxes. That may give me enough not to need the extended cables.

I really need to get some pics post for you Doug. I will try to get some soon. Sorry :goofy:

#132

OK, so my first observation with the resevoirs slid all the way in. Looks like that is what the doctor ordered. Bad news is, the brakelines and clutch line run into the top triple tree. Time to get some Russell or Goodridge custom ends and made some lines. I was not happy with the twists in my Galfers anyway.

#133

Fun, innit? :goofy:

No recent updates from me/mine because the spacers I had made for the R1 hardware are proving difficult to fit - more in my own topic when I get around to it...

#134
The PhantomFun, innit? :goofy:

It is a hoot. Assemble, Disassemble, Assemble, Think you got it right, take it apart again. Tenacity and patience really pay off here.

#135
DonnyBallGameTenacity and patience really pay off here.

And planning... I had my axle spacers made without stopping to think about which side of the original spacers the custom ones had to go... they will work, but it's not as 'perfect' as I'd like it. Pics will show what I mean.

#136
DonnyBallGameOK, so my first observation with the resevoirs slid all the way in. Looks like that is what the doctor ordered. Bad news is, the brakelines and clutch line run into the top triple tree. Time to get some Russell or Goodridge custom ends and made some lines. I was not happy with the twists in my Galfers anyway.

Pics would definately be a plus. I just installed the Galfer lines on my front forks. No custom ends there. Hopefully we can find a work around on this. I'm still waiting for my packages from my parent's house. They just sent them yesterday supposedly. I'm already tired of waiting to put my bike together. It's been rather nice here lately, and I'm dying to ride!!!!

#137

OK, the thread is getting long. I am going to do a brief recap and update my Parts Used list.

Frankenviffer's Checklist:

1. Forks

c. R1

2. Wheels

These are various five or six-spoke front wheels that are a good cosmetic match for the OEM rear wheels

a. OEM

3. Wheel bearings

a. OEM

4. Wheel spacers

b. Left outer: Custom, ordered from www.misumi.com

c. Right outer: Custom, ordered from www.misumi.com

5. Rotors

a. OEM

6. Calipers

f. Yamaha R1/R6/FZ-1/Warrior

7. Front Brake Master cylinders

a. Honda CBR600F4 (front)

8. Rear Brake Master cylinders

a. OEM

9. Lower triple clamps

b. CBR929/954

10. Upper triple clamps

b. Vortex / '00-'01 RC51

I used this to get the clip-ons as high as possible so the clip-ons do not interfere with the instrument cluster. I do noe like the looks of the 929 Top Clamp with a spacer under it.

11. Steering head bearings

Tapered bearing kit from Allballs Racing

12. Clip ons

Cycle Cat: Suzuki Hayabusa

Altered: Needed to shorten the tubes and redrill the holes for the control boxes. Moved everything in by .750 inches.

Also, because of tight clearance issues, the brake lines and clutch line needed to be re routed, via Goodridge Custom ends from Dennis Kirk. I used the ones where you get to pick which end you want, them attach the correct length line.

13. Front Axle

Custom made. A turned down R1 axle was too scary for me. My axle is now solid Stainless Steel

14. Brake Lines

Goodridge custom length lines.

36" on the clutch, 90° banjo fitting at the top, 25° banjo fitting at the bottom.

28" on the left brake caliper, 90° banjo fitting at the top, 15° side angle banjo fitting at the bottom.

25" on the right brake caliper, 45° banjo fitting at the top, 15° side angle banjo fitting at the bottom.

These are a little spendy, but they are the right length and have no kinks to deal with. Figure $12 per banjo and $32 per line. Don't forget new crush washers either.

I am going outside now to take some pictures. Wish me luck.

Edited March 14, 2007 by DonnyBallGame
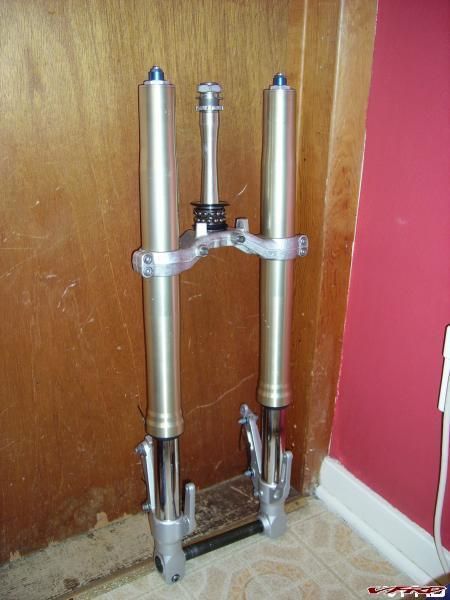
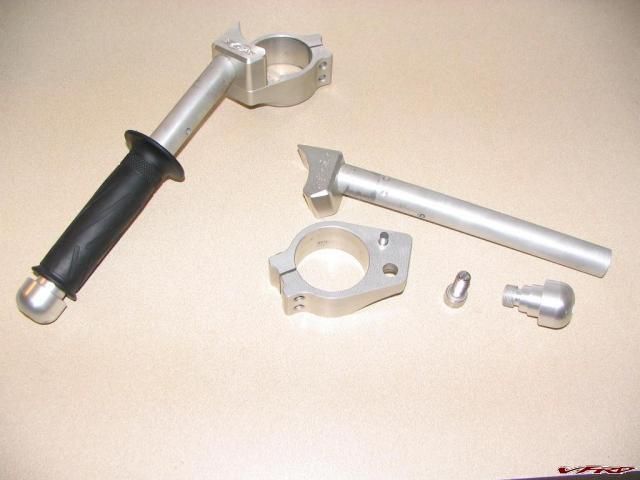
#138
DonnyBallGameI am going outside now to take some pictures. Wish me luck.

Good luck! Let's see it!! :thumbsup:

#139

First the front axle

[image: t_IMGP0776m_67add95.jpg]

GONE TO LUNCH be back in 4hrs.

Right Spacer

[image: t_IMGP0780m_7c96ec2.jpg]

Left Spacer

[image: t_IMGP0781m_01b77e4.jpg]

Clearance Views and Lines (note the positions of the hose ends. They need to miss the fork tubes and instrument cluster.

Pics taken at full left and right steering.

[image: t_IMGP0771m_a5e5529.jpg]

[image: t_IMGP0772m_3dcc5a1.jpg]

[image: t_IMGP0773m_2556001.jpg]

[image: t_IMGP0774m_4ff78bb.jpg]

[image: t_IMGP0775m_4b25ef1.jpg]

[image: t_IMGP0777m_1aa22af.jpg]

Curved Oil cooler and Inner Fairing Clearance Notches

[image: t_IMGP0778m_fec1058.jpg]

[image: t_IMGP0779m_7d5b75d.jpg]

That is it for now. Hope they help. More when I get it all buttoned up.

Edited March 11, 2007 by DonnyBallGame
#140
DonnyBallGameGONE TO LUNCH be back in 4hrs.

WHAT!!!!!!????? :blink:

:blink:

#141
douglasthecookOk, this is what I got back from Cycle Cat.....

We recommend Speigler.

Ahh... a true connaisseur of the motorcycle trade......

Shall we make that Spiegler? :blink:

#142

Ok, when you get back from lunch, will the pics show your unique items, such as your 4mm spacer under the vortex top triple clamp? I'm really curious so see the details of the brake and clutch lines. Why did you need to shorten the tubes? Hopefully my parts will be in this week, and I can put mine back together. I'm using the master cylinder from the 954 as well, so we'll see how mine differs from your CBR 600 F4 master cylinder. I'm really looking foward to comparing notes with you and Phantom, when i'm done of course. And again, many thanks to you guys, as this is not something that I would have tackled w/o the knowledge of the ppl on this website!!!

#143
douglasthecookOk, when you get back from lunch, will the pics show your unique items, such as your 4mm spacer under the vortex top triple clamp? I'm really curious so see the details of the brake and clutch lines. Why did you need to shorten the tubes? Hopefully my parts will be in this week, and I can put mine back together. I'm using the master cylinder from the 954 as well, so we'll see how mine differs from your CBR 600 F4 master cylinder. I'm really looking foward to comparing notes with you and Phantom, when i'm done of course. And again, many thanks to you guys, as this is not something that I would have tackled w/o the knowledge of the ppl on this website!!!

I will get pictures of the RC51 Top Clamp as soon as I recieve it. I will do a fitup to see if it will work like I want it to and post the results. It should be here this next week. If it works, it will come off again and get powder coated.

I needed to shorten the tubes because the throttle cables and choke cable would have been too short. There is plenty of room left to shorten them. I took .75 off mine.

#144

So I'm sitting here looking at the pics of your mods so far. Looks pretty good if you ask me. How much did the custom brake lines cost? I just installed the new Galfer lines on my front end last weekend, and am just waiting for the remainder of the parts to come in before I finish up. I'm guessing you removed the material from the tubes from the inside ends, as the bar end weight still needs a hole that has been tapped.

#145
douglasthecookSo I'm sitting here looking at the pics of your mods so far. Looks pretty good if you ask me. How much did the custom brake lines cost? I just installed the new Galfer lines on my front end last weekend, and am just waiting for the remainder of the parts to come in before I finish up. I'm guessing you removed the material from the tubes from the inside ends, as the bar end weight still needs a hole that has been tapped.

The custom lines are going to cost in the neighborhood of another $160. The big benefit is roting them where I want and they will be kink free. I did remove the material from the outside end of the tubes. There is a machined feature to the inside that makes this difficult to do on the inside. The tubes also come hollow. We need to figure out what we are going to do about bar-ends. :thumbsup:

#146

If you have a tap and die set, perhaps you could use the stock bar ends from your old tubes??? I have such a kit, and may look into doing that. Not too sure if you've seen this website, this guy is one of the first to start this mod I believe. Not too sure how he was able to use the brakes lines that he did, unless the bar risers had more than a 2.5 inch rise. I think the best pic that illustrates is the 8th pic, the cockpit view. I enjoy tinkering, but I'm getting tired of watching other ppl ride. It's alomst 55 degrees, and quite sunny here in Germany today, and if my baby were servicable, I'd be on her. I sure hope all this is worth it..........

http://www.hiperform.com/vfr_project.htm

#147

Some of my stuff came in today, so I was able to install my wave rotors, and hang my forks!!!!!!! Progress is FINALLY being made. Now we'll see just how long it takes for the rest of my stuff to come in.

#148

Glad to see you guys both progressing, wish I could say the same - kids have been sick, wife has been sick, still gotta go to work... there's not a lot of motivation to get out to the garage, till I log on here and see what you're up to : )

DBG your front end (first pic) looks fantastic - most of the Frankenviffers don't look all that remarkable after the swap, until you look closely. Not yours - that front end and guard leap out at you like, well, an NR front end would do. Think it's the shiny hardware against the black wheel and guard combo. Very very nice! The $ spent on the guard were well worth it.

#149

Great job! Lets see some more picks.

#150

Thanks for blazing the trail for future fork swaps. Lookin' Good. :salesman:

#151

I just got my triple tree clamp today, Lines should be here tomorrow. This weekend is suppose to be sunny, so I will get it ou and take more pictures when it is finally complete. Thanks for your comments. I can't wait to get it out and ride it. That will be the real test and reason for doing this mod. Oh, and to be different of course.

Douglasthecook, or anyone else for that matter, if you have any questions, feel free to PM me anytime. I am always glad to help.

OK, I could not resist the urge to visit the garage. The RC51 Top Clamp by vortex was made just for me. (Pictures to follow soon) Since I have the longer YZF-R1 Forks, the Fork tubes are flush with the top of the clamp. Looks great. I was also able to raise my clip-ons another .625 inches. Whahoo!!! No more collisions with the instrument cluster and I get to use the full range of adjustment of the Cycle Cat Risers! I am pumped! Now I am really excited about getting it on the road. :beer:

Edited March 13, 2007 by DonnyBallGame
#152

OK, I got all my database info updated on the previous page. I added the length and fittings of the lines I used.

I got the brakes and the clutch bled tonight. I was so excited that I went over everything twice, torqued things that need torqued, and took it around the block a few times. IT"S ALIVE!!!

The steering was a bit heavy, after I got back I checked the front tire pressure. 18 psi will have that effect on handling. Other than that things worked out great. I can't wait to get it on the road for the real shake down. The major thing I noticed first was the brakes. They work really well. The first bad thing I noticed was the increased turning radius. I made a few U-turns at the end of the block and it became noticable really quick. I am going to adjust my dead stops to gain the most steering movement I can. The one place I need to watch is the fork tube to radiator collision. I maay look into moving the top of the radiator back to gain some more room to turn the steering. More on this later. Right now, it is 100% rideable, and I am happy. Now it needs a good bath and some "After Winter Mods" pictures.

#153

Yippee! Very pleased for you. Looking forward to pics and futher impressions.

#154

SWEET!!! Glad to hear that she's alive, and breathing again. Mine is still on life support, although she is getting noticable better. Hanging the forks the other day really made me feel like I've accomplished something. Now if the rest of the parts would get here...follow the link for pics...

http://vfrworld.com/photos/showgallery.php...500/ppuser/1185

Edited March 14, 2007 by douglasthecook
#155

Ok, so I got most of my parts in last night. All the ones that I need to finish up my front end swap hopefully, providing I don't have any issues with some of my stock components. I decided to swap the left and right bar risers so that the mounting tabs face the rear of the forks, and won't hit the instrument cluster. We'll see if this works. I'll be busy this weekend for sure. Your bike looks really good BTW, DBG!!! HEY!!! Where are the pics of your custom upper???

Edited March 16, 2007 by douglasthecook
#156

Donny Ball Game,

Good luck on moving the upper radiator mount. Its VERY tight there. Maybe you could move it down and back and redo the entire radiator mounts system. That would be fun.

Larry

VFRrider

#157

All buttoned up, for now. I need to start riding it now. Later next week looks like the weather will finally start to cooperate around here.

[image: gallery_4783_2375_29402.jpg]

IMGP0792.JPG

This top clamp really needs to be black.

[image: gallery_4783_2375_913746.jpg]

IMGP0795.JPG

Note the clearance between the reservoirs and the Cycle Cat risers.

[image: gallery_4783_2375_536931.jpg]

IMGP0796.JPG

[image: gallery_4783_2375_377375.jpg]

IMGP0794.JPG

This project has been fun. I have enjoyed chatting with everyone. A big THANK YOU goes out to all who have helped, you know who you are. :thumbsup:

Let's keep it going for Douglasthecook. The stage is yours.

#158

Your bike looks really nice, glad it all came together!!! Hopefully I can get mine looking as sharp as yours!!! I think I'm going to use the Cycle Cat bar ends, as it doesn't look like I'm going to trim my tubes, but as you know with this project things change daily it seems!!!!!

#159

Ok, a little update on my project. I'ts 90% completed, I have a clutch master cylindar on the way, as well as a new 954 top triple clamp. My bike is finally off the stand, and is proudly standing on it's own power and two wheels. Hopefully I'll have it finished by next weekend. It would have been finished alot sooner if I were back in the States, but I'm not ( quite enjoying Germany BTW) and it takes forever for stuff to get here in the mail, priority even!!! Soon I'll have pics on my bike, I've been calling her the "Swan" after hat goofy show that lasted two seasons where they took some average looking woman, spent alot of $$$ on her to make her look above average. I'll let you guys decide when it's all said and done.

#160
douglasthecookOk, a little update on my project. I'ts 90% completed, I have a clutch master cylindar on the way, as well as a new 954 top triple clamp. My bike is finally off the stand, and is proudly standing on it's own power and two wheels. Hopefully I'll have it finished by next weekend. It would have been finished alot sooner if I were back in the States, but I'm not ( quite enjoying Germany BTW) and it takes forever for stuff to get here in the mail, priority even!!! Soon I'll have pics on my bike, I've been calling her the "Swan" after hat goofy show that lasted two seasons where they took some average looking woman, spent alot of $$$ on her to make her look above average. I'll let you guys decide when it's all said and done.

Sounds like your having fun. I can't wait to compare our 2 bikes once you are done. Too bad we can't get together and do a ride comparison. That would be fun.

I have riden mine for 3 days now. Biggest improvement I notice is the brakes. THEY ARE THE BOMB! The springs are too soft for my liking, so new ones are on the way. BTW, R1 front springs are a pain to change. You really need the correct tool to compress the spring before you can get the fork caps off. What a rip. Anyway, IMHO, if you are as happy as I am after the swap, all the pain in shipping and $$$ spent is all worth the out come.

#161

Ok, so after about a month of waiting for all my parts to come in, everything is back together!!! So far the initial riding impressions are quite good, the 954 Front end offers up ALOT more feedback, and the brakes are OUTSTANDING!!! The Micron pipe sounds GREAT!!! I'm quite happy with the sound, appearance, and build quality of it. I haven't been able to test out the wind protection of the new windscreen yet, as I'm still scrubbing in my new tires, and don't want to put myself in a position that would put me back to square one. As far as the change from the 45T rear sprocket, again around town I haven't had a chance to really fel it out yet. Perhaps by the end of the week. Pics can be found here...

http://vfrworld.com/photos/showgallery.php...amp;ppuser=1185

I found it easier to just use my VFRWorld album, as the pics were already updated, and didn't see a need to post them twice. However if you guys think I should post some here as well, let me know and I'll attempt to do such. Thanks to everyone that helped, listened, gave advice, and paved the way for this to get done. It it weren't for the VFR community, this would have never happened!!! You guys and gals are the best!!!!!

Edited April 8, 2007 by douglasthecook
#162

Very cool! Thanks for inviting us along. :thumbsup:

#163

i like it !!! sweet !!!

#165

Great looking work. Everything looks like it went together as planned. I like the front fender.

#167

Thanks for the compliments!!! It was rather fun to do. DBG, as far as the front fender goes, I think yours is of a better quality, if mine ends up cracking I'll order from the same place that you got yours from. Other than that I'm quite pleased with the results!!! I ended up swapping the Cycle Cat clip-ons to the opposite sides, as the coffin style reservoirs gave me some clearance issues. The 954 brake master cylinder fixed that, and I found an Aprilia clutch master cylinder of Ebay as well. I kept the clip-ons swapped because the pinch bolt contacted the instrument cluster, the way I have them now they are in the back and don't touch the instrument cluster. I didn't have any issues with my throttle cables, however it seems that my choke cable may be a little short, or in need of adjustment. It never seemed to work 100% before the swap, so it's something that I'll look into at a later date. After I get a good set of leathers and boots the next items on my list are an aftermarket rear shock, and some Predator or Motad headers to go with the Micron pipe.

Edited April 9, 2007 by douglasthecook
#168
douglasthecookThanks for the compliments!!! It was rather fun to do. DBG, as far as the front fender goes, I think yours is of a better quality, if mine ends up cracking I'll order from the same place that you got yours from. Other than that I'm quite pleased with the results!!! I ended up swapping the Cycle Cat clip-ons to the opposite sides, as the coffin style reservoirs gave me some clearance issues. The 954 brake master cylinder fixed that, and I found an Aprilia clutch master cylinder of Ebay as well. I kept the clip-ons swapped because the pinch bolt contacted the instrument cluster, the way I have them now they are in the back and don't touch the instrument cluster. I didn't have any issues with my throttle cables, however it seems that my choke cable may be a little short, or in need of adjustment. It never seemed to work 100% before the swap, so it's something that I'll look into at a later date. After I get a good set of leathers and boots the next items on my list are an aftermarket rear shock, and some Predator or Motad headers to go with the Micron pipe.

I wondered what reservoirs you were running. That is something I may check into later as well. The one thing keeping me from that right now are my great Pazzo levers. If I got different master cylinders, I would have to buy another set, and I really just want to ride now and put things off 'til next winter. It was also good to see your wheels. I like the looks of the polished rim lips on the 4th gens. That may happen soon here as well. You have a great looking bike.

#169
DonnyBallGame
douglasthecookThanks for the compliments!!! It was rather fun to do. DBG, as far as the front fender goes, I think yours is of a better quality, if mine ends up cracking I'll order from the same place that you got yours from. Other than that I'm quite pleased with the results!!! I ended up swapping the Cycle Cat clip-ons to the opposite sides, as the coffin style reservoirs gave me some clearance issues. The 954 brake master cylinder fixed that, and I found an Aprilia clutch master cylinder of Ebay as well. I kept the clip-ons swapped because the pinch bolt contacted the instrument cluster, the way I have them now they are in the back and don't touch the instrument cluster. I didn't have any issues with my throttle cables, however it seems that my choke cable may be a little short, or in need of adjustment. It never seemed to work 100% before the swap, so it's something that I'll look into at a later date. After I get a good set of leathers and boots the next items on my list are an aftermarket rear shock, and some Predator or Motad headers to go with the Micron pipe.

I wondered what reservoirs you were running. That is something I may check into later as well. The one thing keeping me from that right now are my great Pazzo levers. If I got different master cylinders, I would have to buy another set, and I really just want to ride now and put things off 'til next winter. It was also good to see your wheels. I like the looks of the polished rim lips on the 4th gens. That may happen soon here as well. You have a great looking bike.

Thanks!!! I would like to get the Pazzo levers as well, but that'll be saved for later, waaay later!!! Spiegler has some sweet radial master cylinders for the brake and clutch (http://www.spieglerusa.com/cfm/mc_ca.cfm), that is another option that I have considered, but I just want to ride, I'm tired of down time!!! I would like to upgrade to those eventually, but I have other mods on the list ahead of those. Your bike looks really good to, your fairings are in ALOT better shape than mine!!! It's kinda funny how we both went with a CF front fender, and a double bubble windscreen. As far as the rims go, it wasn't that time consuming, very rough on the hands though. I did all the sanding and polishing by hand. It took about a day per rim. I don't like alot of chrome or polish, but a little can go along way to making a big difference, like your custom top triple clamp (that thing is SWEEET), really makes your cockpit stand out!!! If you decide to do yours, just hit me up, and I'll give you the details, I'd be more than happy to help, as you've helped me quite a bit on this, thanks again for that BTW!!! Now if we can only get Phantom to finish his project up, there just might be enough Frankenviffers to take over the world!!!

Edited April 9, 2007 by douglasthecook
#170

What are you doing about mirrors? Didn't see any on there..did see mirror block-off plates on the fairing.

#171

[image: IMG_1494.jpg]

Now THAT is how the 4th Gen should have come from the factory!

Congratulations DTC - fantastic job. You and DBG have kicked it hard!

I hear ya about finishing mine - just had four days off work and didn't have time to hit the shed even once... sigh... this week I have some 'quality me/bike time' locked in, and I'll be making up for it.

#172

excellent work guys. I was thinking of changing a VFR 750 into a ' streetfighter' with just a small fairing ( I actually like the kinda 'mod' Kawas. Z 1000 mini faring)

- I think the V 4 - if it could be 'cleaned up' plus Alum frame, single S. Arm would be cool, but further investigation kinda rules that out as too complex for me ( headlight / fairing wiring the biggest drawback. ) and the fork conversion looks a little complex - I think with the old classic NT 650 Hawk, ya can just bolt on the fireblade triple clamps / forks, and the 'blades weight is actually fairly close to Hawks .

I still think Honda shoulda offered a VFR stripped down ' streetfighter style' - with sportier 'blade forks, etc of course adjusted to different weight. Maybe next year. NOT intended to divert this useful thread to THAT useless rant. good job, with bikes & writeups.

#173
Hobie1dogWhat are you doing about mirrors? Didn't see any on there..did see mirror block-off plates on the fairing.

I owe you guys one more picture. I use a set of Bar-end mirrors that I designed. I saw them on a friends ZRX1100 and reverse engineered them. They take a little getting use to, but I like them. They are alos powder coated black now.

[image: gallery_4783_2375_793755.jpg]

IMGP0451.JPG

#174

Thanks Phantom and Goodhawk for the kind words. DBG, dang dude, everytime I see your bike I notice yet another nice touch on your bike, such as the custom exhaust hangar, and lack of passenger footrests. I wish I could could do that to mine, however I like it when my wife holds me close on rides!!! I like those bar end mirrors, how well do they work? Your bike looks really clean w/o the mirror stalks sticking waay out in the wind!!!

#175
douglasthecookI like those bar end mirrors, how well do they work? Your bike looks really clean w/o the mirror stalks sticking waay out in the wind!!!

My wife doesn't ride with me much, so there are a few weeks in the summer when my grab handles and passenger pegs go back on for her and my kids. Otherwise the seat cowl and lack of pegs keep our marriage entacted.

I really like the bar end mirros. I am no longer looking into my shoulders. I also like the racy look that the bike gets with the block off plates.

#176

I know that this is an old thread, but i think that i will try and see what parts that i need to change the front end of my bike a vfr750 FR 94, model.

So can some one please list a part list of what is needed to change the front end to a cbr600f3-4 or a vtr1000.

what wheel ,disc's, callipers, fender, yoks, etc

also what would be the easiest way to do it with your vast experience.

cheers jools

#177
joolsvfr

I know that this is an old thread, but i think that i will try and see what parts that i need to change the front end of my bike a vfr750 FR 94, model.

So can some one please list a part list of what is needed to change the front end to a cbr600f3-4 or a vtr1000.

what wheel ,disc's, callipers, fender, yoks, etc

also what would be the easiest way to do it with your vast experience.

cheers jools

Do a search on "frankenviffer" get a beer and start reading :biggrin:

#178

that is one great looking vfr750 The Phantom, this one and Douglasthecook's bike are bloody tops. great work

End of thread · 178 posts recovered Wayback Machine snapshot 15 Sep 2025