VFRDiscussion ARCHIVE / READ-ONLYREAD-ONLY

Vnr? Wtf! Nr750 Replica

278 posts Started 21 May 2013 Last recovered post 5 Apr 2017 Wayback Machine snapshot 10 Jul 2017

#1

Hi there,

I just want to let you have a sneak weiv on my project.

I got inspired of the French guys very nice NR-replica.

However I really don´t have the time and patience of molding my own fairings like he did…so when I found NR-replica fairings in fiberglass (poly26) I felt I had to make an attempt of building a replica of my dream bike.

The fairings is not a exact replica, they are made for early CBR900 (for some reason?), so changes must be made.

[image: post-26810-0-87777700-1369137656.jpg]

To make this project realistic and on a reasonable economic level, the goal is a replica (or a look-a-like) that will pass for a NR at a glance.

My plan was to make this a winter project, but I couldn´t wait so I had to jump to the gun…

The recipe:

VFR 94-97

Replica fairings

CBR900-99 forks

CBR1100 mirrors with integrated indicators

Self made exhaust system

Details to be solved as I go

First step was to order the fairings and finding a reasonably cheap VFR.

A 95 VFR was acquired and stripped down.

[image: post-26810-0-95103300-1369137705.jpg]

Current status is that lower CBR900 yoke is in place (have to adjust steering stop to prevent fork tubes of hitting radiator)

Forks are waiting for new seals.

[image: post-26810-0-93012800-1369137736.jpg]

If you wonder how calipers looks inside after 10+ years of inactivity…like something from a horror movie!

[image: post-26810-0-84140700-1369137757.jpg]

I´ll update this thread as I go, but there will be slow progress during summer...
#2

This should be a good one to watch

#4

Bra!!! :beer:

#5

Interesting project.

I have a perfect candidate for the NR replica - 6th gen....

About NR ferrings: I wonder what would it take to get someone with a set of original ones to make a mold and fab a set based on it.

Prolly notgonahepen though.

#6

Can't wait to see how this one turns out. :lurk:

#7

I would love to see more pictures of the fairings, very cool project.

#8

figuring out the headlights would be interesting, as I don't think the 4th gen headlights would fit in that lower profile upper fairing .

I suspect one would have to cobble up some sort of multiple HID/Projector headlight arrangement, behind a clear Lexan lens?.....

Blackbird mirrors might also work out, with some modifications.....

The tail/exhaust system would be a big project, just on its own....

#9

Wow, I really want that tail for my bike. I'm gonna look for it.

#10

Thanks for the encouragement guys!

I´m realize this is going to be difficult…but that´s part of the challenge.

If someone wonder what a NR750 is:

[image: post-26810-0-34854600-1369199381.jpg]

Only 500 made by Honda in 1992-1993 as a technical show-off without budget limits..

Oval pistons, carbon fibre bodywork with unbeliveble finish, fuel injection (remember this was ´92)

Edited May 22, 2013 by AndreasH
#11

Pics of the fairings:

[image: post-26810-0-12833400-1369218397.jpg]

[image: post-26810-0-80383900-1369218426.jpg]

(The rear end I got is a single seater)

Made by Poly26 in France (poly26.com)

Prob is they communicate only in French…(in 2013?…France in a nutshell? :wink: )

However, google translate worked for me.

Finish of the fairings is OK, partly a bit rough but doesn’t matter in my case since I have to adjust them anyway.

(I have loaded up with filler, polyester and fiberglass fabric)

Edited May 22, 2013 by AndreasH
#12

If you need close up pictures of a real NR for any reason, just tell me. There is one a couple of miles from my home.

#13

Very cool thanks for the fairing pictures

#14

Welcome to VFRD AndreasH, quite an entrance, and you have a nice stable of bikes there.

An NR replica has been high on my interest list for many years. It's good to see someone who is out to do it properly :fing02:

The headlight cut-outs in that fairing are all wrong, but you know that. As Beck suggests, and I have given this a LOT of thought over the years as well as investigated all manner of car headlights and foglights, a custom projector system and housing is the go. Have a look here for the projectors, I have a pair of their products (3" 35W HID) in a Nissan Patrol and can attest to their quality.

http://www.theretrofitsource.com

Beck also mentions CBR1100XX SuperBlackbird mirrors, and they are spot on - in fact, the Blackbird used the NR mirror assembly lock stock and barrel. They are pricey though, around $700 AUD for a pair. I have a pair assembled from a combination of used and new parts (a simple drop ALWAYS breaks the internal bracket system but that is only $40 from Honda) and I think it cost me around $250 AUD all up. Yes, purchased with the intent of building an NR replica...

You might also want to go with 3M carbon wrap along with your paint (assuming you go red, which I think is a must):

http://solutions.3m.com/wps/portal/3M/en_US/Graphics/3Mgraphics/Products/Series1080/

The guy who owns Tyga Exhausts in Thailand owns an NR and has documented the exhaust system he built for it online - lots of pics which might be of some use to you:

http://tyga-performance.com/site/index.php?cPath=73_528

#15

:lurk: good project, but shame on you for using a nice looking black 4th gen, hope you tuck away all the plastics, they will be worth a bomb !

#16
Dutchy

If you need close up pictures of a real NR for any reason, just tell me. There is one a couple of miles from my home.

Thanks Dutchy,

I have the opportunity to take pictures of a genuine NR.

There is a brand new one (never even started!) standing in at a dealer just a km away from my work!

But…it´s standing in a glass cage. So I can take pictures, but I cannot get measures like I would need to get details right.

So if you have the chance to get close to a NR I would be very grateful if you could get some measures of a few things.

BR

Andreas

#17

:lurk: good project, but shame on you for using a nice looking black 4th gen, hope you tuck away all the plastics, they will be worth a bomb !

Don´t worry!

Everything I plan to do is restorable. No permanent damage. :rolleyes:

Stock fairings is in a safe place.

I have a couple of extra rear side panels (from a breaker) that I intend to merge with the NR-rear in order to get a nice fit with a stock fuel tank (also from the breaker)

So if the mission fails I can restore the VFR (but the self-esteem would be badly hurt…)

Edited May 23, 2013 by AndreasH
#18
The Phantom

Welcome to VFRD AndreasH, quite an entrance, and you have a nice stable of bikes there.

An NR replica has been high on my interest list for many years. It's good to see someone who is out to do it properly :fing02:

The headlight cut-outs in that fairing are all wrong, but you know that. As Beck suggests, and I have given this a LOT of thought over the years as well as investigated all manner of car headlights and foglights, a custom projector system and housing is the go. Have a look here for the projectors, I have a pair of their products (3" 35W HID) in a Nissan Patrol and can attest to their quality.

Hi Phantom,

Thanks!

I know about the headlights cut-out.

I think the reason they are made bigger is that the manufacturer also sold a kit with twin headlights.

But they were not even close to the NR so I skipped those.

My plan is, as you suggest, find a pair of projector lights and build my own headlight.

But first I must get the cut outs right. I have made an enlargement of a picture of the NR lights to use as a template. But the best thing would be to get accurate measures from a genuine NR…

I already got the 1100XX mirrors, real cheap from a breaker.

Yepp, I also got the carbon fiber film in mind.

Powerbronze is making windscreens in a color called cool blue, which is kind of like the NR´s iridium screen.

Just need to find out what bike has about the same size of the screen that I need.

The exhaust system will be interesting…I will build it “myself”.

Since I´m in the Aluminum business I have access to the material and (not the least) workshops that can help me out.

So it will be a custom made system all in Al (with modified stock downpipes)

Of course the bike will be red! Anything else would be a sacrilege.

BR

Andreas

Edited May 24, 2013 by AndreasH
#19

Hej hej Andreas,

Am at the airport now, about to fly out. So pm me what you would like measured. You will have it before the end of next week.

#20
Dutchy

Hej hej Andreas,

Am at the airport now, about to fly out. So pm me what you would like measured. You will have it before the end of next week.

Hej!

OK, I´ll prepare a form.

Thanks! :beer:

BR

Andreas

#21

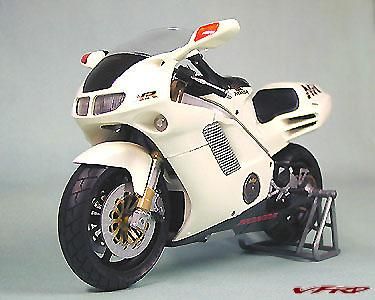
hey just found this piccy, I think its from a model though:

[image: Factory White NR]

#22

Great project. keep up the good Work.

#23

Got a few minutes to the project during the weekend.

When I assemble parts I want them to be clean…then the ultra sonic cleaner is your best friend!

Before:

[image: post-26810-0-22816500-1369633032.jpg]

After:

[image: post-26810-0-43801800-1369633046.jpg]

The steering stop is not the same on the CBR lower yoke, so I had to put something there to prevent the yoke to collide with the radiator.

A M8 lock nut had the appropriate height.

One smaller screw to fix the nut and steel epoxy made the nut stay securely in place.

[image: post-26810-0-15444400-1369633048.jpg]

Then, smack on with the CBR forks:

[image: post-26810-0-11547500-1369633050.jpg]

And wheel:

[image: post-26810-0-84692100-1369633044.jpg]

Could it be that simple…?

Of course not!

The VFR wheel is 1,25mm off centre, so I need special made spacers.

The calipers also need 1,5mm washers to line up with the center of the brake discs.

About the forks:

The NR has USD forks, and I have been searching for a CBR 00- forks.

(00- yoke also fits the VFR)

But the difference in price made me choose the “USD look-a-like” ´99-forks, this also letting me use the VFR front wheel.

(235€ for a ´99 fork and 1300€ for a ´00 fork with front wheel and rotors)

But I can upgrade this in the future if the bike turns out good. :cool:

Edited May 27, 2013 by AndreasH
#24

Got a few minutes last night in the garage.

Refurbished calipers.

[image: post-26810-0-85172200-1369718140.jpg]

Also did some measuring for the spacers.

Correction:

The calipers needs 2 x 1,5mm washers to line up with the brake discs.

[image: post-26810-0-37406800-1369718139.jpg]

Edited May 28, 2013 by AndreasH
#25

Took some measures and some 100+ pictures today........

Every time I see the NR, I notice something new.....

Like the side stand, it has a fairing piece like the 3rd gen right?

[image: post-8974-0-81621500-1370094318.jpg]

Wrong! It has TWO pieces of plactic that "fold out" as you open the stand....

[image: post-8974-0-52932900-1370094260.jpg]

[image: post-8974-0-64582800-1370094184.jpg]

Anyone good with plastic/rubber who can mold one for Andreas?

:goofy:

[image: post-8974-0-45805600-1370094431.jpg]

#26

Thanks again Dutchy for very valuable information and pictures! :beer:

The front wheel is temporarily in place, but I had to try the new clothes on…

Upper fairing fits quite good. Just need to find the right position in length.

Lower part does not fit very good…fairings are made for CBR900 which is wider and higher.

So lower part needs to be split and have parts of it removed.

[image: post-26810-0-08288500-1370235579.jpg]

I also realized the instrument cluster cover needs surgery…

#27

Yeah.... NR's are cool!!1

[image: post-8974-0-98421200-1370243141.jpg]

#28

Correction:

The bottom fairing is OK in height.

I cut the fairing in half and it fitted much better!

[image: post-26810-0-37596700-1370322547.jpg]

#29

High five for doing work :) I'm enjoying this.

#30
AndreasH

Correction:

The bottom fairing is OK in height.

I cut the fairing in half and it fitted much better!

[image: attachicon.gif]IMAG0992.JPG

Now go look for an engraver who can make you one of these.........

[image: post-8974-0-76677500-1370357004.jpg]

#31

Now go look for an engraver who can make you one of these.........

In due time.

The devil is in the details... ;-)

#32

As I said earlier...progress will be slow during summer.

But when I got a few minutes over I try to spend them in the garage!

I have started to sort out the headlight cut out in the fairing, in order to get the right apperance it needs to be like the original.

I printed a photo of the NR headlight (thanks again Dutchy!) and enlarged it to actual size.

[image: post-26810-0-60780600-1371315666.jpg]

You can also see that the "horns" of the fairing edges needs to be rounded off.

I cut out a template in cardboard to mark the fairing, I will then use sheet ABS to close the openings to correct size.

[image: post-26810-0-75432700-1371315653.jpg]

I also found fog lights that fit beautifully in the fairing.

[image: post-26810-0-21436500-1371315676.jpg]

A bargin at 30€! (Biltema = K-mart for cars)

[image: post-26810-0-67261700-1371315684.jpg]

I hope I get some more moments in the garage soon...this is so much FUN! :happy:

Edited June 15, 2013 by AndreasH
#33
Dutchy

Now go look for an engraver who can make you one of these.........

[image: attachicon.gif]20130601_19.JPG

That can quite easily be "simulated" by sand carving. Rayzist has some really nice systems that let you burn your own resist/mask using a program like Adobe Photoshop, Corel Paint, Paint Shop Pro, etc.

https://www.youtube.com/user/Sandcarving

#34

Looking good :) I'm sure you've thought of this but be careful using that picture as a template for your headlights. Cameras... unless you are using the correct focal length will distort the perspective unfortunately. Measurements would be very helpful in this case. Or a traced outline, cause we all know how easy it is to find a local NR 750 to draw on.

#35
apexandy

Looking good :) I'm sure you've thought of this but be careful using that picture as a template for your headlights. Cameras... unless you are using the correct focal length will distort the perspective unfortunately. Measurements would be very helpful in this case. Or a traced outline, cause we all know how easy it is to find a local NR 750 to draw on.

You are qite right.

Fortunately Dutchy has one near by.

[image: post-26810-0-10472500-1371364823.jpg]

He has kindly supplied me with pictures with a measuring tape involved. :biggrin:

#36

Here's what you need...

[image: post-362-0-67926600-1371519440.jpg]

I have it on good authority that David Silver Spares (used to) have one of these for sale. Alas, no longer. Note the extra button on the lower left. Only UK-spec NRs had switchable MPH/KM instrumentation (for those long European tours British owners of NRs were apparently expected to undertake!) :wink:

Ciao,

#37

I cannot imagine how many gold ingots they wanted for that thing.

#38
JZH

Here's what you need...

I have it on good authority that David Silver Spares (used to) have one of these for sale. Alas, no longer. Note the extra button on the lower left. Only UK-spec NRs had switchable MPH/KM instrumentation (for those long European tours British owners of NRs were apparently expected to undertake!) :wink:

Ciao,

Wow...is it for sale?

#39

the little lamps in the ducts are very groovy. I love these kinda projects. I need to get better at diving in and being creative. Go cat go!

#40

DAM great project, thanks for sharing !!!

#41

apples from the same tree.................

[image: post-8974-0-64880500-1371828645.jpg]

Arie was not available; will ask him next time if he has a spare instrument cluster in his parts warehouse............ :goofy:

#43

...just as long as it is not a VFRD orgy. :wub:

#44
AndreasH
JZH

Here's what you need...

I have it on good authority that David Silver Spares (used to) have one of these for sale. Alas, no longer. Note the extra button on the lower left. Only UK-spec NRs had switchable MPH/KM instrumentation (for those long European tours British owners of NRs were apparently expected to undertake!) :wink:

Ciao,

Wow...is it for sale?

Not that I am aware of. But www.bike-parts.fr is showing the main part (excluding the speedometer display) as still "available" for the princely sum of EUR2,175. CMS in NL gives a price of EUR 4,574 for the complete assembly, but it's currently unavailable. The carbon fibre surround is EUR2,700 at bike-parts.fr, and a relative bargain at CMS at EUR1,740...

DSS used to buy up stock from dealers who were going out of business or just wanted to clear inventory. I remember when they used to have NR bodywork and things like wheels and even frames. I was all set to buy the one-piece seat/tank cover for about UKP1,200 + VAT, but it sold before I could work up the courage! It is now much, much cheaper to buy a complete J-spec NR than to buy spare parts for one...

Ciao,

#45
JZH
AndreasH
JZH

Here's what you need...

I have it on good authority that David Silver Spares (used to) have one of these for sale. Alas, no longer. Note the extra button on the lower left. Only UK-spec NRs had switchable MPH/KM instrumentation (for those long European tours British owners of NRs were apparently expected to undertake!) :wink:

Ciao,

Wow...is it for sale?

Not that I am aware of. But www.bike-parts.fr is showing the main part (excluding the speedometer display) as still "available" for the princely sum of EUR2,175. CMS in NL gives a price of EUR 4,574 for the complete assembly, but it's currently unavailable. The carbon fibre surround is EUR2,700 at bike-parts.fr, and a relative bargain at CMS at EUR1,740...

Ciao,

I *was* going to ask my dealer if he holds spare parts for his NR, but at the above prices I will give that a miss...... :goofy:

#46

Yeah, original NR parts are expensive.

[image: NRdash.png]

#47

is that Yen? because if that is dollars or Euros.......WOW

#48

Euro, without tax.

On the plus side: when e.g. a dial breaks you do not have to spend a fortune buying a whole new assembly but most parts are/were available seperately.

[image: NRdash2.png]

#49

Euro.............. ex 21% VAT....................

so unless Andreas is filthy rich (in which case he would have bought a NR..), OEM 4th Gen clockwork it is..... :goofy:

#50

love the attention to detail you have for the build.

Sent from my MB886 using Tapatalk 2

#51
Dutchy

Euro.............. ex 21% VAT....................

so unless Andreas is filthy rich (in which case he would have bought a NR..), OEM 4th Gen clockwork it is..... :goofy:

You are quite right! (In both cases... :-)

But I will spice the meter case with 3D carbon fiber-film.

Edited June 24, 2013 by AndreasH
#52

in swedish: sikket arbete :D får ta den neråt längre fram o visa på svenska vfr träffen.

English: What a project. You gotta come and show it on the swedish vfr-meet

#53

About time for an update, yes?

It is not always you are in control of your own time...especially if you have three children... :-)

I have been working quite a bit with geting the right position of the front fairing.

Dutchy has again supplied me with pictures and measures from a NR, thanks!!

The fairing has also been subject to plastic surgery in order to get rid of the "horns" on the sides.

[image: post-26810-0-17429500-1375642798.jpg]

VFR Clockwork is squeezed in between fairing and yoke, not the best angle but I think the visibility will be OK.

[image: post-26810-0-47704400-1375642814.jpg]

#54

Keep up the fine work! It is looking good!

#55

Great project and great looking donor bike!

#56

A bit of progress!

(but not as much as I hoped for...this is going to be a long runner!)

Headlights has now got the correct shape.

I used pieces of sheet plastic and epoxy.

[image: post-26810-0-96945900-1376889315.jpg]

This is after a few layers of makeup.

[image: post-26810-0-88872600-1376889333.jpg]

#57

…Filler…sanding…more filler…sanding…etc. etc. :schla15:

I´m working with getting the edges around the headlight nice and even. Takes a fair share of time…but I´m still not satisfied with the result.

[image: post-26810-0-13529600-1378098800.jpg]

Front fairing has now got air-ducts!

I cut a plastic tube in low angle and made a elliptical hole in the fairing. Glued with epoxy from the inside = air ducts! Need filler though…

Testing-testing.

I just had to see how that huge NR rear end looks like on the bike.

[image: post-26810-0-48936500-1378099056.jpg]

It really is fat!

Even for a 90´s bike. (Out of scale for 21:st century bikes…)

But I love it! :cool:

Edited September 2, 2013 by AndreasH
#58

Probably an optical illusion but the left headlight opening (right one as you look at it) ilooks narrower from top to bottom and side to side from the other. It's really apparent at the bottom of the middle divider. It also seems to taper up more on the side near the vent. Once you get one the way you like it, make a template and flip it to get the other one the same. This area is a key factor in the NR look and once headlights are in, any variation will stick out like a sore thumb.

Of course, this could all be my tired eyes, in which case, disregard above.

You're making good headway, can't wait to see the finished product and thanks for sharing.

Edited September 2, 2013 by Kel
#59
Kel

Of course, this could all be my tired eyes, in which case, disregard above.

You are (unfortunately) quite right Kel.

That is the reason for all that filler- sanding-filler sanding…

I have a template, so I´m working in small steps to make all the radius alike on both sides. (or at least trying)

But I realize this is impossible to get a good result when working on free hand. So I will try to use cylindrical objects covered with sand paper to get the corners radius right.

#60
AndreasH

It really is fat!

Even for a 90´s bike. (Out of scale for 21:st century bikes)

But I love it! :cool:

I totaly agree :biggrin: Btw, over here fat (in Dutch: vet) is the current youth lingo for cool, so there you go.
#61
AndreasH
Kel

Of course, this could all be my tired eyes, in which case, disregard above.

You are (unfortunately) quite right Kel.

That is the reason for all that filler- sanding-filler sanding…

I have a template, so I´m working in small steps to make all the radius alike on both sides. (or at least trying)

But I realize this is impossible to get a good result when working on free hand. So I will try to use cylindrical objects covered with sand paper to get the corners radius right.

I probably spoke too soon then. Not my intent to bust balls just thought I'd throw that out there before you got too far along. Sounds like you have a good handle on it. This will be the envy of more than a few members here I suspect. :fing02:

Edited September 3, 2013 by Kel
#62
AndreasH

…Filler…sanding…more filler…sanding…etc. etc. :schla15:

Most people never appreciate how much work projects like this are . . . 90% (or more) preparation and 10% paint and assembly. But the results are always so worth it . . . and really satisfying.

But I love it! :cool:

Totally agree!

#63
Kel

I probably spoke too soon then. Not my intent to bust balls just thought I'd throw that out there before you got too far along. Sounds like you have a good handle on it. This will be the envy of more than a few members here I suspect. :fing02:

No worries! Your observations were totally correct.

Opinions and comments is allways welcome, to get them was one good reason to start this thread!

Thanks Kel!

#64

I can completely appreciate the hard work you are putting into this project! Keep plugging away at it, you will be extremely happy in the end. It's looking great :)

#65

Some real progress this weekend!

Headlight problem is about to be resolved!

[image: post-26810-0-57098800-1378722829.jpg]

This has been a major issue.

VFR headlight is way too big, and to fit xenon lights will probably not be accepted by Bilprovningen (mandatory technical inspection that is due every other year)

So I have been looking for bikes with small/low-wide headlights.

I brought my fairing to a local breaker and tested different headlights.

This Yamaha-headlight was close to perfect. Just to remove of the clear lens and there you go!

[image: post-26810-0-40037400-1378722841.jpg]

When I´m done with the light openings I´ll make a clear cover to the headlight that fit the fairing.

(I will not get the projector-lens as the real NR…but again…you can´t get everything)

About the light openings (eyes):

I have measures and pictures, but the result did not look quite right…so I visited the shop here in Stockholm that has a genuine NR (in a glass cage)

Then I realized that the top line of the “eyes” is not straight, it is curved down a bit towards the center divider.

So I went filler-sanding-filler-sanding some more:

A small change that made a great difference! (the difference is more obvious in reality than on this picture)

[image: post-26810-0-81063200-1378722872.jpg]

Now it got a angry look instead of surprised.

Much better. just need some fine tuning. More filler-sanding…

I also started to work with merging the NR rear end with VFR side panels (to get a nice connection with the VFR tank)

[image: post-26810-0-60325700-1378722862.jpg]

Almost impossible to know where to start, so I used the cutter with the finesse of a drunk butcher…and of course I cut too much so start with…ooops.

After a number of cuts I ended up with a couple of wounded VFR-panels that will be cemented to the NR-end with fiberglass & polyester on the inside.

#66

A hot glue gun works nicely to tack various bits in place so you can add fiberglass later.

#67

I think I use my hot glue gun more than any other tool, fastener, sticky thing in my house/shop. Those things are so useful, and the glue will peel off almost anything except fabric without hurting anything.

#68

Nice work! That's awesome you found a light to fit openings! If you struggle too much to connect the tail to the side panels I would perhaps consider taping (aluminum tape), or some sort of plastic wrap around the tank and then just fibreglassing new panels that directly connect to the tail section in place... A little hard to explain but something like this (scroll to the lower end of the page): http://www.motor-forum.nl/forum/list_messages/325653/1/riesland-Fighters-Creativity-winner-custom-bike-co-2.html

You could still perhaps use the side panels as a base to get the right shape under the tank and over the mounting bolts.... cover the panels with foil/tape/plastic/mould release and fibreglass over them, over the gaps and onto the existing NR tail section. It would increase the outside dimensions of the piece but you could do a thin layer and then reinforce the backside afterward.

I know it's possible to fiberglass to plastic panels but somewhat difficult to get them to bond very well. However bonding fiberglass to fiberglass in my experience works quite well if the surface if properly prepped.

Just my thoughts. Feel free to totally disregard them :)

#69
apexandy

You could still perhaps use the side panels as a base to get the right shape under the tank and over the mounting bolts.... cover the panels with foil/tape/plastic/mould release and fibreglass over them, over the gaps and onto the existing NR tail section. It would increase the outside dimensions of the piece but you could do a thin layer and then reinforce the backside afterward.

I know it's possible to fiberglass to plastic panels but somewhat difficult to get them to bond very well. However bonding fiberglass to fiberglass in my experience works quite well if the surface if properly prepped.

Just my thoughts. Feel free to totally disregard them :)

Thanks for the tip!

This is definitely an alternative I´ll consider.

(I know you got the experience, I have seen the great work you did on your bike!)

Edited September 10, 2013 by AndreasH
#70

one trick i use when doing fiberglass to plastic.. drilling small holes! lots of them! the holes fill up with the rosin and act as extra anchors.

#72

Time for update!

There have been little time for my project…as usual…partly self inflicted since a was on a trip a couple a weeks ago. I visited my friend in Germany.

He lives near the Mecca for every motorcyclist in Europe…The Nürburgring!

So I guess a weekend riding along Mosel and in the Eifel is a valid excuse! :491:

But some progress have been made!

I have began the construction of the rear sub frame. I use steel square tube 30x30mm. (I would have prefer to use aluminum, but then I could not weld it myself)

[image: post-26810-0-93294100-1381088299.jpg]

[image: post-26810-0-91307700-1381088267.jpg]

[image: post-26810-0-48094500-1381088327.jpg]

The exhaust is also under construction. Starting with the mufflers.

Ø100mm Al-tube and turned end caps is the recipe.

(now testing with 45mm end pipe, but it will be 55mm when done)

I also have cut out some more in the air ducts. They where way to small before.

[image: post-26810-0-03715700-1381088358.jpg]

Edited October 23, 2013 by AndreasH
#73

For them who is wondering if this project has been stalled: :schla15:

No, but running in 1:st gear…

Getting the fairings to fit properly, and to get a decent form of alterations and base for the future paint is taking its fair share of time.

[image: post-26810-0-49105500-1383112955.jpg]

I manage to join the front part of VFR side panels with the fiberglass NR-rear with a good result.

I have also been working with the exhaust.

It´s not possible to get a nice connection to the VFR downpipes, so it ended up with using the cutter.

#74

Keep up the good work. Can't wait to see it finished.

#75

Keep your eye on the prize! Your attention to detail will be rewarded with a stunning product.

#77

Man you got skills.... Nice work .....

#78

Agreed, this is really looking good! Great work with the side panels. More pics!!! (please)

#79

A milestone is reached! :beer:
The difficult part of the exhaust has been completed (almost).

I had to cut the original joint because I needed the pipe go upwards in a tighter bend.

So I ordered special made adapter rings, so could join the stock downpipes with my own exhaust.

[image: post-26810-0-70297800-1384113808.jpg]

(I really like custom made parts)

[image: post-26810-0-40084500-1384113850.jpg]

I attached the lower ring with a couple of welding Points. (I´ll weld it all around when I got the mufflers compleated and in right place)

[image: post-26810-0-72335100-1384113991.jpg]

Then I welded pieces of 45mm tubes and connected to the mufflers.
(If it looks easy, I can tell you it was not...hours and hours of thinking and testing before I got this in place)

[image: post-26810-0-39872600-1384114020.jpg]

Testing with the tail pipes...nice!

(this is Ø50, but it will be Ø55...and more straight)

Still working on the joined parts.

[image: post-26810-0-53829000-1384114058.jpg]

This is after X number of filler-sanding-filler-sanding... :schla15:

Not quite there yet...but closer!

#80
AndreasH

Testing with the tail pipes...nice!

Fabulous! :fing02:
#81

Once it is ready and the weather turned spring, I guess a VFR trip to Stockholm is in order....... :beer:

#82

That's is going to sound AWESOME ......

#83
AndreasH

Thanks for the encouragement guys!

I´m realize this is going to be difficult…but that´s part of the challenge.

If someone wonder what a NR750 is:

[image: attachicon.gif]NR750_05.jpg

Only 500 made by Honda in 1992-1993 as a technical show-off without budget limits..

Oval pistons, carbon fibre bodywork with unbeliveble finish, fuel injection (remember this was ´92)

hey i found one on raresportbikes.com it is only $94,463.00 US hummm i wonder if i could get some gloves thrown in??

#84

Once again... awesome work!

#85
Dutchy

Once it is ready and the weather turned spring, I guess a VFR trip to Stockholm is in order....... :beer:

You are so wellcome! :wheel:

Edited November 13, 2013 by AndreasH
#86

More progress!

I have been working on the headlight and fairing/mirror bracket.

[image: post-26810-0-05581400-1384322998.jpg]

I cut out a piece of arylic plastic (Plexiglass) and formed it with a heat gun.

[image: post-26810-0-00889400-1384323014.jpg]

It turned out quite good. (the protective foil is still on, that is why it´s white)

CBR1100XX-mirrors in place!

[image: post-26810-0-82148000-1384323056.jpg]

I have also found a screen that has a acceptable resemblance to the NR-screen.

It is a “Iridium cool blue” screen.

But I need to make some cut outs for the air ducts…a bit scary to put the saw in my new 100€ screen… :blink:

#87

When I first saw the fairings I thought they looked too far off actual NR fairings to look good... but you have done an awesome job tweaking them to look authentic! Keep up the good work!

#88

good progress...nice.

post up the windscreen pic when you get a chance...

#89

O boy…my to-do-list just became longer…

A minor extension of the house just fell in front of my feet… :pinocchio:

Originally the plan was to start in April next year, but plans were changed.

However, I have manage to squeeze in a few hours in the garage.

Windscreen is now adjusted to the NR-fairings.

Luckily it was possible to cut it without cracking!

(I have sanded the edges so it will hopefully not crack later)

It looks like smoke color, but it is dark blue.

[image: post-26810-0-22783200-1386569013.jpg]

[image: post-26810-0-25535100-1386568999.jpg]

Testing with the lower side fairing.

It is a little bit too long, but I have not decided if I should shorten it.

(cut out a strip in the lower part and join the pieces again)

A lot of work and the result is a bit uncertain.

I think I better put both sides on and see how it looks.

#90

Seriously, you are doing a wonderful job on that bad boy!

#92
AndreasH

Hi there,

I just want to let you have a sneak weiv on my project.

I got inspired of the French guys very nice NR-replica.

However I really don´t have the time and patience of molding my own fairings like he didso when I found NR-replica fairings in fiberglass (poly26) I felt I had to make an attempt of building a replica of my dream bike.

The fairings is not a exact replica, they are made for early CBR900 (for some reason?), so changes must be made.

IMAG0910s.JPG

To make this project realistic and on a reasonable economic level, the goal is a replica (or a look-a-like) that will pass for a NR at a glance.

My plan was to make this a winter project, but I couldn´t wait so I had to jump to the gun

The recipe:

VFR 94-97

Replica fairings

CBR900-99 forks

CBR1100 mirrors with integrated indicators

Self made exhaust system

Details to be solved as I go

First step was to order the fairings and finding a reasonably cheap VFR.

A 95 VFR was acquired and stripped down.

IMAG0909s.JPG

Current status is that lower CBR900 yoke is in place (have to adjust steering stop to prevent fork tubes of hitting radiator)

Forks are waiting for new seals.

IMAG0960s.JPG

If you wonder how calipers looks inside after 10+ years of inactivitylike something from a horror movie!

IMAG0961s.JPG

I´ll update this thread as I go, but there will be slow progress during summer...
Can I ask what the quality of the poly26 fairing is like?

They do a twin light cowl for my vfr700/750.

Roger

#93

You are making me want to buy a 4th gen very badly! well done man. You should seriously consider selling these conversion kits. I know I would be a buyer if they weren't as much as buying an NR :)

#94


Can I ask what the quality of the poly26 fairing is like?
They do a twin light cowl for my vfr700/750.

Roger

I would say the quality is OK.

Fiberglass is fiberglass, so it is not near the quality of the original fairings in ABS.

In my case the fairings is made to fit a CBR900, so I have to make many adjustments anyway.

But the fitment between fairing parts is OK.

BR

Andreas


deltaboxii

You are making me want to buy a 4th gen very badly! well done man. You should seriously consider selling these conversion kits. I know I would be a buyer if they weren't as much as buying an NR :)

Ohh..I´m affraid a kit like that would be very expensive... :wink:

But I´m actually surprised that no "copy-company" have not made NR-replica fairings!

The ones I have is more like NR-similar than NR-replica.

#95
AndreasH

Can I ask what the quality of the poly26 fairing is like?

They do a twin light cowl for my vfr700/750.

Roger

I would say the quality is OK.

Fiberglass is fiberglass, so it is not near the quality of the original fairings in ABS.

In my case the fairings is made to fit a CBR900, so I have to make many adjustments anyway.

But the fitment between fairing parts is OK.

BR

Andreas

deltaboxii

You are making me want to buy a 4th gen very badly! well done man. You should seriously consider selling these conversion kits. I know I would be a buyer if they weren't as much as buying an NR :)

Ohh..I´m affraid a kit like that would be very expensive... :wink:

But I´m actually surprised that no "copy-company" have not made NR-replica fairings!

The ones I have is more like NR-similar than NR-replica.

Thanks for that

How long after ordering did you take delivery? Are you in the US?

#96
arteeHow long after ordering did you take delivery? Are you in the US?

He is from the country that gives us

[image: swedes.jpg]

#97

Thanks for that
How long after ordering did you take delivery? Are you in the US?

They said 6 weeks for delivery, but I got them after 3 weeks!

Nope, not US. Sweden (EU-member so no problems with tax/customs)

Edited February 9, 2015 by AndreasH
#98

Orange juice? :cool:

Ciao,

#99
JZH

Orange juice? :cool:

Ciao,

and a token brunette...

#100
Dutchy
artee

How long after ordering did you take delivery? Are you in the US?

He is from the country that gives us

[image: swedes.jpg]

Nice

#101

Orange juice?   :cool:

Ciao,

and a token brunette...

Interpretar    !!!!   


#102

Not really my everyday life...it more like dark & grey this time of year this far up north...dusk at 08:30 and dawn at 15:00! :ph34r:

OK, back to topic:

Testing with some more special parts.

This grill is one of the NR signs, so it´s a must have!

[image: IMAG1355.jpg]

(I just hope the exhaust will not melt it...)

I have finally found tubes in the correct measurements, so now I can assemble the mufflers.

I´ll post some pictures when I´m done.


#103

If  it  dont  melt it,  it  will  smoke  it  but  anyway  starting  to  shape  up.  Thanks  for  posting ..


#104
Did you make the grille or buy it?
#106

Did you make the grille or buy it?

It is made in a 3D-printer (from a CAD-model drawn by a friend) 

A genuine part is 484€ or $630 :wacko:


#107

I got a NR for Christmas!

[image: IMAG1363.jpg]

Only a model but anyway…is a nice thing to have on the desk at work.

Many days off this Christmas, but the house-project took most of the available time.

Status for NR-project:

Still working on the mufflers/exhaust.

[image: IMAG1358.jpg]

I have now got the 55mm tubes for tail pipes.

It will also be 35mm pipes in the center that is the actual exhaust pipes.

[image: IMAG1359.jpg]

Tricky to get everything in right place...fine tuning takes a lot of time.

[image: IMAG1362.jpg]


#108

Tricky to get everything in right place...fine tuning takes a lot of time.

[image: attachicon.gif]IMAG1362.jpg

That what it is, but also make a pay off in a werry nice look!

Nice project, looking forward for final product!


#109

i hate be be a downer.. but i think the rear grill will melt.

. take that and have a one machined from some aluminum. :wink:


#110

i hate be be a downer.. but i think the rear grill will melt.
. take that and have a one machined from some aluminum. :wink:


Another solution might be, moulding the grille out of CF (The OP has a good piece to make a mould out of already)......
CF is generally heat resistant as we see it used on many aftermarket exhaust cans...
Plus if left unpainted, it will look kewhler than aluminum...lighter too...
#111

If the exhaust tips are double walled, the plastic will be fine.


#112
I don't think the OP mentioned double walling the tips. Anyway, why would one want to restrict that awesome custom system's tips with smaller diameter outlets??
#113

I don't think the OP mentioned double walling the tips. Anyway, why would one want to restrict that awesome custom system's tips with smaller diameter outlets??

Easy....to keep from melting the custom tail light grill.  :wink:


#114

I don't think the OP mentioned double walling the tips. Anyway, why would one want to restrict that awesome custom system's tips with smaller diameter outlets??

Easy....to keep from melting the custom tail light grill.  :wink:

I'm all for some throaty noise, but not at the risk of melting my hard work!

...and apparently Honda thought it was a good idea too...

[image: 103659d1162354387-60k-nr750-dropped-hond]


#115

Instead of internal double walling the already built system, maybe tubular heat shields with nice rolled-in edges can be added to the outside of the outlets, so no reduction of ID at the tips...... It might mean a larger opening through the grill though. Not sure how much space the OP has left for something like it.....


#116

Status for NR-project:

Still working on the mufflers/exhaust.

[image: attachicon.gif]IMAG1358.jpg

I have now got the 55mm tubes for tail pipes.

It will also be 35mm pipes in the center that is the actual exhaust pipes.

Sounds like OP already has the double walls in mind... 


#117

Andreas has all the measurements he needs  :goofy:

[image: 20130601_45.JPG]

[image: 20130601_49.JPG]

[image: 20130601_57.JPG]

[image: 20130601_61.JPG]


#118

Yepp!

Thanks to you Dutchy! :fing02:

Andreas has all the measurements he needs  :goofy:


#119

Thanks for input guys!

There are two reasons for double tubes at the exhaust tips:

I want it to have the original appearance of the NR, and I also want the bike to pass the annual technical inspection.

The noise limit is 103dB when reving at standstill, quite generous but I´m not sure that it would pass with “open” exhaust.

But there is an obvious risk that Switchblade and gll429 is right…there is only a few mm of space between the outer tube and the grill, and I guess the outer tube will get quite hot since it is connected to the rear cover of the exhaust can.

(aluminum is a good conductor of heat)

[image: IMAG1367.jpg]

The intention was to make the grill out of aluminium, but I have not found any good profile to use and it would take some quite complex machining to fit the fairing (the grill is curved).

We will see the result when I eventually start up the bike…

Construction if the exhaust is almost done!

I have made the inner tube out if perforated sheet metal.

Just cut out a piece and hammered it over a piece of round tube, a few weld points and there it is!

[image: IMAG1364.jpg]

[image: IMAG1366.jpg]

Here is all parts (just add insulation)

[image: IMAG1365.jpg]

But before final assembly I´ll get the parts surface treated.

First I´ll grind/polish the surfaces, then send the parts for anodizing.

Outer tip will be in bright nature, covers in regular nature and maybe some color for the cans (they are slightly visible through the rear air ducts) … how about red?


#120

To pass noise regs you might consider designing/building custom removable exhaust tip spuds as used on systems from Staintune, so you have the option to remove them for "track days" :wink: ......


#121

It's looking great! What plans do you have for the rear wheel? Are you going to try and do some sort of single nut conversion or run the stock 4th gen wheel? 

By the looks of the muffler dimensions I don't think you'll have an issue with the 103db test, I'm no expert but I bet you'll be okay, compared to the much larger internal diameter of my two bros pipe. But Beck does have a good idea.

As for anodizing the canisters? I vote for natural aluminum for the mufflers as well… red might look neat, and although it probably won't be getting any sunlight, I try to avoid any red anodized parts as they seem to always end up pink :( 

Keep up the great work! 


#122

Thanks for input and cheering!

I have been thinking about the single nut-issue quite a bit…it is definitely a specific NR-detail.

To obtain a “real” single nut would be very complex, so I´m planning for a “fake” nut.

A nut (with a piece of threaded axle in it) attached to a disc of sheet metal that I somehow attach to the center of the wheel.

All in the right(or close) dimensions and colors as the NR of course.

But this might be postponed to stage 2…together with a USD-fork and other things.

It's looking great! What plans do you have for the rear wheel? Are you going to try and do some sort of single nut conversion or run the stock 4th gen wheel? 

By the looks of the muffler dimensions I don't think you'll have an issue with the 103db test, I'm no expert but I bet you'll be okay, compared to the much larger internal diameter of my two bros pipe. But Beck does have a good idea.

As for anodizing the canisters? I vote for natural aluminum for the mufflers as well… red might look neat, and although it probably won't be getting any sunlight, I try to avoid any red anodized parts as they seem to always end up pink :( 

Keep up the great work! 


#123
You can buy a single nut cover like that, a few people on here have them.
I did the real thing on my 5th gen, should work on yours to. VFR400 rear axle, brake disc/caliper/hanger etc. had to skim 2mm off one face to get correct wheel alignment on the 800' but should be perfect on the 750's as they use the same swingarm end. Gives the correct wheel nut & cashless drive sprocket setup !
#124

Yeah  the  real  single  nut  rear  would  be  awesome ....


#125

let's not forget to build the proper side stand............    :goofy:

[image: 20130601_203.jpg]

[image: 20130601_205.jpg]


#126

Breaking the project into stages sound like a reasonable ideas… especially if you want to ride it sooner than later. If you're anything like me, you keep thinking of all the details and bits to add onto the project list and it just keeps escalating! I made quite a few compromise decisions on my project and am very happy I did. Now after riding for a season I am able to concentrate more effort on those other details in the off season :) 

Dutchy has a single nut cover on his bike. That, with the 4th gen wheel, would do a decent job of pulling off the look for now :) 


#127

These the components for the "single nut conversion"...

All metal, made by Thurn decades ago.

[image: P1096182.jpg]

[image: P1096178.jpg]

[image: P1096181.jpg]

(the rusted "spring" ring is place inside the hub to keep the "bolt" in place while assembling; the hole in the bolt to hold a cotter pin. Or as Haga or Douglasthecook do, a tie wrap  :goofy: )

If there are say 10+ people seriously wanting one, I can always ask him if he'd consider another production run...

Or if soemone wants exact measurements..... Note that the cover was perfect for the 4th gen wheel, on my 3rd gen 8 spoker you can -on close inspection see that the black plate is ever so slightly too large. But that's the price for vanity...


#128

Is all that really just a fake single nut kit? Rather go and do the real thing, properly.


#129
There was something about Triumph swingarm internals in the VFR swingarm somewhere out there. That may be an option for you as far as single nut rear wheels are concerned.
#130

Yeah, that's something that I started a while back. Need to either go bug one of the shops to make those drive pins so I can finish it, or go do it myself. 


#131

Awesome build and attention to detail!

I have a Triumph hub and axle in the VFR swingarm, and then a Ducati 5 spoke rim.  It was not difficult, you just need to chase the threads down to the step in the shaft and shorten it, and then find/make two spacers for the hub alignment and wheel alignment.

DSC01801.JPG
DSC01801.JPG

I think I have some details in my 750 conversion thread, but I only really estimated the spacers I needed (not scientifically), Yoshi actually measured so you'll want his numbers not mine.
#132

A quick ebay search under "vfr400 rear wheel" brought this up. Not perfect but could help. 

[image: $T2eC16VHJGYE9nooiLnEBRC!TYGt-w~~60_12.JPG]

Edit: Then again… you do machining work don't you...


#133

All: Thanks for tips!

Mrmatt: This looks nice! Is the hub from a Speed Tripple? year? 

Awesome build and attention to detail!

I have a Triumph hub and axle in the VFR swingarm, and then a Ducati 5 spoke rim.  It was not difficult, you just need to chase the threads down to the step in the shaft and shorten it, and then find/make two spacers for the hub alignment and wheel alignment.

  I think I have some details in my 750 conversion thread, but I only really estimated the spacers I needed (not scientifically), Yoshi actually measured so you'll want his numbers not mine.

#134
Here's the link to my what I've done so far. Again, still need to make one part. A few other people have done conversions differently, but I would have questions about some of their setups. http://www.vfrdiscus...y-not-complete/
#135

Is all that really just a fake single nut kit? Rather go and do the real thing, properly.

Well.... with a used Speed Triple swingarm+axle costing Eur 200 and an used Ducati rear wheel Eur 300 and parts to machine,

me likey fake!  :goofy:


#136

FYI, one option is to get an NR rear wheel...  :wink:

However, for some unknown reason Honda made NR wheels incompatible with RC30/45 rear hubs--different PCD, which is not impossible to compensate for, but does require a lot of machining and fabricating.  NR rear wheels do come up on Yahoo Japan Auctions from time to time.

Ciao,


#137

Now for your metal casting and engraving skills....................

[image: abolt.jpg]

[image: abrake.jpg]

[image: aengraving.jpg]

:goofy:


#138
I dunno about that "The result of a decade's perfection" pantographing. It kind of sounds a bit tackey these days....... but I guess it is what it was...
#139

Wow. Thats all I can really say.

Nah kidding. What an amazing amount of work you have done to that bike! I'm blown away. I didny know the NR750 existed till I saw your thread. What a fantastic looking bike. You are doing a wonderful job on yours. Keep it up!

As for the single nut rear, someone here has converted theres with a Ducati 1098 (you will have to look in the 5th Gen folder - I think thats where I saw it) rear. Looks the business. You may be able to go that route. Will cost mucho monies being Ducati though.


#142


The rare and elusive NR125?

I think it is an NSR125 variant, very hard to find info on and even harder to find parts... I've been looking for panels from one of those for years.


Nope, it's an NR50!

http://www.sulit.com...ctors edition "


#143
Hello everybody here's some pictures of what it can look like after a lot of work!
Project was started in 94' with a 93 vfr.
Cheers

Attached Images

  • [image: image.jpg]
  • [image: image.jpg]
  • [image: image.jpg]

#144

Hello everybody here's some pictures of what it can look like after a lot of work!
Project was started in 94' with a 93 vfr.
Cheers

Wow!

Very, very nice!


#146
Looks great. Do you also have pics taken during the build (in a seperate topic)?
#147

Just need to fit a Ducati Monster wheel on the back now..


#148

Hello everybody here's some pictures of what it can look like after a lot of work!
Project was started in 94' with a 93 vfr.
Cheers

Is that the bike that Adrian ( i forget his last name - was it Vanderkroll ?) built?  If so - I saw it after it unfortunately fell over in transport and some damage was done.  If thats not Adrian's bike - then there are two in Ontario!

Welcome to VFRD by the way!


#149

Hello everybody here's some pictures of what it can look like after a lot of work!
Project was started in 94' with a 93 vfr.
Cheers

Is that the bike that Adrian ( i forget his last name - was it Vanderkroll ?) built?  If so - I saw it after it unfortunately fell over in transport and some damage was done.  If thats not Adrian's bike - then there are two in Ontario!

Welcome to VFRD by the way!

That does not look like an Ontario license plate?


#151

Ontario member with a captain america helmet? 

:goofy:


#152

Dutch (or Belgian--they look the same to me!).

Not sure about the "NR50".  Are you sure it's not a Mikuni project, rather than a Honda one?

Ciao,


#153

Hello everybody here's some pictures of what it can look like after a lot of work!
Project was started in 94' with a 93 vfr.
Cheers

Is that the bike that Adrian ( i forget his last name - was it Vanderkroll ?) built?  If so - I saw it after it unfortunately fell over in transport and some damage was done.  If thats not Adrian's bike - then there are two in Ontario!

Welcome to VFRD by the way!

That does not look like an Ontario license plate?

Correct-  but the poster of the Pic is an Ontario member - and the plate could be a "prop".  Our plates certainly are not that insane.


#154

Hello everybody here's some pictures of what it can look like after a lot of work!
Project was started in 94' with a 93 vfr.
Cheers

Is that the bike that Adrian ( i forget his last name - was it Vanderkroll ?) built?  If so - I saw it after it unfortunately fell over in transport and some damage was done.  If thats not Adrian's bike - then there are two in Ontario!

Welcome to VFRD by the way!

That does not look like an Ontario license plate?

That is not a license plate but an air brake that some municipalities require when you unleash a V4 upon public roadways...probably from the old world. :wink:


#155

Fast  bikes  require  big  plates  ....


#156

"Does this plate make my butt look fast?" 


#157
It is a dutch plate from the old country.
Been in Ontario for 12 years but bike was made in holland.
#158

Ahh, so you are indeed Adrian? That bike is legendary around here :) Welcome and wonderful to see her resurrected.


#159

Rather sparsely between updates…but there is some progress!

The side grills is very NR-specific and is a must-have on my replica.

[image: NR grill.JPG]

Problem is genuine parts is beyond expensive at €650 each…plus the fact they would not fit my fairings…

So what to do?

One option is to find a couple of industrial electronics heat sinks…

[image: 20140212_082953.jpg]

…that happens to have the correct c-c between the fins.

Cut the profile in your hobby cutting machine…

[image: 20140211_162356.jpg]

…then cut the too long fins in your bandsaw… (and watch your fingers!!)

[image: 20140211_164728.jpg]

Then mill the fins to 4,5mm height in your hobby cnc-machine.

[image: 20140211_165139.jpg]

The base plate was way too thick, so mill it to 2,5mm.

[image: 20140211_171135.jpg]

Here comes the trick: mill juuust through the base plate so…

[image: 20140211_175217.jpg]

…the fins makes a grill!

[image: 20140211_182050.jpg]

Deburr and toss is into your tumbling machine and leave it for a few hours…

[image: 20140211_185854.jpg]

…and Violá! you have got a nice NR-look-a-like grill! :cheerleader:

[image: 20140211_190439.jpg]

Now I just need to adjust the radius in the corners and drill some holes, and finaly send if for anodizing.

If you don´t have these machines in your garage it helps to have a good contact with a mechanical workshop...

Big thanks to you Anders!! :beer:

(Edit: Just to clearify...I do not have these Machines in my garage)

And to Dutchy that generously helped me with pictures and measurements of the NR-grill.

I also picked up my mufflers that have been anodized.

Now I just waiting for the end-pipes to be bright anodized after being turned to a nice finish.

[image: 20140212_083241.jpg]


#160

Please remove the word "hobby" from your keyboard.  Carry on.


#161

Please remove the word "hobby" from your keyboard.  Carry on.

Hmmm...I can´t find the hobby-key on my keyboard...maybe that word has a different meaning than what I thought ...?
A failed attempt of beeing funny...Sorry!


#162

Shaping up nicely Andreas!    :beer:


#163

I think Timmy was simply referring to the quality of your work being well above the typical hobbyist.

Your work is top notch!


#164

I think Timmy was simply referring to the quality of your work being well above the typical hobbyist.

Your work is top notch!

My thoughts exactly!


#165

I think Timmy was simply referring to the quality of your work being well above the typical hobbyist.

Your work is top notch!

My thoughts exactly!

yes, it was a huge compliment.  never "hobby" with you, always "pro".

keep it up.


#166

I think Timmy was simply referring to the quality of your work being well above the typical hobbyist.

Your work is top notch!

My thoughts exactly!

yes, it was a huge compliment.  never "hobby" with you, always "pro".

keep it up.

Aha, OK!

Thanks guys!


#167

Problem is genuine parts is beyond expensive at €650 each…

And now you know why :biggrin:
Nice work, this bike is going to look great.
#168

Hi guys

I have asked Andreas if it was ok to join this thread, since we share the same passion in building a NR750 replica.

I think we brought the fairings almost the same time, and we have had a mail korrespondance sharing measurements and ideas

I was a little late to start up but finaly got started

I started building the tail and are almoste done with the exhaust.

[image: 2014-02-07 18.04.15.jpg]

[image: 2014-03-02 19.30.23.jpg]

Next step is to allign the fairing with the frame still needs a little adjustment

[image: 2014-03-01 17.01.00.jpg]

[image: 2014-03-01 17.00.46.jpg]

It looks so easy ........  doesn't it


#169

looks great! We  need a close-up photo of that rear wheel !


#171

Well done with the exhaust/subframe!

I see you are a better welder than I am... :fing02:

My bulid is currently stalled by a house extension project...  My goal to have it ready by spring has been revised to spring...2015. :sad:


#172

So there goes my excuse for a trip to Sweden.....

"Yes honey, I need to go north and see this finished NR build...."

"the best laid schemes o' mice an' men

Gang aft a-gley"

Ok, move my trip to Sweden to 2015 then....    :goofy:


#173

Today's work. - Had a little trouble getting lower fairing to fit, but by extending approximately 8 cm it fits fine now

tomorrow i'll start molding fiberglass

[image: 2014-03-10 14.02.30.jpg]


#175

Time for a little update

Dutchy and Andreas "Thanks for your help with pics, measurements and mirrors"

[image: 2014-04-11 10.51.49 HDR.jpg]

First thing to mold in fiber was headlight , had to remove that surpriced look and give the face some nasty eyes

[image: 2014-03-14 20.02.28.jpg]

Headlights is mounted on the frame, to make it more stabil.

My idea is that it's easy to remove only the shell to get access to everything

[image: 2014-03-21 21.05.02.jpg]

Setting up the mirrors

[image: 2014-04-06 22.26.16 (1).jpg]

And this is where I am now 

[image: 2014-04-11 10.57.56.jpg]

The rough part is almost done,  from now on is the fine tuning, details and paint 

[image: 2014-04-11 10.54.00.jpg]  

[image: 2014-04-11 10.53.48.jpg]

[image: 2014-04-11 12.08.40.jpg]


#178
Awesome project , great workmanship. Could tell us about the rear wheel -make/model , thanks..
#179

As for "detailing"; if you miss any measurement/picture of something, just ask.  :beer:


#180

Trés beautiful work. Here is my replica VFR 750 of 91.


#181

Some photos


Modification  reservoir.

Attached Images

  • [image: 20120410.jpg]
  • [image: 20120511.jpg]
  • [image: IMAG3428.jpg]
  • [image: 20130323_155046_resized_1.jpg]
  • [image: 20130331_135037_resized_1 - Copie.jpg]
  • [image: DSC_0615.JPG]

#182
Dear guys.

Where to buy these replica farings used in this topic?

Echelon3, I like the way you have build it. The fuel tank you have used is it the original from a VFR750? And where have you got your replica farings?

Thanks Morten


Sent from my iPhone using Tapatalk
#183

Hello Morten,

Echelon3´s bike is the "original replica", all self made farings spiced with som genuine NR-parts. This beautiful bike inspired me to build my own NR-replica.

I found "NR-Replica" fairings for a CBR900 on poly25.com.

It is fiberglass fairings that can (with more or less effort) be adapted to the VFR.

So maybe there is a third NR replica-build coming? And all in Skandinavia.. :biggrin:


#184

Hi Morten

Poly26 does'nt sell directly to you - you have to buy it through the nordic dealer i Finland - you can send me a PM for details


#185
L'avantage c'est que j'ai les moules des carénages.

Attached Images

  • [image: DSC_0830.JPG]
  • [image: DSC_0828.JPG]

#187

Wow...this is probably as close to the real deal you could get.

Serial production?

I think you might have more than a few potential buyers in here... :tongue:


#188

Really like the work here.. cest tres bon..

With those molds,  Glass, Carbon or Kevlar runs are just a sticky week away......

send to me, i have plenty of spare time.. :beer:


#190
Keeping an eye on this, would be very interested in the fairings....

Rob
#191

Master à vendre

My French is a bit rusty, but it suggests he want to sell the molds?  :unsure:

as for our Scandinavian builders.................  any more pictures/updates????   Skol!!!  :beer:


#192

Well leon nothing much has happend

finished welding exhaust

[image: 2014-06-03 17.03.44.jpg]

Wiring is attached, all electric is full function

[image: 2014-07-12 15.55.52.jpg]

The rear is packed with heat shields to protect the electronics, gas pump relays and most important ( my balls )

[image: 2014-07-12 15.56.21.jpg]

It doesn't look at much, but it takes a hell of a time to put all that stuff in such a small place

I'm planning a longer test tour in week 32 when I come home from vacation.


#194

Modification en cour du nouveau carénage...

Attached Images

  • [image: DSC_0503.JPG]
  • [image: DSC_0504.JPG]
  • [image: DSC_0506.JPG]
  • [image: DSC_0505.JPG]

#195

Looks Great in White, Excellent job!!......although I may be biased

IMG 0020
IMG 0020
The finished product


#196

Looks clean i white - my thoughts has been matte black with gold decals and wheels - I have also made some test paint with matte red - but I've desided it's gonna be similar to the original, shining red and black. the wheels stay gold until paintjob is finished then we'll se if they are gonna be black to


#197

white NR  (may be a model, not real):

Factory White NR
Factory White NR


#198

Well leon nothing much has happend

finished welding exhaust

[image: attachicon.gif]2014-06-03 17.03.44.jpg

Wiring is attached, all electric is full function

[image: attachicon.gif]2014-07-12 15.55.52.jpg

The rear is packed with heat shields to protect the electronics, gas pump relays and most important ( my balls )

[image: attachicon.gif]2014-07-12 15.56.21.jpg

It doesn't look at much, but it takes a hell of a time to put all that stuff in such a small place

I'm planning a longer test tour in week 32 when I come home from vacation.

 i am kinda shocked you didnt mod your frame aka cut off the lower "frame vent"


#199

I didn't cut the frame cause I'm using the origimal holes for the subframe - some might think it is a wrong dessision, that's ok with me -  I don't think it looks that bad, perhaps black colour will hide them a little.


#201

J'aurai une replique NR en rouge, une en blanc et une en noir :wink:


#203

He said...  "I have a replica NR in red, one in white and one in black"...  in French...


#204

There was an NR750 sold quite cheaply in Japan this week (Equivalent of around $24,000 USD). http://page6.auction...tion/f142920225

A Japanese spec example, so "Only" 75 bhp. 

Shhhhhh!!

(At least until I've managed to buy one for myself...)

Ciao,


#205

Does anyone know how it is restricted?

I know all about the methods to de-restrict an RC-30, dunno about the NR...


#208

NR = Never Ready?

I hope not…

House extension project is now done, and the long and warm summer is over, so it is time to get this build moving again!

However there has been some progress since I dropped this build in January.

Single nut, or more precise “single nut”…

A bolt with large washer to cover the four nut-holes in the wheel, a special washer and a castle nut. (Thanks Duchy!)

Just need to put in a R-pin.

[image: 20140603_184244.jpg]

I have also put “air intake tubes” on the tank. Just for looks of course…

Needs more fine tuning with filler for the right NR-look.

[image: 20140922_184835.jpg]

Right now I have taken a step back with the fairing brackets. I found that the fairing was positioned a bit obliquely.

But everything is a compromise…if not the brake reservoir is colliding with the fairing, the clutch lever will.

So I need to find out the point of the least bad.

[image: 20140922_184739.jpg]

I hope I can update this thread on a regular basis from now on.

The absolute goal is to have the bike ready till spring 2015!


#209
Brae!!!!


Do you have a local shop that can produce the decals/stickers? Like the one for the rear hub.
#210

Et voici les modifications....Encore pas mal de travail.....en plein modelage pour crée le carénage du réservoir.

Attached Images

  • [image: DSC_0982.JPG]
  • [image: DSC_0986.JPG]
  • [image: DSC_0987.JPG]

#213

Thank you.
carenages Modification.A lot of work.

Attached Images

  • [image: DSC_1077_1.JPG]
  • [image: DSC_1071.JPG]
  • [image: DSC_1073_1.JPG]
  • [image: DSC_1041.JPG]
  • [image: DSC_1032.JPG]

#214

Echelon3:s replica is probably the closest you can get to the real deal…

Very very nice work!

Unfortunately I don´t possess the skills it takes to achieve that kind of quality.

[image: 20141014_205815.jpg]

[image: 20141014_210012.jpg]

Since last update I have been working with the front fairing bracket.

Finally I have the instrument-cluster in place, along with wiring loom, relays, fog lights and oil cooler!

It was really tight since the headlight stole a lot of space.


#215

All brackets for the front fairing is now done!

I have also enlarged the side vents and began to fit the grill.

[image: 20141019_144307.jpg]


#216

A little update.

I´m working on the exhaust…again.  Now trying to get the pipes in proper position.

Needs fine tuning later.

[image: 20141102_184308.jpg]

The exhaust will be wrapped with heat resistant bandage to reduce heat radiation inside the rear end.

I will also put heat shields in some places where the tubes gets close to the fairings.

[image: 20141109_134507.jpg]

For the moment I´m adjusting the battery-box to make room for the electronics also.


#218
All I can say is....WOW....Great job
#221

exact to the milimetre!!!  :beer:


#222

Det ser godt ud Andreas # great job" It's the details that counts - I'm working on my grills right now, the rest is ready for painting but it's too cold for that right now

I want to wish you all a Merry Christmas


#223
eBay[image: fxxj3ttftm5ltcqnto1o4baovyl.png] Shop by category     All CategoriesAntiquesArtBabyBooks, Comics & MagazinesBusiness, Office & IndustrialCameras & PhotographyCars, Motorcycles & VehiclesClothes, Shoes & AccessoriesCoinsCollectablesComputers/Tablets & NetworkingCraftsDolls & BearsDVDs, Films & TVEvents TicketsGarden & PatioHealth & BeautyHolidays & TravelHome, Furniture & DIYJewellery & WatchesMobile Phones & CommunicationMusicMusical InstrumentsPet SuppliesPottery, Porcelain & GlassPropertySound & VisionSporting GoodsSports MemorabiliaStampsToys & GamesVehicle Parts & AccessoriesVideo Games & ConsolesWholesale & Job LotsEverything Else Advanced  
  •  
  • |Listed in category: 
                [image: $_35.JPG]   Mouse over image to zoom Have one to sell? Sell it yourself H       Item location: Greenford, United Kingdom        

Better  hurry  !


#224

That bike has been advertised for years.  Used to be £99,000, so it's now a bargain!  :cool:

Ciao,


#225
The best place for it is in a museum . . .
#227

Hi I would like to ask what rear light was used?? is it also off a 1998 CBR900??? i JUST GOT A 1994 vfr750 and two blackbird mirrors and will contact Poly 26 soon for the bodywork!!!!!!!!!! thanks from Jason in Dublin 


#228

Hi Jason,

Welcome to the club!

You are in for a good start there with the mirrors!

Rear light is from a Suzuki GS500 ,around `92-97 I think.  (cheers to Helweg DK that found that out)

Good luck with your project!


#229

Hi Jason

Welcome to the club !

Feel free to ask for tricks and tips, It's a lot of work and you have to fabric everything you self, there is no recipe or drawings, just photos and measurements.

btw rear light is Blackbird or Suzuki GS 500 Ebay has one in UK - buy it its cheap ! http://www.ebay.com/...#ht_2902wt_1001

And please upload pics of your ongoing project.

Good luck !


#230

Hi I would like to ask what rear light was used?? is it also off a 1998 CBR900??? i JUST GOT A 1994 vfr750 and two blackbird mirrors and will contact Poly 26 soon for the bodywork!!!!!!!!!! thanks from Jason in Dublin 

I don't know if it's been stated in this thread before, but the Blackbird's mirrors are exactly the same as the NR's (apart from the paint colour), so it is one of the few areas where you can get an exact replica effect.

Ciao,


#231

With a rate of 2-3 hrs a week things are moving really slow…but it´s moving forward.

Don't worry about that. That's more than the rest of us are getting to spend on our projects.


#232

Hi, thanks for the quick replies the info on the rear tail light and for making me feel welcome.  I am experimenting and trying to load an image or two (I did manage to put them in an album on this site), I will work it out at some point, possibly now!!!!!!! (I will see when I post this.  So I goth the light on e-bay thanks, and I expect this to be a difficult project with a long time span as I have limited skills!!!!!!!!!!!!! In fact there will be little happening until I put a small extension onto my shed so as I can start the project.  Thanks again for the help so I may as well make use of the advice and ask if I purchase CBR900 98/99 front forks will they bolt straight on with no problems?? and I presume I will have to get 98 calipers, what about the discs, can I use the VFR's and wheel as indicated?? thanks from Jason 

The bike I picked up is 1994 )hopefully you can see a picture of it) its a good stare for €1400, good price!!!!!!  look forward to being part of the community and seeing what happens???

P.S. I run the VJMC in Ireland here is the website www.vjmc.ie you will see many good photos of our shows etc........ 

[image: November 2014 049]
November 2014 049

[image: November 2014 049]
November 2014 049

[image: November 2014 048]
November 2014 048

[image: tn_gallery_31877_7468_830390.jpg]


#233

CBR forks do fit, but not without "problem"...

If you use the 93-96 forks (92 is "wrong" color) you can use VFR wheel and rotors. But you need special made or adjusted spacers to get the wheel aligned in center.

98-99 CBR900 has Ø310mm rotors and then you will get this problem:

[image: IMAG0976.JPG]

The caliper is too far from the brake disc.

Guess what year my forks is... :pinocchio:  but I got 96-forks lying around!

Steering stop also need to be adjusted. (range must be reduced)

I drilled a hole, threaded, put in a stud and nut. And secured with chemical metal.

[image: IMAG0972.JPG]


#234

Thanks Andreas, yes I did get this info in the early section of the Blog, but thanks for being very specific.  Anyway I went down to my local bike breaker today and luck enough he had a complete front end from a 98 CBR900, So i gota good deal on it at €370 for everything, wheel, discs, calipers, handlebars, forks, the whole lot, so this is good.  Also I will get a friend of mine who speaks French to phone POLY26 in the new year and order the fairing kit,

So I am getting together, just one question I may as well get the headlight, the one you used was off a Yamaha I believe, it looks like a Fazar 600??? what headlight was it exactly please and year????? At least having all the parts is a good starting point but admittedly the easy bit!!! thanks again for all the help from Jason

What country are you in also? I,m in Dublin, Ireland.  Merry Christmas from Dublin 


#235

Yes, hedlight is from a Fazer 600 ´98.

Merry Christmas from Sweden!


#236

A two week Christmas holiday also made it possible to put some time into my NR-project.

No big visual progress, but it is the details that is most time consuming.

Like to create new edges around the grill cut-outs, and to get a nice fit with the grill.

[image: 20141231_132214.jpg]

But I´m happy with the result.

[image: 20150104_182105.jpg]

All changes to the body-parts is now done.

[image: 20150106_140640.jpg]

Like it or not, but this mud-flap is NR-ish…

Anyway, most of it will be covered by the license plate.

[image: 20150104_184450.jpg]

Current status:

[image: 20150106_144530.jpg]

Next step…fine tuning of body-parts, spray filler and wet sanding with 800-paper. Time consuming? Yes.

But as always: only way of eating an elephant is in small pieces! :wink:  

BTW:  Anyone that knows the receipt for that really bright red color that the NR has?


#237

Let us know the paint code, we have a thread with some paint formulas here. Go to Google and search "PSA VFRD".

When they say "the devil is in the details"... what they really mean, is the time it takes to get all the little things correct is hellishly long. lol


#238

It's helpfully called "NR red", Honda paint code R-175.  Not that it helps to know this, as I doubt it is available anywhere as such...

Ciao,


#239

NR-red is available at RS Motorbike paint!

Shipping is £15 to central Europe and Denmark , but £60 to Sweden/Finland...??? :mad:

[image: NRpaint.JPG]


#240

give them a call and ask them to double check the shipping costs.

Here the prices if I order in the Netherlands

[image: Capture.JPG]

Shipping 2-5 kilo to Zweden (insured) is a tad over Eur 20

[image: Capture.JPG]

If they will not budge, PM me.


#241

A.m.a.z.i.n.g!!!!!  Can't wait to see this finished.


#242

Got a package yesterday…

[image: 20150128_183557.jpg]

My special made stickers.  Joy! :cool:

[image: 20150128_183756.jpg]

Fairings is under slow process to get better finish.

[image: 20150128_211915.jpg]

Fiberglass is obviously a quite rough method to make a body…even a dull spray filler reveals a lot of small pits and roughness.

So it goes filler-sanding-filler sanding some more. :schla15:

But I realize I have to accept a level a few clicks from “original surface quality”, if I ever want to see the bike ready.


#243
Dude, be patient. Keep the end goal in sight. All you'll end up doing is stripping it and doing it again if you're not 100% happy anyway, trust me! If you spend the time to get the fairing perfect now, you'll reap the benefits down the line. You've come a long way IMO and you should see it through! I'm sure others will agree.
Also, I was in Stockholm last year for a weekend. There's some amazing roads to ride there so maybe we can meet up when this project is finished and go for a big ass ride.
#244

Love this project! Thanks for posting! 


#245

http://www.vfrdiscus...march-2015-009/     

http://www.vfrdiscussion.com/forum/index.php/gallery/image/70976-march-2015-013/ 

http://www.vfrdiscus...march-2015-011/

http://www.vfrdiscus...march-2015-010/

Wow its all looking good, congratulations!!!!!!!! and happy St Patrick's day to all ha ha!!!!!!!!  I have been building up the pieces of this jigsaw puzzle for a few weeks now, trying to get parts at reasonable prices was a challenge but achievable if you look around.  The fairings arrived only yesterday from France, the lads there gave me a discount €850 posted to Dublin?????? not cheap but where else are you going to get NR750 replica fairings???? The bad news is it will be a while before I can start the project as I still have to build my shed!!!!!!!!!!!!!! but it will happen tis summer anyway.  :schla15:   :smile2:  (I will post photos just need to work it out again as I have forgotten how to on the form, bear with me) 

Jason March 17 2015 


#246

@ Jason:

Looks like you have got most of the pieces for a DIY NR!

Just ad time…quite a bit of it!

My bike came alive today after two years of slumber!

I put on my old gas tank, and it fired up after just a few seconds. :fing02:

I was afraid my self-designed mufflers would be loud, or that the pipes would be very hot (they are quite close to the battery box etc inside the rear end). But the result was better than expected!

The sound was great! Not too loud, and not too restricted.

After 5 minutes of warm-up revving the pipes before the mufflers was not hotter than I could hold my hand around it.

Open throttles on the highway will of course be another thing, but I hope the heat shields will be enough.

[image: 20150322_141959.jpg]

[image: 20150322_142313.jpg]


#247

Wahey!!!

Tonite I will pour a Mackmyra  in your honour  :cool:


#248

The exhaust looks great.  I'd like to figure out something like that for my 5th gen. 


#249

Do make sure you get all the trimmings....


[image: Knipsel.JPG]

If you like, I can do some exact measurements for you again....   :-)


#250

Thanks Andreas for the inspiration.  Yes I now have all the bits and pieces, but as you know that is the easy bit !!!!!!! but I will give the project a go over time, it will keep me out of trouble, ha ha. 

You are well on the way now towards a nice bike and many people are cheering you on and looking forward to the finished bike, so good luck with the paint work.

From Jason 


#251

Well weather was good today - red is attached to fairing,

needs to harden out a couple of days before applying the black

Attached Images

  • [image: 2015-04-05 16.09.01.jpg]

#253
That looks like R258 Winning Red from here...my favorite
#254
johnlondon

The first picture there, from the side...it looks like the front wheel is all but a couple of mm away from the lower part of the fairing..does it touch it?

No, it is not as close as it looks.

There is about an inch of distance.

#255

One inch more is always a good thing no?

and yes, "Nordics" love NR's!!!

[image: post-8974-0-85055200-1431413647.jpg]

#256

Very nice project result. You may want to look at fitting some CBR900 rearsets... If you look at my project thread there's some pics of an example. Wouldn't be too difficult to make a red heel plate like the original too?


Another thought - check to see if you can use an MC28 NSR250 or VFR / RVF400 cushless rear sprocket carrier and hub like the original NR? It's possible to fit 4 x M12 x 1.5 studs, or have the wheel welded and machined to accept a centre lock nut.

#257

Yes, you are right! I have CBR900 footrests lying in the garage.

But fitment has been postponed to “step 2”.

Got the generator cover dummy yesterday.

Turned and machined from billet aluminium, then anodized black.

The edge of the chamfer should have been straight, but this was hard to achieve since the surface is curved.

Well, I think the result became quite good anyway. :cool:

Logos are stickers.

[image: post-26810-0-01447400-1432702424.jpg]

Edited May 27, 2015 by AndreasH
#258

Access to a good machinist is invaluable here! Suberb piece of work (along with the rest)

#259
Dutchy

One inch more is always a good thing no?

and yes, "Nordics" love NR's!!!

[image: attachicon.gif]IMAG1589.jpg

Was quit a thing to see a NR for real! Would be nice to see your replica as well AndreasH

Now, just have a RC45 and NC30 unseen in real.....

Edited May 27, 2015 by keny
#260

That thing must really turn heads. Only a VFR / NR purist would know any difference. Well done!

#261

Finaly my grill is finished - molded in fiberglass

[image: post-5137-0-28863800-1433261959.jpg]

and painted alu look - funny what a difference it makes when the grill is there

[image: post-5137-0-04571600-1433261882.jpg]

I'm very satisfied with the result, now I only miss the grill at the rear between the exhaust pipes

[image: post-5137-0-76308500-1433262129.jpg]

[image: post-5137-0-40253400-1433262161.jpg]

#262
Helweg Denmark

Finaly my grill is finished - molded in fiberglass

Wow, I bet that took some hours to fabricate. Looks very good! :fing02:
#263

Looking great!

#264

Generator cover dummy in place!

[image: post-26810-0-71383800-1433739643.jpg]

(sorry for poor photo!)

With that the bike is, more or less, done for now.

Now I just need some nice weather... :tour:

Next winter I will probably make some improvments, so I will be back!

Edited June 9, 2015 by AndreasH
#265

Such and awesome project! Inspiring!

#266
Hej då, Andreas

Du kan verkligen vara stolt över din motorcykel

This Bike pulls the socks off. (as we say in germany...) I wish, I had a lot of money for make a trip to sweden and have one (or two...) look at your bike.

Awesome piece of work :fing02:

greeting from Saxony

Michael

#267

Ha - Ha Some people consider it more than others. I choose to believe that this man has tried to imitate this thread

He says it's a NSR80

http://www.bike-man.com/dbtest/R/ho093.html

[image: post-5137-0-64495000-1454619106.jpg]

[image: post-5137-0-77659100-1454619104.jpg]

[image: post-5137-0-16044100-1454619106.jpg]

[image: post-5137-0-65450800-1454619107.jpg]

[image: post-5137-0-21997100-1454619107.jpg]

Edited February 4, 2016 by Helweg Denmark
#269

Oh come on! That is bad ass! A little 75cc made to look a little bit like the 750?! I would ride the hell outta that thing!

#270

haha ok ok... maybe the fact that i wouldn't fit on it leans me towards my initial response. its neat, the proportions are just so wacky.

#271

I love it!

Here's another 'little NR'... made by the mothership.

[image: 20101001_8da7c83eeec706bd30e7J5hDx3185Sx]

#272

I just need to find the time this year to ride to Denmark and Sweden to see the real replica's......

#273

Dude - like me, you 'need' to find a way to get to Japan and see the Honda hall of fame.

There's an idea... imagine if a whole bunch of us met for the first time in Japan...

#275

Now the spring has finaly arrived to Denmark - time for an update on this winters work

first the rear grill made i fiberglass, filled and painted black

[image: rear2.jpg]

[image: 2016-04-23 14.20.18.jpg]

I looks like this

[image: rear.jpg][image: reara.jpg]

This easter I took a decision to paint my polished wheels black

[image: 2016-04-23 14.19.44.jpg][image: 2016-04-23 14.19.50.jpg]

I think it's better looking than polished in this case

[image: 2016-04-25 12.14.02a.jpg][image: 2016-05-08 12.43.39a.jpg]

I still need to make the snorkels - but i''m working on it

[image: snorkel1.jpg]

But the summer stands for the door - so I'm not working in the garage for the next six month - unless I absoloutely have to...

#276

That rear grill looks very good.

Nice work!

Update for my bike: No progress...

But there might be an interesting article in next issue of Swedish Bike magazine...

[image: Skärmklipp.JPG]

#277

Small update.

This winter I have fitted a 180 rear tyre. (just for the looks) and "NR-style" footpegs and heel plates.

Pegs & plates is from a CBR900 + a piece of red plastic.

Quite nice!    :cool:

[image: IMG_0168.thumb.JPG.ba953becc666789eb8a3ca832823d8df.JPG][image: IMG_0167.thumb.JPG.8af995ff957c4e9af4f088757deae9b7.JPG][image: IMG_0169.thumb.JPG.beb6cac147eb5af379145a054576e874.JPG]

End of thread · 278 posts recovered Wayback Machine snapshot 10 Jul 2017