terrinVFR750InterceptorHi - I saw this post and I would like to know what you think about my situation......
I purchased a interceptor VFR750 and have had nothing but problems.
First I thought it was the starter... Not...
Then I got a new battery... Seemed fine.
A couple of weeks later had to purchase another battery.
But come to find out that it drains the battery and then just stops completely!
Even when I am in third gear.. it will just stop working.
So I check my battery... dead as can be
These guys at a bike shop tell me it is the regulator and/or the stater!
The regulator is BRAND NEW!!!!
Why are they telling me I have to pay over $375 for new parts not including labor!
I may be a woman but I am not like most.... I do have brains and I do know mechanical stuff.
Still learning at this point about my bike!
Please help me .....
When I tested the wiring, the voltage is low that comes out from the stator.
Please reply..
Thank you Terrin
Rather than reinvent the wheel, I'll here repost some good information from the UK VFR site about how your charging system works. Basically, your "stator" makes alternating current (AC), a/k/a electricity, it is sent to the "regulator/rectifier" (R/R) where the AC current is changed to direct current (DC) AND the voltage is "regulated" to something in the range of 14 volts. The R/R ties into your wiring harness and sends DC volts/amps into the battery, which may accept the charge if in good condition, or reject it, if the battery is failing or gone. If the R/R tries to stuff DC volts into a dying/dead battery, the power backs up and overheats the R/R, ruining it. If a new battery is forced to work with a dying R/R, the battery will overexert and die trying to run the bike, then you replace the R/R but if you don't replace the battery at the same time, the bad battery will kill the new R/R, and you start all over again. The stator can also go bad and/or have a bad connection to the R/R, but that is less likely. In any event, read the information below and let me know of questions. I'm sure others will come along with their input, as well.
What is the Voltage Regulator/Rectifier and what does it do?
The R/R is a little gizmo, a bit larger than a cigarette packet, that converts the AC output from the Alternator into a DC input for the battery - hence the Rectifier part of it's name. It also controls the DC input to the battery in a controlled voltage range - hence the regulator part of it's name.
History
The failure rate for this component on the '98 FiW and '99 FiX models is somewhere in the region of 70%. Generally, the failure of the R/R on the VFR gives an under-volt condition, i.e. it doesn't charge the battery. Mind you, there has been the odd, but much rarer, failure to the over-volt condition which boils the battery and can blow bulbs.
The failures are mainly down to the inability of the R/R to shed heat, which then fries the electronics in them. If you touch one after a ride, you'll find it quite hot to the touch anyway.
It is possible to fit a computer cooling fan to try and prevent the problem, but I think it merely delays the inevitable. An upgraded R/R is available for the '98 FiW and '99 FiX models with improved cooling capacity and has, so far, proved much more reliable than the original. The upgraded replacement is a direct replacement.
Luckily, Honda realised there was a problem and replaced the R/R on the '00 FiY and later models for one that's a whole lot more reliable. The later one comes with an additional voltage sensing wire, which means it's not a direct replacement for the earlier model, but it's not insurmountable to fit one if you want.
Symptoms
The usual symptoms of the R/R going AWOL in the under-volt condition are:-
1. The clock resets to 1:00 AM and the tripmeter resets to 0 miles when you start the engine.
2. The engine fails to start, this can happen even if was running a few minutes previously. Often when you've stopped for fuel.
3. The rev counter and speedo needle start to do "strange" things.
4. The bike may start to stutter and cut out.
The symptoms of the R/R failing to the over-volt condition can include:-
1. Blowing bulbs.
2. Boiled battery.
Things to check
Starting with the simple things:-
1. Check the battery connections are clean and tight. It's not been unknown for the connections to come loose.
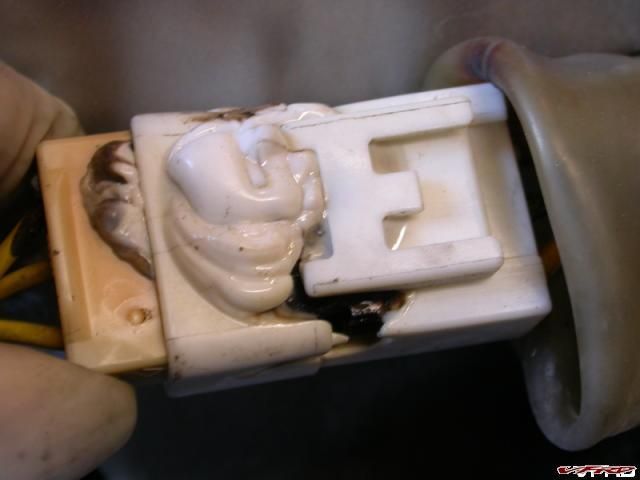
2. Check the electrical connections to the R/R are clean. Sometimes they get corrosion in them, which ups the resistance and causes it to overheat. The overheating, in extreme cases, can melt the plastic.
If those haven't sorted things out, you really need to buy a multimeter. These cost less than £10 and will prove a bonus from here on in. If you're not confident in using one - read the instructions and practise getting DC voltage readings from it. Start practising with a little dry cell (1.5 volts) battery if needs be - we all have to start somewhere.
Warning:- Never, ever connect the multimeter to both battery terminals unless it's selected to the DC volts range. The resistance across the meter when selected to read volts is very, very high so it can measure the difference across the terminals without damage. The meter resistance when selected to amps is very, very low and would effectively short out the battery, possibly melting the leads and blowing the meter up.
Now we're moving into the nitty-gritty.
How old is the battery?
Anything over 3 or 4 years old and it may be past it's best. As they deteriorate, batteries can lose their effective capacity, i.e. they behave as a smaller battery, so, it may be worth doing a selection of load tests on it.
Battery Load Tests
As with many electrical problems, make sure the battery is fully charged. If the charging system is playing up, you've only got a finite amount of power available from it.
a. Off-load test - connect a voltmeter (selected to volts DC) to the battery and off load a fully charged battery should sit at about 12.7 or more volts. Even a failing battery can pass this test at times.
b. Low-load test - a low load test is done with the engine stationary and just turning the bikes lights on and taking a voltage reading at the battery. The battery should have at least 11.5 volts with the lights on.
c. High-load test - this is done when cranking the engine over on the starter motor. You should have more than 10.5 volts while the starting motor is cranking the engine.
If the voltages are appreciably lower than those values, the battery is probably on it's way out.
Replacement Batteries.
If you need to replace the battery, then get a recognised and quality make. For example, the Yuasa YTX12-BS is available from Halfords at around £50. Before you fit it to the bike, ensure it's been fully charged.
What model of R/R is fitted to your bike?
If you lift the seat and have a look just outboard of the LH subframe rail, just behind the cutout in the rear fairing you'll see a grey box a bit larger than a cigarette pack. If it's made by Shendingen (who make them for Honda) you'll see a number on the top of it starting with SH. If it's SH579A-11, then you've one of the original and gloriously unreliable R/Rs fitted. If so, then there's a good chance it's put up the white flag.
If the number on it is SH689DA, then you've got the upgraded item. As mentioned earlier, it is much more reliable than the original, but there is still the possibility of a random failure. Anything else is a non-standard or pattern-part R/R.
For what it's worth the '00 FiY and '01 Fi1 models had R/Rs with SH579C-12 on them which are much more reliable.
No matter which model is fitted, it'd be worth doing a charging system output voltage check.
Output Voltage Test
As alluded to already, the R/R fails when hot, but it can seem to recover when it's cooled down again. The ideal time to do this test immediately after a ride round, if possible without stopping the engine and remove the seat using the spare key.
1. With the voltmeter (set to the volts DC range) connected to the battery, at 4000 - 5000 rpm with the lights off you should have anywhere between 13.5 and 15.5 volts.
2. Turning the lights on could cause the voltage to drop by up to 0.5 volts.
Anything seriously outside those ranges could indicate the R/R is giving up the ghost.
Although Haynes specify the charging voltage should be 14.2 volts for the FiW/FiX models. It's nice if you can get it, but don't worry if you can't. For example, the upgraded SH689DA model regulates at 13.8 volts - chase the 14.2 volts and you'll be throwing a lot of serviceable R/Rs away.
Another oddment, is some people say the lights should get brighter when you rev the engine. That isn't necessarily the case. The SH689DA model can provide more voltage at idle (or slightly above it depending on what idle speed you've got set) than at higher revs, for example, the one on my VFR provides 14.2 volts at idle, but 13.7 volts at 5000 rpm.
Please be aware that multimeters can have slight errors between them. What one is reading could be very slightly different on another.
If the Voltage Regulator/Rectifier is unserviceable
Many thanks to Journeyman for this little bit of useful information.
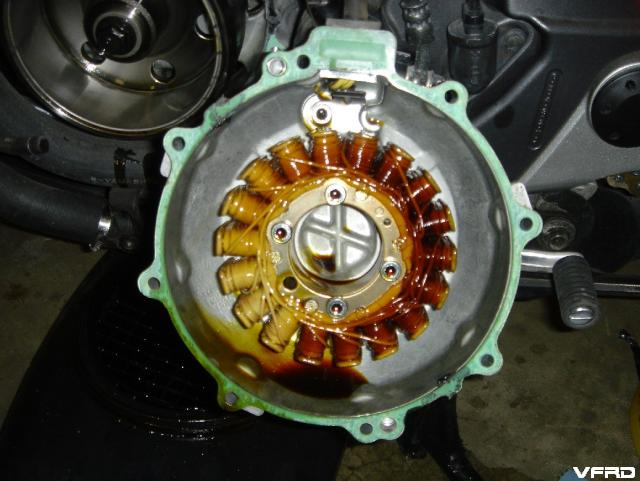
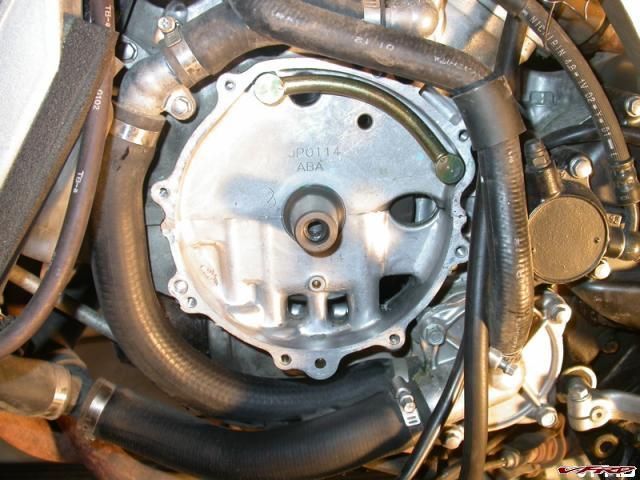
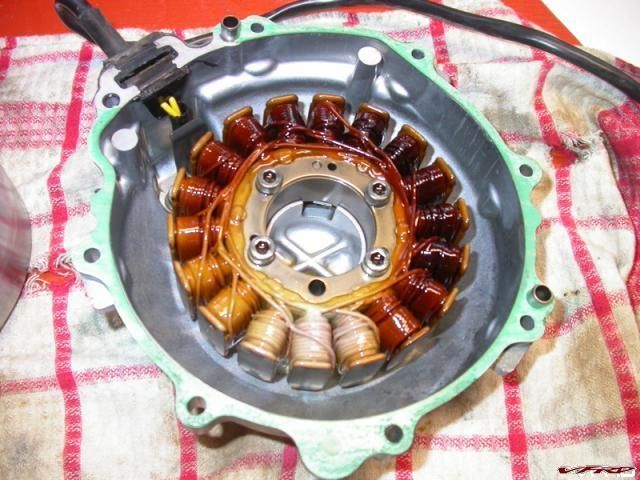
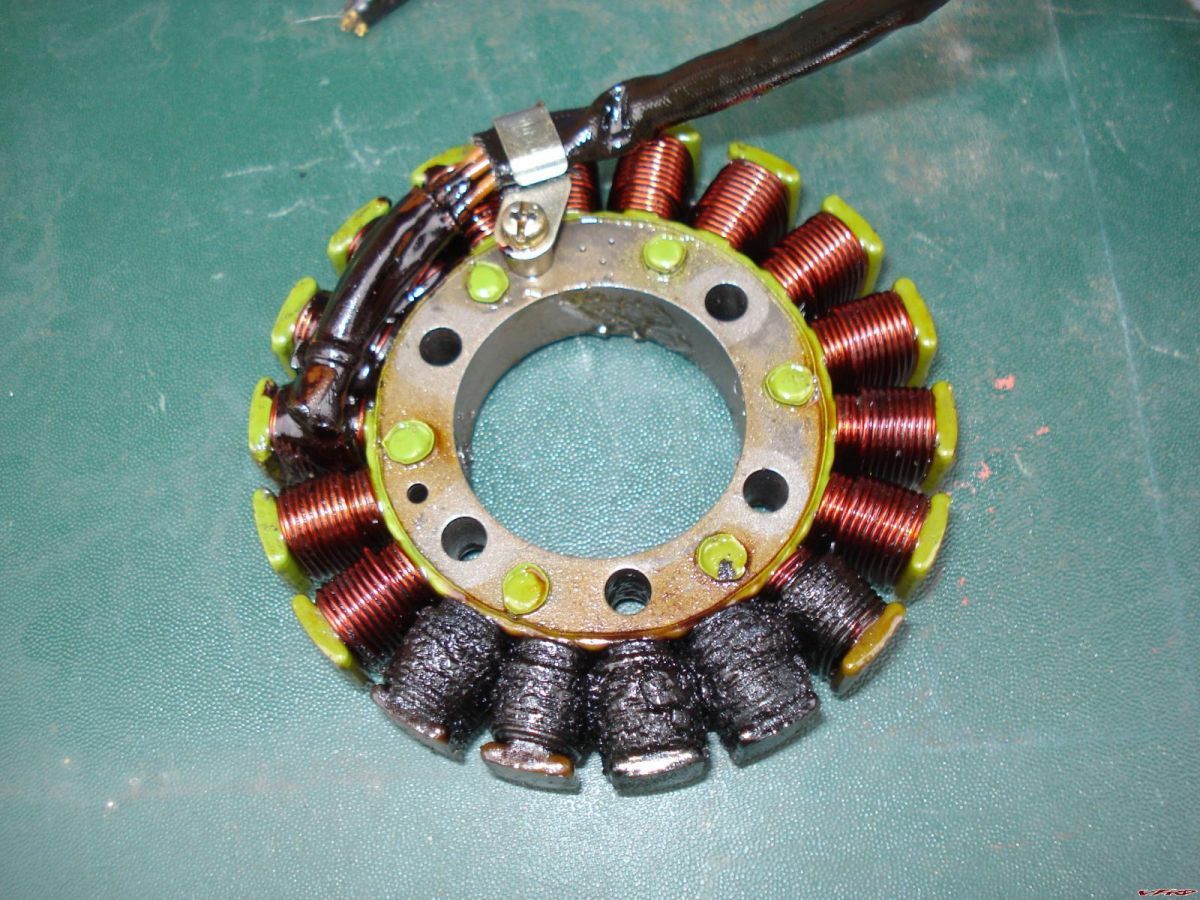
Because the alternator is mounted inside the engine the heat from the engine could affect the insulation on the alternator stator windings. The insulation may even break down between the windings. This typically happens under load and when the engine is hot. You will still get a good output voltage from the R/R, but as the VFR uses a delta wound stator, the alternator will give a much lower AC voltage and much higher AC current.
I will warn you though, having received further information from Brain's, the following procedure may not conclusively prove the alternator stator serviceable or unserviceable. As Brain's reminds me, a multimeter doing resistance checks only uses a few volts, whereas the alternator at high speed may well be inducing in excess of 200 volts at high engine speeds - a much bigger test of the insulation of the windings. Therefore there is the real possibility that a multimeter will say everything is OK, but in use it may well not be.
To check the insulation of the alternator stator coils you'll need to do the following:-
1. Disconnect the R/R connection to the alternator - the one with the 3 yellow wires.
2. Select the resistance (Ohms or Ω) range on your multimeter and touch the two probe ends together. The readout on the multimeter will give you the effective zero reading - so if there is a value shown and your multimeter cannot be zeroed - as many cheaper ones can't be, you'll have to deduct this number from any further measurement.
3. On the three yellow wires coming from the alternator (not the ones from the R/R by accident) measure the resistance between each of the wires in turn, i.e. have one probe on the connection to one yellow wire, then touch the other probe to the connections for the other two yellow wires. So if one probe is one wire 1, place the other probe on wire 2 then 3. Then move the probe from wire 1 and put it on wire 2, then place the other probe on wire 3. That way all combinations are covered.
4. The resistance readings in step 3 should be anywhere between 0.1 Ohm and 1 Ohm - remember to deduct the resistance reading you got in step 2 from the values you saw in step 3.
5. Now test the resistance between each of the yellow wires and earth. There should be no continuity, i.e. infinitely high resistance, between any of the yellow wires and earth.
If the values in step 4 or step 5 are outside the tolerances, then there's a pretty good chance the alternator stator coils are knackered.
Replacement Voltage Regulator/Rectifiers
Use the upgraded OEM one. Electrex make one, but it's reliablity record isn't anything to shout about.
To get an upgraded OEM one at a good price, try David Silver Spares who do them for £55 (plus VAT and P&P), which compares very favourably with about £200 from a Honda dealer for exactly the same item, just look in "OE Regulator Rectifiers" on their site.
If you get the one from "Genuine Spares" area of the DSS site (£79 plus VAT and P&P), the extra money merely goes into buying a nice Honda box to throw in the bin when you've got the R/R out of it.
The cheaper one is identical, just supplied in a poly-bag. Also included is a set of longer bolts (the upgraded R/R is thicker than the original as can be seen in this link) and an additional aluminium heatsink.
Reuse the original domed nuts as these stop the bolt ends rubbing away at the nearby wiring loom. It can also pay dividends to put some heat transfer paste (available from outlets such as Maplins) between the R/R and the heatsink and between the heatsink and the rear subframe. That'll help transfer extra heat from the R/R into the subframe.
I'd tend to advise, if the battery is over 3 years old or of unknown history, replacing that at the same time as the R/R. A failing battery can over-work the R/R hastening it's failure.
The charging system voltage is OK, the battery load test voltages are good, the alternator resistance values are fine, but the battery still flattens quite quickly.
Now we're looking at the battery leakage rate. This is the current (Amps) the bike draws even though everything is turned off.
Ideally the leakage should be less than 1.2mA, but with an alarm fitted and armed it might marginally higher than that. It might be worth consulting the alarm instructions and seeing what current it draws.
You'll need to set your multimeter to the highest DC Amps range. this is to stop the meter overloading when it's connected. On some models of multimeter you'll need to change which connection the red lead goes to.
When set to read amps, under no circumstances connect the multimeter between the battery terminals, otherwise you could short out the battery, melt the leads and wreck the meter.
1. Disconnect the battery negative (earth) lead.
2. Set to multimeter to the highest DC Amps range.
3. Connect the multimeter between the battery negative terminal and the disconnected negaive (earth) lead.
4. Going down one DC Amps range at a time, reduce the range until the reading is sensible. Always start high to protect the meter from overloading.
5. The ideal leak rate should be below 1.2mA, but as mentioned above it may be very slightly higher because of any alarms/immobilisers, but not substantially so.
If the leakage is substantially higher than 1.2mA, try pulling and refitting fuses one at a time and seeing which fuse make the biggest difference to the leakage value when removed. This'll give you a clue as to which circuits are drawing too much current.
Real Time Charging System Monitoring
If you're concerned about the state of your charging system and want to monitor it without the faff of getting a multimeter out every time, there's nothing to stop you fitting a small voltmeter. I have a Lascar EMV1200 fitted to the Big Red Bus - my VFR.
Hope this little lot is of some use.
![[image: 29910223741.jpg]](http://img2.putfile.com/thumb/10/29910223741.jpg)
![[image: 29910223617.jpg]](http://img2.putfile.com/thumb/10/29910223617.jpg)
![[image: 29910194775.jpg]](http://img2.putfile.com/thumb/10/29910194775.jpg)