VFRDiscussion ARCHIVE / READ-ONLYREAD-ONLY

Tips & Tricks To Help Your Charging System

153 posts Started 27 Feb 2007 Last recovered post 20 Jan 2019 Wayback Machine snapshot 23 Jul 2021

#1

A short history: I spent 15 years of my life designing and building high aperage electrical systems for automotive applications. I learned that in order for a charging system to work properly, things have to be solid, clean and over sized...

So

I bought my 99 VFR a couple of weeks ago...upon arriving home, gave the bike a good going over.

Reading about all of the charging gremlins the VFRs have, I decided to check out the electrical system.

When I measured the voltage, I found the voltage output was way to high at higher RPM and to low at low RPM...pulled the regulator, found a hole burnt in the back of it with a solder trail coming out...DOA reg.

I called the dealer where I bought the bike told him the problem - he gave me a new regulator no charge (the updated one even).

After installation, things were better but, I felt the voltage was still on the low side and unstable.

I went to work cleaning and updating all the charge wires...

(My apologies if all of this has been posted before)

First thing I did was pull all connectors apart and check them for coorosion or burning (none - all was fine) and give them a dot of grease.

next I cleaned all OEM ground points and reassembled with lithium grease.

Voltage came up some but, not what I considered acceptable and it was still unstable.

#1 - I ran an additional 8 gauge ground from the battery neg to the connection on the frame (right side with the green wires, not at the brake valve)

#2 - I ran an additional 12 gauge ground from the new ground point to the regulator ground and commoned them (green wires on the reg plug)

#3 - I ran 2 additional 12 gauge wires from the Batt positive to the regulator charge output wires (red & red white)

fired the bike up and BINGO - 14.6 volts, rock solid...@ all RPM w/brights on

My take: The OEM charge & ground regulator wires are to long & to small (for the length the run)...

Next, I'm thinking of upgrading the actual stator wires...for now, I think I'll just ride awhile.

#2
zam70A short history: I spent 15 years of my life designing and building high aperage electrical systems for automotive applications. I learned that in order for a charging system to work properly, things have to be solid, clean and over sized...

So

I bought my 99 VFR a couple of weeks ago...upon arriving home, gave the bike a good going over.

Reading about all of the charging gremlins the VFRs have, I decided to check out the electrical system.

When I measured the voltage, I found the voltage output was way to high at higher RPM and to low at low RPM...pulled the regulator, found a hole burnt in the back of it with a solder trail coming out...DOA reg.

I called the dealer where I bought the bike told him the problem - he gave me a new regulator no charge (the updated one even).

After installation, things were better but, I felt the voltage was still on the low side and unstable.

I went to work cleaning and updating all the charge wires...

(My apologies if all of this has been posted before)

First thing I did was pull all connectors apart and check them for coorosion or burning (none - all was fine) and give them a dot of grease.

next I cleaned all OEM ground points and reassembled with lithium grease.

Voltage came up some but, not what I considered acceptable and it was still unstable.

#1 - I ran an additional 8 gauge ground from the battery neg to the connection on the frame (right side with the green wires, not at the brake valve)

#2 - I ran an additional 12 gauge ground from the new ground point to the regulator ground and commoned them (green wires on the reg plug)

#3 - I ran 2 additional 12 gauge wires from the Batt positive to the regulator charge output wires (red & red white)

fired the bike up and BINGO - 14.6 volts, rock solid...@ all RPM w/brights on

My take: The OEM charge & ground regulator wires are to long & to small (for the length the run)...

Next, I'm thinking of upgrading the actual stator wires...for now, I think I'll just ride awhile.

Please describe what you mean by "commoned them". I can solder, but don't know the methods of connection, connectors to be used, etc. What is your method of connecting the new add'l 12 ga wire to the two green wires on the R/R plug?

What fitting did you use at the battery positive terminal that accomodated the 2 new 12 gauge wires? Or did you use two separate fittings?

Did you bypass the stock R/R feed to the stock harness through the white connector on the skinny red wire, or is that still connected? If so, how did you attach the two new 12 ga postive wires to the R/R positive output?

Finally, why did you run the R/R negative to the frame, rather than to the battery (as you ran the R/R positive to the battery)?

Thanks for your work on this. Very helpful.

Edited February 27, 2007 by Misspent Youth
#3
gll429you forgot to add some heat transfer compound to the back of the r/r and a computer fan on the front .

NOPE - did that too...(you can buy it @ Radio Shack)

I also (to aid cooling) drilled 4 holes right in front of the RR, not sure if it'll help, but sure can't hurt.

I'll try to snap some pics and get them posted.

ALSO - you can get dielectric grease @ autozone (it's located with the RTV)

#4

WOW – I didn’t expect this kind of response but, I’m glad to help….

MR PHEER – I know you from the VTXOA board (zam70 there too) you and your praise of the VFR, is one of the reasons I started to look seriously at a VFR (bought a 99 2 weeks ago…)

To answer a few questions:

-Dialetric grease can be purchased @ auto zone (it is located with the RTV)

-Silicone heat sink grease can be purchased @ Radio Shack (use on the RR to solidify the RR to the frame)

NO OEM wires were cut or interrupted. The new wires are supplemental to the originals.

All connections to existing wires were made with a “button hook†method to preserve the integrity of the OEM wires. I metered all wires to verify their path prior to doing this…

I prefer the button hook method for larger wires since they take a lot heat to solder properly (usually damages the insulation).

Button hook = strip an area of insulation appx ½â€+ long off & completely around an existing wire so you have a bare section in the wire. Then open up a hole in the bare section (I use an awl or small screwdriver and poke it through the center of the bare section and open it up. Strip back a good portion of the new wire…1†– 1 ½†should do for 12 ga…you’ll know how much when you do it. Thread the new wire through the hole in the existing wire, then wrap it around the bare area cinching the hole closed…keep tightly wrapping the new wire around the bare section until the entire bare section is covered – keep it neat & tight and cut off any excess. cover the connection with tape or shrink wrap if possible.

To common 2 wires – you simply hook the new wire through 2 existing wires cinching them together.

-I connected the RR ground at the frame to avoid having to much crap at the battery.

-I connected (button hook) the additional charge leads from the RR to the main batt cable right before the OEM terminal to avoid to many connections on the batt bolt.

.

#5
ChevHmm, I bet this applies to all the generations. I'll be doing this soon enough. Thanks. :thumbsup:

Actually - this applies to any thing....

I go over the wiring on every thing I own...

I have yet to find something it hasn't helped...cars are worse than bikes but not as sensitive because they have a larger charging system.

On a bike, you need all you can get

#6

Yea, all the above might prevent this..

[image: gallery_8428_2711_2834.jpg]

Fuse? Can anyone explain why the fuse didn't blow?

[image: gallery_8428_2711_19588.jpg]

Yamaha part on my VFR-bad Karma? After the second stranding via a Honda rectifier..BTW-the sticky surface on the back of the rectifier made a good thumb print impression for an ultimate identification.

#7
zam70WOW – I didn’t expect this kind of response but, I’m glad to help….

MR PHEER – I know you from the VTXOA board (zam70 there too) you and your praise of the VFR, is one of the reasons I started to look seriously at a VFR (bought a 99 2 weeks ago…)

To answer a few questions:

-Dialetric grease can be purchased @ auto zone (it is located with the RTV)

-Silicone heat sink grease can be purchased @ Radio Shack (use on the RR to solidify the RR to the frame)

NO OEM wires were cut or interrupted. The new wires are supplemental to the originals.

All connections to existing wires were made with a “button hook†method to preserve the integrity of the OEM wires. I metered all wires to verify their path prior to doing this…

I prefer the button hook method for larger wires since they take a lot heat to solder properly (usually damages the insulation).

Button hook = strip an area of insulation appx ½â€+ long off & completely around an existing wire so you have a bare section in the wire. Then open up a hole in the bare section (I use an awl or small screwdriver and poke it through the center of the bare section and open it up. Strip back a good portion of the new wire…1†– 1 ½†should do for 12 ga…you’ll know how much when you do it. Thread the new wire through the hole in the existing wire, then wrap it around the bare area cinching the hole closed…keep tightly wrapping the new wire around the bare section until the entire bare section is covered – keep it neat & tight and cut off any excess. cover the connection with tape or shrink wrap if possible.

To common 2 wires – you simply hook the new wire through 2 existing wires cinching them together.

-I connected the RR ground at the frame to avoid having to much crap at the battery.

-I connected (button hook) the additional charge leads from the RR to the main batt cable right before the OEM terminal to avoid to many connections on the batt bolt.

.

To clarify for me, you left the OEM arrangement for the R/R to the stock harness and just added wires to it? You didn't cut the R/R/harness connector out and direct-wire the R/R charge wires into the main battery lead?

I took a different tack and may need to change it. I bypassed the stock charge wire and cut it out. I direct-wired the R/R charge wires together, then tied them to a single 12 ga wire that I ran to the postive battery post as an add-on. I figured the 12 ga wire would be sufficient, given the skinny R/R charge output wires, and didn't want more wire than I needed.

Then I bypassed the stock harness and direct-wired the R/R ground wire to the brake valve ground, where the main battery ground attaches, again using 12 ga wire.

I picked up a little (1/4 volt) with this direct wire arrangement, but, after hitting 14.6 or so at 1,500-2,500 rpm, then decreasing as rpm increases, still ends up at 13.94 v warm @5 k rpm, clean connections, brand new battery, brand new upgraded R/R and brand new Honda stator.

Hence my interest in your technique. Thanks again.

#8
Misspent YouthTo clarify for me, you left the OEM arrangement for the R/R to the stock harness and just added wires to it? You didn't cut the R/R/harness connector out and direct-wire the R/R charge wires into the main battery lead?

I took a different tack and may need to change it. I bypassed the stock charge wire and cut it out. I direct-wired the R/R charge wires together, then tied them to a single 12 ga wire that I ran to the postive battery post as an add-on. I figured the 12 ga wire would be sufficient, given the skinny R/R charge output wires, and didn't want more wire than I needed.

Then I bypassed the stock harness and direct-wired the R/R ground wire to the brake valve ground, where the main battery ground attaches, again using 12 ga wire.

I picked up a little (1/4 volt) with this direct wire arrangement, but, after hitting 14.6 or so at 1,500-2,500 rpm, then decreasing as rpm increases, still ends up at 13.94 v warm @5 k rpm, clean connections, brand new battery, brand new upgraded R/R and brand new Honda stator.

Hence my interest in your technique. Thanks again.

I left the OEM wires intact because:

A ) it gives you more wire potential to hook it all together...it's not hurting anything, just inadequate

B ) Not to upset the original OEM wire integration just in case it mattered...if it does, I'm safe, it it doesn't then nothing hurt.

I think you should at least double up your wires...age old rule concerning wiring: You can never have to much.

Another possible problem...I think the OEM runs the RR wires to the starter THEN it distributes from there. You have essentially reversed that (batt first, than starter) not sure if it matters, but, it could.

Edited February 27, 2007 by zam70
#9

When my '90 VFR750's R/R died, I just had the dealer install a new (aftermarket) one. When I had a look at the job he did, I wasn't too impressed, so I decided to "do the whole thing properly". First, I decided the RH-side location under the rear cowl was about the worst place (short of the exhaust headers) it could be mounted, so I remounted it on a piece of 3mm aluminum plate under the headstock (where the horn normally resides).

Next, I reckoned that all that thin wiring and connectors were a bad idea, so I cut it all off, from the stator plug back to the battery.

I then relocated the stator wires, so instead of coming out of the left side and running across the engine to the right, they came out of the left side. I cut these as short as I could (without taking the engine cover off) and connected in some large gauge wires from there to the R/R, crimping and soldering the connections before heatshrink covering them. (My electronics soldering iron didn't hold enough heat, so I used my leadlighting one).

I ran one ground to the ground point on the water rail between the engine V, then the other back to the battery.

It had two (2) positive outputs from the R/R, so I commoned them and ran a very thick wire back to the battery, via a 30A inline fuse.

All connections were crimped and soldered, heatshrunk, and then I covered the whole lot in that split trunking and zip-tied it up.

I can't remember for sure, but I think I got about 14.6V max, and about 13.2 at idle.

Apart from the R/R, the whole job cost me only a few shekels. The hardest part was the soldering, but I fond that by wrapping the joints with thin electronics solder, and using lots of heat, it worked OK.

#10
NVR2L8I'm not electrician by trade, but back in the day when I was a electronic technician, I do remember that "given a constant voltage and current load over a specific length of wire of a specific gauge", then there will always be a specified amount of "voltage drop". If your intent is to reduce this drop in voltage in this span of wire, then you must either shorten the span or increase the gauge of wire. Increasing the gauge of the wire also increases how much current the span can safely handle, as well as total wattage.

BINGO - what I did basically does both.

Shortens the length and increases the gauge of wire used (yes, multiple small gauge = large gauge)

I think the main problem is the initial length ran in the OEM wiring prior to reaching the battery & fuse block.

???????????? --------> DOES ANYONE KNOW WHERE THE OEM ENGINE GROUND CONNECTS?

I would like to tackle that next.

#11

well, when i did my RR i soldered theyellow leads to the stator eliminating the connector. i also did a button hole tie in for my extra black lead since i used a 6th gen RR on a 5th gen but i soldered it. Always solder. Always.

Dont argue about it, just do it.

Motorcycles are a harsh envirornment for electrical connections, and you solder for teh same reason you use grease on connectors, not because it helos the connection (it makes it a bit worse actually) but that it does keep it from corroding and therefore makes it stay the same for a long long time.

A soldered button hole joint wrappped with e-tape or painted with liquid e-tape will last you a lifetime, but one tha is just wrapped will probably last 5 years at the very most if you did a really good job in wrapping.

Moisture (and sometimes salt from oceans or roads in winter depending on where you ride) gets in there inevitably and makes your connection degrade, and then it turns into a resistor and starts getting hot, and then fails, or maybe fails intermittantly.

Many years of working on Boat wiring, motorcycle wiring, and industrial wiring in a plating shop have shown wihtout a doubt, you want solder to improve the joint and make it not corrode again.

This is the same school of thought as to why you gold plate connectors. Gold is not as good a conductor as you would be lead to believe, it is actually usually worse than what it is going on. However, because it resists corrosion, it will at least ALWAYS be the same level of connection rather than degrading rapidly over time as whatever surface oxidizes as would alum, steel, copper, silver, etc... This makes a reliable connection and that is usually more important (think AV cables that are cheap and need twisted every so often to get your picture and sound right).

As far as oversizing the wires, ya, thats a good idea too as they are just a hair undersize for some reason so doubling them up creates extra capacity and lowers the resistance of them significantly.

This is why the went to the extra black wire in the 6th gen rectifier straight to the battery, since they were sensing voltage at the RR over the red and black leads which were slightly undersize and would get hot and give a flase reading. The black lead carries no current so remains cool and makes a better measurement point. The better answer would have been for honda to just upsize the wires and leave the black wire off it. I have no idea why they didn't do it that way...

Speaking of the RR, the otehr reason they fail is there is NO AIRFLOW in there... i put a fan on my orig one and it still failed (or was already failing). If you look at the space it is in there is no exit for air. Air wont come in and flow across if there is no exit. The newer ones are up front in the fairing i believe where they get more airflow. i was thinking of drilling a 1" hole in the underside of the tail side plastic and putting a clamshell cover over it to help vent air and still keep chain grease and moisture out of the area, but havent done so yet.

Ah well, more projects...

#12
zam70I left the OEM wires intact because:

A ) it gives you more wire potential to hook it all together...it's not hurting anything, just inadequate

B ) Not to upset the original OEM wire integration just in case it mattered...if it does, I'm safe, it it doesn't then nothing hurt.

I think you should at least double up your wires...age old rule concerning wiring: You can never have to much.

Another possible problem...I think the OEM runs the RR wires to the starter THEN it distributes from there. You have essentially reversed that (batt first, than starter) not sure if it matters, but, it could.

Thanks for the tip.

As for charging voltage distribution, as I understand how things are OEM wired, you are correct and the charging voltage-to-battery connection off of that skinny red wire is the last stop, after first passing through the starter solenoid, etc. My routing has taken the OEM harness (and consequently, the starter solenoid) out of the charging circuit completely. I've noticed no operational issues resulting therefrom, but I'll give some thought to reestablishing the OEM arrangement.

Re: Engine ground point - I don't know, but that eliminating that possible ground point's corrosion issue (with consequent bad grounding, etc.) was one of the prime motivators for my wanting to carve the OEM harness out of the equation.

Thanks again.

#13

Ok, here's a couple more questions.

I have the wiring diagram in front of me (I could make copies showing what I think you mean, and post them), and of the 2 red/white wires that go into the reg, one comes from the battery, and the other one goes to the main connector for headlight, dash etc.

My first question is: Do you use the same fuse, add a new one or bypass it all together?

2nd question: Would it work to take the terminal off the connector for the reg, solder it with the bigger wire and put it back in?

3rd question: Knowing that the second red/white wire isn't a link to the battery, do I still need to double it?

4th question: I noticed that the 2 red/white wires are connected together at one point, shoud I use that instead to connect the bigger wire?

Thanks,

SG

#14

It does by pass the fuse...you could add one...but I would put one in each wire individually.

IF there is a short that could cause a problem, it would have to be in that 8" piece of wire. Highly unlikely really.

If it's in another area, the OEM fuse will take care of that. If you wreck bad enough to cause a short in that wire, I think the wire will be the last thing you need to worry about. In all actualities, the wire will actually function as a fuseable link if no fuse is used.

If it's something that worries you, add a fuse in line

Majority (possibly all) of OEM auto manufacturers DO NOT use a fused charge lead - no reason to really.

I would just add the wires. It will keep the charge leads as short as possible and maintain the OEM wire routing for the original wires.

IF the original wires coming of the reg simply go straight to the battery (and are short) replaceing them out of the plug would be fine but the wire would have to be completely replced from the reg to the battery to be most effective.

Doubling up both of the wires and hooking directly to the battery maximizes the charge potential.

If the RR only has the single lead going to the battery for charge THAT is the major problem in the system.

#15

True that auto's don't use a fused charge lead, but the RR is on the fused side of the battery already, if you provide a direct link from the rr to the battery, you just by-passed the 30a fuse for the entire electrical system. In your system, you could remove the 30a main fuse and the bike would still function normally.

Have you looked at the wiring diagram?

If not, here is my best explination

Battery>30a Fuse> Y splice with one lead going to the RR the other going to bike power.

You went directly from the RR to the battery, therefore the existing 30a fuse could be removed completely from the system and be function normal.

#16

I understand what your saying at it is a very good point...

Since you have the diagram at hand, what does the OEM 30amp actually interrupt that is not protected @ the fuse panel? Just curious.

If it is just the charge lead to the battery, I wouldn't worry about it. That would mean the 30 amp fuse is protecting the originall RR wires.

Like I said, if it's something that concerns you, fuse each additional lead individually...it's a good idea, just not something I did.

#17

Quick Sketch of the Wiring Diagram

[image: gallery_4338_1246_21714.jpg]

Quick Diagram Quick Diagram

#18

ahhh, its protecticing your main harrness. if you have say your headlight wires short, the 30 fuse will blow saving your entire harness from melting. wires make terrible fusible links as they are usually bundled with other wires which they can melt to in a short failure situation.

you would have to increase the wire size from RR to batt, RR to fuse, fuse to main distro point to gain the benefits while still being protected.

Sorry, forgot about that fuse when i gave advice earlier, nice catch.

Well, and my bike is tucked away in the garage since we have had 4 days of freezing rain and even a bit of hail... i should have gone and looked.

#19

I would pin this but there are too many open questions on exactly how you did it, and there are quesitons as to why you bypassed the main bus fuse? If you could perhaps draw and scan in a diagram or use ms paint? or take some digital photos of how you did it so we can plainly see whats involved - pics solve a lot of questions that are difficult to explain.

there is a great how to in the maint section > how to guides on how to perform a linemans soldier splice its easy to perform, is secure and does a good job of making a solid connection.

#20

Sorry...I have a good knowledge of electrical and always take it for granted everyone does...my mistake.

I don't always play things safe on my own stuff...

When I did this, it was basically for myself - after seeing the results, I decided to post up what I did and the results (since this seemed to be an on going problem concern) to share with others.

I never intended this to be a detailed tech "how to" therefore, I never took any pics and didn't post all of the specific fine details.

Maybe someone else will snap some step by step pics if/when they do this.

I could type up a more detailed description w/pics if needed

If you're not comfortable with the mod, I would suggest not doing it.

As far as bypassing the main fuse - this was admittedly an over sight - a fuse or fuses would be a good idea.

The connector at the battery is plenty heavy to pass the current this system provides.

#21
VFR FLYERok, i would like to wade in here and ask a question. first it seems to me when you turn your key on, everything is now on, and the grounds near or at max draw. you push the starter buttom and things dim. would this problem be helped by running a large ground wire directly to the starter mount bolt? or is this back to the power side being overtaxed?

Um, yes and yes and no.

Yes starting is the most taxing moment the elec sees, and upping the wires might help a bit but not really since they are only carrying load for a few seconds and dont have a chance to get hot and be a resistor. The ground might again help a little depending ont the resistance of your gound circuit under that load (snap on makes a kool tester...) but the limiting factor is probably just your battery. It can only put out so much juice at 12.5v befoe it drops, and drops, and drops... on a dead short it may sit at 6-7 volts for a few seconds before you melt something. So cranking it may drop to 11 volts or maybe 10 depending on your battery age/condition/attitude.

I have seen vehicle with REALLY bad, frayed, corroded battey cables/terminals go for a long time since they only needed about 1/2 a second of juice time to get the motor started. Now, take that same situation and run out of gas and need to crank it for 30 seconds, well, that is the start to a real bad day and a big bill to fix everything you have been ignoring as you are now S O L.

chris

#22

OK - went back in today and installed fuses in line on the new wire (thanks for catching that!)

Just for fun, I started the bike and measured the voltage before putting the fuses in the new holder (basically, running the bike with the new ground wires still intact but the new RR power leads disconnected). I was curious to see how much the new charge leads actually improved things.

measured voltage = 13.3/13.6 (new grounds, no new charge lead) voltage was a little unstable

I then dropped the fuses in place and voltage went up to 14.3 immediately, then settled at 14.6 (I think the stator was under load - I had not ran the bike all week, no batt tender).

So - the new charge leads absolutely improve the situation.

anyone done this yet w/full pics. (i'll know next time to take them...)

#23

Here is the wiring diagram of what I did. You won't have the Kriss Amp-U-Tron in line, but you can mearly cut the main feed to the battery and splice in an extra wire to boost charge to the battery.

[image: gallery_4338_1246_52340.jpg]

Wiring Upgrade New + Wires in Red, New - Wires in Green. All wires used are 12ga high strand.

Keep in mind that when you have the extra wire coming directly from the RR to the battery, and you add a second 30a fuse, you then have on the bike side of the battery, 60a of potential. To prevent this you may want to change the 30a fuses for 15a or 20a fuses so as not to have such a huge potential in case of a dead short.

#24
chris2992Here is the wiring diagram of what I did. You won't have the Kriss Amp-U-Tron in line, but you can mearly cut the main feed to the battery and splice in an extra wire to boost charge to the battery.

[image: gallery_4338_1246_52340.jpg]

Wiring Upgrade New + Wires in Red, New - Wires in Green. All wires used are 12ga high strand.

Keep in mind that when you have the extra wire coming directly from the RR to the battery, and you add a second 30a fuse, you then have on the bike side of the battery, 60a of potential. To prevent this you may want to change the 30a fuses for 15a or 20a fuses so as not to have such a huge potential in case of a dead short.

Thanks for posting the diagram and explanation. I'm no electrical diagram reading guy, so please let me confirm that:

You ran one 12 ga wire from each of the R/R's positive outputs and buttonholed them into the big stock to-the-battery positive terminal somewhere south of the terminal, itself (ignoring the amp meter issue). True?

Then you ran the R/R ground directly to the battery negative terminal?

Then you buttonholed the R/R ground to the frame ground?

Then you ran a second ground from the R/R ground line from the battery negative terminal to the frame ground under the plastic?

Then you ran a separate ground wire from the brake res to the frame ground?

If true, you have no new wires added to the positive terminal, but two new wires added to the negative terminal? (one incoming from the R/R and a new one leaving to the frame ground)

If not true, please clarify as to how these wires are physically attached. Sorry in advance if it's my electrical ignorance but if it helps, I am learning a lot, and others likely are, as well.

#25

AutoCAD > Copy and Paste into Paint > Save as .jpeg > upload to VFRD

#26

THANKS - for putting that up...helps clarify things...

I personally didin't do the ground jump to the main ground but, it sure can't hurt (never to much!)

Good point on the fuses as well.

SO, what were your end results?

EVERYONE ELSE- post up your before after results so we can verify this is a solution for a long running problem.

Edited March 5, 2007 by zam70
#27

End Results: (keep in mind that I am using a R1 RR so results may be skewed)

Idle 14.0v steady

5k Rpm 14.2 steady

No drops anywhere in the rev range.

#28

GREAT - I find that the stability is the best part of this.

I always read about the voltage varying so much from one extreme to another...it just didn't make sense. A few tenths, ok but over a volt? No good.

Thanks for your assistance with the diagrams.

it'll be intersting to see a large # of results.

#30

Got my bike ripped apart rewiring everything I can think of and decided to add the RR>Battery rewire to the list. Did mini writeup. Most of the stuff should have been covered through the rest of this post, but heres a couple pics of what I did. Haven't got the bike back together to test it but I'll let you know what my results are when I finished, hopefully by Sunday.

[image: rrpost1.jpg]

[image: rrpost2.jpg]

[image: rrpost3.jpg]

[image: rrpost4.jpg]

[image: rrpost5.jpg]

[image: rrpost6.jpg]

#31
ChevLooks like your on your way to where I want to be. I'm doing this this weekend. I'm hoping to lower my voltage as it sits around 15.1 most of the time. I think that's high.

Might want to check your battery voltage feed to to the R/R resistance, which tells the regulator how much voltage the battery has, essentially the regulator thinks the batteries running at 11 vdc ( example ), so it steps up charging output to make up for the low voltage. ( I'm thinking you shouldn't have more than 0.6 ohms when connecting between the Red/White to Battery + ) I was talking to Jeremy556 about this yesturday and apparently several people have had problem with this, which I was unaware of, but it can cause charging to peak at 16+ vdc sometimes. I don't know a whole lot about what was causing the problem, all I know is Jeremy said when he ran new wires it fixed the problem allowing correct monitoring of battery voltage. Might be worth a farther search on this before getting into it for I just did this to pick up a little voltage and lessen resistance across length & connectors. I think total if you include fuses as connectors, the voltage runs through 4 connectors w/ a 0.2vdc voltage drop off each connector, which off the top is loosing 0.8vdc. Will post final results later.

Edited: forgot to add this: was getting 0.6ohms of resistance off the factory feet from r/r to battery, getting 0.15 ohms of resistance off the new wiring. Big improvement of resistance off the top.

#32
Chev
tinymindsEdited: forgot to add this: was getting 0.6ohms of resistance off the factory feet from r/r to battery, getting 0.15 ohms of resistance off the new wiring. Big improvement of resistance off the top.

I still have to sort out how I will rewire this, but I am getting 35 ohms between my R/R and my battery. I think I'm in for a new riding experience soon.

35 ohms!?!?!? you either forgot a decimal point or you have a really bad contact somewhere in your system. At 35 ohms your bike would just stop running in 30 min... Still, if that was .35 than its still high, i like to see roughly .01 cold, and as high as .05 when the wires are hot and the bike has been running for 30 min at speed. when the wires are hot they incrrease their resistance, sometimes it goes up drastically, if the wires are big enough, they dont change much at all.

Zerosum
captainchris13Always solder. Always.

Dont argue about it, just do it.

Could you post a link to a decent tutorial on how to do this properly? I'm interested in doing this for the connections on my 4th Gen, but the only thing I've ever soldered before was copper pipe.

Um, not much different really. Make sure your wires are clean with no trace of corrosion, strip them back 3/8 to 1/2", twist together with fingers or pliers firmly (making good contact already), give a light brush of flux or use rosin core solder, and just warm them with a soldering iron untill the solder melts in thoroughly. You can also use one of theose little cigarette lighhters that are 'windproof' and make a flame like a small jet. just keep the flame from touching the wire so they get the heat blast, but no uncombusted fuel. Then when it cools wrap multiple times with electrical tape.

thats for an end to end connection, for a button hole (doubling up factory wires WITHOUT cutting them) you strip off an inch of insulation very carefully, then poke a hole through dividing them into two at the section. stick new wire through, part in halves and wrap in opposite directions tying the whole t-joint together very tightly (no looseness or air gaps). solder as above and wrap as above.

Personally i like silver solder as it is a bit harder than normal electronics solder and has even better electrical/thermal properties. Its available most anywhere that sells electronics even radio shack.

Edited March 25, 2007 by captainchris13
#33

I just did a 90 mile loop after adding the (2) new positive leads with 30 A fuses and the additional negative lead , commoned the negatives and added an additional frame ground wire (8 ga.)

zam70....you have enabled me to now ride again without watching that freaking volt meter. Thank you and I will buy you a drink should our paths cross.

This is the Holy Grail for the VFR.

Oh yea 14.2 and steady.

(Also in the past when I excelerated (you know to blow the carbon out like in dads car) the clock and trip meter would reset. Not so today.

Did I say thank you? :rolleyes: +1.gif :thumbsup:

#34
captainchris1335 ohms!?!?!? you either forgot a decimal point or you have a really bad contact somewhere in your system. At 35 ohms your bike would just stop running in 30 min... Still, if that was .35 than its still high, i like to see roughly .01 cold, and as high as .05 when the wires are hot and the bike has been running for 30 min at speed. when the wires are hot they incrrease their resistance, sometimes it goes up drastically, if the wires are big enough, they dont change much at all.

Well, actually it was a piece-of-crap voltmeter issue. I connected the leads together and registered 30 ohms. I just finished and started the bike, but I did not ride it. It sits at 15.0 at just above idle (~1300 rpm), but if I rev it, it does not fluctuate much. The real test will be the riding test. I hit 16V between Rolla and KC yesterday, and that scared me.

I also had some heat damage to the 30 amp fuse holder. It does not seem fatal at this point, though.

#35

Summary::::::::::::

ChevIt sits at 15.0 at just above idle (~1300 rpm), but if I rev it, it does not fluctuate much. The real test will be the riding test. I hit 16V between Rolla and KC yesterday, and that scared me.

So relating to what you posted about running high voltage, I finally got my bike back together after doing the wiring mods, then hooked up multimeter, started her up, woooooooo 16.0vdc. Not cool. Well that wasn't right thats for sure. So, I got a different Multimeter because I have blown several Amp fuses in that meter and was thinking maybe somehow I damaged the meter, since I pretty much just use that meter for amperage testing. So, new meter, boom..... 16.0vdc. Well, I wasn't happy. So, I remember Jeremy mentioning to me that he had this problem and it was an issue with the R/R's Monitor Feed ( Black Wire > Ignition ). So pull that fairing off again, backprob the 'black wire from R/R with one multimeter, while leaving the other multimeter hooked directly up to the battery, ( Battery showing: 16.0vdc, Black wire showing: 12.3vdc ). Cha..ching! So, pulled the black wire out of the stator connector harness, hooked it separately ( out of the connector ) up to the battery direct to she if this helps the problem, plugging the harness back up which connects all the wires but the ' black > white / black '. So hooked this wire up, boom, voltage charge dropped instantly from 16.0vdc to 14.7vdc. So hook up a perminant wire from stator voltage monitor wire ' black wire ' to battery, still solid 14.7vdc. Slapped fairing back on, good as gold.

Edit:

if you run a new wire from black monitor wire to the battery, you have to, have to, have to disconnect the black wire to white/black wire from eachother in the harness. If you don't when you turn the key off, the bike will keep running because it wills end a reverse 12v feed to the ignition switch, tricking it to thinking the key is still on.

Edit End:

Come to find out, this high voltage problem has been going on for a while I suppose ( haven't checked voltage in about a month, was good then though ), but didn't test voltage before I started this project, so... lesson learned, but problem solved. So, back to what this thread is about. I ran the two new 12guage stator wires ( red/white ) from regulator to battery to lower resistance while keeping an additional 30amp fuse in each wire. So, pulled the fuses out of the new wires, tested voltage, 14.5 vdc, put fuses back in and tested voltage, 14.7vdc. Not a huge improvement in my case, but dropped resistance on the feeds for sure. Have been pretty constant on doing a lot of preventative stuff without any problems, excluding the new R/R monitor wire I stated above, which has been my first electric issue thus far. Some people get better results than others, but its a peace of mind and worth the time to prevent issues before they occur for me, instead of waiting for things to blow then figure out what happened. :thumbsup:

#36
Chev
tinymindsif you run a new wire from black monitor wire to the battery, you have to, have to, have to disconnect the black wire to white/black wire from eachother in the harness. If you don't when you turn the key off, the bike will keep running because it wills end a reverse 12v feed to the ignition switch, tricking it to thinking the key is still on.

So, does this wire need to be switched? My black lead into the R/R is not hot when the bike is turned off. I don't have me service manual on me, so I can't double check what wire is what, and verify that this is the voltage regulator monitor wire.

You can run it constant w/ no problems, but you have to disconnect it from the 'White/Black' wire on the female side of the R/R Connector and cut it off or tape that wire off or it will send a 12 volt feed backwards to the ignition, causing the bike to keep running even when you turn the key off. You don't have power to that black wire when the key is off because its reading voltage from the ignition, but its just monitoring the voltage, not actually putting it to use. Running it constant instead or switching it the way it is factory, makes no difference, all the R/R cares about is how much power is at the battery, when the bike is off, voltage is still feeding to the monitor wire, but its just sitting there, no current draw from it at all. Next week I'm going to look at trying to track down exactly where and what is causing the resistance problem in that 'white/black' wire that seems to be a known issue. Not sure if its a short somewhere in the wire or a connector problem along the way. Its a tiny wire, so short could easily be a problem, but it appears to be a progressive problem, slowly getting worse and worse, which makes me think its heat related. Will keep you informed. If that doesn't make sense let me know, I'll draw up a diagram.

#37

I just did mine. I followed most of the how to except for the "button" hook. I did the button hook(open the wire, pull the new 12 gauge in, and curl it around). Then I added a dab of solder: Here what I did not to burn the isolation.

[image: gallery_4229_2149_694006.jpg]

I used a small torch (they have lighters that do the same kind of job) and heat only the coper part. Worked like a charm. Make sure the foil doesn't touch the isolation.

End result: 14.3 without the fuse. 14.4 with the fuse on. I will redo the test once everything is connected again(no lights were connected when I did it).

#38

To clarify for me, you left the OEM arrangement for the R/R to the stock harness and just added wires to it? You didn't cut the R/R/harness connector out and direct-wire the R/R charge wires into the main battery lead?

I took a different tack and may need to change it. I bypassed the stock charge wire and cut it out. I direct-wired the R/R charge wires together, then tied them to a single 12 ga wire that I ran to the postive battery post as an add-on. I figured the 12 ga wire would be sufficient, given the skinny R/R charge output wires, and didn't want more wire than I needed.

Then I bypassed the stock harness and direct-wired the R/R ground wire to the brake valve ground, where the main battery ground attaches, again using 12 ga wire.

I picked up a little (1/4 volt) with this direct wire arrangement, but, after hitting 14.6 or so at 1,500-2,500 rpm, then decreasing as rpm increases, still ends up at 13.94 v warm @5 k rpm, clean connections, brand new battery, brand new upgraded R/R and brand new Honda stator.

Hence my interest in your technique. Thanks again.

_________________________________________________

Correction to above - I had run a single 10 ga commoned GROUND from the R/R ground wires to the brake valve, and had run to the battery positive post a SINGLE 10 ga (not 12) wire commoned between the two R/R charge wires. That arrangement got me 13.94 v at 5k when warm (13.89 v when cold). This is WITHOUT the stock charge line.

To implement the suggestions in this thread, I:

1. Left the added ground line to the brake valve.

2. Undid the commoned 10 ga wire to the postive terminal.

3. Ran TWO 12 ga wires, one from each R/R charging wire, to the same buttonhook hole in in the positive battery cable (soldered the connections w/butane torch).

Result: 14.10 v at 3,500, 14.04-07 v at 5k. (Stock spec lower end is 14.0 v).

Then:

1. Added EXTRA 10 ga ground from negative battery post to frame ground. Result: No change.

2. Added back in the STOCK charge line (16 ga?) to the positive battery post. Result: No change.

I had previously cleaned both grounds (frame/brake valve), and the connectors for both battery terminals. The two wires off the R/R charging wires aren't affected by any uncleaned connections.

Conclusion: It looks like I've added enough wire to allow the (upgraded Honda, w/1000 miles on it) R/R to deliver its max charge to the battery, and I've added enough grounds. It looks like the extra ground, and the stock charging wire, are unnecessary in that their presence doesn't allow any more juice to hit the battery. It looks like the max charge this particular R/R is putting out at 5k is 14.07 v., thought it easily hits 14.30 v in the lower rpm regions (declines as rpm rises until it stabilizes at the 14.04-07 v.).

The stock setup with new battery, new stator, and new R/R never made more than 13.60 v at 5k. Doing these changes (or substantially similar changes) in this thread brought the charging output into the specified range, albeit at the low end, at 14.04-07).

Edited April 9, 2007 by Misspent Youth
#39
Misspent YouthI added fuse holders to the direct-charge wires that go to the positive cable. What is a "safe" fuse size for the output going through each wire?

I just put 30amp fuses in them since thats what the factory harness has in it. The biggest change in voltage from what I've seen on my bike and others is when replacing that 'black' voltage monitor wire from the R/R. Theres a major major progressive resistance problem in that wire somewhere. Someday I want to take the front end off and track that wire down to see exactly whats the problem in the wire from the ignition to the R/R. Mine has a major issue with about 9.3 ohms of resistance from the monitor wire to ignition, which was upping voltage output to 16V +. Since replacing that wire, I can remove the fuses from positive side running to the regulator to the battery to test it and it only causes a 0.6v voltage drop. So basically by rerunning that black wire to my battery allowing correct voltage monitoring, solve a lot of overcharging issues in that alone.

#40
tinyminds
Misspent YouthI added fuse holders to the direct-charge wires that go to the positive cable. What is a "safe" fuse size for the output going through each wire?

I just put 30amp fuses in them since thats what the factory harness has in it.

Depending on how I am reading this, this could be bad. You should only have 1 30a fuse, or if you have multiple fuse holders, you should have fuses that add up to 30a or close. If you have 2 fuse holders, and 2 30a fuses, on the down stream side of the fuses you have 60a of potential. A dead short with 60a is enough to do alot of damage. If you have 2 fuse locations, I'd use 2 20a fuses as the smaller fuses will blow quicker than the larger one, and in a dead short as the amperage spikes, one of the fuses will let go then immediately the other because all the amperage is concentrated to one instead of both. Kinda confusing, but the end goal is to minimize the potential with out shorting yourself power on the bike side of the battery. Why have 60a of potential when you only need 5a.

#41
tinyminds
Misspent YouthI added fuse holders to the direct-charge wires that go to the positive cable. What is a "safe" fuse size for the output going through each wire?

I just put 30amp fuses in them since thats what the factory harness has in it. The biggest change in voltage from what I've seen on my bike and others is when replacing that 'black' voltage monitor wire from the R/R. Theres a major major progressive resistance problem in that wire somewhere. Someday I want to take the front end off and track that wire down to see exactly whats the problem in the wire from the ignition to the R/R. Mine has a major issue with about 9.3 ohms of resistance from the monitor wire to ignition, which was upping voltage output to 16V +. Since replacing that wire, I can remove the fuses from positive side running to the regulator to the battery to test it and it only causes a 0.6v voltage drop. So basically by rerunning that black wire to my battery allowing correct voltage monitoring, solve a lot of overcharging issues in that alone.

This is interesting...

Honda Went and added that black wire to the 6th gen fron the 5th which used the pos output leads as the sensing circuit since that cisruit could become hot and give a false reading. Problem solved right?

Wrong.

Then they went and made that sensing wire have a lousy connection to the battery since they moved it to the front of the bike and ran through the harness. Why?

I upgraded my 5th gen bike with a 6th gen R&R and i put that black wire to the fuel pump lead with a wraparound and solder joint inches away from the battery. Its a good solid attachment ppoint without adding another ring terminal to my battery (which has too many and is a pain to take the screws on and off now).

14.3 volts all over the place. rev it, 14.3. low rpms 14.3 everything turned on, 14.3.

I would bet just the simple act of taking that black wire straight back to the battery and not run it throught the harness, would be the most uselful electrical upgrade you could do. everything else helps, but it is more like a safety of making everything overkill.

Also, i notice no battery drain with it set up that way. i also went with a AGM battery when i did mine as they tend to like a hair more volts that a lead acid and should live longer anyway.

#42

Guys, is this still a problem with the 6th gens? Is it something that I should still "bother" doing? My bike is pretty much nekked at the moment, and I could just get it over with now if that's the case. From the sounds of it, it does seem like something that I should do. :unsure:

Also, does anyone plan on doing a "Boost your electrical system for dummies"? I can strip, crimp, run and heat shrink wires... and recently learned how to solder. I also know where the R/R, battery, and main 30amp fuse are located. Just a little unsure on where to find the rest. There's a lot of info in this thread; just trying to piece it all together since it's something I'm not completely sure on it's a bit of a challenge.

I could just beg, whine and possibly bribe hubby to do it for me, but I really want to learn this. I'm not the kind of girl that can take to sitting by and watching somebody do it for me. C'mon guys, how about one nice little write up, complete with pics and a VFRD's not liable disclaimer? I love the tutorial's that HS does! :thumbsup:

#43
Chev
tinymindsThe biggest change in voltage from what I've seen on my bike and others is when replacing that 'black' voltage monitor wire from the R/R.

Jason, can you clarify this for me. That black wire does not need to be switched? Just run a replacement straight to the battery? I'm really dense when it comes to electrical thingamajigs.

The black wire does not have to be switched, but you do have to remove it from the harness and break the connection from the factory harness. If you don't pull the somehow break the connection from the factory harness ( either cut the wire or pull it out of the white r/r connector ) it will send 12v backwards into your ignition allowing the bike to stay running even if you turn the key off.

VFRiderGalGuys, is this still a problem with the 6th gens? Is it something that I should still "bother" doing? My bike is pretty much nekked at the moment, and I could just get it over with now if that's the case. From the sounds of it, it does seem like something that I should do. :unsure:

'02-'05 use the same harnesses, which means these problems couple be a potential problem for your '05. I know the wiring harness changed for '06-'07, but I'm not sure and haven't heard of what changes were made to know if they are still a potential problem or not for newer models. So far it seems no one has had an issue on the '06-07's to date, but only time will tell for they are the newest & least milaged VFR's out there so far.

#44

I have a 3rd Gen with only 50k km travelled and whilst reading this post right through last week and smugly thinking all this garbage doesn't happen on older well settled bikes (I have a working life of electrical/electronic experience, hence my interest in this droll subject) BINGO on my way home from a funeral I runs out of electric power, 80 km from home just 2 days later. Would you believe 2 km before reaching the 50k km milestone!

No need to describe what happens next, the pushing the clutch starting attempts, the "how do I get out of this mess" thoughts, the dredge through the mobile phone numbers (for once I had it with me!) in the end I got home with the help of a friend who lives nearby having a power pack which is small enough to jam between my chest and the tank and left the seat with him. It had enough charge to get me home.

After checking that the local stator repairer is still in business and anticipating the worst, then preparing to remove stator I checked the stator lead socket/plug, damn another fairing to get off, and there it was similar to all the pics on VFRD of toasted plugs and sockets. Stator checks out at 0.3 ohm phase to phase. WHEW! Solder job on wires and all is well, original R/R I think, but a PC fan attached. Battery survives experience.

My son owned this bike before me for 7 years and only did short trips of 200km or so, whereas I have done a couple of 500km days in hot weather before Xmas and believe these have worked away at the poor contact in the plug/socket joint. It was only a matter of time.

MORAL of the story is no matter how old your bike is keep an eye on, or get rid of, the plug and sockets on the heavy current lines. Check them every time you do some maintenance, sooner or later they will get you. I have over the years managed to get better connections in the sockets (bikes, cars, washing machines, whatever!) by squeezing the curled over tab of the lug inside the plastic shell down a bit with long nosed pliers, not too far or you will never get the plug into it again. But only if everything is clean and bright metallic looking, once it discolours it is too late. This makes the plug and socket a lot firmer to reseat or pull apart but cuts down possibility of a high resistance joint developing.

Plenty of good advice I am reading for the later models too, I can't disagree with any the principles put forward in this post for getting in front of the inevitable troubles which seem to haunt Hondas. I can remember some from my maggot (CX500) days.

[image: gallery_7554_2878_75993.jpg]

3rd gen stator lead plug

UGLY SIGHT but now behind me.

#45

Here's the quick summary on my '99: did only step #3 and charging voltage at the battery went from shaky 13.1V (2500rpm) to solid 14.1V. I commoned the red-white wires coming out of the new style Honda rr using zam's recommended button hook method and also soldered it, then ran direct to the battery positive with a 30a fuse in the line.

The background is my batteries have started dying sooner and sooner over the last few years. I was always able to charge them back up and they'd run for awhile but the top off charge would need to be more and more frequent. This was regardless of new/old battery. My current battery is 8 weeks old and was just about dead Sunday morning, for the second time. The Electrex/ElectroSport flow chart showed everything within specs other than the voltage at the battery, which would not go over 13.1V and was about 12.8V at idle.

New values are 14.1V at 2500rpm, 13.8V at 5K rpm, a full 1V higher at all rpm's. I've never seen 14V at the battery before, ever. Running around yesterday with a lot of short trips, frequent starts and the battery seemed solid, no weakness. Battery is sitting at 12.8V volts now with the bike shut off. I'm cautiously optimistic this problem may be fixed! :thumbsup: (Although I'm going to hunt down a Yamaha rr just in case...)

The rr connectors were getting very hot when I was letting it idle Sunday, now the power/ground plug shows no sign of heat build at all. The stator plug is still getting very hot but it seems to be isolated to the connector itself, the wires a couple inches away on either side were not particularly hot. It would seem the connector has some major resistance? I'm thinking it needs to be rewired and the stator wires upgraded? I've cleaned the connectors and they seem about as good as they're going to get.

edit: I think swas answered my queston in the previous post. Time for new stator plug...

#46
vfrcapnNew values are 14.1V at 2500rpm, 13.8V at 5K rpm, a full 1V higher at all rpm's. I've never seen 14V at the battery before, ever. Running around yesterday with a lot of short trips, frequent starts and the battery seemed solid, no weakness. Battery is sitting at 12.8V volts now with the bike shut off. I'm cautiously optimistic this problem may be fixed! :thumbsup: (Although I'm going to hunt down a Yamaha rr just in case...)

Update: one week later and values are still the same. Battery still is at 12.8V while the bike is off. I haven't had to charge it and no problems the past week starting it up. Was really getting sick of "selfislhy wasting bandwidth" starting!

:thumbsup: to this wiring mod, thanks zam! :beer:

#47

So, after catching a taxi home last night after my bike suddenly died [twice] this thread reads like the symptoms I experienced. Thankfully, it failed about a block from a highly regarded local bike modding shop, so I plan within the next couple of hours to printout key diagrams and quotes from this thread, then go back to the scene of the failure and push my little darling down the street to the repair shop for an assist.

Before I do that, can someone tell me where the headlight fuse is located? I have a non-ABS, if that matters.

Here's a fast recap of the events for you all. It's 7PM Sunday evening, I've just sprinted away from a light along the Honolulu waterfront fast approaching a great left hand sweeper, doing about 45mph when I notice a jaywalker in the center of three lanes. Fearing we're on a collision course, I give him a two beep heads up of my horn.

And no sooner have I done that then the engine flat out dies. No lurches, no sputters, just engine kills switch style OFF. So there we are, him paused mid lane whilst I'm now gliding past on inertia. [karmic smackdown? you be the judge :unsure: ] Next, I roll it nto a parking lot thinking WTF is this about? At that moment, I'm thinking either it's something in the fuel line, or perhaps the kickstand relay has gone bad. Fuel guage shows two bars and I assume that's the problem.

I've got gauges, every thing appears normal, the engine is turning over, but it seems as though there is little fuel getting to the engine [or is it another reason?] because it's barely firing. And then whoomp! on the *#th try it fires up and sounds fine. Still thinking the gas is bad, I head off to the nearest Shell station [less than 2 miles], fill it up, get back under way, get less than a 1/4 mile down the road and she dies again.

Only this time I realize the headlights are out- both high and low. Dash lights are fine. I check the turn signals and while all are working the fronts are flashing far dimmer than the rear on either side. But, as before, the engine was firing.

If anyone has some advice I'd love to take some down to the shop with me and point out to them where that fuse is that needs replacing and where the best points for the extra ground wire [or do you suggest several] would go.

Edited May 7, 2007 by Molten
#48

Who am I to question Mother Honda but I am going too.

Trying to fix some electrical problems with my handy service manual for 2003 to 2004 vfr's.

I am looking at the wiring diagram from the 02 to 03 abs and taking voltage reading and things are not right. Here is the thing. the white/ black wire that comes from the R/R has a different voltage on it then the red/white wires even though the wiring diagram show the they are at the same point or potential as far as voltage goes. When the key is turned off there is no voltage on the white/black but there is still full voltage on the red/white. These 3 wires can not be tied together as show in the diagram.

After more readings I have come to the ideal that the wiring diagram IS wrong. :o When I look at the diagram for after 03 models it shows the white/ black wire from the R/R the right way.

Now if someone can prove me wrong on this I would be happy to listen. I am looking forward to my talk with Honda Canada.

#49

Hi guys,

I've read all the post on this thread but couldn't find what I need regarding the charging problem on my bike.

Firstly, I'm riding a 5th gen Y2K VFR. A couple of days the batt went dead and a quick voltage check at the batt terminal with the bike running only registered 12.4V. And revving the engine does not bring about any increase, which means 12.4V is the actual voltage of the battery ALONE, without any charging system.

So I bought a new battery and a new R/R and swap both parts. Problem is, there is still no charging!

It's possible the new R/R that I bought is faulty, hence will like to ask:

a. How to check the R/R? If I connect the 3P natural connectors with the yellow wires to the bike and start the bike, should I get 13V and higher between the red/white and green cable? Or does the R/R function only when a +12V is applied onto the white/black wire? Picture attached to show what I'm talking about.

Measured the voltage produced at the red/white and green cable, about 7V on my old (asume dead) R/R and only 4V on my new R/R! Am I doing something wrong here?

[image: gallery_11419_2992_36241.jpg]

b. Assuming it's my stator that's roasted, how do I confirm that? I've done the continuity checks and earth leakage checks as suggested by the manual and all turn out pretty fine. With the bike running, the AC voltage as measured from the yellow cables on the wire harness side reads between 2.8-3.2 vac.

c. Is there any way to damage a R/R by simple connecting it?

Thanks!

#50
snowparangb. Assuming it's my stator that's roasted, how do I confirm that? I've done the continuity checks and earth leakage checks as suggested by the manual and all turn out pretty fine. With the bike running, the AC voltage as measured from the yellow cables on the wire harness side reads between 2.8-3.2 vac.

c. Is there any way to damage a R/R by simple connecting it?

First off, fill in this chart. In brackets are typical good results.

Battery voltage with bike off = [12.5v]

Voltage with bike at idle = [13.2v]

Voltage with bike at 5k RPM = [14.0]

AC voltage from stator at idle (all 3 legs checked across themselves) = [20 vac]

AC voltage from stator at 5k RPM (all 3 legs checked across themselves) = [60 vac]

Those 5 checks really help diagnosis.

B. Sounds like your stator is tost, but the AC voltage checks will confirm that.

C. No, so long as you didn't run it for a really long time (long heat cycle).

#51
chris2992Still didn't answer the question, 3vac where? Idle? 5k rpm? somewhere else? If you had a rough idle, it may be that low on its own at idle.
I see. the values are as below. Will update the reading of the last value later.

Battery voltage with bike off = [12.6v]

Voltage with bike at idle = [12.6v]

Voltage with bike at 5k RPM = [12.5V]

AC voltage from stator at idle (all 3 legs checked across themselves) = [2-3 vac]

AC voltage from stator at 5k RPM (all 3 legs checked across themselves) = [pending]

#52

Latest readings are as below. All done without headlights on.

Readings with the R/R disconnected:

Battery voltage with bike off = [12.6v]

Voltage with bike at idle = [12.42v]

Voltage with bike at 5k RPM = [11.30V]

AC voltage from stator at idle (all 3 legs checked across themselves) = [2-3 vac]

AC voltage from stator at 5k RPM (all 3 legs checked across themselves) = [3-4 vac]

Readings with the R/R connected:

Battery voltage with bike off = [12.6 V]

Voltage with bike at idle = [12.42 V]

Voltage with bike at 5k RPM = [12.39 V]

Voltage at R/R output at idle = 12.18 V

Voltage at R/R output at 5k rpm = 12.10 V

AC voltage from stator at idle (all 3 legs checked across themselves) = [2-3 VAC]

AC voltage from stator at 5k RPM (all 3 legs checked across themselves) = [3-4 VAC]

Well, it seems my stator is the one causing all the trouble. Is there any possible causes? Will loose wiring cause such a discrepancy?

And more bad news...my local dealer do not have stock of the stator! sad.gif

Anybody used the Electrosport ones, are they any good? - http://www.electrosport.com/electrosport_e...cal_honda1.html

Or are there compatible alternatives (other Honda models? Yamaha? Suzukis?)?

Edited May 18, 2007 by snowparang
#53

Horror stories from electro sport products. Try Ricks products,

http://www.ricksmotorsportelectrics.com/

then read this thread to see his work.

Rick's stator

The good thing about rick's is he is cheeper than OEM, and offers a 1 yr warranty. He also uses higher quality wire that is more resistant to heat and stress that a MC engine provides.

I can't speek for sure, but I doubt that there will be a compatiable stator.

#54
chris2992Horror stories from electro sport products. Try Ricks products,

http://www.ricksmotorsportelectrics.com/

then read this thread to see his work.

Rick's stator

The good thing about rick's is he is cheeper than OEM, and offers a 1 yr warranty. He also uses higher quality wire that is more resistant to heat and stress that a MC engine provides.

I can't speek for sure, but I doubt that there will be a compatiable stator.

Thanks for the info again! I've email Ricks. A slight problem will be that I'm in Singapore, so I have to ship my burnt stator to him for rewiring. And then get it shipped back. Hopefully Rick carries OEM replacement for stators too.

Well,, my VFR is my only form of transport..except for the Aprilia RS250 which is in project state. Was hoping to ge it fixed within a week...but fat hope I guess. Who would guess the parts dealer here has no stock of that item! (90% of motorcycles in Singappore are japan made, and 50% of that are Hondas.)

Anybody has a spare working stator let me know!

#55
tinymindsif you run a new wire from black monitor wire to the battery, you have to, have to, have to disconnect the black wire to white/black wire from eachother in the harness. If you don't when you turn the key off, the bike will keep running because it wills end a reverse 12v feed to the ignition switch, tricking it to thinking the key is still on.

Well, I finally got around to rewiring the lead to the R/R from the 12V source to monitor the system voltage. Initial reports look fantastic. I have been idling around 15.2-15.6 pretty consistantly and I just started her up and she idles at 13.9 and when I rev her she stays solid as a rock right there at 13.9. I will have to go out and flog run her on the open road to see if my initial impressions are correct, but I think I may have one of the best electrical systems for a first generation VF on the road...... now that I sayh that, I'm sure she'll explode if I ever fall below 88 mph.

Yes, officer, have you ever seen Speed? I like Back to the Future more. :goofy:

#56
PonchoWho am I to question Mother Honda but I am going too.

Trying to fix some electrical problems with my handy service manual for 2003 to 2004 vfr's.

I am looking at the wiring diagram from the 02 to 03 abs and taking voltage reading and things are not right. Here is the thing. the white/ black wire that comes from the R/R has a different voltage on it then the red/white wires even though the wiring diagram show the they are at the same point or potential as far as voltage goes. When the key is turned off there is no voltage on the white/black but there is still full voltage on the red/white. These 3 wires can not be tied together as show in the diagram.

After more readings I have come to the ideal that the wiring diagram IS wrong. :o When I look at the diagram for after 03 models it shows the white/ black wire from the R/R the right way.

Now if someone can prove me wrong on this I would be happy to listen. I am looking forward to my talk with Honda Canada.

Here is a trace of the '02 NON ABS full size schematic. I don't know where to find the ABS - it's not in my electronic copy of the service manual (but they left a page for it).

[image: 2002vfrwiretracesx6.png]

#57
tinyminds
Misspent YouthI added fuse holders to the direct-charge wires that go to the positive cable. What is a "safe" fuse size for the output going through each wire?

I just put 30amp fuses in them since thats what the factory harness has in it. The biggest change in voltage from what I've seen on my bike and others is when replacing that 'black' voltage monitor wire from the R/R. Theres a major major progressive resistance problem in that wire somewhere. Someday I want to take the front end off and track that wire down to see exactly whats the problem in the wire from the ignition to the R/R. Mine has a major issue with about 9.3 ohms of resistance from the monitor wire to ignition, which was upping voltage output to 16V +. Since replacing that wire, I can remove the fuses from positive side running to the regulator to the battery to test it and it only causes a 0.6v voltage drop. So basically by rerunning that black wire to my battery allowing correct voltage monitoring, solve a lot of overcharging issues in that alone.

I seem to have somehow missed this thread for the last 2 months.

Jason, regarding the monitor wire, the schematic in the service manual is BS, take a look at the wire harness than Ken was nice enough to cut apart for me to see where the monitor wire goes... Farking nowhere.

[image: IMG_4541.jpg]

#58

[image: gallery_11167_3051_26002.jpg]

Harness side of RR Connector Block

I don't know what is going on with Ken's old harness but I decided to checked out the RR input to the harness on my '02 (with a mulitimeter).

I checked the continuity and resistance of my harness from the RR back to the battery. I also wanted to know where the White/Black wire went - did Honda crimp it onto the red wire 8 inches away?

When you pull the RR plug to the harness apart, the picture you see above is the part that feed into the harness. Reference that and what you read below and you'll get it (I hope). This is what I found...

(Note: to be accurate the red wires are actually red with white stripe)

Battery Disconnected:

Green to Green = Continuity (0.2 ohms)

Red to Red = Continuity (0.2 ohms)

Reds to Pos Battery Lead = Continuity (0.3 ohms)

Greens to Neg Batt Lead = Continuity (0.2 ohms)

White/Black to Red = No Continuity <--- Kills the "Ken's harness" on my '02 theory

White/Black to Green = Continuity (1.0 ohm) <--- WTF?

White/Black to Pos Batt Lead = No Continuity

White/Black to Neg Batt Lead = Continuity (0.8 ohms)

Battery Connected - Key OFF:

Green to Green = Continuity (0.3 ohms)

Red to Red = Continuity (0.3 ohms)

Reds to Pos Battery Lead = Continuity (0.3 ohms)

Greens to Neg Batt Lead = Continuity (0.2 ohms)

White/Black to Red = No Continuity

White/Black to Green = Continuity (0.9 ohms)

White/Black to Pos Batt Lead = Continuity (-153.2 or infinity if leads are switched) <-- Like a diode?

White/Black to Neg Batt Lead = Continuity (0.8 ohms)

Battery Connected - Key ON (bike not running):

Green to Green = Continuity (39.6 ohms) <--- WTF? Grounding issue with power on?

Red to Red = Continuity (0.3 ohms)

Reds to Pos Battery Lead = Continuity (4.3 ohms)

Greens to Neg Batt Lead = Continuity (one shows 18.3 ohms the other 59.3 ohms) <---this is Odd but answers the above 39.6 ohms resistance

White/Black to Red = Continuity (-53.0 at 200K and if I reverse the electrodes and I get infinity)

White/Black to Green = No Continuity

White/Black to Pos Batt Lead = No Continuity

White/Black to Neg Batt Lead = Continuity (-153.2 or infinity if leads are switched) <---Diode?

Conclusions:

1. I have good lines to the battery (there is continuity and little resistance at least with the key off anyway);

2. I have a good ground (again, at least until I turn the key on)

3. There is no way my Regulator/Rectifier Black/White monitor wire is DIRECTLY connected to the Red wire 8 inches away (aka Ken's setup). Mine is going through something - probably the ignition and start switch as per the wiring diagram.

4. I even checked the diode as per the service manual (page 19-18) and it checks out OK. AND if you ever want to get into your forward fuses under the left (ABS stuff) and right (lights etc) meter panels you DO NOT have to remove the upper cowl as the service manual says. Thankfully ScottyDo has some pics on how to take the left or right meter panel off - as well a very cool blue light mod. It's the little things like removing these panels for the first time that drives me nuts.

Surprises:

1. That the White/Black to Green ground (and Negative Battery terminal) showed continuity and very little resistance with the key off - I need to look closer at the wiring diagram.

2. That resistance goes up on grounds with key ON - There is something going on here I think. I don't know why a ground would be fine with no power applied but show resistance with power on. Any thoughts?

I have also been looking at the RR upgrade wiring job some people are doing. Chris had mentioned that you would want to reduce the fuse size if you bring all the wires back to the battery. I agree. All you have to do is imagine a short on one of the three wires. All other wires will begin to "feed it" until the amperage begins to blow fuses. I'm no electrical engineer but to me, if you have three 30 amp fuses each on their own wire, you might as well have one 90 amp fuse on one wire.

I also think that there has to be a "cleaner" way to set this up so that there are not so many fuses piled up back at the battery.

[image: gallery_11167_3051_28948.jpg]

Stock RR and Suggested Rewired RR

PS - I never put in Chiris' extra ground mods - but at the moment I think they are a good idea.

chris2992Here is the wiring diagram of what I did. You won't have the Kriss Amp-U-Tron in line, but you can mearly cut the main feed to the battery and splice in an extra wire to boost charge to the battery.

[image: gallery_4338_1246_52340.jpg]

Wiring Upgrade New + Wires in Red, New - Wires in Green. All wires used are 12ga high strand.

Keep in mind that when you have the extra wire coming directly from the RR to the battery, and you add a second 30a fuse, you then have on the bike side of the battery, 60a of potential. To prevent this you may want to change the 30a fuses for 15a or 20a fuses so as not to have such a huge potential in case of a dead short.

Edited June 7, 2007 by talus
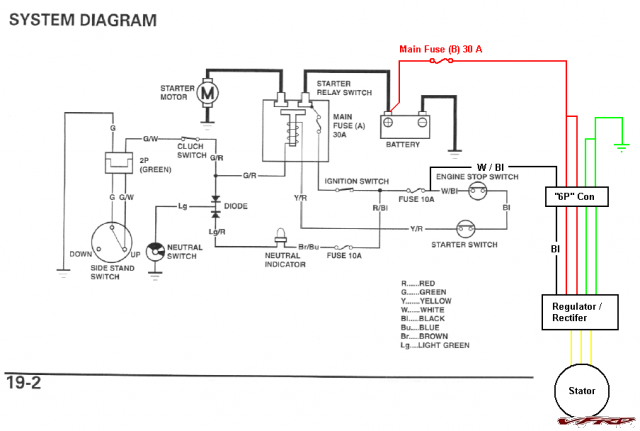
#59

So, I am confused. Assuming that the monitor wire is not attached to the red wire out of the R/R but goes up to the ignition etc, then is it still correct to do the mod by interrupting the old thru-harness-to-ignition-to-RR circuit and replace it by attaching a wire from the positive battery side to the back/white monitor wire.

If the old circuit was going up to the ignition and so on, there is certainly the potential of some voltage drop and have a false reading at the RR. I am just trying to understand Honda's logic: Why would a monitor wire need to be anywhere except to the positive battery post?

Is it suggesting that this wire is not an 'input wire to the RR but rather an output wire to feed the ignition circuit. If so, then this is why I am confused and I can't really proceed with clipping the monitor wire. Is it to detect ignit AND to measure its voltage if it has any?

(yes, I find wiring 3-way circuits difficult in older houses)

Edit - after thinking about it, I concluded that the black/white wire in the RR must be an input to the RR as KKKen's was monitoring the voltage in the red/white wire and the RR part numbers haven't changed from the 02 model to the 03 model year. But as seems to tbe the case, the monitor wire seems to have a different attach point from KKKen's to Talus's version. However the part number hasen't changed, so the wire's purpose into the RR shouldn't be different, should it?

/Edit

#60
BOBINOTTAWAEdit - after thinking about it, I concluded that the black/white wire in the RR must be an input to the RR as KKKen's was monitoring the voltage in the red/white wire and the RR part numbers haven't changed from the 02 model to the 03 model year. But as seems to tbe the case, the monitor wire seems to have a different attach point from KKKen's to Talus's version. However the part number hasen't changed, so the wire's purpose into the RR shouldn't be different, should it?

/Edit

I would be curious to know where your black/white wire goes. With a multimeter it's a fairly quick check. Just unplug the RR from the harness and check the continuity between the red/white wires and the black/white wire.

#61
talus
BOBINOTTAWAEdit - after thinking about it, I concluded that the black/white wire in the RR must be an input to the RR as KKKen's was monitoring the voltage in the red/white wire and the RR part numbers haven't changed from the 02 model to the 03 model year. But as seems to tbe the case, the monitor wire seems to have a different attach point from KKKen's to Talus's version. However the part number hasen't changed, so the wire's purpose into the RR shouldn't be different, should it?

/Edit

I would be curious to know where your black/white wire goes. With a multimeter it's a fairly quick check. Just unplug the RR from the harness and check the continuity between the red/white wires and the black/white wire.

Been a hectic day, but I just got finished the multimeter test and I DO have continuity between the monitor wire and the red/white wires. This, I assume suggests that I have the monitor wire crimped onto the red wire in the harness similar to KKKen's 02 harness. This means that I can positively go and put a fused lead from the battery '+' post to the monitor wire.

I will report back after I do that, but it will likely be Monday. One of the things that is slowing me down is the fact that I will have to replace the 30 amp fuse/holder AGAIN. I had used 12-gauge inline fuses as a replacement. None of the electrical shops around here seem to carry any 10 or 8 gauge 30-amp inline fuses. I went for a short hop today and my rad fan was on enough to cause the RR problem to keep producing more and more juice. My fuse and holder were deformed due to the heat. Why did it not blow instead of melting itself to death.

Hopefully, the replacing of the fuse and the monitor wire mod and the t-stat change will correct this problem, once and for all.

#62

Thanks for checking that Bob, I really appreciate that.

I would say that you have the same setup as KKKen and it appears different than mine. That makes a difference when we are all troubleshooting. I would have thought that a 12 gauge fuse holder would have done it. A very quick look here http://www.powerstream.com/Wire_Size.htm shows the ability to carry 41 Amps in that 12 gauge wire (not in a bundle), another shows 60 amps .... http://www.rowand.net/Shop/Tech/WireCapacityChart.htm

I'm still no further along with my hot Stator wire issues (new battery now in) and have ordered a new RR in the mean time.

I'm very curious about the increased resistance in my ground wires - BUT only when the key is on!?

My white/black wire issues also have me worried about some sort of harness issue but I think that a diode gone astray would be a more likely problem. I checked the diode in the right hand fuse box but I'm going to check it again. I'm not sure what that one is for either.

If you get a chance could you meter the following paths on the harness side of your RR with the plug pulled apart i.e. RR disconnected (my results follow the "=" sign and picture in the above post should clarify things for you).

Battery Disconnected:

White/Black to Neg Batt Lead = Continuity (0.8 ohms)

Battery Connected - Key OFF:

White/Black to Green = Continuity (0.9 ohms)

White/Black to Pos Batt Lead = Continuity (-153.2 or infinity if leads are switched) <-- Like a diode?

White/Black to Neg Batt Lead = Continuity (0.8 ohms)

Battery Connected - Key ON (bike not running):

Green to Green = Continuity (39.6 ohms) <--- WTF? Grounding issue with power on?

Red to Red = Continuity (0.3 ohms)

Reds to Pos Battery Lead = Continuity (4.3 ohms)

Greens to Neg Batt Lead = Continuity (one shows 18.3 ohms the other 59.3 ohms) <---this is Odd but answers the above 39.6 ohms resistance

White/Black to Red = Continuity (-53.0 at 200K and if I reverse the electrodes and I get infinity)

White/Black to Green = No Continuity

White/Black to Pos Batt Lead = No Continuity

White/Black to Neg Batt Lead = Continuity (-153.2 or infinity if leads are switched) <---Diode?

Edited June 13, 2007 by talus
#63

My info will be in bold

Battery Disconnected:

White/Black to Neg Batt Lead = Continuity (0.8 ohms) - mine - no continuity to neg post but yes when using frame

Battery Connected - Key OFF:

White/Black to Green = Continuity (0.9 ohms) - mine - 2 ohms

White/Black to Pos Batt Lead = Continuity (-153.2 or infinity if leads are switched) <-- Like a diode? - mine - minus 279 and infinity

White/Black to Neg Batt Lead = Continuity (0.8 ohms) - mine - 2 ohms

Battery Connected - Key ON (bike not running):

Green to Green = Continuity (39.6 ohms) <--- WTF? Grounding issue with power on? - mine - 25 ohms

Red to Red = Continuity (0.3 ohms)

Reds to Pos Battery Lead = Continuity (4.3 ohms) - mine - 4 ohms

Greens to Neg Batt Lead = Continuity (one shows 18.3 ohms the other 59.3 ohms) <---this is Odd but answers the above 39.6 ohms resistance - mine - minus 174 and infinity for the other one

White/Black to Red = Continuity (-53.0 at 200K and if I reverse the electrodes and I get infinity) - mine - I get -240 and infinity for the other one

White/Black to Green = No Continuity - mine - I had continuity here, I think, but I can no longer repeat test

White/Black to Pos Batt Lead = No Continuity - mine - same

White/Black to Neg Batt Lead = Continuity (-153.2 or infinity if leads are switched) <---Diode? - mine - minus 270 & infinity

-------------------------------------------------------------------------------------------

Before I disassembled or snipped anything, I turned on the engine and of course, I could feel the fuse holder starting to warm up immediately. I tried to measure voltage between the black/white wire and the positive terminal and I was getting a reading of about .75 volt and when I put the high beams on, the voltage went up to approximately 1.25. I don't know if that number is any way significant, but I took it any.

After I change the fuse & holder/wire and put in the positive terminal/black white monitor wire connection, I sure hope life will return to normal. I am going to do the green wire/blue connector correction too.

At some point on monday or tuesday, I will be going thru as many stator checks as I canntoo.

I hate electrical crap

#64
BOBINOTTAWAI hate electrical crap

So do I.

Thank you for the testing Bob. I would say that our numbers pretty much agree - except that on my machine there is no way that the Black/White wire makes direct contact with the Red/White RR wires. Unless there is some freak of fate - our bike have the same harness setup (or failure - but I doubt that).

I still can't tell you for sure what that White/Black (W/Bl) wire is "monitoring". According to the wiring diagram the W/Bl circuit starts at the Fuse Box and goes to the Regulator/Rectifier, the Engine Stop switch and the Bank Angle Sensor. From the Engine Stop switch in the "Run" position it comes out as a Black (B) wire to the Engine Stop Relay. Finally, it comes from the Engine Stop Relay in the Red/Orange (R/O) wire to the Bank Angle sensor. Either way it looks to me like it then goes to Green (G) Ground.

// -- Edit -- you know, that might explain why there is continuity to ground from the W/Bl with the key OFF.

Now when the key is ON the W/Bl wire is powered up through Fuse C (10A Starter/Bank Angle Sensor) and Engine Stop Relay is powered.

// -- Edit -- In this case, when the key is ON the Engine Stop relay will be activated and the W/Bl wire will then monitor battery voltage. Now why would Honda choose here to monitor the battery?

I repeated all the diagnostic tests from the Honda Service Manual just to be sure. Everything I can check looks fine - the last step in the process is to replace the RR, so I ordered a new Honda OEM one. I don't like doing the RE-and-RE without definitively diagnosing the problem, however, I now have the wiring diagram enlarged and printed - 4 feet by 2 feet ought to be big enough!!

For the record, in diagnosing the fried stator / alternator connector and warm / hot stator wires - so far I have:

  • Done all the tests from the Honda Service Manual (page 17-4);
  • Done all the tests from the Electrosport flow chart (http://www.electrosport.com/Images/fault_finding.pdf);
  • Metered out all connections that the RR makes with the harness - in an attempt to educate myself;
  • Separated, inspected, cleaned, and di-electric greased all accessible connectors and fuses boxes on both sides including the notorious blue connector on the left side (I did not pull apart the more solid sealed connectors - they were to difficult to separate); and
  • Replaced the battery on speculation and re-tested (same results).

Both the Honda Service Manual and the Electrosport chart point to the regulator being the problem Tuesday will tell.

I am tempted to run direct wiring from the RR Red/Whites back to the battery and Greens to solid grounds but I am going to wait until the new RR is in. I want to see if the RR is the fix. Then I'll beef everything up.

Edited June 13, 2007 by talus
#65

Here is the Engine Stop Relay.

The Red/Orange wire comes from the Bank Angle Sensor. The Black wire comes from the B/W wire of the RR.

[image: gallery_11167_3051_86181.png]

Engine Stop Relay page 5-83 HSM

Edited June 11, 2007 by talus
#66

Talus: My RR is less than 3 riding hours old and it fried the 30 amp fuse. It was hot to the touch at what I thought was the tail end of my last RR but the new one just continued to bake the fuse. It was probably even moreso due to the fact that my fan was on at least half of the time since the new RR change. Hopefully, I will get the new fuse and black wire mod done today sometime, and have some new observations (improved of course).

I will be keeping the old RR, as I think it may have some life left in it. One thing that I have to do is find >10 gauge wire and 30 amp battery combo somewhere. One of the auto store clerks said that I may have to go to a truck electrical supply store to find that.

EDIT: I studied the electrical layout a bit and now I am again confused (doesn't take much these years). Is what you are suggesting is that the black wire from the rr just monitoring for some/any voltage from the engine off relay and not actually be monitoring the actual voltage of the rr output? /EDIT

#67

I've been going over the charts some more and I found a better diagram to explain things with (the previous diagram confused things - sorry). Here is an edited diagram of how the factory '02 White / Black sensing wire hooks up.

NOTE: The Main Fuse "B" on the red wire is the 30 Amp one that gets toasty. The short section of wire that needs replacing is just before the 30 Amp fuse (not depicted).

gallery_11167_3051_25140.png

System Diagram 19-2

You can see where the White/Black sensing wire picks up it's battery voltage reading - just after the 10 amp fuse (this proves out on the actual wiring diagram).

If you look closely at the actual wiring diagram in the manual (p21-3), starting at the 10 amp fuse "C" and tracing the White/Black wire you'll see that it branches in three directions:

  • to the Regulator / Rectifier;
  • to the Engine Stop switch;and
  • to the Bank Angle Sensor and eventually the Engine Stop relay (not shown in the simplified diagram above)

I agree with everyone else that reinforcing the wiring from the RR to the battery should improve the charging system.

By making a direct connection between the RR monitor wire (the black one on your RR) and the battery, you will not hurt anything as long it is a new circuit. You can see from the above diagram that if you were to simply branch off from the White/Black RR wire and go direct to the battery positive post you would create a path around the ignition switch and the bike would not shut off when you turned off the key (as someone had said before). It is fairly simple to take a small jewelers screwdriver and release the catch on the Black wire and remove the male end from the RR "6P" connector (the one that has the 2 reds, 2 greens and 1 black going into it from the RR). Be sure to use fuse in this new circuit as well - 10 amp should do.

The use of new power supply wires (reds) from the RR to the battery should also improve things as well by reducing the load on the small wiring going to the 30 amp main "B" fuse (the one that gets toasty). And, of course a couple of new grounds wouldn't hurt either.

Bob: Why not use a couple of 10 or 12 gauge wires instead of one large wire?

Edited June 19, 2007 by talus
#68

I just returned from talking with a lead mechanic and we went over the wiring diagram and the proposed solutions and he completely agrees with the black monitor wire needing to go to the battery. As per tracing the route, he indicated that depending on something as simple as the connection type, small amounts of resistance (ie producing a voltyage drop) could occur along the path before the RR would be reading it. He also agrees with the double fused circuit from the RR red wires to the battery.

He recommended doing the changes one at a time and measure the voltages and amps before and after a change and monitor the result. I couldn't agree more.

So, to get things going, later today, I will put in a new 12 gauge, single 30 amp gauge circuit to get bike startable and testable again. I will then do the fused black/white monitor wire to the positive battery pole and snip the old monitor circuit and run that way for several days and monitor etc.

Then I am planning on:

- Each RR red wire to battery

- Enhance RR green ground to new frame ground.

- Blue connector green ground wire mod to new frame ground

- Dilectric grease everything

#69
BOBINOTTAWASo, to get things going, later today, I will put in a new 12 gauge, single 30 amp gauge circuit to get bike startable and testable again. I will then do the fused black/white monitor wire to the positive battery pole and snip the old monitor circuit and run that way for several days and monitor etc.

Then I am planning on:

- Each RR red wire to battery

- Enhance RR green ground to new frame ground.

- Blue connector green ground wire mod to new frame ground

- Dilectric grease everything

That all sounds great. If you want to make the monitor wire change reversible, you can get away with removing the black/white male connector from the 6P block. Just use a small jewelers screwdriver to release the connector then crimp (and solder if you wish) a female connector onto your new monitor wire run. Simple plug and play and fully reversible. Of course the new power and ground runs won't be.

PS - my new regulator install did nothing to fix the insanely crazy hot stator wire connection. I tried every other mod as well - new monitor wire run (making a perfect 14.3 V at the battery), new red power wires, new green ground wires. Combinations of all of the above. CRAP. New stator here we come.

Edited June 19, 2007 by talus
#70

Hooray!!

Before the black monitoring wire mod - 15.23 V cruising and 15.6 with brights on

After the black monitoring wire mod - 14.3 V and no change with brights

I will run this way for several days to ensure my fan comes on and causes no problems and then get to the grease and ground mods.

#71
tinymindsThe black wire does not have to be switched, but you do have to remove it from the harness and break the connection from the factory harness. If you don't pull the somehow break the connection from the factory harness ( either cut the wire or pull it out of the white r/r connector ) it will send 12v backwards into your ignition allowing the bike to stay running even if you turn the key off.
Hmm...Just a thought. If I send a 12V supply from this black lead I could not shut down the bike but can I start the bike? Can I use this method if I somehow lost my keys? Will this bypass the HISS security?

Secondly, if I connect the black sensing wire from the R/R to the battery positive, isn't that as good as connecting it to the R/R red output? Since both of these all ended up at the battery positive.

[image: original.jpg]

#72
Daniel Paul14.6v volts is a bit too much... would using a thinner gauge wire produce less dratic results?

I'm pretty sure that you need to do the black wire replacement part of this mod to get the voltage where it should be. I went from 15.2-16.0 to 13.5-14.0 with the voltage mod.

P.S. to the older generation riders, this entire thread completely applies to you. :thumbsup:

#73
zam70
NVR2L8I'm not electrician by trade, but back in the day when I was a electronic technician, I do remember that "given a constant voltage and current load over a specific length of wire of a specific gauge", then there will always be a specified amount of "voltage drop". If your intent is to reduce this drop in voltage in this span of wire, then you must either shorten the span or increase the gauge of wire. Increasing the gauge of the wire also increases how much current the span can safely handle, as well as total wattage.

BINGO - what I did basically does both.

Shortens the length and increases the gauge of wire used (yes, multiple small gauge = large gauge)

I think the main problem is the initial length ran in the OEM wiring prior to reaching the battery & fuse block.

???????????? --------> DOES ANYONE KNOW WHERE THE OEM ENGINE GROUND CONNECTS?

I would like to tackle that next.

Zam, I really appreciate your expertise and you sharing it. I have resisted making any of the modifications previously suggested here because, while I was convinced the oem wiring was to small, I am averse to hacking the oem wiring as I am unsure I could produce nice clean connections with larger gauge wire that would be an improvement. Your idea of simply doubling the wires with button hooks seems fool proof except for one thing.

There is one concern that I have from intuition, not any electrical knowledge that I have (which is limited to a vague understanding of ohms law). That concern is: it seems to me that piggy backing a second run of wire to the orginal, while effectivley doubling the gauge for the most part, would create a "bottle-neck" at both buttonhook joints. Does the current coming through the two wires cause overheating where the wires join into one, or is my "bottle-neck" intuition just wrong?

Thanks again!

#74
RolandHTGThere is one concern that I have from intuition, not any electrical knowledge that I have (which is limited to a vague understanding of ohms law). That concern is: it seems to me that piggy backing a second run of wire to the orginal, while effectivley doubling the gauge for the most part, would create a "bottle-neck" at both buttonhook joints. Does the current coming through the two wires cause overheating where the wires join into one, or is my "bottle-neck" intuition just wrong?

Thanks again!

Good question. While waiting for Zam to respond, I'll say I suspect he'll say the main cable that the R/R wires tie into is plenty big enough to prevent backup. My own buttonhooking job has not melted down and still consistently puts out 14.06v at 5k, and up to 14.25 when rpm below that. I added inputs and grounds until the voltage wouldn't go any higher, so I'm satisfied I've overcome the small wires and am getting all the R/R has to offer (it was in the high 13v region before the rewire).

My lay understanding of why the R/R got hot was because juice was backing up into the R/R due to the too small OEM wiring, and that the wiring free-up allowing more juice to the battery should let the R/R run cooler, but that hasn't occurred. The R/R still gets too hot to touch.

#75
RolandHTG
Chev
RolandHTG
Chev
Daniel Paul14.6v volts is a bit too much... would using a thinner gauge wire produce less dratic results?

I'm pretty sure that you need to do the black wire replacement part of this mod to get the voltage where it should be. I went from 15.2-16.0 to 13.5-14.0 with the voltage mod.

P.S. to the older generation riders, this entire thread completely applies to you. :thumbsup:

I have not been following this thread closely because I thought it involves a 5th "voltage sensing wire"

that is found on the 6th gen R/R connctor only, am I wrong?

Yes you are wrong. AFAIK Honda has not changed the layout of the wiring on the R/R since 85. My 30 amp fuse showed some heat damage and I was running at over voltage. After doing the mods listed out in this thread, I have doubled the strength of the 30 amp fuse wire and brought my voltage back down to safe levels.

I have no knowledge of 6th gen VFRs but I was going from this post: "Honda Went and added that black wire to the 6th gen fron the 5th which used the pos output leads as the sensing circuit since that cisruit could become hot and give a false reading."

The thread has gotten too cumbersome to trace but I know it started out as un undercharge problem fix for a fifth gen but in the end the problem is overcharge. Is that because the rewire fix for the 5th gen needs modification for 6th gen models or is it two different issues? I certainly don't have an overcharging problem so I do not understand why you say the entire thread applies to older gen riders.

Yes, it started out as an undercharging fix. The 30 amp fuse circuit, including ground, is not beefy enough to handle the task. This is why many people experiance 30 amp fuse heat damage (mine was pretty minor). Somewhere in the midst of all this commotion it was found that a lot of people's charging systems are running the battery at too high a voltage due to resistance in the monitor wire (the resistance lowers the voltage that makes it back to the R/R and the R/R ups the output to compensate). The end result with both of these problems, is a 30 amp fuse that is experiancing over than rated voltage, and more amperage is going through the system than the origional design can handle.

I did each mod one at a time, but feel like both absolutely need to be done on most of these bikes (especially with a some years on them).

I also absolutely cound not imagine riding my bike without the voltage gage right there on the dash. Those, and grip heaters, should be on every motorcycle. :thumbsup:

#76

This thread is getting crazy. Some things should probably be pointed out here before everybody starts de-evolving their 6gen charging system back to 1985.

Acceptable charging system voltage, as measured at the battery on a 6th gen is max 15.5 volts. There is nothing wrong if you are reading up to 15.5v. (hi beams on, @5000rpm)

Batteries tolerate a relatively wide-range of charging voltages. The Honda manual for a 4th gen lists 16 volts as acceptable maximum. My Schumacher model 10000A, digital electronic, microprocessor controlled "smart charger" frequently runs its charging voltage up to 17 volts.

Modern fuel-injection sensors and components, on the other hand, are sensitive to small fluctuations in voltage by design. Sensors frequently require precision down to tenths of a volt.

The remote voltage-sensing circuit on modern VFRs and many other new Hondas is there to help the R/R maintain correct voltage out in the harness, where the sensitive components are; not at the battery+ terminal.

Many FI, ABS and other parts are located downstream of the ignition switch, the fuse block, and splices and connectors in between. They all potentially contribute some resistance and voltage drop from the system. Add to that, wear and corrosion which are further antagonists.

Low voltage on the sensor wire signals the R/R to increase output. So, excessive resistance in this wire could cause over-voltage (15.6<). However, it could be a symptom of high resistance in any of the above mentioned locations. Check for resistance/ voltage drop at connectors, the ignition switch, the fuse box, there are several situations that could cause the remote wire to return a low reading, pushing up the R/R's output.

Finally, keep in mind that burned connectors are caused by (duh) heat. Excessive heat is not produced by voltage, or even current neccesarily, but from too much resistance for a given level of current. Check all those connectors, keep them clean, and use some kind of corrosion preventative on them. (Lately I've been using Ox-Gard.)

It's a new millennium people! :D

#77

If MR HONDA is so smart why do I have a fried stator connector on what I consider to be a relatively new bike?

Why all the cooked 30 Amp fuse wires here in the forum? Why do people have so many of the notorious fused BLUE connector block? Why did Honda recall and upgrade the Alternator assembly? Why are people getting free main wire harness replacements or doing it at their own expense?

I'm sorry it this is offensive - Honda makes a beautiful engine and drivetrain, and I absolutely love my bike, but their electrics remind me of the LUCAS Electrics in my old MGB. As one mechanic said "LUCAS Electrics - The Prince of Darkness!"

For the record there are exactly three items at play between the Black monitor wire and the positive post of the battery:

  1. The 30 Amp "A" fuse in the starter relay;
  2. The Ignition Switch;and
  3. The 10 Amp "Starter and Bank Angle" fuse.

I checked everything humanly possible. Fuses, wires, continuity, resistance, paths of travel, the orbit of the planets and Venus' trajectory reference Mars. Heck, I would have sacrificed a chicken if I thought it would have helped. I did kick the dog but he was humping the neighbors cat. That didn't help. Well, it helped the cat - I think.

My theory (with the help of several members here). The wire harness - especially the main power supply and charging line (Red/White) is undersized and insufficient for this bike. The monitor wire is somehow sensing resistance from the Starter, Bank Angle sensor, or a combination of them and jacking up the Regulator / Rectifier output voltage. This is causing an overcharging condition which cooks the undersized 30 Amp wire near the battery and then a cascade starts.

For the record. I have 28,000 Km on my 2002. I originally had made NO MODIFICATIONS or additions to the bike - pure stock from the factory. No FARKLES what-so-ever.

  • I replaced the burnt 30 amp ("B") fuse wire and upgraded the wire to the battery from the fuse as well.
  • A couple of days later I noticed a "burning nylon smell". My Stator to Regulator/Rectifier 3P connector was totally cooked and fused (I don't even know how the bike was charging at all). I cut it out and rewired BUT the stator wires were so hot they were melting the insulation around the NEW connections.
  • I replaced my Battery then RR in an attempt to fix the "cheap" items (BTW the stator tested fine according the the maintenance manual and every other possible check).
  • Finally I replaced the alternator / stator - my VIN was NOT covered in the alternator assembly "recall" according to 3 dealers AND Honda Canada.

I don't know what came first - the chicken or the egg? Did the battery take out the RR? Did the RR take out the Stator? Did the battery take out the stator? Did the crummy 16 gauge wire on the 30 Amp fuse put too much stress on the whole frig'n camel?

I know we aren't talking about trickle chargers but how about this from Yausa Batteries (the bold is my handywork) .... http://www.yuasabatteries.com/motor_battery.asp

Overcharging is an insidious killer; its effects often aren't apparent to the innocent purchaser of the ten-dollar trickle charger who leaves it hooked to the battery for extended periods. A trickle charger charges at a constant rate regardless of the battery state of charge. If that rate is more than the battery's natural absorption rate at full charge, the electrolyte will begin to break down and boil away. Many a rider has stored a bike all winter on a trickle charger only to find the battery virtually empty in the spring. Also, since charging tends to oxidize the positive plates, continued overcharging can corrode the plates or connectors till they weaken and break.

Undercharging is a condition that exists on many Gold Wings. Your voltage regulator is set to maintain your system voltage at around 14 to 14.4 volts. If you're one of those folks who rides the interstate highways with your voltmeter showing only 13.5 volts because you're burning more lights than Macy's Christmas display, you should be aware that that voltage is sufficient to maintain a charged battery but insufficient to fully recharge a depleted one. Remember, we said that gassing occurs when all or most of the lead sulfate has been converted back to lead and lead dioxide. The voltage at which this normally occurs, known as the gassing voltage, is normally just above 14 volts.

Yes the maintenance manual says 15.5V MAXIMUM at 5000 RPM. And yes I definitely noticed that my bike was charging anywhere from 13.7V to 15V + before the monitor wire mod.

However, short of a new harness, I now have a completely NEW electrical system installed and when I checked the battery voltage guess what? ---- 15V + and variable. Just like before. When I connected the black monitor wired directly to the battery - instantly I had 14.3V - rock solid. That is perfect as far as I'm concerned.

For the last 2 1/2 weeks I have been sourcing parts, replacing parts and tracing wiring diagrams. I have the full wiring diagram blown up to 3 x 4 feet on my garage wall! I have researched this issue on the web and with every mechanic and battery sales person that I can find that will talk about it -- and many that don't want to hear about it anymore.

Want a nice footnoted summary? Try this... Car Batteries are NOT 12 Volts

Yes he does say that you could go higher than 14.5 volts BUT that would be on specialized batteries (deep cycle batteries can also benefit). I think that 15V + is high. To each his own.

Oh ya - a big thank you to all that helped out with this post and others here at VFRD. Without you I would not have had a wiring digram, maintenance manual, a place to start investigating or a place to just get some extra info. Thank you all. I'm going riding. If this cooks my harness then so be it. It didn't seem to be doing much good the other way Mr Honda built it.

BTW if anyone needs an new alternator assembly - CARTER Honda Motorsports in Vancouver had ONE left as of last Friday. Good luck finding one otherwise.

MODS: 30 Amp Fuse wire improved, Black sensing wire directly to battery, and supplemental red/white wires from RR to battery.

TO DO: Reinforce the ground wires BEFORE my blue connector fuses, supplement the ground wires from the RR and post a full how-to with pics for everyone who wonders what the hell is going on here. Oh, and drink a beer.

Edited June 21, 2007 by talus
#78
talusIf MR HONDA is so smart why do I have a fried stator connector on what I consider to be a relatively new bike?

Heh; I have a 4th gen! Don't have to tell me about failure-prone Honda electrics. Yer preaching to the choir brotha! Amen! :beer:

-and for what reason has Honda not yet adopted weather-resistant type connectors across the board? One can only wonder why a 10 year old Chevy Cavalier is full of sealed Packard WeatherPack type stuff; and yet Honda....

If reading 14.3 at the battery terminal gives you a warm fuzzy feeling, have at it.

However, we're now seeing posts from people currently having no trouble, yet being scared to the verge of chopping up their harness to de-activate a significant feature of the electrical system. -without even knowing what the black monitor wire is for.

When jumping the monitor wire pin of the R/R straight to the battery results in a big drop in V, what does that tell us? -that there is an unusually large differential between V in the charging circuit and what was being measured through the harness. You have proven this with the jumper wire. You did say you replaced everything except the harness... Bypassing the monitor circuit doesn't fix the problem, just treats a symptom. Elsewhere in the system we now have a low-voltage condition. (hope it's not at your ABS computer!)

The footnoted link was good reading, if a bit heavy on conjecture. It should be noted that the "specialized" batteries mentioned, like Optima are commonly known now as AGM or Absorbed Glass Mat cells. At first AGMs were rolled in cylinders inside the battery, like a six-pack of big capacitors. However nowadays rectangularly stacked mats are commonplace as well, like WestCo.

had to chuckle from the first footnote in that article:

"Batteries: Current Designs", Mike Dale, Motor magazine, November 1985

heh. :D

Peace; and Happy Motoring!

:wheel:

#79
snowparangLatest readings are as below. All done without headlights on.

Readings with the R/R disconnected:

Battery voltage with bike off = [12.6v]

Voltage with bike at idle = [12.42v]

Voltage with bike at 5k RPM = [11.30V]

AC voltage from stator at idle (all 3 legs checked across themselves) = [2-3 vac]

AC voltage from stator at 5k RPM (all 3 legs checked across themselves) = [3-4 vac]

Readings with the R/R connected:

Battery voltage with bike off = [12.6 V]

Voltage with bike at idle = [12.42 V]

Voltage with bike at 5k RPM = [12.39 V]

Voltage at R/R output at idle = 12.18 V

Voltage at R/R output at 5k rpm = 12.10 V

AC voltage from stator at idle (all 3 legs checked across themselves) = [2-3 VAC]

AC voltage from stator at 5k RPM (all 3 legs checked across themselves) = [3-4 VAC]

Well, it seems my stator is the one causing all the trouble. Is there any possible causes? Will loose wiring cause such a discrepancy?

And more bad news...my local dealer do not have stock of the stator! sad.gif

Anybody used the Electrosport ones, are they any good? - http://www.electrosport.com/electrosport_e...cal_honda1.html

Or are there compatible alternatives (other Honda models? Yamaha? Suzukis?)?

After recieving all the help here, I think it's only right for me to update. Btw, mine's a y2k 5th Gen.

I've ascertain that my stator is bad, and hence ordered an Electrosport one from somebody selling it off in this forum and (after hearing all praises) decided to get one from Ricks too. Here are the 2 stators:

[image: medium.jpg]

Funny, it seems the Electrosport ones is narrower than the one from Rick's. Which one is correct though?

[image: medium.jpg]

Then I open up my alternator and took out the old coil. I guess this is what you could call 'burned'. Anybody knows what can cause this?

[image: original.jpg]

Comparing thickness of alternator. The one from Rick's is of the correct dimension. I'll be keeping the Electrosport's one as a spare I guess. Anybody who had used Electrosport's stator coil can confirm that I got the correct coil?

[image: medium.jpg]

[image: medium.jpg]

Next, some readings with the new coil:

Bike at 2500 rpm: 14.68V

Bike at 5000 rpm: 14.68V

Stator AC voltage - 24VAC - 67VAC form idle to 5000 rpm

Voltage drop from batt positive to R/R black wire (voltage sensing): 0.287V (which fail the <0.2V requirement from Electrosport's fault finding guide).

Hence I wire the black sensing wire directly to the battery positive and obtained:

Bike at idle: 13.4V

Bike at 5000 rpm: 14.2V

I guess that's good news...until you guys are now debating the credibility of doing the black wire mod! Drats, I've already cut the wire from the harness side...

Edited June 21, 2007 by snowparang
#80

I don't think a minor variance in the thickness of the two units matters.

I think 14.2 V at cruising rpm is too high.

Here is my working theory and practice:

Your charging system should function like a battery tendender.

Your cruising rpm (where most time is spent) voltage should be just above your batteries steady state full charge voltage. Batteries differ so I won't give a specific number. My Oem Batt was at 12.6 & 12.5 for 18 months. My new Westco has sat at 13.0 & 12.9 for 5 years. This is what they both measured after sitting on a battery tender (digital automatic maintenance charger) over night and then unplugged for two hours. That is what I call steady state full charge.

If your charging system is working right your battery should measure the same after a one or more hour ride at cruising speed ( no extended stop & go or low speed running)

and then parked for two hours.

When I put my battery on the tender it goes up to 14.2 briefly if it was loewer than its usual 12.9 0r 13.0 then settles down to a constant 13.2. If the battery was already at 13.0 it just goes right to 13.2 and stays there.

When you crank your engine or run your lights without starting for a few seconds you battery will be low and 14.2 or 14.4 can be expected when you first start up but should soon settle down to around 13.2 after a few miles at cruising speed as the battery returns to full charge. Variables such as RPM and accesorries use wil cause the charge voltage to fluctuate more than it does with the bike parked and on the tender but if you see either less tan OR more than .5 volt above your steady state voltage, you have a problem.

I don't really know about the monitor wire on the 2000+ bikes but I feel sure the above applies to all 12 volt charging systems. Just one other thing, be sure your battery tender is suitable for the type of battery you have.

snowparang
snowparangLatest readings are as below. All done without headlights on.

Readings with the R/R disconnected:

Battery voltage with bike off = [12.6v]

Voltage with bike at idle = [12.42v]

Voltage with bike at 5k RPM = [11.30V]

AC voltage from stator at idle (all 3 legs checked across themselves) = [2-3 vac]

AC voltage from stator at 5k RPM (all 3 legs checked across themselves) = [3-4 vac]

Readings with the R/R connected:

Battery voltage with bike off = [12.6 V]

Voltage with bike at idle = [12.42 V]

Voltage with bike at 5k RPM = [12.39 V]

Voltage at R/R output at idle = 12.18 V

Voltage at R/R output at 5k rpm = 12.10 V

AC voltage from stator at idle (all 3 legs checked across themselves) = [2-3 VAC]

AC voltage from stator at 5k RPM (all 3 legs checked across themselves) = [3-4 VAC]

Well, it seems my stator is the one causing all the trouble. Is there any possible causes? Will loose wiring cause such a discrepancy?

And more bad news...my local dealer do not have stock of the stator! sad.gif

Anybody used the Electrosport ones, are they any good? - http://www.electrosport.com/electrosport_e...cal_honda1.html

Or are there compatible alternatives (other Honda models? Yamaha? Suzukis?)?

After recieving all the help here, I think it's only right for me to update. Btw, mine's a y2k 5th Gen.

I've ascertain that my stator is bad, and hence ordered an Electrosport one from somebody selling it off in this forum and (after hearing all praises) decided to get one from Ricks too. Here are the 2 stators:

[image: medium.jpg]

Funny, it seems the Electrosport ones is narrower than the one from Rick's. Which one is correct though?

[image: medium.jpg]

Then I open up my alternator and took out the old coil. I guess this is what you could call 'burned'. Anybody knows what can cause this?

[image: original.jpg]

Comparing thickness of alternator. The one from Rick's is of the correct dimension. I'll be keeping the Electrosport's one as a spare I guess. Anybody who had used Electrosport's stator coil can confirm that I got the correct coil?

[image: medium.jpg]

[image: medium.jpg]

Next, some readings with the new coil:

Bike at 2500 rpm: 14.68V

Bike at 5000 rpm: 14.68V

Stator AC voltage - 24VAC - 67VAC form idle to 5000 rpm

Voltage drop from batt positive to R/R black wire (voltage sensing): 0.287V (which fail the <0.2V requirement from Electrosport's fault finding guide).

Hence I wire the black sensing wire directly to the battery positive and obtained:

Bike at idle: 13.4V

Bike at 5000 rpm: 14.2V

I guess that's good news...until you guys are now debating the credibility of doing the black wire mod! Drats, I've already cut the wire from the harness side...

#81

I'm not sure if this will help the discussion or not, but FWIW here are the readings I get on my 3 month old stock 2007 VFR (no mods):

resting voltage (overnight) 12.8

ignition on, not running 12.2

fully warmed up, @idle 14.6

@idle w/ hi-beams 13.3

@5000 rpm 14.6

@5000 w/ hi-beams 14.6

#82

I now have a basic understanding of how to accomplish these electrical mods but I have a couple questions before I start tearing into the bike.

1. How or is the R/R wiring mod associated with the main 30amp fuse mod/replacment?

2. How is the R/R wiring mod associated with the Blue Connector grounding mod?

3. If I do the main 30amp fuse mod/fix, do I still need to do the R/R wiring mod and the blue connector grounding mod or all of them?

4. If I have to do all of these electrical mods, in what order should I do them?

Right now, my only problem/concern is that my main 30 amp fuse is discolored and starting to melt... but is that reason enough to go ahead and do all of these mods? Any help would be much appreciated!!

Here are my current voltage readings:

A. Bike Cold not running

a. At the Battery – 12.77 vdc

b. Key on (with just the low beams on) - 12.00 vdc

B. Bike Started/Running @ idle but still cold

a. Voltage Climbed from 13.00 vdc to 15.1 vdc within the first minute.

b. The same condition with high beams on at first minute was 14.2 vdc.

C. Bike Started/Running at Operating Temperature and at idle.

a. 30 amp fuse is hot to the touch meaning cannot keep hand on more than 1 second.

b. R/R is hot to the touch, same as fuse.

c. Blue connector is barely warm

d. Voltage with low beams on – 15.15 vdc

e. Voltage with High beams on – Fluctuates from 13.66 vdc to 13.75 vdc

f. Voltage with Radiator fans on and high beams – 12.70 vdc

g. Voltage with Radiator fans on and low beams – 13.73 vdc

D. Bike running @ 2500 rpm.

a. Low beams - 15.16 vdc

b. High beams – 15.57 vdc

E. Bike running @ 5000 rpm.

a. Low beams – 15.17 vdc

b. High beams – 15.20 vdc

Edited June 26, 2007 by JSZR2
#83

I took my bike into the dealership to have the melted 30 Amp fuse done. What they did was add 2-12g wires instead of adding 1 thicker wire (as posted here), and replaced the stator. Now my readings from my voltmeter are:(not sure what they were before, as I just added the voltmeter)

Bike at Idle = 13.2 volts

Bike while driving = 15.2 Volts

Is this too high?

#84

Working on my electrical system mods at the moment and read again through ALL of the pertinent electrical threads. Still have a couple of questions.

On, my '02, I've upgraded the battery + wiring with 8 ga wiring, eliminating the stock 30A fuse holder and connector. I'm planning on adding the 10A fused direct-to-battery R/R monitor wire mod, and also increasing the capacity of the charge wires from the R/R.

My question is this:

Is there anything wrong with running the two extra charge (red) wires from the R/R connector to the point where my new 8 ga wire (30A fuse holder) mates to the smaller red/white wire?

I see this as taking the guesswork out of having 2 additional fuse holders (what fuse rating to use), as well as still being a significant upgrade over stock.

I am also wiring in an accesory fuse block for running ALL of my extras from, so that stock wiring only has to do minimal extra load.

Thoughts or suggestions before I go and cut the next round of upgrades?

#85

Ok read through the forum and found my 91 is different. I have only 5 wires.

Red - + ?

Green - - ?

Yellow -stator

Yellow -stator

Yellow -stator

Is the same hold true to this?

Any 90 - 92 VFR owners in here try there system?

#86

Ok, I have read this whole thread, and the others like it, twice. My questions should be an easy answer:

Bike:

2002 VFR w/ABS, 15K miles

Current Status:

30Amp fuse holder looks slightly discolored

Volt w/key off and overnight rest is 12.9

Volt with Key on, Engine off is 12.4

Volt with Engine idling is 13.2

Volt at 5K RPM is 15.4, or 15.8 w/high beam

I think that means I need to upgrade the wiring in 3 parts:

#1. 30 Amp fuse needs rewired with 12 Gauge wires

#2. Blue connector, green wire needs bypassed at connector and supplemental ground added

#2. Red/White wires need supplemented from RR to Battery, with 20Amp inline fuses for each

#2.1. Black sensing wire....do I have this on a 6th Gen? Do I need to do something with it?

And the dumbest question....where is the RR located?

Blue connector is on the left side...do I need to remove all panels? I have never had it apart.

#87

OK, I found the RR after much swearing, and 6 trips into the house. It appears to be located above the Radiator on the right side. It has rounded fins(some are taller than others).

I tested the voltage there, and at 5K RPM got:

15.6 volts from the Red/White wire,

16.4 with highbeams on, and

14.6 V from the Black/White wire.

At idle the Black/white gives 12.9V with High beam, 13.4 without....Black/White never goes above 14.4

I pulled the Black Connector out of the plug, and jumpered it to the positive lead of the battery. This gave me a solid 14.4 volts at all RPMs, with or without the highbeams on. I am very curious what the black/white wire is reading to get those voltages.

#88

I replaced my regulator with an aftermarket one(old one was bad) and added a battery to frame ground, a regulator to frame ground, and a regulator to battery hot.

With an analog volt meter the needle is rock solid @ 14v from idle to almost 12k rpm. Thanks for the wiring suggestions they definately help.

#89

Just wanted to report back on my fix.

I added a relayed circuit for the sensor wire straight to the battery. At the same time I added an accessory wire so I could charge my cell phone, power a CD player, what have you. I did not mount the accessory wires permanently because I was short on time prior to my trip. I did however use spade terminals to make it simple to disconnect the Cigarette lighter terminal, and plug something else in (tba as to what exactly).

I wanted to be able to monitor my voltage most of all, so I used a cheap multimeter as a voltmeter, and plugged the probes in a modified cigarette plug that I made. I had 14.37 rock solid the entire 1435 miles I logged, except when I used my high beams, then it was 14.31. Seemed perfect to me. I did notice that my battery is now stable at 12.6 after a night, where it should be, instead of 13.2 where it had been....sure sign that it was being overcharged before the mod.

The only scare I had was about 150 miles from home, I looked down at the meter and it was jumping around from 10-14.38 and back....rather sporadic and didn't make sense. My first thought was that my stator was crapping out, or my RR was...not the case. I pulled on the wires my multimeter was plugged into and it became rock steady again....I just had a bad connection.

#90
Chris NikirkI cut the OEM harness connection from the r/r to the battery and simply ran 10guage directly to the battery. *BUT* - the accesory fuse block in the OEM arrangement pulls power on the downstream end of the main fuse, thereby having a direct connection to the r/r. In my modified state, that connection now runs THROUGH the main 30a fuse. Am I running the risk of cooking the 30a fuse or the holder?

I've read this thread three times and this mod makes the most sense to me.

What I will describe applies to my '98 with a 7-wire r/r (3-yellow, 2-red/wht, 2-grn/wht, NO blk monitoring wire).

1. Cut the OEM harness between the r/r and red/grn connector.

2. Splice two 12ga (or one 10ga) wires to the red/wht outputs from the r/r and connect these directly to battery positive. No fuse.

3. Splice two 12ga (or one 10ga) wires to the grn/wht outputs from the r/r and connect these directly to battery negative or frame ground.

4. Isolate/insulate the wires on the cut connector and plug it back in for safe keeping.

According to the wiring diagram, the red/wht pair (and grn/wht pair) are tied together soon after the connector anyhow. I would think the 30A main fuse is there to protect the wiring harness from the battery to the fuse block and ignition switch. With the r/r connected after the fuse, the harness is not protected if the r/r 'happens' to put out more than 30A. With the r/r connected directly to the battery, you enjoy best possible charging and the harness is ALWAYS protected.

Tell me what would be wrong with this?

-M

#91
TightwadI did notice that my battery is now stable at 12.6 after a night, where it should be, instead of 13.2 where it had been....sure sign that it was being overcharged before the mod.

At 12.6v your battery is in a discharged state.

There was nothing wrong with it at 13.2v

Full charge = 13.0 to 13.2 volts according to the service manual:

[image: gallery_4773_2265_2280.jpg]

02spec.jpg

#92

Just saw this on the Concours 14 forum:

[image: icon_posticon.gif]Posted - 10/04/2007 : 06:58:48 http://www.concours.org/forum/pop_profile.asp?mode=display&id=5425">[image: icon_profile.gif][image: icon_email.gif] [image: icon_reply_topic.gif] Stator is "oil cooled", common on bikes, it operates in the engine crankcase oil. The windings are epoxy coated to keep them out of actual contact with the oil.May not be news to some or most of you but it sheds some light on our VFR charging issues for me.

We all know that heat inreases resitance in electrical circuits. The harder we ride the higher the RPM and the higher the stator output and at the same time the hotter the oil gets and thus the less effective it is at colling the stator when it needs cooling most.

#93
pontiac_bansheeOk read through the forum and found my 91 is different. I have only 5 wires.

Red - + ?

Green - - ?

Yellow -stator

Yellow -stator

Yellow -stator

Is the same hold true to this?

Any 90 - 92 VFR owners in here try there system?

I just picked up a new-to-me 1990 with low miles. All lights flickering slightly on my first night ride so I checked voltages and would you believe 18V at 5000RPM??? All this talk of the mods to the newer bikes is interesting, but I'm with Banshee:

How do I get my 5 wire RR to put out less voltage?

Thanks.

#94
Tightwad
Pete McCraryIs this fix recommended for the 6th gen's also or just 5th generation models?

Yes, very much so! I have sold 3x as many for the 6th gen.

Anything on 4th generation, thanks Tom

#95
DiscoStu
pontiac_bansheeOk read through the forum and found my 91 is different. I have only 5 wires.

Red - + ?

Green - - ?

Yellow -stator

Yellow -stator

Yellow -stator

Is the same hold true to this?

Any 90 - 92 VFR owners in here try there system?

I just picked up a new-to-me 1990 with low miles. All lights flickering slightly on my first night ride so I checked voltages and would you believe 18V at 5000RPM??? All this talk of the mods to the newer bikes is interesting, but I'm with Banshee:

How do I get my 5 wire RR to put out less voltage?

Thanks.

If you have to much voltage, your regulator or sensing wire is bad...usually, the regulator is bad and needs replaced.

#96
zam70
DiscoStu
pontiac_bansheeOk read through the forum and found my 91 is different. I have only 5 wires.

Red - + ?

Green - - ?

Yellow -stator

Yellow -stator

Yellow -stator

Is the same hold true to this?

Any 90 - 92 VFR owners in here try there system?

I just picked up a new-to-me 1990 with low miles. All lights flickering slightly on my first night ride so I checked voltages and would you believe 18V at 5000RPM??? All this talk of the mods to the newer bikes is interesting, but I'm with Banshee:

How do I get my 5 wire RR to put out less voltage?

Thanks.

If you have to much voltage, your regulator or sensing wire is bad...usually, the regulator is bad and needs replaced.

not sure, but i thought someone said the older bikes dont have a feedback wire....

#97

1999 and older don't have a sensor wire.

#98

Could someone PLEASE condense all of this into an easy to follow how-to for 5th gens with pictures ¡¡POR FAVORRRRR!!

After reading the whole thing I can longer think straight!! :fing02:

Tightwad1999 and older don't have a sensor wire.

98 and older (ehem). In then end tightwad, as you can see, I smashed up my Vtecker and was forced to keep the 5th gen for I have no car... should have gon through with the 5th gen harness too, plug and play... almost... drool drool...

Edited March 31, 2008 by Auspañol
#99
chris2992
snowparangb. Assuming it's my stator that's roasted, how do I confirm that? I've done the continuity checks and earth leakage checks as suggested by the manual and all turn out pretty fine. With the bike running, the AC voltage as measured from the yellow cables on the wire harness side reads between 2.8-3.2 vac.

c. Is there any way to damage a R/R by simple connecting it?

First off, fill in this chart. In brackets are typical good results.

Battery voltage with bike off = [12.5v]

Voltage with bike at idle = [13.2v]

Voltage with bike at 5k RPM = [14.0]

I get 12.6 volts - bike off, 13.5 volts at idle, and 12.5 at 5000 rpm when it should be 14.3. Battery is holding a charge fine.

Anyone want to help me out on this one?

I think I need to do the ground and positive lead rewire too. BTW, I have checked all the other readings and they're within specs.

I also added the pcu fan when I put on a new RR two years ago.

#100
AuspañolCould someone PLEASE condense all of this into an easy to follow how-to for 5th gens with pictures ¡¡POR FAVORRRRR!!

After reading the whole thing I can longer think straight!! :beer:

Tightwad1999 and older don't have a sensor wire.

98 and older (ehem). In then end tightwad, as you can see, I smashed up my Vtecker and was forced to keep the 5th gen for I have no car... should have gon through with the 5th gen harness too, plug and play... almost... drool drool...

The 5th Gens, especially the 98-99 are very easy(no monitor wire). Here are pics of the VFR developement for the 5th gen that should help:

5th Gen R/R Fix

#101

So I'm sort of getting the impression that R/Rs are somewhat universal... Rather than spending $100 on a replacement for my 1st gen, I'm wondering what donor bikes I might be able to ebay a cheaper one from. CBRs? R1s? What's the deal with that?

#102
duderadideaSo I'm sort of getting the impression that R/Rs are somewhat universal... Rather than spending $100 on a replacement for my 1st gen, I'm wondering what donor bikes I might be able to ebay a cheaper one from. CBRs? R1s? What's the deal with that?

R1's work, but have odd plugs so they require more tweaking. Look for an R/R from a bike with more electrics (so newer generally) and 3 stator wires going to it. The Red/Green may be Red/Black, and may not be duplicated like the VFR R/R.

I don't think the R/R is the problem, I think it is the wiring. Of course all regulators can fail...happens in cars all the time. Happens less than it used to, but wiring has gotten better in them generally.

#103

It is amazinq what upgrading the wiring did for my VFR. Now running heated grips, electric jacket liner and regular bike stuff I never run lower than 13.6. Oh the warmth! PS using a 35 dollar R1 reg from ebay. I think it is a 2002 model but not sure.

#104
Tightwad
AuspañolCould someone PLEASE condense all of this into an easy to follow how-to for 5th gens with pictures ¡¡POR FAVORRRRR!!

After reading the whole thing I can longer think straight!! :fing02:

Tightwad1999 and older don't have a sensor wire.

98 and older (ehem). In then end tightwad, as you can see, I smashed up my Vtecker and was forced to keep the 5th gen for I have no car... should have gon through with the 5th gen harness too, plug and play... almost... drool drool...

The 5th Gens, especially the 98-99 are very easy(no monitor wire). Here are pics of the VFR developement for the 5th gen that should help:

5th Gen R/R Fix

Those are nice pics, but would you please explain what you did? What is that wire you have connected the rr mounting bolt?

#105
Badazzteacher
Tightwad
AuspañolCould someone PLEASE condense all of this into an easy to follow how-to for 5th gens with pictures ¡¡POR FAVORRRRR!!

After reading the whole thing I can longer think straight!! :biggrin:

Tightwad1999 and older don't have a sensor wire.

98 and older (ehem). In then end tightwad, as you can see, I smashed up my Vtecker and was forced to keep the 5th gen for I have no car... should have gon through with the 5th gen harness too, plug and play... almost... drool drool...

The 5th Gens, especially the 98-99 are very easy(no monitor wire). Here are pics of the VFR developement for the 5th gen that should help:

5th Gen R/R Fix

Those are nice pics, but would you please explain what you did? What is that wire you have connected the rr mounting bolt?

The VFRness is just the "Beef up dem wires" thread condensed into a plug and play harness....no soldering/cutting/special tools required. In this case another board member trailered his bike up to have it developed, as I have a 6th gen and wanted a live specimen.

That is where the duplicate ground was connected, to avoid too much going to the battery terminals.

#106

Can I run a couple of wires from the Red RR wires (using a buttonhook or positap) to the battery and same thing from the green RR wires to a ground? I just want to add to the existing system, not reroute it. Also, would I need to put a fuse on the positive wire coming from the RR to the battery?

Edited April 21, 2008 by Badazzteacher
#107

I'm just going to put this out there in case anyone can offer some insight to my situation..

I just put my freshly rewound stator in, plugged in my brand new R/R from Rick's (really nice), and started it up. It runs fine, charges right around 14.5 from idle through 5k. So everything sounds right, right? Well, after about a minute of running, something started smoking. It was the connector with the 2 red and 2 green wires, between the R/R and the harness. It was heating up on the harness side. Basically, that's all I've got right now, it's dark outside and I'm going to get back into it tomorrow. Probably a bad ground, or a short? any advice on how to chase down this problem? It seems real weird to me... two weeks ago, I fried the connector on the stator side of the R/R, now it's frying the connector on the harness side.

#108
duderadideaI'm just going to put this out there in case anyone can offer some insight to my situation..

I just put my freshly rewound stator in, plugged in my brand new R/R from Rick's (really nice), and started it up. It runs fine, charges right around 14.5 from idle through 5k. So everything sounds right, right? Well, after about a minute of running, something started smoking. It was the connector with the 2 red and 2 green wires, between the R/R and the harness. It was heating up on the harness side. Basically, that's all I've got right now, it's dark outside and I'm going to get back into it tomorrow. Probably a bad ground, or a short? any advice on how to chase down this problem? It seems real weird to me... two weeks ago, I fried the connector on the stator side of the R/R, now it's frying the connector on the harness side.

Contact Ricks, it sounds like an internal R/R issue. They make a nice product but everyone has bad days or gets a bad piece.

#109
BadazzteacherCan I run a couple of wires from the Red RR wires (using a buttonhook or positap) to the battery and same thing from the green RR wires to a ground? I just want to add to the existing system, not reroute it. Also, would I need to put a fuse on the positive wire coming from the RR to the battery?

Yes, this is exactly what the VFRness does, except I use the frame for ground and a heavy duty inline fuse holder (8 gauge wire). Instead of Button Hooks I added a set of connectors to tee into the harness. Button hook would potentially introduce less possibilities for issues, but can be hard to do without a good soldering gun (not an iron, they don't get hot enough really).

#110
Tightwad
BadazzteacherCan I run a couple of wires from the Red RR wires (using a buttonhook or positap) to the battery and same thing from the green RR wires to a ground? I just want to add to the existing system, not reroute it. Also, would I need to put a fuse on the positive wire coming from the RR to the battery?

Yes, this is exactly what the VFRness does, except I use the frame for ground and a heavy duty inline fuse holder (8 gauge wire). Instead of Button Hooks I added a set of connectors to tee into the harness. Button hook would potentially introduce less possibilities for issues, but can be hard to do without a good soldering gun (not an iron, they don't get hot enough really).

I just did one wire each. One from the red to positive terminal and one from a green to the stock ground point and picked up significant voltage. I am within specs for the idle, but the @5000 rpm I'm still only getting about 13.9. I hope this is fine now because I was making due with a lot les voltage before.

I may go back in and do the other wires if I continue to get charging probs. I am also going to order one of those little digital volt meters so I can monitor the system constantly.

Thanks for your help Tightwad!

#111

Where are you ordering the voltmeter from? I gotta get myself one of those too...

#113

Nice, thanks. I've got the bike running and charging, but I can't help but still worry a little, so having some numbers to watch will be nice.

Just to finish off the last post: I did some investigating trying to see what was causing that connector to heat up, and didn't find anything. I then went ahead and did the wiring mod that Zam started this whole thread with. I did the positive wires from the RR to the battery leads first, and that caused the pos side of the connector to stop heating up. Then I did the RR grounds to frame ground connection, and that completely solved the problem! I opted to skip the beefing up of the actual batt terminal-to-frame ground; the OEM is an 8 gauge wire, only about 7 inches long, and it looks to be in perfectly good shape. If anyone sez there's a good reason to beef up that connection, I will, but I put 140 miles on it on Sunday and everything checked out fine when I checked stuff at every stop. STOKED. Nothing better than a running Viffer.

#114

Add me to the list on 5th gen. I doubled the 4 charging wires running back to the battery and gained almost 1 volt at 5 grand. The idle volts are up about a half volt. It never has been right since I put a new regulator on about 2 seasons ago so I'm ready to go with one less worry. :biggrin:

#115

WOW - I haven't been back for awhile - lloks like this thread has taken on a life of its own (over 11,000 views!)

Thanks Tightwad for coming up with a plug and play harness...makes it easy for the masses.

Glad to see this has helped out so many!

#116
ex TZ tuner

Yea, all the above might prevent this..

[image: gallery_8428_2711_2834.jpg]

I have this problem exactly. Does Honda make a replacement connector for this and what is this part so i can ask the dealer or Honda America, customer service? My connector isnt burnt quite as badly but still ugly and causing problems so i need to fix this. Then i will work on reducing the resistance in the charging system.

Thanks

#117

Just wanted to add my .02 on this...

Most car audio shops have quality wire (in just about any gauge you need) and connectors for just about any of these wiring upgrades. Easy to source, and cost is pretty decent. :rolleyes: Easy to make your own harness if you have the proper stuff to start with.

#118

I wrote this up for someone and decided I would copy / paste it on here for any interested. I'm sure some / all off it might have been covered elsewhere but I didn't feel like reading all the 100000 electrical posts to verify.

Tinyminds Melted Connectors ReasoningTurn the key on but not running, check voltage on the black ( or black/white) wire at the R/R. Then test battery voltage directly at the battery. She if there is a big difference. Generally the only reason those connectors melt is because the R/R is overworking itself. But in nearly every case its only working itself to much because it thinks the bikes not charged. Two reason, number 1: That black wire is telling the R/R what voltage the battery is ( monitor wire ). If it see's to low of voltage, it tells the R/R to work harder, that's where the heat comes from. That wire is running from the R/R to the key cylinder, then back to the battery, but it passes through some 6 switches/connectors before it gets there, so resistance is a huge issue on that wire, along with a lot of room for voltage drop error. The more voltages the R/R has to product, the more the diode packs inside heat up. Those plastic connectors have a much lower insulation than the wire itself does, so when heat reaches a critical point, the connector will melt before the insulation on the wire will. Number two: You can only push so many volts through a wire before the wire will start restricting the voltage flow, even before it starts to melt. Those two red wires coming off the R/R also route themselves through a few connectors before actually getting the charge from the R/R to the battery. Voltage output on that red wire probably looses some 1/2 a volt by the time it reaches the battery as it passes through the ignition switch and different connectors. So in order for your battery to get a 14.4 volt charge, ( which is where my R/R keeps my battery planted at every second without fluctuating at all, and where ideal charging is ) the R/R would have to push 14.9 volts to allow a 1/2 volt to be lost and get 14.4 to the battery. So my solution. Tap ( solder ) to the two R/R wires coming out of the R/R, leaving the two that are already there in place, because they do to much routing and serve other purposes that I didn't feel like going through, and place a inline fuse in each running the new cables directly to the battery, no connectors, no switches, no voltage loss. Now that black wire you need to pull out of the connector completely because you need to tape off the wiring harness side leaving it hooked to nothing, connect a new wire the the R/R's black wire and run it straight to the battery also, that way its reading exactly whats at the battery and not voltage dropping through connectors.

If you do a backward calculation. Even if you loose about 0.1 volt on every connect made, that's ideal but usually your close to 0.2 on a connector because of the world isn't ideal. If your battery says 14.4v, and the black monitor wire passes through 6 connectors at 0.1 voltage drop per connector that means your R/R would have to charge 0.6v more to keep 14.4v, so your R/R is now pushing 15.0v. Now the red wires pass through about 5 connectors loosing another 0.5v forcing the R/R to be pushing 15.5 volts which you will never see that its pushing that because it loosing it before it reaches the battery and all you see is 14.4 volts ( ideal number ). Your R/R pushes way more than you notice if wiring isn't working properly. Even putting a voltage meter on the battery isn't taking into account how much extra your R/R is having to work to show that number, extra work = extra heat = R/R connector melting because its the weakest point.

Let me know if you have other questions. That's the best way to explain what I've learned and what I've done to fix / prevent future problems on my bikes charging system.

Pictures can be found on the bottom of the first page of this post.

#119

Good things never last...or lasted about 18 months in this case. The stator just keeps burning up connectors...

[image: IMG_9215Medium.jpg]

#120
vfrcapn

Good things never last...or lasted about 18 months in this case. The stator just keeps burning up connectors...

Were those crimped, only? Or crimped and soldered? What kind of crimp tool? I understand there are good ones and less good ones. Interesting outcome.

#121

Interesting. Looks like the splices couldn't handle anywhere near as much current as the wires.

When the GF's 99 melted the near-new Hitachi stator connector I went into overkill mode, and used 10G spade lugs crimped & soldered. It's been fine since.

My 98 still has the replacement Hitachi that I put on back when my R/R fried 2 Decembers ago. Go figure. That will be going away soon though as I feel like that connector is a ticking time bomb....

#122
MBrane

Interesting. Looks like the splices couldn't handle anywhere near as much current as the wires.

When the GF's 99 melted the near-new Hitachi stator connector I went into overkill mode, and used 10G spade lugs crimped & soldered. It's been fine since.

My 98 still has the replacement Hitachi that I put on back when my R/R fried 2 Decembers ago. Go figure. That will be going away soon though as I feel like that connector is a ticking time bomb....

I was all set to do the "eliminate the connector" drill and direct-connect the stator wires to the r/r wires, but now see that apparently a "standard" connection won't work for long. You used "10G spade lugs" and I found this site/pic that shows those: http://workmanship.nasa.gov/lib/insp/2%20books/links/sections/206%20Spade%20Lug%20Terminals.html

1. How did you use spade lug connectors to make the connection? It looks like these go under a bolt head, or something like that, not attached to one another. Did you have one of these lugs on each side?

2. You used 10G lugs - what is the gauge of the stator and r/r wires? It looks smaller than 10 gauge to me, so wouldn't the lug not fit very well? Or am I misunderstanding?

I just want to do this job right, the first time. Thanks for any help.

#123
Misspent Youth
MBrane

Interesting. Looks like the splices couldn't handle anywhere near as much current as the wires.

When the GF's 99 melted the near-new Hitachi stator connector I went into overkill mode, and used 10G spade lugs crimped & soldered. It's been fine since.

My 98 still has the replacement Hitachi that I put on back when my R/R fried 2 Decembers ago. Go figure. That will be going away soon though as I feel like that connector is a ticking time bomb....

I was all set to do the "eliminate the connector" drill and direct-connect the stator wires to the r/r wires, but now see that apparently a "standard" connection won't work for long. You used "10G spade lugs" and I found this site/pic that shows those: http://workmanship.nasa.gov/lib/insp/2%20books/links/sections/206%20Spade%20Lug%20Terminals.html

1. How did you use spade lug connectors to make the connection? It looks like these go under a bolt head, or something like that, not attached to one another. Did you have one of these lugs on each side?

2. You used 10G lugs - what is the gauge of the stator and r/r wires? It looks smaller than 10 gauge to me, so wouldn't the lug not fit very well? Or am I misunderstanding?

I just want to do this job right, the first time. Thanks for any help.

Well I guess the ones I used aren't true "spade" lugs since they have a hole not a slot. I simply bolted them together, and covered 'em with shrink tube. The stator/R/R wires are 12G, but you can put 10G connectors on 'em just fine. Just gotta crimp 'em a bit more. I ALWAYS solder too. Don't trust crimping alone to provide a good electrical connection.

The ones I used look like the yellow one on the R:

[image: 59929.jpg?rand=539224160]

#124
MBrane

Well I guess the ones I used aren't true "spade" lugs since they have a hole not a slot. I simply bolted them together, and covered 'em with shrink tube. The stator/R/R wires are 12G, but you can put 10G connectors on 'em just fine. Just gotta crimp 'em a bit more. I ALWAYS solder too. Don't trust crimping alone to provide a good electrical connection.

The ones I used look like the yellow one on the R:

Thanks for the clarifications.

Re: the soldering, how do you solder after the crimp with that plastic cover in the way on the lug? Do you do away with that? Move it off and then try to slide it back over the now crimped/soldered connection?

#125
Misspent Youth
MBrane

Well I guess the ones I used aren't true "spade" lugs since they have a hole not a slot. I simply bolted them together, and covered 'em with shrink tube. The stator/R/R wires are 12G, but you can put 10G connectors on 'em just fine. Just gotta crimp 'em a bit more. I ALWAYS solder too. Don't trust crimping alone to provide a good electrical connection.

The ones I used look like the yellow one on the R:

Thanks for the clarifications.

Re: the soldering, how do you solder after the crimp with that plastic cover in the way on the lug? Do you do away with that? Move it off and then try to slide it back over the now crimped/soldered connection?

Just use a large, hot iron, heat the lug, & flow solder into the crimp area. Work quickly, and the plastic won't melt too much. If you use too small an iron you'll melt the plastic long before the solder flows. You could always just remove it too since it's getting covered anyway.

Edited April 13, 2011 by MBrane
#126
MBrane

Just use a large, hot iron, heat the lug, & flow solder into the crimp area. Work quickly, and the plastic won't melt too much. If you use too small an iron you'll melt the plastic long before the solder flows. You could always just remove it too since it's getting covered anyway.

I'll bet the big iron's the key. I've melted a bunch of plastic on connectors! Thx

#127

no point using a 10 gauge lug really...the stator wires are 14 gauge. The real key seems to be getting a good connection from wire to connector, and then between the connectors. I have a stator hardwire kit that works great if you want to be able to remove them, or you can do as suggested and just bolt them together...be careful to insulate the bolt very well, as you don't want it vibrating and rubbing through.

I also prefer solder, although the purist claim vibration can cause the solder joint to fail. so far my solder joints lasted longer than the crimp connections, so I will stick with that.

The key to soldering is lots of heat in a concentrated space for the shortest time possible. Naturally too much heat will leave the connector hot for a long time, so don't overdo it. I use a fairly big Weller gun on high, it takes about 10 seconds from start to finish, and the insulation should never melt away or look burned. Dual wall heat shrink is also the best thing ever!

#128

Once again, HobbyKing is your friend.

Check out these bad boys!

[image: XT150.jpg]

Gold plated 150amp connectors, $10 for three sets of five pairs. Oh yeah!

Or if they're too big you can go smaller.

[image: 9001-AB.jpg]

These things are great because their actual purpose is for connecting to three-phase AC brushless motors - which are basically exactly what our stators are (in reverse).

#129
kaldek

Once again, HobbyKing is your friend.

Check out these bad boys!

[image: XT150.jpg]

Gold plated 150amp connectors, $10 for a set of five pairs. Oh yeah!

Or if they're too big you can go smaller.

[image: 9001-AB.jpg]

These things are great because their actual purpose is for connecting to three-phase AC brushless motors - which are basically exactly what our stators are (in reverse).

Thanks to you and Tightwad for the info/tips. My head's swimming with so many apparent choices among the available methods of connection and protection of the connection. My goal is to relocate the r/r to the underside of the fender eliminator, so that's a complication for the stator, and battery connections/wiring.

#130
vfrcapn

Good things never last...or lasted about 18 months in this case. The stator just keeps burning up connectors...

[image: IMG_9215Medium.jpg]

Those splices look soldered to me, and the fact that they burnt at the splice means that you had a bad solder joint. And based on this picture I say that the failure most likely resulted from resistance and not over-voltage, so keep that in mind when you solder wire-to-wire or use solder to fill in crimp connectors. It's always a good idea to make sure the splice did not create any resistance in the wire, especially if the wire handles a lot of current or voltage.

#131
NVR2L8
vfrcapn

Good things never last...or lasted about 18 months in this case. The stator just keeps burning up connectors...

Those splices look soldered to me, and the fact that they burnt at the splice means that you had a bad solder joint. And based on this picture I say that the failure most likely resulted from resistance and not over-voltage, so keep that in mind when you solder wire-to-wire or use solder to fill in crimp connectors. It's always a good idea to make sure the splice did not create any resistance in the wire, especially if the wire handles a lot of current or voltage.

They were soldered, I guess I'll have to work on a better connection next time.

This was the other end of the splice, showing a lot of heat at the crimp.

[image: IMG_9211Medium.jpg]

#132
vfrcapn
NVR2L8
vfrcapn

Good things never last...or lasted about 18 months in this case. The stator just keeps burning up connectors...

Those splices look soldered to me, and the fact that they burnt at the splice means that you had a bad solder joint. And based on this picture I say that the failure most likely resulted from resistance and not over-voltage, so keep that in mind when you solder wire-to-wire or use solder to fill in crimp connectors. It's always a good idea to make sure the splice did not create any resistance in the wire, especially if the wire handles a lot of current or voltage.

They were soldered, I guess I'll have to work on a better connection next time.

This was the other end of the splice, showing a lot of heat at the crimp.

[image: IMG_9211Medium.jpg]

Were those quick disconnects crimped and soldered, or just crimped? Either way, you can see evidence of heat there too. But that's exactly how I bypassed the OEM stator connector on my bike, and now I'm wondering if my quick disconnects are also burnt. I don't know what to say about these connectors, except that maybe you used quick disconnects smaller than 14 gauge? If so, as a general rule of thumb then I don't anything less than 14 gauge would be capable of handling the current flow that each phase of the stator is capable of producing. FYI...on a 12 volt system, for a short length of wire 14 gauge is rated at 30 amps, but 18 gauge is only rated at half that.

#133
NVR2L8

It's always a good idea to make sure the splice did not create any resistance in the wire, especially if the wire handles a lot of current or voltage.

What's a good way to make this check?

#134
Misspent Youth
NVR2L8

It's always a good idea to make sure the splice did not create any resistance in the wire, especially if the wire handles a lot of current or voltage.

What's a good way to make this check?

Technically you would want to test a run of wire end-to-end, but that isn't possible with the stator wires because you cant easily get to the ends. But what you can do is test the stator per the service manual. So you'll have to somehow get one of your multimeter leads underneath the insulation of each connector or splice on the side that is nearest to the Rectifier/Regulator, and then connect the other lead to ground. The manual says the resistance of each yellow wire to ground should be between 0.1 - 1.0 ohm (which indicates a good stator), so if you have more than 1 ohm then you probably have an issue with your repair/modification.

#135
NVR2L8
Misspent Youth
NVR2L8

It's always a good idea to make sure the splice did not create any resistance in the wire, especially if the wire handles a lot of current or voltage.

What's a good way to make this check?

Technically you would want to test a run of wire end-to-end, but that isn't possible with the stator wires because you cant easily get to the ends. But what you can do is test the stator per the service manual. So you'll have to somehow get one of your multimeter leads underneath the insulation of each connector or splice on the side that is nearest to the Rectifier/Regulator, and then connect the other lead to ground. The manual says the resistance of each yellow wire to ground should be between 0.1 - 1.0 ohm (which indicates a good stator), so if you have more than 1 ohm then you probably have an issue with your repair/modification.

Perfecto - thanks. I suppose I could penetrate the insulation (beyond the connection) with a pin and use the pin as the upstream test point.

#136
NVR2L8
vfrcapn

They were soldered, I guess I'll have to work on a better connection next time.

This was the other end of the splice, showing a lot of heat at the crimp.

Were those quick disconnects crimped and soldered, or just crimped? Either way, you can see evidence of heat there too. But that's exactly how I bypassed the OEM stator connector on my bike, and now I'm wondering if my quick disconnects are also burnt. I don't know what to say about these connectors, except that maybe you used quick disconnects smaller than 14 gauge? If so, as a general rule of thumb then I don't anything less than 14 gauge would be capable of handling the current flow that each phase of the stator is capable of producing. FYI...on a 12 volt system, for a short length of wire 14 gauge is rated at 30 amps, but 18 gauge is only rated at half that.

Just crimped. Those were definitely 12 or even 10 gauge connectors. I don't know what I could have done wrong, strip the wire, insert, crimp. I'm wondering if it's just an over amperage problem and not resistance through the splice? This was a new splice in Dec. '09.

[image: wires.jpg]

Which replaced the original connector which was still barely charging the bike:

[image: rr_connector_99.jpg]

#137

When splicing I always try to get as much wire into the connector as possible, and as long as you have a good mechanical connection at the splice points then they are probably fine. The problem with the stator wires, is that when the engine is at typical operating speed (5K rpm or more) the stator is continuously pumping out about 60 volts AC per phase. Current flow is what's burning wires and melting connectors, so if there is too much amperage flowing through these wires, then you have to look at the R/R since it regulates the current flow from the stator. If you're still burning stator wires and don't have resistance in your repairs, then you might have something else going on with your electrical system.

This is a really good guide to troubleshooting the stator and R/R: http://www.electrosport.com/media/pdf/fault-finding-diagram.pdf

#138

Well, 10 years old battery (orig.) bit the dust so set off in search of a new. The Yuasa is $180 at cyclegear, and i dont even want to know what a stealer charges. My search for a 12S leaves me empty handed, only to find the 12BS which is taller and will not fit under the seat. Sears had the Craftsman 9S which has identical dimensions to the 12S but the A-hr rating is 9 vs 12. So I went with it for $80. Before I add the mix and charge it, and knowing if I use it that cold weather starts will be taxing on this battery, does anyone recommend that I not use this battery in lieu of the 12S? Also, if I do use it, will the added load 'hurt' the RR & charging system?

#139
TurdEngineer99

Well, 10 years old battery (orig.) bit the dust so set off in search of a new. The Yuasa is $180 at cyclegear, and i dont even want to know what a stealer charges. My search for a 12S leaves me empty handed, only to find the 12BS which is taller and will not fit under the seat. Sears had the Craftsman 9S which has identical dimensions to the 12S but the A-hr rating is 9 vs 12. So I went with it for $80. Before I add the mix and charge it, and knowing if I use it that cold weather starts will be taxing on this battery, does anyone recommend that I not use this battery in lieu of the 12S? Also, if I do use it, will the added load 'hurt' the RR & charging system?

Well, you went from a battery that is barely addequate at 12 amp hour, to one that is defintiely sub par at 9. Cycle gear is not competive on batteries.

Batterystuff.com is a good place

Edited April 19, 2011 by spud786
#140

The VFR battery is common to a LOT of other bikes. No good reason you shouldn't be able to find one.

I would get a AGM battery myself. Some here are using the lithium variant batteries, but I'm still in wait & see mode on those.

Edited April 19, 2011 by MBrane
#141

Thanks Kaldek - Those Hobby King connectors look like the nuts for the stator hook up!

Adding a note June 2013 - negative on the HK for the stator connectors

and hell yeah to DephiPackard Metri pack 630 automotive connectors

#142

I did the solder route for the splice and now have 13.2V at idle, a solid 14V at 2.5K and 5K rpm.

I'm wondering if the bad starter switch I had contributed to the connectors burning? The switch was sticking half way, bike started and ran but headlights were not coming on. Not sure how long this has been going on but I know I had more than a few long (daylight) commutes with the headlights off. ??

BTW, Walmart sells an inexpensive AGM battery for the VFR, about $60.

#143

I thought I would share my version of power distribution upgrades;

2002 VFR 800 VTEC, 3,700 miles, 1 owner till me. I picked it up a month ago.

I rode it one week until the bike started cutting out on me! High beams on, day time riding.

Just had Honda run the recall, they did the blue connector (front ground issues), and nothing else.

I pulled the body off, to check thier work, and look for other problems.

I found no signs of heat build up on any connectors.

I did not rework the stator wires, as I plan on buying the upgraded Stator/flywheel set soon.

I did however die-electric grease all connections and in/out them all several times to clean them off.

On the Main 30 A fuse, I went with a "MAXI" type inline, which comes with 8 Ga wire.

Much more conducting area for the higher full time current draw, don't ya think?

Available behind the counter at NAPA. ( I forget the #, as I had a few on hand.)

I put a 30A MAXI Fuse in there.

Here it is compared to an ATO type;

[image: post-22701-0-69347800-1309964333_thumb.j]

Soldered into the main..

[image: post-22701-0-21789200-1309964376_thumb.j]

I left the original intact, with the fuse pulled, maybe for accy's later.

It fit nicely above the starter relay.

[image: post-22701-0-28254200-1309964425_thumb.j]

I added 2 x 10 Ga ground wires soldered (tapped and wrapped) from the R/R to a crimp and soldered copper connector to the chassis, on a fairing mount bolt;

Yes, I filed the excess solder, down to nice copper.

[image: post-22701-0-58986500-1309964567_thumb.j]

Don't forget to emery cloth or file the frame mount spot clean, as the anodized aluminum is not a good conductor.

[image: post-22701-0-64353000-1309964584_thumb.j]

I also ran 2 x 10 Ga wires from the two + 's on the R/R harness, into two sealed ATO in-line fuses, then back to a soldered connector at the battery post.

(I went with 15 A each, as these run in parallel to the stock transmission line through the MAXI Fuse - the idea being double overkill so if the multiple stock connectors are compromised, the new path can handle most if not all of the charging current. The fuses are there top protect the wiring, not the components)

These were only $3.69 at NAPA, behind the counter. (Different number and package, same item)

- Ask to see their electrical parts catalog, lots of great modern stuff in there, most of it made by Buss. - the fuse people.

[image: post-22701-0-45169300-1309964690_thumb.j]

Yes, I need to add some plastic conduit to that power line, I ran out.

[image: post-22701-0-19254400-1309964882_thumb.j]

My Next step is another MAXI fuse to branch off the battery, and feed the headlight relays directly. Being a 20A load, I want to rip out the factory wires, connectors, etc and have my own clean power supply up to the repays. This will also let that 30A circuit that powers the rest of the bike, breath a little easier.

Edited July 7, 2011 by biggsxr
#145
biggsxr

These were only $3.69 at NAPA, behind the counter. (Different number and package, same item)

- Ask to see their electrical parts catalog, lots of great modern stuff in there, most of it made by Buss. - the fuse people.

[image: post-22701-0-45169300-1309964690_thumb.j]

These sealed fuse holders are actually made by Delphi and re-packaged by Buss/NAPA. They're part of the Metri-Pack family. I'm now using Metri-Pack 280 and 630 sealed connectors on my bikes' critical electrical components these days. You can get them from Mouser Electronics and Waytek, Inc. in the 'States. Eastern Beaver also sells pre-made fuse holders. (That said, that price for a complete, high quality sealed ATO fuse holder is very good!)

Ciao,

#146
zam70

#1 - I ran an additional 8 gauge ground from the battery neg to the connection on the frame (right side with the green wires, not at the brake valve)

#2 - I ran an additional 12 gauge ground from the new ground point to the regulator ground and commoned them (green wires on the reg plug)

#3 - I ran 2 additional 12 gauge wires from the Batt positive to the regulator charge output wires (red & red white)

Would this be a good idea to do on a 4th gen? I mean, I can't see how you could go wrong doing the same thing, but would it be a waste of time or beneficial?

#147

for the 4th gen the problem is that R/R connector. The VFRness I sell is 10 gauge wire to the battery for + and - and a 12 guage wire to the starter relay (red/white wire OEM). Stator wires are also bulked up to 12 gauge down to the stator connector in the front.

#148

NVR@L8T

you sure you want continuity from the yellow wires to ground ? I don't think so.

#149

Hi,

Good info, but with this being kinda technical in nature...pics or a Utube of the original post would have helped immensely.

Edited June 15, 2013 by justice1327
#150

I called the dealer where I bought the bike told him the problem - he gave me a new regulator no charge (the updated one even).
After installation, things were better but, I felt the voltage was still on the low side and unstable.
I went to work cleaning and updating all the charge wires...

Motorbike Driving Gloves
#151
vfrcapn

Here's the quick summary on my '99: did only step #3 and charging voltage at the battery went from shaky 13.1V (2500rpm) to solid 14.1V. I commoned the red-white wires coming out of the new style Honda rr using zam's recommended button hook method and also soldered it, then ran direct to the battery positive with a 30a fuse in the line.

The background is my batteries have started dying sooner and sooner over the last few years. I was always able to charge them back up and they'd run for awhile but the top off charge would need to be more and more frequent. This was regardless of new/old battery. My current battery is 8 weeks old and was just about dead Sunday morning, for the second time. The Electrex/ElectroSport flow chart showed everything within specs other than the voltage at the battery, which would not go over 13.1V and was about 12.8V at idle.

New values are 14.1V at 2500rpm, 13.8V at 5K rpm, a full 1V higher at all rpm's. I've never seen 14V at the battery before, ever. Running around yesterday with a lot of short trips, frequent starts and the battery seemed solid, no weakness. Battery is sitting at 12.8V volts now with the bike shut off. I'm cautiously optimistic this problem may be fixed! :thumbsup: (Although I'm going to hunt down a Yamaha rr just in case...)

The rr connectors were getting very hot when I was letting it idle Sunday, now the power/ground plug shows no sign of heat build at all. The stator plug is still getting very hot but it seems to be isolated to the connector itself, the wires a couple inches away on either side were not particularly hot. It would seem the connector has some major resistance? I'm thinking it needs to be rewired and the stator wires upgraded? I've cleaned the connectors and they seem about as good as they're going to get.

edit: I think swas answered my queston in the previous post. Time for new stator plug...

This is why I love this site...thanks to zam70 for starting this post and thank you vfrcapn for posting your results.

I did a check on my charging system and with a brand new battery I was resting at 12.7 V and idling at 13.2 V at 5k rpm voltage dropped to 13 or 12.9 V. I followed the extensive stator / R/R checks from Electrosport and everything checked out as it should have.

I will try your method above and post my results...was already looking for a new R/R and stator...hope this will provide results...Cheers!! :beer:

#152

OK so here is the update:

I commoned the two red/white wires and soldered a 10 gauge wire with a 30 amp fuse directly to battery.

Same results as vfrcapn, I gained 0.80 volt. So at idle I was at 13.5v and now at 14.3v at 3-5000rpm I was at 13.2 and now at 14v steady...at the battery...previous results were taken from the new volt meter...I'm losing about .30v from resistance to the meter

From reading some of the posts i have seen the comment that if your charging voltage drops when increasing revs that the stator is toast...I'm not so sure about that (please correct me if I am wrong) it seems that the bike may be charging more at idle to compensate for electrical loads ...when I tested the stator the resistance was .5 ohms equally and no short or partial to ground...I also did all the tests from electrosport and everything tested o.k.

I can only assume that this is normal...I'm getting a steady 14v at any rpm above 3k so it is charging...I will leave it and see how it goes.

I hope this will help someone with the same doubts I had that the stator or R/R were faulty...

***Update - After some more reading it looks like the voltage drop when revving is possibly due to the increase in demand I.E: fuel injectors and ignition...I also have yet to install the tail lights and only one of the old headlights is working...haven't really tested the charging under full load.

#153

Poor charging performance on my '99 led me to your post.  After determining that the stator was in good working order, your solution made much sense.  After a short time implementing your solution my charging troubles are a thing of the past!  Thanks for your posting, it sure helped.

End of thread · 153 posts recovered Wayback Machine snapshot 23 Jul 2021