Ok ladies and gentlemen, its getting close enough to start the buildup so i will make my post now.
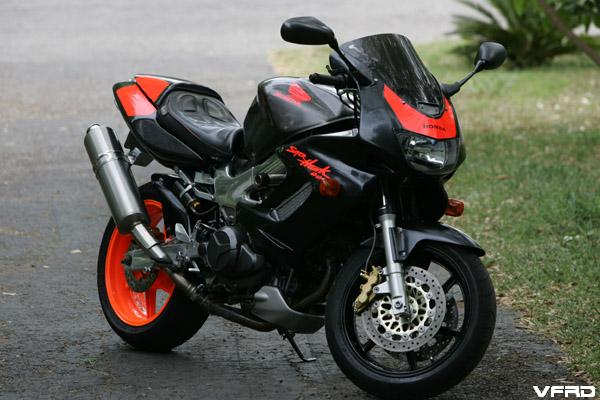
I am building a custom 91 VFR750. i have really yet to come up with a name for it, so bear with me on that.
the plans are as follows:
-CBR900RR bodywork from 93-95. look it up, it has twin round headlights.
-Exhaust from a 4th gen (already have)
-Fuel injection Via GSXR600 throttle bodies and megasquirt to control them
-CBR900RR rear subframe (already have)
-VTR fork lowers and cartridges so i can run F4i brakes (already have)
-custom adapters for the injection setup so i can run a totally stock airbox (in the works)
-seats and such off of the CBR
-woodcraft clipons (already have)
-CBR900 gauge cluster (already have, but need a digital speed sending unit, maybe on the way)
-polished frame
-candy black powdercoating on various parts, including but not limited to the wheels and the peg holders (wheels should be done by now)
-some form of blue on the fairings, have not decided on color. have a few in mind tho
-929 shock from Daugherty motorsports with a 17kg spring and delrin spring bushing (have yet to purchase, one is made for me and waiting)
-modified fork valving for a .90kg spring
-angel eye headlights (already have, but have to figure out how to mount)
-custom lighting here and there.
-chrome powdercoated swingarm
-in the future, a jet hot coated exhaust system with a high mount shorty pipe
-custom wire harness for charging system and stock harness modded to look stock on CBR fairings.
-and if i forget something i will add to this list later.
i have alot of pics of the teardown of my bike so i will post those in teh near future, along with all the mods to fit the fuel injection. overall, it seems like a very challenging project, but i think i can swing it.
im buying sharkskinz for it so i wont have any issue getting replacements. i picked the front end because it reminds me alot of the rc30. i think it will be amazing looking when its done
vfrrider:
marchesini wheels?! i wish i had the money! i think the rc30 hub and wheels will be a next year addidion, aloing with a nice left exit exhaust. where do i go about getting this replica tail? sounds pretty cool! i dont know anything aobut hard anodizing, but im going to coat the frame with one of the POR-15 products made for highly poilshed surfaces so i dont have to polish the damn thing all the time. after its done im going to be lazy. ill keep it clean tho.
For fancy wheels take a loko at ebay.de You may need to use babelfish a bit to try and get a few translations (or get your freind Hans round for a few beers) but if you search for PVM, Marvic, Dymag etc there's some pretty special wheels on there. I've been looking recently for some for my rc211v rep, but there's not much going on unfortunatley. A carbon or mag front 5 spoke would be tres cool though.
i cannot venture to that link that you posted. can u send me some pics?
i put the tail up against the frame tonight and i need to do some surgery to it, but overall i think it will work out great. the subframe will of course have to be modded and i will have to make some sort of fiberglass cover for the frame and other things so its not so hideous, but that shouldnt be that hard.
my wheels should have been done, but the powdercoater never called me so he must have gotten busy. its all good, gave me time to compare the length of my F4i brake lines. they sure seem to be the same length as a VFR. plus i will be having shorter handlebars so i dont think it will be a problem.
on another note, does anyone have the tank mounting bolt/sleeve thing for the back where the seat hooks to? i must ahve lost it in the sea of parts i have around here and i am in dire need so i can modify the subframe the right way. anyone have one?
ok its picture time. heres some of the goodies i have collected for my beast
divorced from the switch throttle tube/clamp thingy [image: Posted Image]
Woodcraft clipons [image: Posted Image]
1000RR ignition switch/kill switch/starter button thing [image: Posted Image]
900RR rear subframe, undertail, seat, and plastics [image: Posted Image]
a nice LED integrated taillight will reside in this hole. the bike will be blue, but around the light will be black. [image: Posted Image]
cavernous trunk. will probably contain my injection computer unless i dind somewhere else to put it. [image: Posted Image]
these sweet little wire things are built into the seat, so when i need them all i have to do is flip them out. i will probably use them for carrying my lunch to work. and the convertibolts are shown as well. [image: Posted Image]
F4i front brakes and master cylinder. im attempting to find something that has a remote reservoir like off of a ducati so i can have more clipon clearance. [image: Posted Image]
here is something of interest. i originally had a cable driven speedo. i found a sensor off of an 03 vfr that i thought i would have to modify to get to work right. i looked up the part numbers and there was a difference in them as well as the price for the 4th gen as compared to the 03. well, lo and behold it bolted right up and fits perfectly. now all i have to do is feed it power and ground and send the signal forward so i can hook it to my cbr900RR guages, which o forgot to take pictures of today. i have more stuff coming in so i will take more pics soon. [image: Posted Image]
anyway, there u go. i know i love to see pictures in threads so i hope u all enjoy it.
Come on why would you use F4I calipers & have to mod mounts to suit VTR lowers when these bolt straight up no mods at all & there 6 pot not 4 so even better :thumbsup:
the VTR fork lowers work with F4i brakes when you do a little creative grinding on the caliper. it wont be noticed when installed.
Just don't use the VTR springs as they are too light. I found that adding a forkbrace to my SuperHawk really helped with front tire feedback especially under braking with the 6p gixxers I had too.
but will they work with F4i calipers? i have a set thats going onto the the bike and i know that master cyl size matters. is there a chart somewhere with master cyl sizes and such?
so far i have been told CBR900RR and VTR1000 front master.
what about the clutch? i dont imagine size changes with those do they? RC51 has a nice looking master for the clutch.
i got this from the powdercoater who was doing my wheels. the color is candy black/black chrome. looks sexy, eh?
the peg holders and a few other little tidbits will be this color, and the swingarm will be chrome powdercoated. i hope it doesnt look stupid against my polished frame.
any idea how to remove the swingarm bearings without damaging them?
i will be modifying the wiring harness off of the cbr gauges so that i can use the factory wiring connections for the VFR. i will have to add a few wires to the harness to run the speedo, but thats only one wire to the gauges and a tap off of ground and switched on. im going to revise the grounds and spliced connections on my harness as well. from what i have seen on the stock harness, wiring isnt one of honda's better points. i think my katana was far superior in that aspect.
anyway, i just recieved a GSXR regulator off of ebay that i will post pictures of today sometime. it is double wired on the positive and negative leads. pretty sweet if you ask me. i will be eliminating the main fuse on the solenoid and using a 4 wheeler solenoid without fuse. the main fuse will be a larger maxi fuse that is ran with 14 gauge or possibly 12 gauge wire.
overall i was a little dissapointed with the masking job the powdercoaters did on the wheels. but i managed to scrape all the powder off so all is well. hopefully it looks just as good on the bike. hopefully the swingarm is done soon. ill be sending off money for my 929 shock this week, so i can put her back on two wheels after i get some tires.
VTR1000 innards. will be running the rods and caps from the VTR and the valves from the VFR. high flow SHOWA instead of the HMAS setup currently on it. ill keep the HMAS around tho, just so i can bore em out and port them for future use.
and here is the regulator from a fuellie Gixxer. i cant remember the year, possibly 04? anyway, here it is. notice the double wiring and overall heavier gauge wiring on the suzuki part. this is somewhere that suz got it right. and i will be taking full advantage of it :-D
i took off the HMAS stuff and cleaned up some of the parts. i did not measure or count the shims.
i sanded the notches out of the Showa ports and ported the entry paths a bit. so hopefully i reduced some of the turbulence that the oil would have to overcome when in situ.
ok here are a few of the parts that i have in my posession.
swingarm in powdercoat chrome. its not anywhere near as shiny as chrome, but at least it will match the fork lowers and the outer star of the cush drive.
heres the rearsets and brake pedal. i was a dumbass and forgot to take the shifter to the coaters, so i will have to have that go out on the next load. hopefully the next one is the last. i keep forgetting things....
nevermind that piece of cloth on the last one. its padding the brake lever from messing up the coating on either it or the rearset. i had to chisel some of the material off of it to get it to seat properly on the spindle that it mounts to. oh well, all in a half hours work haha
i was under the impression that the bore sizes were different. if this is not true then i have way more options for master cylinders.
anyway, i have an actual progress update! i know, its amazing.
i spent some time modifying my Nissin calipers from teh F4i today so that they would bolt up to my VTR1000F/Firestorm fork lowers. to mount them you have to grind/machine some stock off of the middle mount. i split them in half and mounted them in the mill at work. i didnt take a picture of the process used, but basically stuck the machined parts on some 1-2-3 blocks and used a 1/2" endmill to cut the notches. worked like a charm. it was kind of a trial and error thing, but they now bolt up. lets just hope that they arent too thin in the places that count.
first picture, the notch made in the caliper. other side mirror image [image: Posted Image]
second, is the clearancing of the freshly powdercoated lowers. i will put some clear on those for those of you worried about corrosion.
i also cleaned my stator and applied a coating of air dry varnish to it. lets hope its oil resistant, cause that stuff probably wouldnt work wonders on an oil pump.
no pics of that tho. i did some finish work to my freshly powdercoated side covers too. i learned a valuable lesson today about powdercoatings: they DONT like non-chlorinated brake cleaner. at all. or carb cleaner. so i gotta watch out for that next time. i have a nasty spot on my fork lowers that thankfully is covered up by the fender in the inside.
and just so you can see the man behind the madness, here i am a few years ago at wrigley field before a finch show at the metro just down the road. go cardinals! [image: Posted Image]
i was under the impression that the bore sizes were different. if this is not true then i have way more options for master cylinders.
anyway, i have an actual progress update! i know, its amazing.
i spent some time modifying my Nissin calipers from teh F4i today so that they would bolt up to my VTR1000F/Firestorm fork lowers. to mount them you have to grind/machine some stock off of the middle mount. i split them in half and mounted them in the mill at work. i didnt take a picture of the process used, but basically stuck the machined parts on some 1-2-3 blocks and used a 1/2" endmill to cut the notches. worked like a charm. it was kind of a trial and error thing, but they now bolt up. lets just hope that they arent too thin in the places that count.
first picture, the notch made in the caliper. other side mirror image [image: Posted Image]
Very nice project you got there. Did you get the VTR front fender or do you plan on using the VFR one? Also, don't forget that you will need a longer front axel.
alright. i've come to a point in my build where i have to make a decision.
i really dont want to use the CBR900 gauges that i currently have. i would rather use a cbr1000RR setup instead or possibly the 954/929 unit. so, do i keep what i have and just deal with it, even tho i want something else, or should i modify it to work on a 3rd or 4th gen and sell it to one of you fine gentlemen, sell it on ebay as a stock replacement part, or just keep it around?
if i keep it, i will be using the VFR gauge harness and modifying it a bit so that it works with the CBR cluster. all i really have to do is shorten a few things and get rid of a few illumination lights. and possibly change the bulb holders over. that shouldnt be too bad.
i really just like the looks of the trapezoid cluster of the 1000RR. it is one fine unit. but i dont know how the temp gauge works very well. it looks like the wiring for it goes into the cpu and not to the gauge. anyone have any idea how those work?
i scored an evening job, so even tho i wont have as much time to work on the bike, i will have more money to burn on it, hence it will get done faster.
i have decided to not bother with trying to get ahold of an F4i cluster. what i have will work and wont cost me an arm and a leg.
anyways, i de-pinned the CBR clocks and i have to shorten a few wires so that they are all the same length. i will reuse one of the cbr plugs and steal the other plug from the VFR gauge cluster harness. i feel this is easier and involves alot less splicing.
on the main harness side of it i will be using the stock fuel sending wire to run the speedometer. i could just use a bullet connector, but i really dont like the idea of that on the speedo line and i also plan on moving the fuel gauge to one of the inside top fairings. it would just look too cluttered with it up top. however that location might not work out too well.
im also going to chop almost all of the stock fairing brace apart to use with the cbr fairing stay. more on this at a later date.
alright, i have an update, but with no pics. apparently i lost my micro-SD card adapter. ill have to find it before i can post some pics.
anyway, i finished the halo headlight conversion for the 900rr headlight. i am pretty happy with it as a whole, but not with the headlights themselves. the cheap-o APC halo lights i ended up with have one lense that is crooked, so hopefully nobody will notice it. they also have a stupid ass parking light that i really wish they didnt have, but i cant really change that right now so ill just put a strobe or something in there.
all u have to do is cut the old headlight off of the bucket adapter and glue in the other ones after you either file off the mounting stubs from the lights or cut notches into the headlight frames.
im going to wire the halos to only come on when i have all the other lights on the bike on. this bike will have lights underneath it, on the tail section, and something to illuminate the fender/front tire area.
this is of course the front side. its pretty nice if you ask me. one of them is a little slanted, but i think that its fine. if i dont like them i can just buy new ones for the cbr.
i made a few tools at work to remove the lock nuts from my engine mounts. just used a 1 1/8 12 point for the swingarm and a 7/8 12 point for the engine mounts. [image: Posted Image]
and i sanded one side of my frame all the way to 2000 grit and bufffed a small portion of the top of the frame with black compound and a sisal wheel. looks nice. it motivated me to mask off and paint most of my engine. ill get pics of that up when its done.
i also polished the one side of my frame last night and boy does it look sexariffic. i took my entire clutch system apart as well (the lever operated stuff) and my master cylinder was full of nasty shit, and the slave was pretty corroded. i took care of all that, and now i have to paint the master black to match my F4i master cyl. and the slave will get a nice coat of paint as well, cause its all flakey and whatnot.
pics of frame to come soon.
i can actually startgetting this bike in one piece soon!
so i assembled my forks/front end tonight. a few things to note when using VTR1000 lowers with F4i brakes: you will have to clearance the caliper for mounting to the vtr lower, and shimming the caliper over so that its centered over the rotor is also a good idea. mine doesnt drag anywhere, but its clearly not centered. i think a washer between the caliper and the fork lower will take care of the problem. also, stock F4i lines worked on my setup! bear in mind im using woodcraft clipons, so on a stock vfr they probably wouldnt work. so the brake lines i HAD for the F4 will work just fine, and i will have to purchase them back from the chick i sold them to. no biggie, she already agreed to it.
anywho, fork specs are as follows:
racetech C33 stack on stock 3 port showas, with 1mm bleed (notches removed)
rebound is changed to racetech specs
VTR1000 guts
.90 springs
5w belray fork oil (it was local and cheap, alright!)
150mm oil height. this is an experimental height, i couldnt find the spec so i took a shot in the dark and made that up.
and for some pics!
[image: Posted Image]
stock F4i lines. i guess since the attatchment point is so high on the caliper the shorter lines just work. im happy about it, and VERY glad i didnt order front lines yet!
[image: Posted Image]
this is everything on the throttle side. that cheap ass throttle part is going in the trash. cant put a stock honda grip in it or it binds and rubs. no good!
[image: Posted Image] [image: Posted Image] [image: Posted Image]
im not suree how clear you can see what im talking about, but the caliper needs to go inward about the thickness of a washer. ill give that a try tomorrow and see what it gets me. it does NOT rub and would probably be fine the way it is, but i dont like it, so im going to fix it.
[image: Posted Image]
and this part just sucks. i cant move the master cylinder further on the clip on due to the reservoir hitting the clip on clamp assembly. if i can find a 5/8ths master with a remote reservoir i will probably use it. anyone have one? would 954 work? the R6 stuff i have here is only 14mm master, and i dont think it would be adequate.
anyway, im tired. goodnight all
ps, the bike looks like a chopper cause it doesnt have a rear end on it, so the frame is basically on the ground. as soon as im done polishing that will change. i suspect that it will be a rolling chassis by the end of the week. WITH engine installed.
i picked up some 8mm washers from the local ace hardware to see if they would fix my brake calpier mis-alignment. lo and behold it worked flawlessly! i didnt take a picture, but its just like the other ones but centered. i need to get a fender now. im getting the goodridge lines i sold back so ill be putting those on soon. i would use the f4i lines but they wont mount up right.
anyway, i made various lengths of pvc preload spacers at work on the mill. heres an in-action shot [image: Posted Image]
also, i made this really trick mod that i found in another post for removing the frankenbolts and replacing them with ball lock pins. i ordered some pins from mcmaster carr that would fit INSIDE the threads on my seat so that i wouldnt have to drill them out. i want to be able to bolt the seat back on once i get everything figured out. here they are [image: Posted Image]
other than that i didnt do anything tonight. i think tomorrow i will at least finish the sanding on the other side of the frame and possibly the polishing.
i spent the entire day with my dad and my buddy busa and got the tail section sorted. we started about 10ish in the morning and ended at about 5 this evening.
tail is stock cbr900rr aluminum unit. heavily modified to fit onto a vfr. the only real issue i didnt like about how we mounted it was the upper spars, but i really dont have much of a choice, it had to be done this way.
the frame had to be modified slightly. all the holes except for the already tapped one were drilled out and tapped for a 14x1.5 thread so i can get threaded inserts to bring it back down to the stock 10x1.25 thread. and the upper frame horns had to be ground a little bit on the very ends to get the strap mount to line up with everything and not need spacers or anything. a totally new lower mount was fabbed for the subframe and welded in with the shops spool gun. its nice to have things like that at my disposal!
here you can see the strap thing my father fabbed to try and get everything straight and measured up with the right angles and lengths and whatnot. i printed out a few nice straight in side shots of a vfr and a cbr off of bikepics.com and got out the ol protractor. in the end it worked out great and i love how the bike looks with this tail.
[image: Posted Image]
heres another one, but with the seat on. a fiberglass wrap will be made to cover the tank and side areas. eventually the tail and that wrap piece will be one whole unit, courtesy of either shark skins or my own custom fiberglass work. oughta look pretty damn nice in the end.
[image: Posted Image]
heres the new welded on lower mount. its made from .75 thick aluminum plate that i machined down and drilled to fit inside the frame tube. the side and the bottom were cut out to fit this, and then welded in place. the weld is strong and holds nicely. a spacer is needed, about .15 inch each side so that it doesnt spread the lower frame rail out when you tighten the bolts. i think a few washers will work for this, but i turned an aluminum one for each side anyway. should work nicely.
[image: Posted Image]
heres how the upper frame mount was made. thats a piece of 3/16 stainless sheet that was cut and fashioned onto the subframe by my father. inside the tube of the subframe is an aluminum plug that i made on the mill and shoved inside the tube. no worries about crushed tubes here. although the bolts are not stainless, i think i will just red locktite them and paint them so they dont rust. in fact i will probably paint the whole subframe black just to hide the welds and mods.
[image: Posted Image]
heres a nice shot of the clearance between the 929 reservoir and the battery box. i hope to GOD that the exhaust doesnt hit the box or the subframe or else im in trouble. if i have to do any more subframe mods i will be intensely angry. however upon checking out the stock vfr undertail its really not that more into the frame than before so i might be alright. at least i sure hope i am.
[image: Posted Image]
heres how she looked at the end of the day. 7 hours of work paid off well!
all attachment bolts will be installed from the inside out, so no bolt heads showing on the outside to interfere with my plastics. i will probably have to trim up the stock 900rr tail parts just to fit them onto the vfr. which really doesnt bother me too much, cause i wont be using them for terribly long anyway.
i SO wish i had a 4th gen tho, it would have been alot easier. but this is what i have, so i wont complain! i think she will be a nice ride!
yes for you that might be a bad thing for them to know. where do you work at again?....
anyway, i threw the tail plastics and seats onto the subframe and took a few pictures. no cutting of the stock cbr900rr bodywork necessary! i STILL wish i had a 4th gen tho. would look MUCH better....
i did some polishing today, the frame will look just as good as it did when i tried to clear it. a fact that makes me incredibly happy.
also, i e-mailed sharkskinz about getting a fairing made with no headlight holes but with mounts molded on. they said i can get it. so when i get the fairing im mounting up the headlights, marking the holes, cutting them out, and glassing in the recesses so it looks just like an rc45/30 (without the silly contours that the 900rr has). i think it will be something like 250 for it. not a bad deal. then 180 a piece for the lowers and i will have almost all the fairings i need for this bike.
i also decided to put the fuse box under the seat. i dont want it hanging out in the wind up front. most hondas have them under the seat anyway.
i also have plent of clearance between the exhaust and the undertail, so that issue is moot.
however my up pipe for my high mount doesnt seem like its going to be where i want it to be, and i may have to cut something like 4" out of the can. something i do not relish in doing.
both pictures are from the auctions so nevermind that they are copies. ill take pictures when i get them in my hands and whatnot.
but i will be switching my wheels in the future to this setup and running my YZF forks with a F4 wheel and probably ducati snowflake rotors. but first i want to get everything working with the hybrid front forks so that i can confidently sell them knowing they work fine.
[image: View Post]flyguyeddy, on Feb 24 2008, 07:14 AM, said:
[image: View Post]SAFE-T, on Feb 23 2008, 01:21 PM, said:
For those of you who have a '90-'97 VFR750, converting the rear spindle for a Ducati wheel is fairly straightforward.
is it? i dont have the parts on hand yet to know for sure. i had almost had myself convinced i had to make a custom hub to fit it into my swingarm, being as i do not want to use the ducati part. i also dont want to have to weld a piece to my stock axle, and have to modify it to work with pins on a different bolt pattern.
Once you have the Ducati spindle you can compare it to the VFR's.
Since you have access to machining equipment, just make a press fit, hollowed axle that goes inside the VFR spindle. I secured mine with a nyloc nut on the cush drive. Drill and press fit RC45 drive pins along the same diameter circle as the Ducati spindle. You will have to machine off some material from the back side of the Honda rear brake caliper to clear the Ducati wheel but it will all work fine.
I did one for Swiffer's '94 VFR750, which he then fitted a 6" wide Marchesini to. Did track days and such on it before he decided to big bore the motor...
[image: View Post]flyguyeddy, on Feb 24 2008, 05:13 PM, said:
if i plan on using the ducatis rear brake caliper would i be alright? i think i want to use the ducati spindle but like i said before i dont have one handy to compare and my spindle is currently holding my bike up. so thats another quandry i have to work out.
press fit, like 1 or 2 thou interference? i can then shrink the thing in at work with liquid nitrogen. should it go all the way through to the cush drive? i would rather weld it so that i can use a regular vfr rear wheel stand.
i need to get that dang thing here before i start making rash decisions.
No idea if you can use the Duc's rear caliper - I managed to fit the Ducati's brake stay on my 800's eccentric, and then did some various machining/re-aligning of other parts to make it work, but the press-fit axle into the Honda's spindle was easier and looked better IMHO.
I highly doubt you can use the Ducati spindle in the VFR750's eccentric - it didn't seem to want to work in the 800's, but you should still check it out for yourself.
I have no idea what the specs on the press fit are in terms of interference, but the axle I had made goes all the way through to the cush drive side and is secured there with a nyloc nut.
[image: Posted Image] Modified a Ducati rear brake stay and the VFR torque rod
[image: Posted Image] This is the modified spindle assembly for the rear wheel
[image: Posted Image] 015.jpg 015.jpg
As for welding, it was the opinion of the driveline machinist and others that welding a rotating part to secure it was not recommended.
As you said, wait until you get the parts, compare them a bit and I think you will find things make a lot more sense one way or the other.
You know, just when I THINK I know what I'm going to do, someone jumps up with another idea. OK, so if I follow this correctly (Safe-T, flyguyeddy, gll429, etc, etc.) it is not only possible, but relatively easy to run the Ducati drive in the VFR rear end by axle conversion? Not swapping the whole rear end?
Here I go again. Just when I thought I had the rear end all figured out. Not my VFR, but the RC211V replica just got a little more "authentic", I just don't know.
OK, go slow and explain it to me one step at a time, please!
OK, here what i did..
pressed out the vfr stud bolts...
drilled a 9/16 hole next to the bearing area (all the way through both sides).. found a fork tube and machined it down so it could be press fit into the vfr hub..
welded tube in place at the drilled holes.. welded tube at the face.. machined the raise lip down to the size of the duc 916 wheel..threaded end of new pipe..
the sleeve that i had on the spindle fell off.. and some flash stuck to the spindle.. so i filed it down.. looks worse than it is.. needs to shaved a tiny bit..and have duc stud holes drilled.
[image: View Post]vfrrider, on Feb 26 2008, 05:36 AM, said:
OK, so if I follow this correctly (Safe-T, flyguyeddy, gll429, etc, etc.) it is not only possible, but relatively easy to run the Ducati drive in the VFR rear end by axle conversion?
Ummmmm....no :wacko:
You 'might' be able to put the entire Ducati final drive - eccentric, spindle, cush drive, rear caliper, etc into the VFR's swingarm by fabricating a cylindrical spacer and adapting the rear caliper stay to work with the VFR's setup. I have looked at this pretty closely and have all the Duc/VFR parts, while Varium is actually attempting to assemble one.
You CAN convert the VFR750's rear spindle by making a press-fit axle that goes INTO the VFR's spindle and drilling press-fit holes in it for RC45 drive pins - you could also use Ducati pins but they are more expensive. This is what I did for my VFR800 and Swiffer's VFR750. The driveline machine shop that did Swiffer's took all their measurements from a Ducati spindle and even gave it the same slight taper - and it was almost impossible to see where the old spindle and press-fit peice joined - very nice work. These guys make stuff for the oil and gas industry that HAS to be good because it is getting shipped 900 miles into the middle of freaking nowhere. Luckily the Italian owner (Tony) likes motorcycles.
For Swiffer's '94 VFR750 the only other modification necessary was to machine the Honda's rear caliper to clear the Ducati wheel, which Jonas did himself.
I looked at numerous ways to reposition/shim my '99 VFR800's caliper to clear the Ducati's wheel shape- you need to find about 5mm and unfortunately there just isn't that much real estate available.
now i could be wrong in the following parts, so bear with me
[image: View Post]vfrrider, on Feb 26 2008, 10:44 AM, said:
So, I get a spare VFR spindle, adapt it to Ducati axle and slide into VFR eccentric using Ducati rear caliper mount and shave caliper to miss new Ducati rear wheel. Save old spindle assembly and rear caliper bracket as spares, just in case. Does that just about summarize coversion process?
Anyone want to volunteer to make a spindle for me? Bueller, anyone out there (sound of crickets chorping in the silence). Could be a thriving business op here, Rivcyko?
Larry
VFRrider
to make the VFR spindle work you will have to make something like what safe-t has shown. the drive pin holes will have to be drilled, and you will probably have to cut notches into your wheel to make the rear brake rotor bolts clear. (couldnt you just tap them and use bigger bolts to hold on the rotor? just daydreaming here...) the VFR brake stay will have to be used. shave the caliper for clearance. now i really dont like the idea ofa shaved caliper, cause those ridges are on there for a reason. anywho...
heres what i may try doing if everything is equal
i like how varium did it with the split collar spacer, but i will make mine a tube without splits and shrink it onto the ducati hub, then install into my VFR. i do not know what the measurements are on the ducati stuff but i plan to take my axle out and find out what mine are.
does anyone have an axle that they could put onto a nice piece of marble on some 1-2-3 blocks and get me some measurements as far as hub thickness, rotor mount, roller bearing race length and where the shoulder is on the second set of bearings? i can do the same with what i am getting and post my findings. everything i know about this will be public knowledge and i will keep no secrets. i hate it when people do that.
i have a contour SVT and there is a guy who does engine swaps for them and has a few secrets up his sleeve he wont share. i have figured out a few of them but its irritating to not know the others.
anyway, someone try and get me some measurements. i want accuracy to the thousandth.
well i got the goods. i now know for sure that the axle from teh ducati will not fit into the VFR hub. this has been said before so its no big surprise. (that being said i didnt doubt anyone on the matter just wanted to measure and see how far off)
anywho, heres what i got. the cush drive end has a little bit of road rash that i tried to turn out but that axle is some damn hard stuff!
anyway the ducati roller bearing journal is 42mm and the VFR is something like 50?
pin drive circle is 85mm diameter
brake rotor circle is 125mm with an ID of the rotor at 108.1 mm to fit against the machined lip.
the hub itself is 98mm in diameter at the actual part that gets clamped and the hub is 81mm long on the part that would be inside the swingarm. i would assume that this is common for ALL of the older ducati SSSA bikes. mine is from a 2004? 998.
[image: View Post]vfrrider, on Apr 19 2007, 02:10 PM, said:
Flyguy,
Yeah, where's the RC30 rear hub and front and rear Marchesini wheels?
How about shotgun exhausts, very WSB, especially on the left side?
On the paint, if you like blue, the Candy Aleutian Blue (Honda color) is available at Color Rite and looks dynamite.
I always thought the blue from anodizing looks great, how about a full hard anodized frame?
Mad Doctor in Italy makes some cool looking rear ends that imitiate the RC211V look, with center up exhaust can?
Just a few thoughts, nothing you can't handle with $ cubed.
Larry
VFRrider
Just thought everyone with the desire for a single nut rear wheel would enjoy this.
VFR spindle adaptors were originally made by the previous Dymag importer in Florida. We bought the last several that they had for $800 each. It is the complete axel/spindle replacement to use the single axle wheels. They stopped producing them several years ago and if the winner wants one, we will put up a private auction for our cost of $800
And the auction is for a OEM RC45 rear wheel. Like to bet where this price will end up. If you have to ask, its too expensive.
just to make a brief update, i picked up a used vfr head from ebay and im going to use it to space out my throttle bodies. i also have new shaft material for them and just need to get all my measurements from the spare head so i can get to work.
the sharkskinz fairing i bought is going to have to get modified cause they put the headlight mounts in wrong. no big deal, its just that i paid 50 bucks for a modification that im going to have to do on my own anyway. kinda shitty but what can you do?
[image: View Post]gll429, on Mar 11 2008, 11:40 PM, said:
hey, does the vfr cush drive fit on the duc spindle?
i dont know i will have to check. im thinking it probably doesnt but it would be nice if it did! i HATE the way ducati has they're cush drive setup! and quick change sprocket carriers are EXPENSIVE!
great work guys....highly entertaining....you need to send this project in to Performance Bike magazine when its done as they have a regular featured article in the "Build It" section....they love this kind of stuff.
ok, folks im going to get back onto this here pretty soon. probably this week i will be laying out the harness and shortening/lengthening things to fit where i want them to be.
anyway, i have been tossing around the idea of going with vfr800 radiators or something similar to it. what do u guys think about it? i wouldnt mind having the access in front of the engine for COP and an air snorkle. the current radiator kinda gets in the way of that and i really dont want to shell out the cash for the custom radiators i have seen on here by the likes of VFROEM (which has a BEAUTIFUL 3rd gen, of which i am jealous of).
thinking of getting an electric water pump and running it without a fan, since the fan is kinda in the way of the left side of the engine/frame rail. or maybe put the fan on the very front and make some kind of ductwork to the radiators. like air scoops inside the fairing.
I'm sure you've thought of it but will the side mount radiators fit inside the fairing? Might add a lot of width to the bike visually
Been reading the thread, good work, looking forward to how it comes out
[image: View Post]flyguyeddy, on Jan 23 2009, 01:15 AM, said:
so i picked these bad boys up on ebay for like 50 bux and i think im going to give them a try on this bike. any thoughts?
One of the driving decisions on what bodywork I would use on my RCBVFR was radiator placement. Originally, I really wanted to go with a RC51 front end based on looks alone but it has side rads. Side rads are IMO a compromise in terms of thermal efficiency and accidental damage. Serious privateer RC51 racers spent about $1k to convert to front rads.
So, I saved myself a bunch of headaches and went with the CBR bodywork designed for a front rad and bought an RC51 too! :)
[image: View Post]FotoMoto, on Jan 26 2009, 10:08 PM, said:
[image: View Post]flyguyeddy, on Jan 23 2009, 01:15 AM, said:
so i picked these bad boys up on ebay for like 50 bux and i think im going to give them a try on this bike. any thoughts?
One of the driving decisions on what bodywork I would use on my RCBVFR was radiator placement. Originally, I really wanted to go with a RC51 front end based on looks alone but it has side rads. Side rads are IMO a compromise in terms of thermal efficiency and accidental damage. Serious privateer RC51 racers spent about $1k to convert to front rads.
So, I saved myself a bunch of headaches and went with the CBR bodywork designed for a front rad and bought an RC51 too! :)
so are side radiators more thermal efficient?
yea i can see where the accident forgiveness goes away, but i want COP and an air snorkel and cant have either with a front radiator and fan taking up all my real-estate.
i have been thinking electric water pump to berid myself of a fan. thoughts?
[image: View Post]flyguyeddy, on Jan 26 2009, 10:18 PM, said:
so are side radiators more thermal efficient?
yea i can see where the accident forgiveness goes away, but i want COP and an air snorkel and cant have either with a front radiator and fan taking up all my real-estate.
i have been thinking electric water pump to berid myself of a fan. thoughts?
Do you see side rads on any MotoGP bikes? :)
I'm not saying they won't work but with a cbr900 fairing never designed to move air to side rads PLUS them not being in the natural air flow direction anyway might (OK, I think will) lead to heat issues; either engine cooling or rider heating. If it were me, I do the rad mods first and see what, if any, difference it has. Then if it works, do the COP/snorkel mods next. FWIW
[image: View Post]FotoMoto, on Jan 26 2009, 10:48 PM, said:
[image: View Post]flyguyeddy, on Jan 26 2009, 10:18 PM, said:
so are side radiators more thermal efficient?
yea i can see where the accident forgiveness goes away, but i want COP and an air snorkel and cant have either with a front radiator and fan taking up all my real-estate.
i have been thinking electric water pump to berid myself of a fan. thoughts?
Do you see side rads on any MotoGP bikes? :)
I'm not saying they won't work but with a cbr900 fairing never designed to move air to side rads PLUS them not being in the natural air flow direction anyway might (OK, I think will) lead to heat issues; either engine cooling or rider heating. If it were me, I do the rad mods first and see what, if any, difference it has. Then if it works, do the COP/snorkel mods next. FWIW
well i had planned to modify the opening of the 900rr fairings to be more side radiator friendly. and i had planeed to make scoops to the front of the fairing to channel air to the side radiators. something that would sort of wrap around the radiator on teh back and not allow wind to go by it thus channeling it into the radiator. i also thought a small fan in front of these scoops would help at slow speeds or in traffic.
thoughts? i guess i could keep everything from the conversion so i could just go back if need be. no point in getting rid of anything stock if im going to use it!
[image: View Post]flyguyeddy, on Jan 27 2009, 09:23 AM, said:
and i had planeed to make scoops to the front of the fairing to channel air to the side radiators. something that would sort of wrap around the radiator on teh back and not allow wind to go by it thus channeling it into the radiator. i also thought a small fan in front of these scoops would help at slow speeds or in traffic.
thoughts? i guess i could keep everything from the conversion so i could just go back if need be. no point in getting rid of anything stock if im going to use it!
I can't find a direct link to Thorsten's air scoops for the '51 but here's the German site:
Click on the "product/info" link on the left hand side for info and pics.
In case my directions are confusing, here's a partial copy/paste of some of the details:
Radiator Air-Scoops
Pressurize your Radiators with cool Air !
Learned that from my 999 Vx-Project.
Designed to fit at every RC51 .
At the Modelwork I've paid attention that those Ducts even fit with Fans ! A btw. Advantage: with Engine running but Bike stands still there's no heat-exchange from Engine/Frame/Headers to Radiator . The Maximum for your Bike !Available now , Carbon or Glass ,Weight : 230 gr (1/2 lbs) for both ducts .
The bang for the buck :
1. double to triple amount of Air, which can reach the Radiators, through maximum usage of available Space
2. the good feeling, that no heat can reach the Rads while you stand still .
3.the opportunity the reverse the rotation of the Fans ( simple inevert the 2 wires ) so that the Fans then will pump the Air from inside to outside, so now then there's a way higher efficiency of cooling through the fans during riding
4. no further necessary rebuilt except to relocate the horn (fix it at the Engine-starter-screw) and to remove the PAIR-hose (but I assume nearly everyone has already done this )
5.Makes front-rads nearly superflouos.
6: more Horsepower, considered from the point, that you do not loose HP through unnecessary heat .
The Maximum you can do to your Rads......to your Bike....to you.
[image: View Post]FotoMoto, on Jan 27 2009, 09:40 AM, said:
[image: View Post]flyguyeddy, on Jan 27 2009, 09:23 AM, said:
and i had planeed to make scoops to the front of the fairing to channel air to the side radiators. something that would sort of wrap around the radiator on teh back and not allow wind to go by it thus channeling it into the radiator. i also thought a small fan in front of these scoops would help at slow speeds or in traffic.
thoughts? i guess i could keep everything from the conversion so i could just go back if need be. no point in getting rid of anything stock if im going to use it!
I can't find a direct link to Thorsten's air scoops for the '51 but here's the German site:
Click on the "product/info" link on the left hand side for info and pics.
In case my directions are confusing, here's a partial copy/paste of some of the details:
Radiator Air-Scoops
Pressurize your Radiators with cool Air !
Learned that from my 999 Vx-Project.
Designed to fit at every RC51 .
At the Modelwork I've paid attention that those Ducts even fit with Fans ! A btw. Advantage: with Engine running but Bike stands still there's no heat-exchange from Engine/Frame/Headers to Radiator . The Maximum for your Bike !Available now , Carbon or Glass ,Weight : 230 gr (1/2 lbs) for both ducts .
The bang for the buck :
1. double to triple amount of Air, which can reach the Radiators, through maximum usage of available Space
2. the good feeling, that no heat can reach the Rads while you stand still .
3.the opportunity the reverse the rotation of the Fans ( simple inevert the 2 wires ) so that the Fans then will pump the Air from inside to outside, so now then there's a way higher efficiency of cooling through the fans during riding
4. no further necessary rebuilt except to relocate the horn (fix it at the Engine-starter-screw) and to remove the PAIR-hose (but I assume nearly everyone has already done this )
5.Makes front-rads nearly superflouos.
6: more Horsepower, considered from the point, that you do not loose HP through unnecessary heat .
The Maximum you can do to your Rads......to your Bike....to you.
i like it!
thats what im talking about. but with a small car radiator fan or some kind of slimline fan in the front of it all for air movement.
im anticipating the stock fan not fitting in where the radiator wil have to go. its pretty thick and the vfr800 engine is a bit thinner overall and the fan looks to sit RIGHT up against the engine or very close to it. (according to pictures i requested in the 5th gen forum)
i have read that when i switch to an electric water pump and controller that fans are not needed. thoughts?
I'd like to go to an electric water pump, but am worried that it won't pump the required amount of water at the proper GPM. What kind of pump did you have in mind initially?
[image: View Post]douglasthecook, on Jan 27 2009, 11:19 AM, said:
I'd like to go to an electric water pump, but am worried that it won't pump the required amount of water at the proper GPM. What kind of pump did you have in mind initially?
the auxiliary water pump from a volkswagen or mercedes. you can find them easily enough on ebay.
[image: View Post]flyguyeddy, on Jan 27 2009, 09:00 PM, said:
then you should go find thorsten durbahn! he's the one who started the electric water pump on a vfr thing. http://durbahn.de/
but i think his is running wide open no thermal controller. im going to guess that vfroem has the controller.
What is a thermal controller? I'm guessing it's like a thermostat, where it turns the pump on and off? Why would this be necessary, couldn't the pump just run all the time? I'm not too good with some of this stuff, so if you could clarify, I'd really appreciate it, thanks!!!
[image: View Post]douglasthecook, on Jan 27 2009, 02:11 PM, said:
[image: View Post]flyguyeddy, on Jan 27 2009, 09:00 PM, said:
then you should go find thorsten durbahn! he's the one who started the electric water pump on a vfr thing. http://durbahn.de/
but i think his is running wide open no thermal controller. im going to guess that vfroem has the controller.
What is a thermal controller? I'm guessing it's like a thermostat, where it turns the pump on and off? Why would this be necessary, couldn't the pump just run all the time? I'm not too good with some of this stuff, so if you could clarify, I'd really appreciate it, thanks!!!
davies craig makes a controller that runs the pump in low voltage until it heats up then it maintains the engine temperature at whatever u set it at. neat little item really.
[image: View Post]flyguyeddy, on Jan 27 2009, 09:30 PM, said:
[image: View Post]douglasthecook, on Jan 27 2009, 02:11 PM, said:
[image: View Post]flyguyeddy, on Jan 27 2009, 09:00 PM, said:
then you should go find thorsten durbahn! he's the one who started the electric water pump on a vfr thing. http://durbahn.de/
but i think his is running wide open no thermal controller. im going to guess that vfroem has the controller.
What is a thermal controller? I'm guessing it's like a thermostat, where it turns the pump on and off? Why would this be necessary, couldn't the pump just run all the time? I'm not too good with some of this stuff, so if you could clarify, I'd really appreciate it, thanks!!!
davies craig makes a controller that runs the pump in low voltage until it heats up then it maintains the engine temperature at whatever u set it at. neat little item really.
Ok, I get it now, thanks for the info!!! I think this might wait until next winter, as I'd like to do some more research on what pumps I can use. Thanks again!!!
I would worry about not running the pump all the time becuase hot spots would develope in places that may not be the same as that measured by the Temp sending unit....plus TSU could fail.....that would be bad.
[image: View Post]Tightwad, on Jan 27 2009, 04:34 PM, said:
I would worry about not running the pump all the time becuase hot spots would develope in places that may not be the same as that measured by the Temp sending unit....plus TSU could fail.....that would be bad.
from what i can tell the unit is only not running for a small amount of time. it varies voltage to the pump to maintian a set temperature.
I have the Thorsten air scoops on my RC51. I can tell you this. They are molded tight to the rads, and the space around them. If you use them, you will have to mod them. The carbon fiber set is over $300. On the RC51, they are well worth the price.
[image: View Post]RustyA, on Jan 27 2009, 08:55 PM, said:
I have the Thorsten air scoops on my RC51. I can tell you this. They are molded tight to the rads, and the space around them. If you use them, you will have to mod them. The carbon fiber set is over $300. On the RC51, they are well worth the price.
i dont plan on buying the air scoops from him, im probably going to make my own. plus i dont thing the rc radiators are the same size as my stuff anyway, and the engine is different too.
however if u could get me a shot from the front of the bike showing the scoops i would appreciate it :biggrin:
[image: View Post]flyguyeddy, on Jan 28 2009, 04:16 PM, said:
[image: View Post]RustyA, on Jan 27 2009, 08:55 PM, said:
I have the Thorsten air scoops on my RC51. I can tell you this. They are molded tight to the rads, and the space around them. If you use them, you will have to mod them. The carbon fiber set is over $300. On the RC51, they are well worth the price.
i dont plan on buying the air scoops from him, im probably going to make my own. plus i dont thing the rc radiators are the same size as my stuff anyway, and the engine is different too.
however if u could get me a shot from the front of the bike showing the scoops i would appreciate it :biggrin:
hi project looking good mate slightly off topic but hoping somwonw on where could help me im in new zealand and looking for a faring kit for my 94 vfr750 rc36 im looking for a rvf kit to fit rc45 doesw aly one know a company that could make one or suply??
any help apprechated also ive seen a cbr900 headlight used is this the same????
I have some red and some blue leds that would fit in there pretty well. They're clear when off, so you could wire the halos and blue leds to the same switch to get a cool effect...
[image: Posted Image]
heres the two vfrs i own. i wanted to show off the bikes :) sebastian, can you see anything of interest in the picture? (hint, its on the table)
[image: Posted Image] [image: Posted Image]
heres the area that i have to fill with a scalped stock seat. if u can see the spot where the stock seat was, thats what im going to fill with the stock seat parts.
[image: Posted Image]
i think ill get one of those clear oval taillights from a trailer and glass into here. turn signals to go into the vents. could be sweet.
[image: Posted Image]
my fleet. at front, the r6, then the 86, then 91, and way over in the corner under the blue tarp buried behind tires is the 77kz1000. i buried it so i would not think about working on it or looking at it. i have two hondas to get done first :)
![[image: Posted Image]](http://i16.photobucket.com/albums/b5/Flyguyeddy/VFR%20pictures/DSCN0411.jpg)
![[image: Posted Image]](http://i16.photobucket.com/albums/b5/Flyguyeddy/VFR%20pictures/0422071839.jpg)
![[image: Posted Image]](http://i16.photobucket.com/albums/b5/Flyguyeddy/VFR%20pictures/0422071839a.jpg)
![[image: Posted Image]](http://i16.photobucket.com/albums/b5/Flyguyeddy/VFR%20pictures/0422071840.jpg)
![[image: Posted Image]](http://i16.photobucket.com/albums/b5/Flyguyeddy/VFR%20pictures/0422071841.jpg)
![[image: Posted Image]](http://i16.photobucket.com/albums/b5/Flyguyeddy/VFR%20pictures/0422071841a.jpg)
![[image: Posted Image]](http://i16.photobucket.com/albums/b5/Flyguyeddy/VFR%20pictures/0422071842.jpg)
![[image: Posted Image]](http://i16.photobucket.com/albums/b5/Flyguyeddy/VFR%20pictures/0422071842a.jpg)
![[image: Posted Image]](http://i16.photobucket.com/albums/b5/Flyguyeddy/VFR%20pictures/0422071844.jpg)
![[image: Posted Image]](http://i16.photobucket.com/albums/b5/Flyguyeddy/VFR%20pictures/PICT0001-1.jpg)
![[image: Posted Image]](http://img412.imageshack.us/img412/4955/vtrcaliperuz1.jpg)
![[image: Posted Image]](http://i16.photobucket.com/albums/b5/Flyguyeddy/VFR%20pictures/Picture.jpg)
![[image: Posted Image]](http://i16.photobucket.com/albums/b5/Flyguyeddy/VFR%20pictures/0502072037.jpg)
![[image: Posted Image]](http://i16.photobucket.com/albums/b5/Flyguyeddy/VFR%20pictures/0502072105.jpg)
![[image: Posted Image]](http://i16.photobucket.com/albums/b5/Flyguyeddy/VFR%20pictures/0506072156.jpg)
![[image: Posted Image]](http://i16.photobucket.com/albums/b5/Flyguyeddy/VFR%20pictures/0506072239.jpg)
![[image: Posted Image]](http://i16.photobucket.com/albums/b5/Flyguyeddy/VFR%20pictures/0506072240.jpg)
![[image: Posted Image]](http://i16.photobucket.com/albums/b5/Flyguyeddy/VFR%20pictures/0506072245.jpg)
![[image: Posted Image]](http://i16.photobucket.com/albums/b5/Flyguyeddy/VFR%20pictures/0506072245a.jpg)
![[image: Posted Image]](http://www.verycoolparts.com/DSC04604.JPG)
![[image: Posted Image]](http://i16.photobucket.com/albums/b5/Flyguyeddy/VFR%20pictures/0508072242.jpg)
![[image: Posted Image]](http://i16.photobucket.com/albums/b5/Flyguyeddy/VFR%20pictures/0508072245.jpg)
![[image: Posted Image]](http://i16.photobucket.com/albums/b5/Flyguyeddy/VFR%20pictures/0508072245a.jpg)
![[image: Posted Image]](http://i16.photobucket.com/albums/b5/Flyguyeddy/VFR%20pictures/0512071458.jpg)
![[image: Posted Image]](http://i16.photobucket.com/albums/b5/Flyguyeddy/VFR%20pictures/0512071458a.jpg)
![[image: Posted Image]](http://i16.photobucket.com/albums/b5/Flyguyeddy/VFR%20pictures/0512071508.jpg)
![[image: Posted Image]](http://i16.photobucket.com/albums/b5/Flyguyeddy/finch%20show/1ffc7e4f.jpg)
![[image: Posted Image]](http://i16.photobucket.com/albums/b5/Flyguyeddy/VFR%20pictures/0606072153.jpg)
![[image: Posted Image]](http://i16.photobucket.com/albums/b5/Flyguyeddy/VFR%20pictures/0606072154.jpg)
![[image: Posted Image]](http://i16.photobucket.com/albums/b5/Flyguyeddy/VFR%20pictures/0610071954.jpg)
![[image: Posted Image]](http://i16.photobucket.com/albums/b5/Flyguyeddy/VFR%20pictures/0830071851.jpg)
![[image: Posted Image]](http://i16.photobucket.com/albums/b5/Flyguyeddy/VFR%20pictures/0830071851a.jpg)
![[image: Posted Image]](http://i16.photobucket.com/albums/b5/Flyguyeddy/VFR%20pictures/BPFS-0011.jpg)
![[image: Posted Image]](http://i16.photobucket.com/albums/b5/Flyguyeddy/VFR%20pictures/0901071434.jpg)
![[image: Posted Image]](http://i16.photobucket.com/albums/b5/Flyguyeddy/VFR%20pictures/0901071435.jpg)
![[image: Posted Image]](http://i16.photobucket.com/albums/b5/Flyguyeddy/VFR%20pictures/0901071952.jpg)
![[image: Posted Image]](http://i16.photobucket.com/albums/b5/Flyguyeddy/VFR%20pictures/0901071958.jpg)
![[image: Posted Image]](http://i16.photobucket.com/albums/b5/Flyguyeddy/VFR%20pictures/DSCN0409.jpg)
![[image: Posted Image]](http://i16.photobucket.com/albums/b5/Flyguyeddy/VFR%20pictures/DSCN0406.jpg)
![[image: Posted Image]](http://i16.photobucket.com/albums/b5/Flyguyeddy/VFR%20pictures/DSCN0408.jpg)
![[image: Posted Image]](http://i16.photobucket.com/albums/b5/Flyguyeddy/VFR%20pictures/DSCN0407.jpg)
![[image: Posted Image]](http://i16.photobucket.com/albums/b5/Flyguyeddy/VFR%20pictures/DSCN0413.jpg)
![[image: Posted Image]](http://i16.photobucket.com/albums/b5/Flyguyeddy/VFR%20pictures/DSCN0438.jpg)
![[image: Posted Image]](http://i16.photobucket.com/albums/b5/Flyguyeddy/VFR%20pictures/DSCN0433.jpg)
![[image: Posted Image]](http://i16.photobucket.com/albums/b5/Flyguyeddy/VFR%20pictures/DSCN0440.jpg)
![[image: Posted Image]](http://i16.photobucket.com/albums/b5/Flyguyeddy/VFR%20pictures/DSCN0439.jpg)
![[image: Posted Image]](http://i16.photobucket.com/albums/b5/Flyguyeddy/VFR%20pictures/DSCN0443.jpg)
![[image: Posted Image]](http://i16.photobucket.com/albums/b5/Flyguyeddy/VFR%20pictures/DSCN0435.jpg)
![[image: Posted Image]](http://i16.photobucket.com/albums/b5/Flyguyeddy/VFR%20pictures/0918071646.jpg)
![[image: Posted Image]](http://i16.photobucket.com/albums/b5/Flyguyeddy/VFR%20pictures/0918072129.jpg)
![[image: Posted Image]](http://i16.photobucket.com/albums/b5/Flyguyeddy/VFR%20pictures/DSCN0454.jpg)
![[image: Posted Image]](http://i16.photobucket.com/albums/b5/Flyguyeddy/VFR%20pictures/DSCN0457.jpg)
![[image: Posted Image]](http://i16.photobucket.com/albums/b5/Flyguyeddy/VFR%20pictures/DSCN0458.jpg)
![[image: Posted Image]](http://i16.photobucket.com/albums/b5/Flyguyeddy/VFR%20pictures/DSCN0459.jpg)
![[image: Posted Image]](http://i16.photobucket.com/albums/b5/Flyguyeddy/VFR%20pictures/0929071032.jpg)
![[image: Posted Image]](http://i16.photobucket.com/albums/b5/Flyguyeddy/VFR%20pictures/0929071036.jpg)
![[image: Posted Image]](http://i16.photobucket.com/albums/b5/Flyguyeddy/VFR%20pictures/0929071546.jpg)
![[image: Posted Image]](http://i16.photobucket.com/albums/b5/Flyguyeddy/VFR%20pictures/0929071642.jpg)
![[image: Posted Image]](http://i16.photobucket.com/albums/b5/Flyguyeddy/VFR%20pictures/0929071547.jpg)
![[image: Posted Image]](http://i16.photobucket.com/albums/b5/Flyguyeddy/VFR%20pictures/0929071704.jpg)
![[image: Posted Image]](http://i16.photobucket.com/albums/b5/Flyguyeddy/VFR%20pictures/0930071153c.jpg)
![[image: Posted Image]](http://i16.photobucket.com/albums/b5/Flyguyeddy/VFR%20pictures/0930071153b.jpg)
![[image: Posted Image]](http://i16.photobucket.com/albums/b5/Flyguyeddy/VFR%20pictures/0930071158.jpg)
![[image: Posted Image]](http://i16.photobucket.com/albums/b5/Flyguyeddy/VFR%20pictures/0930071153.jpg)
![[image: Posted Image]](http://i16.photobucket.com/albums/b5/Flyguyeddy/VFR%20pictures/0930071153a.jpg)
![[image: Posted Image]](http://i16.photobucket.com/albums/b5/Flyguyeddy/VFR%20pictures/1008071846.jpg)
![[image: Posted Image]](http://i16.photobucket.com/albums/b5/Flyguyeddy/VFR%20pictures/1008072154.jpg)
![[image: Posted Image]](http://i16.photobucket.com/albums/b5/Flyguyeddy/VFR%20pictures/ducatiebayhub.jpg)
![[image: Posted Image]](http://i16.photobucket.com/albums/b5/Flyguyeddy/VFR%20pictures/ducatiebaywheel.jpg)
![[image: Posted Image]](http://i164.photobucket.com/albums/u30/gll429/hub2.jpg)
![[image: Posted Image]](http://i164.photobucket.com/albums/u30/gll429/hub1.jpg)
![[image: Posted Image]](http://i16.photobucket.com/albums/b5/Flyguyeddy/VFR%20pictures/IMG_0317.jpg)
![[image: Posted Image]](http://i16.photobucket.com/albums/b5/Flyguyeddy/VFR%20pictures/IMG_0316.jpg)
![[image: Posted Image]](http://i16.photobucket.com/albums/b5/Flyguyeddy/VFR%20pictures/IMG_0323.jpg)
![[image: Posted Image]](http://i16.photobucket.com/albums/b5/Flyguyeddy/VFR%20pictures/IMG_0320.jpg)
![[image: Posted Image]](http://i16.photobucket.com/albums/b5/Flyguyeddy/VFR%20pictures/IMG_0318.jpg)
![[image: Posted Image]](http://i16.photobucket.com/albums/b5/Flyguyeddy/VFR%20pictures/IMG_0319.jpg)
![[image: Posted Image]](http://images33.fotki.com/v1190/photos/3/36012/69357/RearWheel-vi.jpg)
![[image: Posted Image]](http://i16.photobucket.com/albums/b5/Flyguyeddy/VFR%20pictures/IMG_6089.jpg)
![[image: Posted Image]](http://i16.photobucket.com/albums/b5/Flyguyeddy/VFR%20pictures/DSCN0997.jpg)
![[image: Posted Image]](http://i16.photobucket.com/albums/b5/Flyguyeddy/VFR%20pictures/DSCN0999.jpg)
![[image: Posted Image]](http://i16.photobucket.com/albums/b5/Flyguyeddy/VFR%20pictures/DSCN1003.jpg)
![[image: Posted Image]](http://i16.photobucket.com/albums/b5/Flyguyeddy/VFR%20pictures/DSCN1005.jpg)
![[image: Posted Image]](http://i16.photobucket.com/albums/b5/Flyguyeddy/VFR%20pictures/DSCN1004.jpg)