I thought I'd post up some pics of the 1000R I'm rebuilding. Not sure how long this is going to take, hopefully by next spring it'll be on the road. I'll post updates as anything worthwhile happens. Any hints, tips, "are you crazy?" comments appreciated.
Picked it up for $300, non-running, sitting in an overgrown backyard.
Update: As Seb said, “Dig in man! If it was easy everyone would do it!” :rolleyes:
My original thought was to do the standard F2 front/rear wheel upgrade. I ordered Jamie’s front F2 wheel kit and after fitting that ordered the rear which is a machined carrier and three new wheel spacers. While waiting I found a 900rr rear wheel (5.5”, 180 tire) and thought I’d give it a try. Tom, mutant bike, fitted a VFR sss with a 180 so I knew it was possible for the 5.5” wheel/180 tire to fit and still line things up. I wanted to use the original swingarm though, the sss is too much fab for me.
The F2/F3/900rr share the same sprocket carrier, so after getting Jamie’s machined carrier back I put it in the 900rr wheel and lined things up. It was apparent I would need an offset countershaft sprocket. The R bike shares sprockets with the 5/6 gen VFR, Blackbird, CB900, CB750 dohc plus some others. Kruger offers these in several different offsets, http://stores.ebay.de/krueger-junginger-cycle-parts. I went with the 9mm offset, the largest measured that would squeeze in the frame.
The chain and wheel are within a mm of being lined up and centered. I think I’ll live with the difference at this point.
Next hurdle is machining some space under the sprocket cover where the clutch slave mounts in. This will probably mean spacing the clutch slave out about 5mm or so, necessitating a longer release rod to be machined up.
Shock extension machined up, still some final steps to finish it off. Using a 5G dogbone, 4G triangles, raising the rear of the bike about 1”.
Gives me hope on the 5.5" wheel! Is that a Pilot Power rear tire? What size? I tried a 180 Dunlop 207 and it wouldn`t clear the swingarm. Also, what about the RC51 shock reservoir? mine hits the bottom of the seat, cut a notch in the seat? How far did you machine the sprocket carrier?
Lots of questions, but it looks like you have some issues figured out that were troubling me greatly.
KelLooking good! How many mm between chain and tire. How did you check tracking of rear tire to front tire? Which upper triple are you using?
On the tracking front-rear, I'll have to check that once I get a complete front end to bolt up. For now I'm measuring off the frame centerline, so there may be a little more work down the line. The VF forks are in pieces or I'd put them on to check. There are about 3-4mm between the chain & tire, just a little less between the chain & frame. It's a tight fit!
VF1000RSGives me hope on the 5.5" wheel! Is that a Pilot Power rear tire? What size? I tried a 180 Dunlop 207 and it wouldn`t clear the swingarm. Also, what about the RC51 shock reservoir? mine hits the bottom of the seat, cut a notch in the seat? How far did you machine the sprocket carrier?
Lots of questions, but it looks like you have some issues figured out that were troubling me greatly.
It is a 180/55 PP tire. The carrier was machined by Jamie Daugherty for the F2 rear wheel. I just figured I'd bolt it up and see how close it came, no pre-planning involved. :blink: The shock reservoir does hit the bottom of the seat which will need to be notched. It doesn't look like it needs much though. I'm planning a second pin through the lower shock clevis just to eliminate any slop between the shock & extension.
The clutch slave is going to be a little bit of work, not sure exactly how to solve it yet but I guess that's the fun. No plans on motor mods, I'm just hoping the used block I bought runs. :blink:
KelLooking good! How many mm between chain and tire. How did you check tracking of rear tire to front tire? Which upper triple are you using?
On the tracking front-rear, I'll have to check that once I get a complete front end to bolt up. For now I'm measuring off the frame centerline, so there may be a little more work down the line. The VF forks are in pieces or I'd put them on to check. There are about 3-4mm between the chain & tire, just a little less between the chain & frame. It's a tight fit!
VF1000RSGives me hope on the 5.5" wheel! Is that a Pilot Power rear tire? What size? I tried a 180 Dunlop 207 and it wouldn`t clear the swingarm. Also, what about the RC51 shock reservoir? mine hits the bottom of the seat, cut a notch in the seat? How far did you machine the sprocket carrier?
Lots of questions, but it looks like you have some issues figured out that were troubling me greatly.
It is a 180/55 PP tire. The carrier was machined by Jamie Daugherty for the F2 rear wheel. I just figured I'd bolt it up and see how close it came, no pre-planning involved. :blink: The shock reservoir does hit the bottom of the seat which will need to be notched. It doesn't look like it needs much though. I'm planning a second pin through the lower shock clevis just to eliminate any slop between the shock & extension.
The clutch slave is going to be a little bit of work, not sure exactly how to solve it yet but I guess that's the fun. No plans on motor mods, I'm just hoping the used block I bought runs. :blink:
Thanks for the tire tip. Almost bought a 160/60 Pilot Power for the 4.5" rear I had in place and ready to go to match the front I had. Got the 180/55 for the 5.5" once I read through your latest on the project. Used the F2 sprocket carrier and have a VF1000R caliper hanger/torque arm mocked up. Using a small Nissin underslung caliper in this setup so it will be a little different than your bike, but I haven`t been this stoked in awhile!
As far as the clutch slave cylinder, you may be able to remove enough of the countershaft cover so the sprocket will clear and not have to worry about a new clutch rod. I`ll post a pic of the Mutant setup.
VF1000RSThanks for the tire tip. Almost bought a 160/60 Pilot Power for the 4.5" rear I had in place and ready to go to match the front I had. Got the 180/55 for the 5.5" once I read through your latest on the project. Used the F2 sprocket carrier and have a VF1000R caliper hanger/torque arm mocked up. Using a small Nissin underslung caliper in this setup so it will be a little different than your bike, but I haven`t been this stoked in awhile!
As far as the clutch slave cylinder, you may be able to remove enough of the countershaft cover so the sprocket will clear and not have to worry about a new clutch rod. I`ll post a pic of the Mutant setup.
Going to be close...
Looks good with the cover trimmed back to just the minimum.
That was my thought, just notch the cover to clear the chain, but measuring yesterday it looked like there would still be interference with the slave. You got it right though, it all clears and it is close, thanks. Not sure if it's too close, once it's running guess I'll hear it if it is. :biggrin:
Thanks for the tire tip. Almost bought a 160/60 Pilot Power for the 4.5" rear I had in place and ready to go to match the front I had. Got the 180/55 for the 5.5" once I read through your latest on the project. Used the F2 sprocket carrier and have a VF1000R caliper hanger/torque arm mocked up. Using a small Nissin underslung caliper in this setup so it will be a little different than your bike, but I haven`t been this stoked in awhile!
Too funny Tom! I dug out my 900rr wheel today for a test fit too. Just painted it and will throw the 180 on my VFR rim on it. I'll use a 500 interceptor sprocket carrier that is on my F2 wheel. I had read this somewhere on line with good results. It's not as "robust" but it has been handling my R for some time now. It's shallow like the 600's but without the machining. I used the stock brake arm location on the frame with a fab'd brake arm attached to a 929 caliper. 9mm off set seems awfully big. I think i'll be hugging the tire and having less off set. I'll keep you guys posted.
KelToo funny Tom! I dug out my 900rr wheel today for a test fit too. Just painted it and will throw the 180 on my VFR rim on it. I'll use a 500 interceptor sprocket carrier that is on my F2 wheel. I had read this somewhere on line with good results. It's not as "robust" but it has been handling my R for some time now. It's shallow like the 600's but without the machining. I used the stock brake arm location on the frame with a fab'd brake arm attached to a 929 caliper. 9mm off set seems awfully big. I think i'll be hugging the tire and having less off set. I'll keep you guys posted.
[image: gallery_13847_3747_9720.jpg]
rear brake
I used a 3.5mm thick spacer between a machined F2 hub and the swingarm...the rubber casting nubs brush the chain when I spin the wheel...should be about right. 12mm spacer between the right side of the wheel then the stock VF1000R brake carrier. May have to offset the sprocket slightly. Just for reference, I`m working on the VF1000F with a VF1000R swingarm so your mileage may vary. Eyeballed the wheel/tire to centerline, haven`t measured but looks darn close.
I hope we are adding info and not hijacking VFRcapn`s thread...?
KelI think he won't mind the info swap since it's all related. There was a reason I didn't use the stock R rear brake but I can't remember. I think it bottomed out on the CBR rotor not allowing the axle to pass through but I could be mistaken. Perhaps you're using a different caliper on the carrier? What reference are you using for center? I was using the hole in the cross member at the rear of the subframe. I'm guessing thats the center of the frame but...
I`m playing with this idea:
[image: gallery_10340_3750_362385.jpg]
Little Nissin caliper I got from Japan. VF1000R caliper hanger/torque arm /swingarm , 5.5" wheel, my mockup of an adapter.
You are right Kelly, the stock R caliper won`t clear the CBR wheel.
I`m using the same bolt/hole you are referring to for center. Haven`t really measured anything yet, just eyeballing. Swapping back and forth between a bare frame and the complete VF1000F. Had to see what it would look like!
No worries on the thread, great info. I'm using the same hole on the subframe to eyeball the wheel alignment. I did notch the underside of the seat to clear the RC shock, no more than a 1"x2" cutout and it's just grazing the foam underneath. After looking at how bad the seat looked though, I had to fix that up today.
Don`t worry about the tire/chain clearance. You have plenty. When I did the Mutant I think I could get 3 sheets of paper in between the Dunlop D207(a notoriously wide 180, more like 190 something) and the chain. Never touched and I used it until I put a D208 on it. The D208 was significantly narrower than the 207 and this Michelin Pilot Power is the same way. Probably a true 180mm tire.
Well, that other thread got killed so this is a repost:
This VF1000F bike popped up on Craigslist for around a hundred bucks so, having a small spot left in the garage I brought it home. Missing just a few things that my R project will donate to complete it, wheels, carbs, clutch. Main thing is I need to find an exhaust header for it. I'm hoping it all bolts together and runs, not planning any mods. I may not even clean it. :idea3:
Just a heads up on the RC51 shock, the spring will need to be changed. Mounted mine up to check the bracket I designed and fitment, etc and it is definitely too soft. I have a VFR spring that may swap, or a different shock. Looks good otherwise though.
VF1000RSJust a heads up on the RC51 shock, the spring will need to be changed. Mounted mine up to check the bracket I designed and fitment, etc and it is definitely too soft. I have a VFR spring that may swap, or a different shock. Looks good otherwise though.
Thanks for the feedback, I suspected the spring may be too soft. I've been keeping an eye open for something aftermarket like an Ohlins. My VFR spring (5G) looks like it's about 1/2" longer than the RC so it may squeeze in. Also looking at other shocks like from BMW's that have the u-shaped lower clevis.
Bike looks good, did you use the SP1 shock with the reservoir pointed back and up? And, were you able to squeeze in the crankcase breather tank or did you just remove it?
vfrcapnThanks for the feedback, I suspected the spring may be too soft. I've been keeping an eye open for something aftermarket like an Ohlins. My VFR spring (5G) looks like it's about 1/2" longer than the RC so it may squeeze in. Also looking at other shocks like from BMW's that have the u-shaped lower clevis.
Bike looks good, did you use the SP1 shock with the reservoir pointed back and up? And, were you able to squeeze in the crankcase breather tank or did you just remove it?
Thanks, still very much a work in progress.
I pointed the reservoir up and back, yes. I haven`t tried to mount the breather, but I`m pretty sure it won`t fit. I may just block off the breather that returns to the airbox and do something smaller for the crankcase breather. Did something similar on my Mutant R with a T and a small K&N. I have a 94-97 VFR shock here I`m about to compare to the RC length and also a VFR800 shock which is about 1/2 inch longer than the 94-97 shock. I suspect the 94-97 spring will be closer......just have to drop the swingarm......again....
Nope, 94-97 spring is too short. VFR800 spring is approx 3/16" longer. If I continue this route, I`ll try the VFR800 spring in the RC shock after some more measurements, if that isn`t possible.....stiffer spring for the RC shock?
Well, today I decided to cut my losses on the RC51 shock. Would have had to order a new stiffer spring and then had it revalved. Add that to the cost of the custom clevis I designed and had machined up and I could have had a custom shock built....which I ordered up from Works Performance today. Guess when you blaze trails, you leave ashes...
In hindsight, I probably should have sent my VFR800 shock to Jaimie for some of his longer clevis adapters...maybe next time.
On a more positve note, I got the RC51 front end installed last night after the rebuild. No surprises, just what I expected; stock 929 bars are no way going to work, nor are the 929 Helibars I have acceptable for this F project. They would work on an R, but I decided to go for a riser top triple from ISL. Pricey, but the risers are built-in since it`s all machined from one piece, unlike another set of risers which look crappy bolt on crap(to me), or a couple other muti-adjustable bars which would interfere with the F`s bodywork/fairing. This way, I can put on a set of Daytona tube bars, or any other bar I like.
vfrcapn
I still need to work out bars for my R. I've got 954 and RC clip ons, I'm hoping the 954 will work on top of the triple. I really like the Cyclecat clipons I have on my VFR..well cr@p, i just checked their site and it looks like Cyclecat is out of business... :fing02:
I still need to work out bars for my R. I've got 954 and RC clip ons, I'm hoping the 954 will work on top of the triple. I really like the Cyclecat clipons I have on my VFR..well cr@p, i just checked their site and it looks like Cyclecat is out of business... :pissed:
You can forget about the bars on top. You would have to push the forks up WAY too much. Even with the CBR upper, the forks are still too short in my book. Here's what I did. The 51 lower as an upper allows the forks to ride nice and low. BUT...because it is a lower, the ID is larger than a true upper.(the forks taper towards the top.) I had a bent fork that I used to make some spacers. I had the insides machined to go over the forks while the tops remained the right OD for the clipons. Since the new upper is SOOO beefy, I can have the lower pinch bolt grab the fork( still larger than a 51 upper pinch point) and have the upper pinch the spacer. Bingo, clipon goes right on. I originally thought that I would need the 929 bar to get me up near stock reach but I'm actually HIGHER. It's like a damn riser now! It's too high so I need to find some 51 bars instead. I thought I would like the easier reach but it just looks too funny. I think I can use the mounting points that were originally for the brake lines to attach the idiot lights. The ignition will go where ever. I'm thinking of going keyless somehow anyway.
VF1000RSWell, today I decided to cut my losses on the RC51 shock. Would have had to order a new stiffer spring and then had it revalved. Add that to the cost of the custom clevis I designed and had machined up and I could have had a custom shock built....which I ordered up from Works Performance today. Guess when you blaze trails, you leave ashes...
In hindsight, I probably should have sent my VFR800 shock to Jaimie for some of his longer clevis adapters...maybe next time.
Thomas, I dropped my VFR and RC shock off today at the local suspension shop to have them move the RC lower mount to the VFR shock ('99). They're an Ohlins, Penske service facility ( http://www.naake.com ) so he wasn't positive it was an easy switch with the Showa's but he promised to let me know in a day or two, and just looking at it he didn't think it would be a problem. They have the same shaft size and same spring OD. Will post the results.
Also got my VFKR triple back from the machine shop. Bushing machined and pushed in to the triple with the VFKR steering stem pressed in and welded up. He made sure to keep the same exposed length on the stem, 260mm. I sure wish I could tig like this. :blink:
vfrcapnThomas, I dropped my VFR and RC shock off today at the local suspension shop to have them move the RC lower mount to the VFR shock ('99). They're an Ohlins, Penske service facility ( http://www.naake.com ) so he wasn't positive it was an easy switch with the Showa's but he promised to let me know in a day or two, and just looking at it he didn't think it would be a problem. They have the same shaft size and same spring OD. Will post the results.
Also got my VFKR triple back from the machine shop. Bushing machined and pushed in to the triple with the VFKR steering stem pressed in and welded up. He made sure to keep the same exposed length on the stem, 260mm. I sure wish I could tig like this. :blink:
Looks very familiar! Nice work! I ground down the steering stop nubs and the casting mark on the triple for a cleaner look. Then went over the whole thing with Scotchbrite for a smooth but not too blingy look. I suppose it could be polished.
Let me know how the shock turns out. Looks like you have a nice resource close to you.
Also, got my LSL 929 top triple from Spiegler today and couldn`t hold out, had to see what it may look like. I reversed the mounts on top of the clamp to get more toward the center of the triple. The other way they are closer to the gas tank. Mounted a set of black Daytona bars to get a feel for it.(note that this is just a mockup as the bolts aren`t completely in,etc.)
[image: gallery_10340_3750_51828.jpg]
One from the side:(LSL top triple and Daytona bars)Gives it a bit of old school Superbike I think. Think I`ll go this route on this bike since I`ve already got the low bar R.
[image: gallery_10340_3750_165481.jpg]
Stock 929 top triple and Heli-bars(this would require chopping or grinding the fairing for full swing of the bars and also not clear the stock throttle cables or 929 throttle cables):
[image: gallery_10340_3750_101433.jpg]
I won`t show a pic of the stock 929 bars as there probably isn`t enough room to even put a set of grips on the F, although they or the Heli-bars would be a good option for the R I think.
KelI still need to work out bars for my R. I've got 954 and RC clip ons, I'm hoping the 954 will work on top of the triple. I really like the Cyclecat clipons I have on my VFR..well cr@p, i just checked their site and it looks like Cyclecat is out of business... :mad:
You can forget about the bars on top. You would have to push the forks up WAY too much. Even with the CBR upper, the forks are still too short in my book. Here's what I did. The 51 lower as an upper allows the forks to ride nice and low. BUT...because it is a lower, the ID is larger than a true upper.(the forks taper towards the top.) I had a bent fork that I used to make some spacers. I had the insides machined to go over the forks while the tops remained the right OD for the clipons. Since the new upper is SOOO beefy, I can have the lower pinch bolt grab the fork( still larger than a 51 upper pinch point) and have the upper pinch the spacer. Bingo, clipon goes right on. I originally thought that I would need the 929 bar to get me up near stock reach but I'm actually HIGHER. It's like a damn riser now! It's too high so I need to find some 51 bars instead. I thought I would like the easier reach but it just looks too funny. I think I can use the mounting points that were originally for the brake lines to attach the idiot lights. The ignition will go where ever. I'm thinking of going keyless somehow anyway.
[image: gallery_13847_3747_109529.jpg]
upper
This is nice work. The idea is similar to what I'm doing with the GSXR750 forks on my SuperHawk right now. Most inverted forks attach the clip-ons under the triple clamp but tank/bodywork constraints don't allow this. I've made similar extended fork caps so that I can attach the original VTR clip-ons to the GSXR forks and have them in the same location s stock. Luckily the GSXR forks are approximately the same length as the VTR's. I like how you've addressed this by making the caps longer so that you can mount the forks lower in the triples. Good job!
This is nice work. The idea is similar to what I'm doing with the GSXR750 forks on my SuperHawk right now. Most inverted forks attach the clip-ons under the triple clamp but tank/bodywork constraints don't allow this. I've made similar extended fork caps so that I can attach the original VTR clip-ons to the GSXR forks and have them in the same location s stock. Luckily the GSXR forks are approximately the same length as the VTR's. I like how you've addressed this by making the caps longer so that you can mount the forks lower in the triples. Good job!
Thanks Jamie. I've seen your own uppers for the VF's and they are quite nice. This came out well. Yea, the top of the forks are half way up in the upper, giving me a nice drop while still remaining "secure". Not bad for $50! I don't have the resources to design and fab from scratch my own uppers but I KNEW I could turn this one into something useful and that really is where I get my most enjoyment. I think I'm real close on stock stance. Maybe someone can shoot me a measurement of stock stance. The only draw back is wheel lock. I feel it's going to be a 6 point turn out of the garage!
"If I were you, I'd eventually paint it, and plug the two threaded holes with a couple of allen head bolts.
Not that that would actually DO anything, other than filling the holes..........."
SEBSPEEDHow 'bout some updated pics then? :biggrin: :laugh:
I can give some pics of my VfKf. I wanted to have this running within 3 weeks after getting it, that would have been last Friday. Oh well, it's close.
I got the motor mounted properly and removed the suspenders that were holding it in the frame, they didn't seem to be Honda OEM items. :goofy: Entire wiring harness was reinstalled along with almost everything else. Most parts, not in the boxes, were held on by loose bolts - I still need to go back through front to back and check everything.
Major items missing where I didn't have spares from my R project were the lower rad and complete exhaust system. I got lucky when the rad popped up on eBay, along with the fans, and the seller had the exhaust in stock. Exhaust had one minor hole that my local exhaust shop fixed up in under a minute.
I made the mistake of opening the fuel bowls on the R carbs I was going to use and found the same sludgy varnish that is inside the R's tank. So carbs were completely torn down, cleaned and put back. One carb body was cracked so I had to graft in an F carb body. The original carbs from the F were extremely corroded and trashed but the body itself was still useful.
The F forks were also corroded along with the front wheel & brakes, so I used the R forks, wheels and brakes. The forks were broken down, the lowers blasted and painted black to match the originals. The bike didn't have a rear wheel so it made sense to use the R's, I mounted the R swingarm and rear under-axle caliper. The F front fender has a different mount/fork brace so the R's had to be modded to fit the fender.
New fuel lines, chain, BT45 tires, spark plugs. Valve adjustment done. Still need some mirrors, seat needs recovering, bleed all the brakes and clutch, coolant, oil and fuel. It will get a good cleaning and maybe some new body panels if I can find them. And the carbs need syncing.... :goofy:
vfrcapnIt will get a good cleaning and maybe some new body panels if I can find them.
Why? The bodywork on that bike looks pretty darn good in the pictures.
The clear coat is peeling, the tabs on the side panels are gone and the front is cracked around the headlight, plus all the parts have spider web cracking throughout the paint. It's serviceable though.
The motor started right up, after I determined the fuel pump was dead, and settled immediately in to a nice idle. Jamie, do you route the fuel lines any particular way to gravity feed the bike? Do you run an inline fuel filter?
After a couple minutes I noticed a slow oil leak which I traced to this:
The front left motor mount/case is cracked. It looks like someone tried to repair it previously. Has anyone seen this before? I wonder if I can get away with some JBWeld... :fing02:
SEBSPEEDNot an easy job to weld, the parts will need to be clean and preheated. Then there is still the fact that it's cast. It's doable, but will not be quick & easy. Might not be cheap either.
I wonder if it can be done in the bike? Or are we talking about a tear down to the bare case? If the header, filter and maybe frame rail are removed I think there's room to weld it, I don't know how clean you can get it.
Yes, to do it right, you would need to pull the motor and tear it down. I wouldn't trust the weld if I couldn't have a bare, clean part in my hands as a welder.
Cast aluminum has millions of tiny(sometimes not so tiny!) air pockets. The second you start an arc on it, the material starts to melt away(it has to for weld penetration), and the air bubbles out, creating new ones at the same time. this leads to a loss of structural integrity in both the new weld, and the area around it. In reality, the area immediately around the new weld will crack before the weld does.
I've seen this stuff in use, and it's pretty damn amazing. I would absolutely try it if it was my bike. The worst that can happen is it cracks out again and you have to pull it apart for TIG. You can get it cheaper on ePay. Just scroll down and select qty. You will still need to use solvent and a metal detailing brush to get the area really clean before brazing. I'd also rough up the surface as much as possible with sandpaper to assure a good bond.
Oooo, gnarly. Did Honda farm out work to Kawasaki during the 80's or what? :pissed:
I know I'm going to take all kinds of heat for this, but I stand by my earlier suggestion. Clean it, mount it, and use the aluminum brazing rod. When I saw the stuff demonstrated at the Seattle MC show, the guy brazed a glob on a piece of cast aluminum can and then pounded on the glob with a hammer to show how strong it was. It didn't separate, crack or do anything but deform a bit from the hammer blows. Incidentally, a broken case from an old Norton or something was on display, repaired with the brazing rod and polished out beautifully.
magellanOooo, gnarly. Did Honda farm out work to Kawasaki during the 80's or what? :pissed:
I know I'm going to take all kinds of heat for this, but I stand by my earlier suggestion. Clean it, mount it, and use the aluminum brazing rod. When I saw the stuff demonstrated at the Seattle MC show, the guy brazed a glob on a piece of cast aluminum can and then pounded on the glob with a hammer to show how strong it was. It didn't separate, crack or do anything but deform a bit from the hammer blows. Incidentally, a broken case from an old Norton or something was on display, repaired with the brazing rod and polished out beautifully.
Why not try it?
Yes, the whole casting in this area seems pretty light considering there are only two forward mounts, the weight of the motor, etc..
I saw the stuff demo'd at a woodworkers show and was pretty impressed. I'm also getting a suggestion from a friend to just JBWeld it back in place. My concern is that if either of those approaches don't work it may not be able to be welded after the metal has been contaminated. I want to give my local mc machinist/welder a shot at it first. If he won't or can't weld it (in the bike) I'm leaning towards trying the brazing. It sounds like you have to apply quite a lot of heat to get it to flow, also not sure about using it at that downward angle - I assume it must flow the same way as sweating a copper pipe..
That may work or not, I can't say I'm an expert and that know for sure.
Forget the JB Weld. Just forget it.
I have no experience with the brazing rod, but beating it with a hammer and showing that it can fill a crack does not hold any water when you're talking about a stressed member subject to long periods of various frequencies of vibration, heat cycles, and hard knocks in general.
Your best, safest, and longest-lasting method will be to remove the damaged part and fix it outside of the bike.
- With the part out, and as clean as you can get it, use an oxy/ace torch to heat the pieces. Get it sooty with the acetylene, then heat it with both till the soot burns away.
- While it's hot, weld with 5356 filler rod(TIG).(not 4043!)
- If you really want to be safe, stick it in a box of vermiculite right after you weld it, so it cools down very slowly, this keeps it from cracking as it cools.
- If you get a nasty looking weld from all the crud that WILL cook out of the casting, grind the weld down some(not all of it), and repeat the process. Once you get a clean bead on top, build it up a bit.
- Once cooled, use a die grinder and some files, clean up the excess weld. Repaint & reinstall, and ride away happily with peace of mind.
I talked to my machinist today on welding up the F motor and the recommendation was no way. Maybe, possibly if the cases were split. The issue is it's broken out right at the seal between the top and bottom case, you can't weld all the way to the top or it won't seal, if you don't weld it all the way up it won't seal, plus getting it lined up, etc, etc. Time for new cases if I want to save it.
And the suspension shop told me they couldn't do anything with swapping the lower clevis from the RC shock to the VFR shock, so, I may be looking for Jaime's VFR shock extension also for the R bike.
On the good news side...oh wait, there wasn't any... :comp13:
First impressions on very short ride are... Steering lock is unacceptable! Almost to the point of dangerous. Unless I can move the radiator down to gain a few degrees of steering, I would say the rc51 swap is a no-no on older VF's. The difference is dramatic. It's one thing to turn a million times in the garage, it's quite another to not be able to avoid objects in the driveway! I'm going to put on the fairings and go for a ride but I'm not sure I'll be swayed. We'll see. As it stands, I wouldn't suggest anyone try this at home. Please correct me Tom.
KelFirst impressions on very short ride are... Steering lock is unacceptable! Almost to the point of dangerous. Unless I can move the radiator down to gain a few degrees of steering, I would say the rc51 swap is a no-no on older VF's. The difference is dramatic. It's one thing to turn a million times in the garage, it's quite another to not be able to avoid objects in the driveway! I'm going to put on the fairings and go for a ride but I'm not sure I'll be swayed. We'll see. As it stands, I wouldn't suggest anyone try this at home. Please correct me Tom.
Kel, did you remove the grill off the front of the radiator? That gains you a few degrees. I'm at the same point now, got the front end and radiator mounted, and evaluating the situation. Moving the radiator down gains a few more degrees but the frame is final limiter, and I'm concerned the fender/wheel may impact the radiator if it's lowered? :rolleyes:
I'm going to try to take a few measurements on the lock to lock angle.
I not only removed the grill but I cut the back off of the rubber mount on the upper rad mount to gain a little. Well I went for a lengthy ride last night. Obviously you won't notice any difference at speed. But turning right at an intersection, you really do. It's unsettling to go to turn like you're used to only to have the steering suddenly stop well short. The new bars will take some getting use to. With the wider upper, they are wider and more upright. My palms are parallel to the ground instead of slightly turned in. Reminds me of the superbike bars on my Cb750F. There's alot more leverage and the reach is shorter so I think I'll like it. The bars themselves are shorter than stock so I can't put on the bar ends until I get some modern reservoirs but even with the stock kR reservoir, it stops like mad!
As you can see, the stance is very close to stock, even feels a little higher? Tom, can you shoot me a measurement from the ground up to something like the bottom of the radiator? I never cared much for the stock 51 rotor pattern so I went with a pair of 929's PLUS they're 330mm! Huge! Because they are larger, I had to make a caliper bracket to raise the calipers slightly. Love the look now. I trimmed up the bulbous front fender and now just need to paint it white. Got my dual headlight in and you'll notice it uses a cut down '85 headlight surround which I think looks better, gives it more of an intake look than the stock dual trim piece.
KelFirst impressions on very short ride are... Steering lock is unacceptable! Almost to the point of dangerous. Unless I can move the radiator down to gain a few degrees of steering, I would say the rc51 swap is a no-no on older VF's. The difference is dramatic. It's one thing to turn a million times in the garage, it's quite another to not be able to avoid objects in the driveway! I'm going to put on the fairings and go for a ride but I'm not sure I'll be swayed. We'll see. As it stands, I wouldn't suggest anyone try this at home. Please correct me Tom.
Kelly,
You are using the 929 bottom triple?
Is the triple hitting the rad?
The RC51 bottom triple clears the rad due to the dogleg and gives you that much more steering lock. Still less than stock, but better.
KelFirst impressions on very short ride are... Steering lock is unacceptable! Almost to the point of dangerous. Unless I can move the radiator down to gain a few degrees of steering, I would say the rc51 swap is a no-no on older VF's. The difference is dramatic. It's one thing to turn a million times in the garage, it's quite another to not be able to avoid objects in the driveway! I'm going to put on the fairings and go for a ride but I'm not sure I'll be swayed. We'll see. As it stands, I wouldn't suggest anyone try this at home. Please correct me Tom.
Kelly,
You are using the 929 bottom triple?
Is the triple hitting the rad?
The RC51 bottom triple clears the rad due to the dogleg and gives you that much more steering lock. Still less than stock, but better.
Yes, I'm using the 929 bottom but even if I could completely clear the rad, the fork tube is already very close to the frame so I can't gain much.
That`s the only limiting factor I can think of. On mine, the fork leg touches the frame on full lock and after removing the rad grill, the bottom triple clears the rad. Every bit is needed.
Yes, I'm using the 929 bottom but even if I could completely clear the rad, the fork tube is already very close to the frame so I can't gain much.
That`s the only limiting factor I can think of. On mine, the fork leg touches the frame on full lock and after removing the rad grill, the bottom triple clears the rad. Every bit is needed.
I must say, it is growing on me. Do I miss full range of steering? Yes. Do I think it looks cool as hell? Yes. The thing that stinks now is it looks like I need seals. I haven't done a set of USD's before so...I may farm this one out. I guess now I'll jump on the backend and get my 5.5 on. How did you make out? Happy? What offset did you end up with? Shoot me a measurement from the R factory so I can see how close to stock she's sitting. Maybe bottom of the front fairing under the headlight.
KelI must say, it is growing on me. Do I miss full range of steering? Yes. Do I think it looks cool as hell? Yes. The thing that stinks now is it looks like I need seals. I haven't done a set of USD's before so...I may farm this one out. I guess now I'll jump on the backend and get my 5.5 on. How did you make out? Happy? What offset did you end up with? Shoot me a measurement from the R factory so I can see how close to stock she's sitting. Maybe bottom of the front fairing under the headlight.
The steering lock is never going to be the same. It`s the single biggest drawback in my opinion. I don`t notice it anymore since I`ve probably adjusted to the bike. Until someone makes a set of upper and lower trees specifically for this, I`m happy.
You can do the seals, I`ve done a couple sets now, not much different than regular right way up forks.
Back end is complete except for the rear shock I`m waiting on. I used a single 3mm spacer on the left with the chain adjuster spacer turned to the inside for an extra 1.5mm, had a 900RR sprocket carrier milled so the sprocket is now closer to the wheel(26mm from wheelside of carrier to the sprocket face). I used a 5mm offset countershaft sprocket but I have a spacer to bring it to 6mm, that gives close to perfect chain alignment although I may have to accept just the 5mm sprocket since I have a small drip of oil I can`t seem to get rid of with the extra 1mm spacer behind the sprocket. Either that or get a 7mm offset sprocket and carefully grind down the frame weld that the bottom chain run will hit. I`d much rather have the chain chew into the tire than the frame...if it`s going to chew through anything. (Joke, it`s not going to chew into anything!)
OK, with the bike on the sidestand, right side, from the center of the right side phillips head fairing bolt under the nose just in front of the turnsignal "opening" straight down to the floor is 27". Let me know if you want any more.
OK, with the bike on the sidestand, right side, from the center of the right side phillips head fairing bolt under the nose just in front of the turnsignal "opening" straight down to the floor is 27". Let me know if you want any more.
Wow, I'm 27 1/4. I'm actually tall? I can actually slide them up a little! Guess the upper did it's job.
I often wonder why people do not remove the pic from quotes, but here is an exception. What a beauty, really like the paintjob & mods. Well done :fing02:
Though it would look even better without the rothmans decal
I often wonder why people do not remove the pic from quotes, but here is an exception. What a beauty, really like the paintjob & mods. Well done :fing02:
Though it would look even better without the rothmans decal
Yes I agree. It's so out of place. I got rearended by a Harley and the oil door got scraped up so I had to cover it with the only stickers I had till it gets a repaint, which is soon. The paint idea really came about from wanting to cut up the large areas. If you see a kR painted one solid color, the bulkiness of the fairings is clear so I thought some stripes at different angles would break it up. My buddies kR that is all red looks like a completely different beast, short and squat. These lines going front to back really help stretch it out.
KelI must say, it is growing on me. Do I miss full range of steering? Yes. Do I think it looks cool as hell? Yes. The thing that stinks now is it looks like I need seals. I haven't done a set of USD's before so...I may farm this one out. I guess now I'll jump on the backend and get my 5.5 on. How did you make out? Happy? What offset did you end up with? Shoot me a measurement from the R factory so I can see how close to stock she's sitting. Maybe bottom of the front fairing under the headlight.
The steering lock is never going to be the same. It`s the single biggest drawback in my opinion. I don`t notice it anymore since I`ve probably adjusted to the bike. Until someone makes a set of upper and lower trees specifically for this, I`m happy.
You can do the seals, I`ve done a couple sets now, not much different than regular right way up forks.
Back end is complete except for the rear shock I`m waiting on. I used a single 3mm spacer on the left with the chain adjuster spacer turned to the inside for an extra 1.5mm, had a 900RR sprocket carrier milled so the sprocket is now closer to the wheel(26mm from wheelside of carrier to the sprocket face). I used a 5mm offset countershaft sprocket but I have a spacer to bring it to 6mm, that gives close to perfect chain alignment although I may have to accept just the 5mm sprocket since I have a small drip of oil I can`t seem to get rid of with the extra 1mm spacer behind the sprocket. Either that or get a 7mm offset sprocket and carefully grind down the frame weld that the bottom chain run will hit. I`d much rather have the chain chew into the tire than the frame...if it`s going to chew through anything. (Joke, it`s not going to chew into anything!)
I`ll get some measurementas tonight.
In my quest to find more steering lock, I found that the stock front can turn more to the left than the right. Don't know why other than maybe it helps load the kickstand? I made some hash marks on the bottom steering nut flange. One at center and then one at each lock as a stock base line. Then again with the 51 front on. It now gives me something to shoot for. I have found some mm's to play with. 1st, I swapped the R rad for an F's. The F's is just over one cooling row narrower. I had to flip the F rad and make some brackets for fans and frame mounting. This gets the rad out of the equation. Now the forks hit the frame at the steering neck bracing. The area of the fork that hits the frame is 54mm but right above that, it quickly tapers to 50. If the fork tube maintains a consistent ID, I should be able to take a few mm's from the 54mm spot there without losing strength. After looking at the steering neck bracing, I know I can carve a few mm's out of there with no concerns. This should get me close. I refuse to ride this thing with the limited lock it has.
KelIn my quest to find more steering lock, I found that the stock front can turn more to the left than the right. Don't know why other than maybe it helps load the kickstand? I made some hash marks on the bottom steering nut flange. One at center and then one at each lock as a stock base line. Then again with the 51 front on. It now gives me something to shoot for. I have found some mm's to play with. 1st, I swapped the R rad for an F's. The F's is just over one cooling row narrower. I had to flip the F rad and make some brackets for fans and frame mounting. This gets the rad out of the equation. Now the forks hit the frame at the steering neck bracing. The area of the fork that hits the frame is 54mm but right above that, it quickly tapers to 50. If the fork tube maintains a consistent ID, I should be able to take a few mm's from the 54mm spot there without losing strength. After looking at the steering neck bracing, I know I can carve a few mm's out of there with no concerns. This should get me close. I refuse to ride this thing with the limited lock it has.
Good idea on the F radiator, I went to mount an R rad to the F bike and didn't think to flip it and went off to source a F rad which I eventually did.
I took some measurements (rough). I'm getting almost 20 degrees each way with the stock R radiator mounted without the upper rubber mounts. On my VFR with the RC front end I get 24-25 degrees each way. I can check the stock F lock-lock...but this feels to me like it's ok.
I'm not sure you can shave down the RC fork tubes. I've got some spares torn down, I can try to measure the wall thickness. I'd have to go look but I think the wall thickness is consistently tapered. Shaping the frame at those two points may be a much better option. :unsure:
KelIn my quest to find more steering lock, I found that the stock front can turn more to the left than the right. Don't know why other than maybe it helps load the kickstand? I made some hash marks on the bottom steering nut flange. One at center and then one at each lock as a stock base line. Then again with the 51 front on. It now gives me something to shoot for. I have found some mm's to play with. 1st, I swapped the R rad for an F's. The F's is just over one cooling row narrower. I had to flip the F rad and make some brackets for fans and frame mounting. This gets the rad out of the equation. Now the forks hit the frame at the steering neck bracing. The area of the fork that hits the frame is 54mm but right above that, it quickly tapers to 50. If the fork tube maintains a consistent ID, I should be able to take a few mm's from the 54mm spot there without losing strength. After looking at the steering neck bracing, I know I can carve a few mm's out of there with no concerns. This should get me close. I refuse to ride this thing with the limited lock it has.
Good idea on the F radiator, I went to mount an R rad to the F bike and didn't think to flip it and went off to source a F rad which I eventually did.
I took some measurements (rough). I'm getting almost 20 degrees each way with the stock R radiator mounted without the upper rubber mounts. On my VFR with the RC front end I get 24-25 degrees each way. I can check the stock F lock-lock...but this feels to me like it's ok.
I'm not sure you can shave down the RC fork tubes. I've got some spares torn down, I can try to measure the wall thickness. I'd have to go look but I think the wall thickness is consistently tapered. Shaping the frame at those two points may be a much better option. :unsure:
Yea, check the thickness for me. You don't need to measure, just peek inside and see if it's smooth all the way up, doesn't follow the outside contours. It SEEMS like the inside should be consistent, one smooth tube. Depends on how they are made. If they're turned, then I should have plenty. I don't know how you're measuring but your numbers seem to say you have MORE steering travel with the RC?
KelYea, check the thickness for me. You don't need to measure, just peek inside and see if it's smooth all the way up, doesn't follow the outside contours. It SEEMS like the inside should be consistent, one smooth tube. Depends on how they are made. If they're turned, then I should have plenty. I don't know how you're measuring but your numbers seem to say you have MORE steering travel with the RC?
You're right obviously, same ID all the way. Would be kind of hard to seal it otherwise. I haven't had enough caffeine today. :unsure: Still, I'd hack the frame before touching the forks...probably better to get BLS to machine up some of those custom magnesium triples to give some more offset. :fing02:
I didn't measure the turning angle with the stock front end, I'm not sure what it is. I'm measuring the angle the RC front end will turn left or right from center, it's a rough measurement but 19-20 degrees each way on the R, 24-25 degrees on my VFR. I doubt I have any more than 20 on my CB750, it doesn't do tight u-turns but it's no problem on the road.
KelYea, check the thickness for me. You don't need to measure, just peek inside and see if it's smooth all the way up, doesn't follow the outside contours. It SEEMS like the inside should be consistent, one smooth tube. Depends on how they are made. If they're turned, then I should have plenty. I don't know how you're measuring but your numbers seem to say you have MORE steering travel with the RC?
You're right obviously, same ID all the way. Would be kind of hard to seal it otherwise. I haven't had enough caffeine today. :unsure: Still, I'd hack the frame before touching the forks...probably better to get BLS to machine up some of those custom magnesium triples to give some more offset. :fing02:
I didn't measure the turning angle with the stock front end, I'm not sure what it is. I'm measuring the angle the RC front end will turn left or right from center, it's a rough measurement but 19-20 degrees each way on the R, 24-25 degrees on my VFR. I doubt I have any more than 20 on my CB750, it doesn't do tight u-turns but it's no problem on the road.
Just what I thought. Thanks. I am after every degree I can get. If you don't have 23 years on your R, you probably won't care, but I want it to turn like it has the whole 23 years I've had mine. Silly? Not to me. I went to alot of trouble to get it to sit right with the 51 forks so I'm not about to compromise the slow speed handling now. I know I could "get used to it" but I don't want to. I could get used to my toaster only browning one side but it's just not right. Old dog, new trick sort of thing I guess. At any rate, since I'm tearing into it, I decided to paint the whole thing again. Will put my RC45 tail on it this time. There's been some things naggin me that I can finally get to. Still have to get the 5.5 on the rear but don't really want to spend $100 for a front sprocket yet.
KelJust what I thought. Thanks. I am after every degree I can get. If you don't have 23 years on your R, you probably won't care, but I want it to turn like it has the whole 23 years I've had mine. Silly? Not to me. I went to alot of trouble to get it to sit right with the 51 forks so I'm not about to compromise the slow speed handling now. I know I could "get used to it" but I don't want to. I could get used to my toaster only browning one side but it's just not right. Old dog, new trick sort of thing I guess. At any rate, since I'm tearing into it, I decided to paint the whole thing again. Will put my RC45 tail on it this time. There's been some things naggin me that I can finally get to.
Kelly, step away from the grinder...seriously.
If you really can`t stand it maybe you should work on the frame instead of the forks, then weld a plate over the hole you make. Or, cut the steering stem off and reweld it along with more narrow upper frame tubes. I can`t see grinding the fork tubes down and compromising their integrity. Or better yet, make up a set of triples with the offset closer to the stock R that will fit the 51 forks.
KelJust what I thought. Thanks. I am after every degree I can get. If you don't have 23 years on your R, you probably won't care, but I want it to turn like it has the whole 23 years I've had mine. Silly? Not to me. I went to alot of trouble to get it to sit right with the 51 forks so I'm not about to compromise the slow speed handling now. I know I could "get used to it" but I don't want to. I could get used to my toaster only browning one side but it's just not right. Old dog, new trick sort of thing I guess. At any rate, since I'm tearing into it, I decided to paint the whole thing again. Will put my RC45 tail on it this time. There's been some things naggin me that I can finally get to.
Kelly, step away from the grinder...seriously.
If you really can`t stand it maybe you should work on the frame instead of the forks, then weld a plate over the hole you make. Or, cut the steering stem off and reweld it along with more narrow upper frame tubes. I can`t see grinding the fork tubes down and compromising their integrity. Or better yet, make up a set of triples with the offset closer to the stock R that will fit the 51 forks.
I'm not anticipating a hole, just a little off the corner where the bracing comes up to meet the lower frame rails, but yes if there's a questionable hole, a plate for sure. And yes, the frame is my first plan of action. I may not even need to address the forks. The spot on the forks that is hitting is right on the sharp lip where the 54mm starts to taper to 50. All I would be doing is really just moving the taper down, say 10mm's. Making the widest part of the fork 13 1/4" long vs 13 5/8 long. Not much difference. Integrity is the same, the taper is just in a VERY slightly different place. In the grand scheme of the fork length, I truly don't see any issue. Again, it may not even come to that, and it is only 2mm's but if I need some more, I know I can get some there. I may not get to stock R lock but I want close. Besides, it's a custom, so digging in is half the fun. This bike is my daily driver and I know it will just bug me if it's not to my liking.
VF1000RSNothing too radical, chopped the fender and smoothed the plastic so I could mount up the plate mount Seb sent me.
Trying to get some of the detail things done while waiting on my shock...
Looks good. Seb sent me one too and was wondering how it would look, definitely on the to do list.
I also swapped out the RC shock, this is from a GSXR, same dimensions as the RC shock, about .5" longer actually. The spring is 450lb, it will need to be changed out but that will be easier than on the RC shock. I believe the VFR shock is about an 800lb spring, I'm hoping something close to that will fit this shock body. Thomas, do you know what rate spring yours is being built with?
JamieDaughertyHumm, that two piece version looks suspiciously like the single piece machined caliper guide bracket I include with my kit! Imitation is the sincerest form of flattery I guess... or at least that's what I'm going to tell myself.
Nice work guys.
Also looks similar to the steel one I started making for my CB about 3 years ago..you sure you weren't snooping around sohc4.net... :dry: :unsure:
I obviously did see yours but other than attaching the torque arm I don't know that there are too many different ways to do it, this seemed to be the least involved route. I really wanted to flip it under the swingarm, maybe something to do later..
CB750, not mine but where I was headed before swapping in another swingarm.
What a reality check for me. I haven't mounted mine yet! :unsure:
Not too bad really. This shot is taken about plate level from 6-7 feet back and the lift is 7" when fully lowered. You can still read the numbers easily...if I would have left the plate on for the pic. Of course, that means the police can see it easily...need to perfect a hideaway plate mount...actually, I don`t like getting pulled for obvious stupid stuff(you wouldn`t believe the plates on some of the bikes here, stuffed up in front of the rear wheel, etc)
Seriously though, I`m not sure if I`ll bend it down slightly. Have to wait until I get it on the ground and see if I eventually like it or it bugs me. It`s a little higher than my Nighthawk S plate, dunno, we`ll see.
Ok, I give up. I had a little overtime $$ burning a hole in my pocket, got a white 900RR rear wheel on ebay for $75. I want to put a 180 Avon Storm on to match the front.
What front sprocket do I need, and are you guys running a Jamie-spec machined hub, or have you taken more off? Did some reading back through the thread and got my answers, Thanks... :rolleyes:
What are you guys doing for gearing to make up for the smaller rear? Seems like a much smaller(less teeth) rear sprocket is necessary, then the next thing is ride height. I've raised the forks in the trees 9mm already, but a 60 series rear would be ~2" shorter than the stock 130/80 combo... so I jack the rear of the bike up 2" how? And run what, 5 teeth less than stock to try to come close to stock gearing?
My goal was to end up with gearing similar to going -1 front, +1 rear on the stock bike.
SEBSPEEDOk, I give up. I had a little overtime $$ burning a hole in my pocket, got a white 900RR rear wheel on ebay for $75. I want to put a 180 Avon Storm on to match the front.
What front sprocket do I need, and are you guys running a Jamie-spec machined hub, or have you taken more off? Did some reading back through the thread and got my answers, Thanks... :mad:
What are you guys doing for gearing to make up for the smaller rear? Seems like a much smaller(less teeth) rear sprocket is necessary, then the next thing is ride height. I've raised the forks in the trees 9mm already, but a 60 series rear would be ~2" shorter than the stock 130/80 combo... so I jack the rear of the bike up 2" how? And run what, 5 teeth less than stock to try to come close to stock gearing?
My goal was to end up with gearing similar to going -1 front, +1 rear on the stock bike.
TIA
Welcome to the dark side.... :fing02:
What is the stock wheel for your 750? The 140/80 17 rear on the 1000R/F works out to 140*80=112mm section height. The 180/55 works to 99mm section height, so about .5" shorter. I added about 1" to my custom shock extension but the new Penske I picked up adds about .5" more. So I figure about 1.25" overall?
I haven't really considered the gearing, the front offset sprocket is the same # teeth, the rear I had laying around is 43 teeth, stock R bike is 44 I believe. I was going to try the 43 and switch out if necessary.
SEBSPEEDOk, I give up. I had a little overtime $$ burning a hole in my pocket, got a white 900RR rear wheel on ebay for $75. I want to put a 180 Avon Storm on to match the front.
What front sprocket do I need, and are you guys running a Jamie-spec machined hub, or have you taken more off? Did some reading back through the thread and got my answers, Thanks... :mad:
What are you guys doing for gearing to make up for the smaller rear? Seems like a much smaller(less teeth) rear sprocket is necessary, then the next thing is ride height. I've raised the forks in the trees 9mm already, but a 60 series rear would be ~2" shorter than the stock 130/80 combo... so I jack the rear of the bike up 2" how? And run what, 5 teeth less than stock to try to come close to stock gearing?
My goal was to end up with gearing similar to going -1 front, +1 rear on the stock bike.
TIA
Sell it and buy an F3 wheel. It's 5.0 wide and will take a 170. Plus, I don't think you'll have to offset the front sprocket at all but the chain will be close to the tire. You won't notice the difference between the 180 and 170 visually. Might work better for the 750's?
SEBSPEEDStock wheel for the 750 is 130/80V18. I have an F2 wheel in there now with a 160/70, and I think it looks like a truck tire:
However, if I'm going with a wider tire, I want the wheel to match. I want the handling and the looks!!
I talked to Tom briefly yesterday, he reminded me that the 750 frame is smaller, and that you guys are already running the chain kinda close to the frame... I mighta bought that wheel too soon!! :mad:
Don`t know for sure without trying it Seb, but it seems to me that the frame might be a bit smaller yes. I`ve been randomly thinking(funny that) that when I put an R motor in my 1000F frame I may put the F motor in the 750 frame...maybe, random thoughts like I said.
Anyway, the swingarms are probably the same between the 1000 and the 750, but it`s the lower chain run which is where clearance may be an issue. Looking at both the 1000 and 750 frames, it looks like you could have enough clearance for 5mm offset on the sprocket, doubt you could go much more. This is no measurements, just eyeballing. When you get the wheel, space the countershaft sprocket out the 5mm and use your F2 hub on the 5.5" wheel to see how the spacing may line up for you, and space the hub/rear wheel like we are doing on the larger bikes as a starting point and go from there.
I`ll make it pretty after I get everything engineered right. I`ve taken it around the block gingerly since at that time I had spacers behind the countershaft sprocket, didn`t want to dump the engine oil all over the rear wheel...again. If it`s anything like my R, it should be much better than stock. Not enough to tell yet. Hopefully will take a shakedown run or two this weekend. Several things left to do. The clutch release bracket I got from Winning-Run in Japan(www.winning-run.com). I`d like to have it copied and several more sets made up, haven`t researched it to see if it`s cost effective yet. Not cheap either way, but I need a couple more myself so maybe. I found a cable to use from Motion Pro. Longer than stock and different, the stocker won`t work. Also need the speedo pickup from a RC30 to make it work, like I said, not cheap if you decide to do it.
Mwdaug still has a VF1000R engine, complete, on Ebay. Just letting you know, if interested.
BTW, if you do scrap your present engine, I need a starter.
Thanks and good luck,
Larry
VFRrider
I was thinking of stuffing my R motor in the F. I did get a couple leads on F cases, Thomas linked me up with one for cheap but the seller can't ship them until Sept. I talked to Mwdaug about his motor but it's got 50K miles and he says pick up only, no ship. I'm halfway tempted to just buy his bike on eBay with the Dave Dodge motor and call it done. :fing02: Auction ends in 2 hours and it's a bargain at that price imho. :fing02:
VF1000RSThe clutch release bracket I got from Winning-Run in Japan(www.winning-run.com). I`d like to have it copied and several more sets made up, haven`t researched it to see if it`s cost effective yet. Not cheap either way, but I need a couple more myself so maybe. I found a cable to use from Motion Pro. Longer than stock and different, the stocker won`t work. Also need the speedo pickup from a RC30 to make it work, like I said, not cheap if you decide to do it.
I don't have one in the garage anymore but the speedo pickup from the 3rd gen VFR looked like it would mount up, going from memory here..May be the same part # as the RC30..
Winning-Run in Japan: Nice stuff, wish I read Japanese!
Well, if you can do a much better job, Burns Stainless has all the pieces, albeit in SS, to make your own. I was leaning towards that way myself. Wanna make a RC211V type system for the VF1KR motor for me, cheap, that is?
vfrriderWell, if you can do a much better job, Burns Stainless has all the pieces, albeit in SS, to make your own. I was leaning towards that way myself. Wanna make a RC211V type system for the VF1KR motor for me, cheap, that is?
Larry
VFrrider
Sure, buy me a TIG welder, and I'll make you 2!! :huh:
I said I could make them better because we have argon chambers at work in our fusion weld area. To properly weld titanium, it has to be fused in an oxygen-free environment. I can tell by the discoloration around the welds that oxygen was present when those pipes were welded, which means the welds are contaminated and susceptible to cracking.
Welding stainless is cake! But until I scrape up the $1900 I need for the Thermal Arc welder I want, there will be no TIG welding at my house. sad.gif Right now I have a crappy little wire feed unit, and my big TIG unit at work.
vfrcapnThomas, did you have a shop machine your Speedo pickup/clutch release bracket? Any chance they have the specs stored and could CNC out another one or two? Any issue with the length of the speedo cable reaching the pickup?
VF1000RSI`d like to have it copied and several more sets made up, haven`t researched it to see if it`s cost effective yet. Not cheap either way, but I need a couple more myself so maybe.
As I mentioned to Tom once, we have a LaserQC scanning tool at work, and could reverse engineer this bracket.
I also, just recently(last week) got a local CNC contact.
Tom, if you ever have that bracket off the bike, can you snap some pics of it, maybe with a tape measure in the background, then I could pay this guy a visit and ask for a quote. That quote would be based on me providing him with, at minimum, a 3D CAD file or maybe even a Surfcam file with g-code if his machine's processor will accept that format. If it does, we're in for materials + setup time! :unsure:
vfrcapnThomas, did you have a shop machine your Speedo pickup/clutch release bracket? Any chance they have the specs stored and could CNC out another one or two? Any issue with the length of the speedo cable reaching the pickup?
Thanks Rob-san! Works out to about $196 if I'm reading that right, 21K Yen. I bought an all in one digital tach/speedo for my CB that ran about the same iirc, but it has a wired pickup and sensor for the front wheel, same style as a bicycle computer, not the most elegant or accurate device. The unit itself would fit nicely in place of the stock speedo with a bevel around it. This could be a viable alternative.
I`ll provide whatever is necessary, including the bracket itself as Seb and I have talked about at a previous time.
Jamie, if you can make this for that price, I`m sure you could sell a few, however, I`m sure we could work something out...I need 3...
As far as the bracket itself goes, it`s actually 2 brackets that bolt together and 5 spacers. There is also a brass or bronze bushing insert that the shifter shaft rotates in.
I need to do some test runs on this bike before I start tearing it down though. If all works out, a good time may be when I send the spare frame and the wheels for powdercoat...
SEBSPEEDHey Tom, mind if I ask what paint you're using on the clutch slave? I was thinking of using PJ1's Honda case paint(match for their dirt bike cases), which would be a magnesium color.
The more parts I attach to my frame, the darker it gets...
I used Ace gold metallic. Not sure I like it.
Downside: -The bling factor
Upside: -It does a great job of breaking up a dark area on the bike
-The bling factor :unsure:
Last time I tried to get PJ1 paints from my dealer, they gave me a run around about backorders or some crap... I think they just forgot my order a couple times... gonna check with them again tonight about the case paint.
Took the F out for about 50 miles saturday, then about 100 miles sunday. Nothing fell off or broke. Ran over a piece of metal on saturday and thought I had lost something, checked the bike ok, and checked my tools when I got back, everything ok and I hadn`t forgotten a tool in the bike somewhere. Sunday I had a "moment" where I went into a blind right-hander and was too wide, was leaned over on the double yellow and had to make myself trust the tires instead of braking and running wide, cranked it over a bit more and without drama came back to my lane. I like the tires so far, the bike actually feels more nimble than stock at low speeds and is stable at much higher speed but there is definitely a point where you need to commit to the lean. I like to work my way up to the limit without going past it. Right now I still have 1/2" to 3/4" chicken strips on both the front and rear tires. Fair enough for a couple shakedown runs through mountain roads.
The bike is still not exactly how I want it, need to get it closer to being balanced front to rear. I started by setting the fork up like my R. Backed off the compression on the front, probably need to do more. Backed off my initial preload on the front also and need more in the rear. Definitely a totally different animal than my R, the R has much more weight on the front tire than the F. More twiddling of suspension settings to come. Think I may go for a lower bend on the bars also....more to come.
P.S. The front brakes kick ass. The little rear does very little as the pads haven`t worn to the rotor yet...I may have a flatter rotor to swap in since locking the front while pulling off onto gravel at speed to wait for my buddy isn`t fun. I don`t need it to do much, but next to nothing won`t work.
All in all a good couple shakedown runs.
Almost forgot, new chain with original grease makes a helluva mess on the white rear wheel after 150 miles...
KelI was curious as to how the 5.5 would affect handling. I imagined it would turn in slower. Large radial vs small bias has to change things as well. Hopefully all for the better.
It handled surprisingly well. Must be the profile of the tires. Not as nimble as say, my Nighthawk S, but at least as good as the stock sized tires if not better. This is at low city speeds. At faster twisty speeds, it definitely wants to lean faster and further than I have had it, but I need to get the suspension dialed in before I try to find the tire edges. The pegs also feel too low and the bars too high at the moment....but it is comfortable...must be getting old...nah!
vfrcapnWell, I took my F out today too, just around the block. Really seems like it has nice torque, I could feel it just wanted to loft the front wheel. Sounds good, very comfy, upright position. Feels like so much more power down low than the VFR.
Same motor, I just (don't tell Seb), JBWelded the motor mount back on. It's leaking though and won't stop so it's not going anywhere. Oh well, what could have been...
That stinks. No lead on a motor or cases yet? Light a fire under Chuck, he needs it!
He said it would probably be around September. Someone needs to light a fire under me too, 'cuz I don't know that I'm up for a motor rebuild. It has DMV issues too that I'm not too up to fight about. This thing may be headed for the parts bin in the sky unless someone has $800 to ride it away. kitty litter to soak up the oil trail not included..
R motor just about ready to go in the frame hopefully this weekend. Got Jamie's oil kit installed.
Hi all. Im a new member here. I have been following this thread for a while. You guys seem like the best people to ask a few questions. First off, I am currently riding the VF1000F and I bought the VFKR as a parts bike for one that I will have this fall to do a ground up on over the winter. I am getting itchy now though and have swapped the R front wheel to the F. I am in the middle of swapping the R swingarm and rear wheel to the F as well. I have two questions. First, When doing the swingarm swap what have you been doing for the torque arm for the rear brake? I am thinking of machining a new arm and machining and welding a stay for it on the forward end of the swingarms underside. Can you see any complications with this? Second I also want to swap the motor and carbs to the F as well. What are the obsticals that I am going to encounter in doing the swap and what solutions have you found for them? Thanks a bunch.. smile.gif
HondanutHi all. Im a new member here. I have been following this thread for a while. You guys seem like the best people to ask a few questions. First off, I am currently riding the VF1000F and I bought the VFKR as a parts bike for one that I will have this fall to do a ground up on over the winter. I am getting itchy now though and have swapped the R front wheel to the F. I am in the middle of swapping the R swingarm and rear wheel to the F as well. I have two questions. First, When doing the swingarm swap what have you been doing for the torque arm for the rear brake? I am thinking of machining a new arm and machining and welding a stay for it on the forward end of the swingarms underside. Can you see any complications with this? Second I also want to swap the motor and carbs to the F as well. What are the obsticals that I am going to encounter in doing the swap and what solutions have you found for them? Thanks a bunch.. smile.gif
Hondanut :warranty:
Welcome. I tied the R torque arm to the F frame by using a longer bolt(60mm) through the lower peg hanger mounting hole:
[image: gallery_10340_3750_202046.jpg]
I used one of he bushings for the stock shock upper eye as the stock torque arm bushing has an internal diameter too small. Also had to cut it shorter. Then a washer and a locknut to hold it in place. This needs to pivot so grease it up. I am using a wider wheel, and I bent the torque arm around the wheel so not sure if it will line up for you with the stock R wheel.
Also thought of just making a torque arm bracket like the R`s, then welding it to the frame on the F. Looks simple enough, but I haven`t yet decided whether to put an R motor in the F frame or convert an R frame to carry the F bodywork.
Ok I have just created an album in the members area. Sorry no pics yet of the R front wheel installed but when both wheels are on I will post another. smile.gif
Im not sure yet. The VFKR that im getting at the end of the summer I have not seen yet. All I know is that its in pieces and in good shape. The one problem with it is that its missing parts. Which parts Im not sure. I shoulkd know at the end of the summer when I have all the parts together and figure out what all is missing. After that sure. If I have two then no problem :unsure: :unsure:
SEBSPEEDHey capn, got an underside shot of the motor? I'm 99.999% sure I know where to drill for the oil tap... a pic would cinch the deal. I spent $75 on parts and will build my own oil kit... pics coming soon, looks very similar to yours. :unsure:
On the R motor there's a raised area with a little dimple in the middle, that's right where I drilled. yeah, if I had known then what I know now I would have assembled the kit myself.
So, I was getting my daughters ATV checked out for summer today and got my R checked out also(poor neglected thing, don`t mind the dust!) and thought I might as well do a quick comparison. My R feels tight, a little reluctant to turn at low speed(Dunlop 208`s), motor quiet except for the gear whine and the bellow from the twin Yoshi`s. Big power from the motor, addictive.
Hop on the F and it immediately feels like a chopper...bars are too high and the ass too low and compresses too easily, need lower bars and I think I`m going to send the Works shock back for a stiffer spring(had this in the back of my mind since last weekends ride, this ride clinches it). It also feels loose, turns easier at low speed than my R though(high bars, pointier profile tires-Michelin Pilot Powers). I feel disconnected from the front end with the high bars. The motor makes more noise than my R(cam chains vs gears I suppose) and doesn`t feel anywhere near as strong...weird, what frame of reference will do to your mind, thought it was adequate until I rode my R, wait, that`s not right, it is adequate, enough to get me in trouble easily, but the brakes haul me back down, not as much power, immediately, as the R.
Switch to my nice, completely stock 86 R. Quiet except for gear whine, notchier trans than either of the others. Doesn`t seem to want to pull like my R or even the F for that matter...I think the stock exhaust must really cork these up, mine seems a beast compared to this one. Comfortable and I think of sport touring on it. Don`t feel I could push the front end on it, seems a little vague. On the other 2, I felt like giving it a handful of throttle until I scared myself, this one I seem to want to just cruise, weird. Give it the berries anyway, then haul it down with the brakes, definitely less powerful than the RC51 brakes on the others(big mystery there!), but pretty good for this big girl. That`s the other thing, this one feels alot heavier than the other 2 and doesn`t turn as easily at low speeds as the F or my modded R. Probably has to do more with the Dunlop 501`s in 120/80/16 and 150/70/17 and their flatter profile than anything. Front end feels less a part of the bike on this one for sure.
Here`s the girls after their outing today:
[image: gallery_10340_3750_102488.jpg]
And what would it be if I didn`t get one from the rear...
Maybe black or white on the wheels. If you are using the RC forks, maybe a brown to match and polish the lip along the edges of the swingarm. Or a gold that`s not too garish. Silver is always good.
That`s a brand new chain with original chain grease everywhere. I use the Honda HP stuff that doesn`t fling normally...and just wipe off the side plates to keep the bling factor intact! Might have to try the Bel Ray stuff.
Just so this doesn`t turn into a chain lube thread...sending my shock back to Works today for them to replace my spring with a 1000 lb spring under their 30 day ride quality gaurantee.
VF1000RSJust so this doesn`t turn into a chain lube thread...sending my shock back to Works today for them to replace my spring with a 1000 lb spring under their 30 day ride quality gaurantee.
That's surprising, a 1000lb/in is the minimum I install on shocks for the 1000's. Are they going to revalve too? My experience with their shocks is they are really underdamped, going to a higher rate spring will expose this even more.
On the fuel pump topic - all of my V4's run gravity feed with no issues at all. I've run them this way for many years and the only difference is that they don't break down (for this reason at least) anymore!
JamieDaughertyOn the fuel pump topic - all of my V4's run gravity feed with no issues at all. I've run them this way for many years and the only difference is that they don't break down (for this reason at least) anymore!
Can you post some pics on how you routed the fuel lines? I ran it as short as I saw possible without kinking the line, it wasn't getting any fuel - I did have a filter inline. Worked fine with an elevated external tank & then with the fuel pump but it died on the gas tank.
Once I got the motor in the oil fitting is very, very tight up against the frame. Is this going to be an issue with vibration and flexing of the frame?
SEBSPEEDHmm... should the hole for the fitting be drilled as far inboard as possible?
By the way, it's looking great Mike! Paint or powder on the frame? I think the swingarm would look good in silver, my bike is kinda on the dark side...
It should have been about 3mm more inboard, too late now. I'm just worried about snapping it off at some point while riding. That would be bad. Real bad.
Any sealant on those threads in to the case? I was just going to use some red loctite.
Thanks! Just paint, best quote I got was $560 to powder the frame and swingarm, so about $25 in spray cans it was. :blush:
JamieDaughertyThat's surprising, a 1000lb/in is the minimum I install on shocks for the 1000's. Are they going to revalve too? My experience with their shocks is they are really underdamped, going to a higher rate spring will expose this even more.
Interesting. So much for taking my weight and riding style into account. I weigh 165 and specified aggressive street, twisty mountain roads. I even talked at length about the front end and wheel modifications and my preferences as to how this bike was to be used. Well, maybe they took my weight and decided it was an old sloppy VF, those guys don`t expect much... send that guy a chopper shock. Sent it out today with a note as to what I needed. I had also talked to Oscar and Ortiz on the phone previous to this and they are expecting it, I think a follow up call when it arrives(I`ll be tracking it) is in order. Wish I could build a flipping shock myself...., I know what I want, I just have to feel it so I know it`s right. Just need to make sure they get it how I want it.
VF1000RSIs it touching the frame? If it is, I really doubt it will snap or be a problem, maybe just rub some paint off.
Don`t know about Jamie`s kit, but if that is a pipe thread fitting, I`d use teflon tape.
It's under a lot of lateral pressure from the frame, I'm surprised I got the frame on. I hadn't completely tightened up the pipe thread insert in to the motor so I took the 90 fitting off and it doesn't look like it's going to be easy to get it back on w/out stripping the threads. I'm going to have to bend the 90 slightly or loosen the frame mounts to install it. I either got the drill off center a little or ended up tapping at a slight angle.
I wasn't sure if teflon tape would hold up to the heat and oil but I can give it a try. Any recommendations Jamie?
vfrcapnIt's under a lot of lateral pressure from the frame, I'm surprised I got the frame on. I hadn't completely tightened up the pipe thread insert in to the motor so I took the 90 fitting off and it doesn't look like it's going to be easy to get it back on w/out stripping the threads. I'm going to have to bend the 90 slightly or loosen the frame mounts to install it. I either got the drill off center a little or ended up tapping at a slight angle.
I wasn't sure if teflon tape would hold up to the heat and oil but I can give it a try. Any recommendations Jamie?
Humm, from the pictures it looks like it's not touching. The process is intended to be done with the engine installed, that helps line things up better. About the only thing I can think of is to make an extension. I don't really like that because it could easily turn into a "rigged" looking setup. In reality the fitting is most likely going to be ok as long as you can reinstall it.
Teflon has a tremendously high temperature rating and will fine. I don't use it on that fitting when I install them but it would not hurt anything.
You need a low profile 90 fitting to replace that fitting I think. NPT on the engine end, AN to the hose end. I`ll see if I can get a pic and maybe a part number. Need time.
I`ve had teflon tape on mine for years now. Any NPT fitting, you really don`t want to risk a leak there.
Try a Google search on Earls 922104 . Then replace the existing 90 hose end fitting with a straight AN hose end fitting. That _may_ give you the clearance and also has a swivel which may also help. ANplumbing.com has worked for me in the past.
VF1000RSYou need a low profile 90 fitting to replace that fitting I think. NPT on the engine end, AN to the hose end. I`ll see if I can get a pic and maybe a part number. Need time.
I`ve had teflon tape on mine for years now. Any NPT fitting, you really don`t want to risk a leak there.
Try a Google search on Earls 922104 . Then replace the existing 90 hose end fitting with a straight AN hose end fitting. That _may_ give you the clearance and also has a swivel which may also help. ANplumbing.com has worked for me in the past.
I think that might work. Thanks for the tip on AN Plumbing, they look like the best pricing. I'll see when the order gets here.
Did you mean 921104? http://secure.chassisshop.com/partdetail/921104/ I don't think there's enough room to screw in the 922104, 10mm to the case. The 1104 should work with the straight hose fitting. It's tight, it's pointed straight at the frame rail, there is no offset and I don't think there was more than a mm or two I could have offset it.
The 921104 won't help, if your current fitting is hitting then it will also. The 922104 might be better but you'll just have to try it and see. The pictures are often misleading, they normally show a -6 or -8 size fitting and the -4's are not usually proportional to those.
Another option would be to use a 45 on the AN-NPT adaptor part. It would be Earl's part 982304 and you would also need a 45 hose end fitting, Aeroquip part FBM1021. You should be able to get the adaptor in there and it would allow you to angle the lines away from the frame rail while also getting it in the right direction.
[image: View Post]vfrcapn, on Jun 27 2008, 01:11 AM, said:
[image: View Post]VF1000RS, on Jun 26 2008, 09:08 PM, said:
You need a low profile 90 fitting to replace that fitting I think. NPT on the engine end, AN to the hose end. I`ll see if I can get a pic and maybe a part number. Need time.
I`ve had teflon tape on mine for years now. Any NPT fitting, you really don`t want to risk a leak there.
Try a Google search on Earls 922104 . Then replace the existing 90 hose end fitting with a straight AN hose end fitting. That _may_ give you the clearance and also has a swivel which may also help. ANplumbing.com has worked for me in the past.
I think that might work. Thanks for the tip on AN Plumbing, they look like the best pricing. I'll see when the order gets here.
Did you mean 921104? http://secure.chassi...tdetail/921104/ I don't think there's enough room to screw in the 922104, 10mm to the case. The 1104 should work with the straight hose fitting. It's tight, it's pointed straight at the frame rail, there is no offset and I don't think there was more than a mm or two I could have offset it. [image: Posted Image]
No, I meant 922104. It would replace the straight NPT to AN fitting in your pic. It has the swivel NPT so you don`t have to worry about hitting the case. It threads directly into the engine. That should move it high enough. Then put a straight or 45 hose end fitting. I`ll try to get a pic up tonight as I`ve got a similar setup.
[image: View Post]JETninja, on Jun 28 2008, 02:21 PM, said:
Black Frame / Black Swing Arm.....Nice and Glossy. With so much Frame exposed, Silver or Polished would look disjointed and goofy IMO.
Kinda like those Red Wheels as well, how about Black Rims with Red Stars. Find someone with some PS skills.....
Looking Good!
Thanks. This is the R bike so most of the frame/motor is covered up. Wheels are black, not planning on changing them right now. I went with a dark bronze on the swingarm to almost match the RC forks, just polished the ribs. [image: Posted Image] [image: Posted Image]
Kick ass thread guys, love what you're all doing :fing02:
The frame and swingarm / fork setup vfrcapn posted recently looks killer, great choice of colors!!
[image: View Post]VF1000RS, on Jun 22 2008, 06:26 AM, said:
Switch to my nice, completely stock 86 R. Don`t feel I could push the front end on it, seems a little vague. On the other 2, I felt like giving it a handful of throttle until I scared myself, this one I seem to want to just cruise, weird. Give it the berries anyway, then haul it down with the brakes, definitely less powerful than the RC51 brakes on the others(big mystery there!), but pretty good for this big girl. That`s the other thing, this one feels alot heavier than the other 2 and doesn`t turn as easily at low speeds as the F or my modded R. Probably has to do more with the Dunlop 501`s in 120/80/16 and 150/70/17 and their flatter profile than anything. Front end feels less a part of the bike on this one for sure.
Here`s the girls after their outing today:
[image: Posted Image]
And what would it be if I didn`t get one from the rear...
[image: Posted Image]
The top heavy feel and slow turn in come from 2 things:
You have a 150/70 rear and stock is 140/80 so the 150/70 lowers the rear a bit and slow steering. Then on the other whit the rc51 forks you have the front lower and rear high, it give faster steering (not nesseserly as tripel ofset has to do whit it also) and bringin the motor lower, the front part at least thats more heavy.
I can feel my RC24 beeing a slight slower steering whit a 140/70-18 (or 160/60R18 :cool: ) vs stock 130/80-18 that has about same height differens as you now have (140/80 vs 150/70). I have also dropped my forks in the tripels 15mm (17mm max you can) and it made a lot differens in the steering, much faster now (even faster that stock) whit the 160/60R18 rear, and the top heavy feel, a lot lighter now! But I do not recomend droping the forklegs until there is stiffer springs in the fork!
[image: View Post]keny, on Jul 4 2008, 01:44 AM, said:
The top heavy feel and slow turn in come from 2 things:
You have a 150/70 rear and stock is 140/80 so the 150/70 lowers the rear a bit and slow steering. Then on the other whit the rc51 forks you have the front lower and rear high, it give faster steering (not nesseserly as tripel ofset has to do whit it also) and bringin the motor lower, the front part at least thats more heavy.
I can feel my RC24 beeing a slight slower steering whit a 140/70-18 (or 160/60R18 :cool: ) vs stock 130/80-18 that has about same height differens as you now have (140/80 vs 150/70). I have also dropped my forks in the tripels 15mm (17mm max you can) and it made a lot differens in the steering, much faster now (even faster that stock) whit the 160/60R18 rear, and the top heavy feel, a lot lighter now! But I do not recomend droping the forklegs until there is stiffer springs in the fork!
Keny,
You bring up some good points which I neglected to mention in my short write up.
This was simply an observation of the different bikes/setups ridden back to back, but I wasn`t really asking why. I know exactly why each rides as it does. It just shows how far I have yet to go to get the F to handle how I want. I guess I assume(wrongly) that everyone is on the same page as me and I didn`t feel like writing a book at the time, just my observations. There is only so much that can be expressed on a forum, much thinking and all the work happen off list,... More a notation of what I have to do yet to the F project to get it to ride how I would like.
A ways to go yet, it`s still not ready obviously. It won`t be as radical as my R, but it will be better than it is now. With the soft shock spring, more weight gets transferred to the rear, there is not enough weight on the front and the rake isn`t steep enough, the rear compresses too much when I am on it adding to this, so I don`t get the turning ability and feel I am after. The smaller diameter CBR wheel/tire is also adding to this. I have compensated for some of this with a longer than stock shock. The shorter RC51 forks drop the front some which helps. Add the high bars that puts my weight further back on the bike and that adds to the disconnected/chopper feeling. I really hate it. But I will fix it. I need to be able to feel what the front is doing and I know I can get there. I also don`t want to go to the extreme that I did on my R with the F but I want more of a balance between the front and rear. The bike as a whole if you will.
My R sits as it does with the high rear and the low front because that is what it took to get it to turn how I want. The rear ride height adjustment was built in so I could get it dialed in for me. It was engineered that way for a purpose. Steeper fork rake and more weight on the front. The fork springs were changed to 1.0kg/mm to deal with this. The fork offset adds to the stability and combined with the steeper rake, the bike turns better at high speed, but is still a rock as far as stability goes. I didn`t build my R without knowing what I was doing, far from it, I had a specific goal, and it wasn`t just to look cool, it had to handle.
The F is a different animal and presents challenges not altogether different, but getting there is alot of the fun for me. I`m sure I`ve left a ton of information out, but that`s all I feel like writing at the moment.
[image: View Post]Kel, on Jul 11 2008, 03:30 PM, said:
[image: View Post]SEBSPEED, on Jul 11 2008, 05:03 PM, said:
Anyone care to motivate me with their progress?
OK, You gonna let Tom get a blue VF on the road before you? "Gentlemen...Start!...Your!...Projects!"
Game on...
Ordered my custom sidepanel decals from Mark at CBDecals today to match the full set I have....will have the 84 VF750F RWB paint scheme with the "750" removed, the red stripe cleaned up and the "Interceptor" left in white lettering on the blue paint on the sidepanel, then will have "V45" in red lettering above on the white of the sidepanel.
Their site will be down for the next week(if anyone is interested) but he was going to knock it out to me by tomorrow.
[image: View Post]Kel, on Jul 11 2008, 02:30 PM, said:
[image: View Post]SEBSPEED, on Jul 11 2008, 05:03 PM, said:
Anyone care to motivate me with their progress?
OK, You gonna let Tom get a blue VF on the road before you? "Gentlemen...Start!...Your!...Projects!"
I'm just trying to clean out the garage, getting rid of stuff on eBay. I still have a R lower and 2 uppers left, a header along with some F brakes, swingarm, valve covers. Need some room..
[image: View Post]vfrcapn, on Jul 11 2008, 11:51 PM, said:
[image: View Post]Kel, on Jul 11 2008, 02:30 PM, said:
[image: View Post]SEBSPEED, on Jul 11 2008, 05:03 PM, said:
Anyone care to motivate me with their progress?
OK, You gonna let Tom get a blue VF on the road before you? "Gentlemen...Start!...Your!...Projects!"
I'm just trying to clean out the garage, getting rid of stuff on eBay. I still have a R lower and 2 uppers left, a header along with some F brakes, swingarm, valve covers. Need some room..
I`ve been trying to clear out some bikes to get some room and still waiting on my rear shock to come back from the rework at Works. Also started toying with my XR500 Supermotard project again...
[image: View Post]VF1000RS, on Jul 12 2008, 02:52 AM, said:
[image: View Post]vfrcapn, on Jul 11 2008, 11:51 PM, said:
[image: View Post]Kel, on Jul 11 2008, 02:30 PM, said:
[image: View Post]SEBSPEED, on Jul 11 2008, 05:03 PM, said:
Anyone care to motivate me with their progress?
OK, You gonna let Tom get a blue VF on the road before you? "Gentlemen...Start!...Your!...Projects!"
I'm just trying to clean out the garage, getting rid of stuff on eBay. I still have a R lower and 2 uppers left, a header along with some F brakes, swingarm, valve covers. Need some room..
I`ve been trying to clear out some bikes to get some room and still waiting on my rear shock to come back from the rework at Works. Also started toying with my XR500 Supermotard project again...
& I'm trying to get my lawn mower and associated crap out and into a new shed I'm finishing today... then I have to organize, I'm making a second "bay" to work in so I can have 2 projects going without mixing stuff up... it'll be nice to not have to tiptoe around stuff anymore! :fing02:
Tom, do you know Mark from somewhere other than his site? I've sent him two emails this year and have yet to hear back from him. It was a pretty simple question too, I wanted to order certain decals instead of the whole kit because I'm going to paint the stripes...
[image: View Post]SEBSPEED, on Jul 12 2008, 07:18 AM, said:
& I'm trying to get my lawn mower and associated crap out and into a new shed I'm finishing today... then I have to organize, I'm making a second "bay" to work in so I can have 2 projects going without mixing stuff up... it'll be nice to not have to tiptoe around stuff anymore! :fing02:
Tom, do you know Mark from somewhere other than his site? I've sent him two emails this year and have yet to hear back from him. It was a pretty simple question too, I wanted to order certain decals instead of the whole kit because I'm going to paint the stripes...
Just from CBDecals. Are you using this email: cbdecals@afegraphics.com ? He usually sends me a return email the next day. He has always been very quick returning emails but he just told me the site is going to be down for the next week. I wouldn`t think that your request is out of the ordinary, he made two full sets for me without warning labels and he is doing the sidecover decals custom. He also has done many custom decals for people on the CB1100F list.
[image: View Post]VF1000RS, on Jul 12 2008, 11:11 AM, said:
[image: View Post]SEBSPEED, on Jul 12 2008, 07:18 AM, said:
& I'm trying to get my lawn mower and associated crap out and into a new shed I'm finishing today... then I have to organize, I'm making a second "bay" to work in so I can have 2 projects going without mixing stuff up... it'll be nice to not have to tiptoe around stuff anymore! :fing02:
Tom, do you know Mark from somewhere other than his site? I've sent him two emails this year and have yet to hear back from him. It was a pretty simple question too, I wanted to order certain decals instead of the whole kit because I'm going to paint the stripes...
Just from CBDecals. Are you using this email: cbdecals@afegraphics.com ? He usually sends me a return email the next day. He has always been very quick returning emails but he just told me the site is going to be down for the next week. I wouldn`t think that your request is out of the ordinary, he made two full sets for me without warning labels and he is doing the sidecover decals custom. He also has done many custom decals for people on the CB1100F list.
I have been to his house quite a few times. Both my R and F decals are from him. He lives about a half hour from me. Anytime I have emailed him it usually gets replied to pretty quick.
Busy day for UPS and the Postal Service. Got my reworked shock today from Works with the spring switched to a 1100lb spring and tweaked. Haven`t installed it yet though. Hope this is the final revision. Also got my custom sidepanel decals from CBDecals for the 750 today. Looks like Mark did his usual excellent work with the decals and it will end up giving the bike a factory looking but custom touch.
Can't wait to hear more ride reports on the bike Tom, that really makes me want to work on mine.
I will check Mark's site again later today and over the next few days, I have questions and I hope he's got answers...
I got a teensy bit of work done on my 750. The little screw the holds the plastic knob for the trip meter reset had snapped its head off when I tried to remove it years ago, when I was disassembling the bike. A plastic part on the end of another shaft also broke from the pressure(I know, I know, frikken ham fist...). I also wanted to swap out the white plastic tub from the 750 unit, as one of the four grommet mounts had a piece missing.
So, I went into "swiss watchmaker" mode, and laid out my three gauge units - the 2,997mi unit from my 750, the 26,000mi unit from my and an 8900mi unit from ebay(700).
Disassembled 2 and had one for reference, always a plus, seeing as how that's not covered in any manuals... they expect you to buy a whole new cluster... I also took lots of pics along the way of various angles for more reference. Didn't actually take too long and after fiddling with a few e-clips and springs, I had my 750 unit working like new again! I took the parts I needed from the 26,000mi unit, and will be selling the 8900mi unit soon. It was a pain in the butt fiddling with all the little gears and springs, keeping everything aligned while dropping parts in place(I have sausage fingers!), but I got'er dun. Another reason to keep this bike FOREVER when I finish it!!
I went all out(like with everything else on this bike) and brought the plastic tub in the house to clean it, nice wash with warm soapy water, will get a coat of Vaseline later to keep the plastic from drying out...
I'm also planning to swap out all the little incandescent bulbs for wedge type LEDS... might even color match them to add some pizazz... going to make life very easy on my electrical system with all the LEDS I plan to use on this bike, might make up for it by going to an HID headlight. :biggrin:
Do any of you guys know the bulb type number for the bulbs in the gauge cluster?
It is good to hear that you are making progress, Seb! To answer your question about the bulb type-I think it is a non-standard bulb type, as I had to order mine through Honda due to the fact that nobody carried anything close to the bulb for the IPC. The bulbs have the same base as a 23 automotive bulb, but the bulb itself is about half the size. If there was a way to convert to LED, I'd jump at it. For now, I had to settle with just replacing the burnt out bulbs.
I have a question for you, though. My tachometer face seems to have detached from the rest of the IPC and rotated about 15-20 degrees. It is still functional, but looks bad (though, now that I think about it, that is pretty much how that whole bike is). Are these repairable, or should I make you an offer on your spare?
[image: View Post]SEBSPEED, on Jul 22 2008, 08:51 AM, said:
Can't wait to hear more ride reports on the bike Tom, that really makes me want to work on mine.
I will check Mark's site again later today and over the next few days, I have questions and I hope he's got answers...
I got a teensy bit of work done on my 750. The little screw the holds the plastic knob for the trip meter reset had snapped its head off when I tried to remove it years ago, when I was disassembling the bike. A plastic part on the end of another shaft also broke from the pressure(I know, I know, frikken ham fist...). I also wanted to swap out the white plastic tub from the 750 unit, as one of the four grommet mounts had a piece missing.
So, I went into "swiss watchmaker" mode, and laid out my three gauge units - the 2,997mi unit from my 750, the 26,000mi unit from my and an 8900mi unit from ebay(700).
Disassembled 2 and had one for reference, always a plus, seeing as how that's not covered in any manuals... they expect you to buy a whole new cluster... I also took lots of pics along the way of various angles for more reference. Didn't actually take too long and after fiddling with a few e-clips and springs, I had my 750 unit working like new again! I took the parts I needed from the 26,000mi unit, and will be selling the 8900mi unit soon. It was a pain in the butt fiddling with all the little gears and springs, keeping everything aligned while dropping parts in place(I have sausage fingers!), but I got'er dun. Another reason to keep this bike FOREVER when I finish it!!
I went all out(like with everything else on this bike) and brought the plastic tub in the house to clean it, nice wash with warm soapy water, will get a coat of Vaseline later to keep the plastic from drying out...
I'm also planning to swap out all the little incandescent bulbs for wedge type LEDS... might even color match them to add some pizazz... going to make life very easy on my electrical system with all the LEDS I plan to use on this bike, might make up for it by going to an HID headlight. :biggrin:
Do any of you guys know the bulb type number for the bulbs in the gauge cluster?
[image: View Post]chickenofsea, on Jul 22 2008, 12:37 PM, said:
It is good to hear that you are making progress, Seb! To answer your question about the bulb type-I think it is a non-standard bulb type, as I had to order mine through Honda due to the fact that nobody carried anything close to the bulb for the IPC. The bulbs have the same base as a 23 automotive bulb, but the bulb itself is about half the size. If there was a way to convert to LED, I'd jump at it. For now, I had to settle with just replacing the burnt out bulbs.
I have a question for you, though. My tachometer face seems to have detached from the rest of the IPC and rotated about 15-20 degrees. It is still functional, but looks bad (though, now that I think about it, that is pretty much how that whole bike is). Are these repairable, or should I make you an offer on your spare?
The bulb size on top shouldn't really matter if we're converting anyway... right? The only thing I'm really going to give thought to is whether or not to leave the little metal hoods in there - they are there to "disperse" the light evenly in the cluster, but with the right LED arrangment that shouldn't matter, right? If they are too bright we could solder some tiny resistors onto each positive lead of each bulb to tone them down, yes/no?
Don't quote me on this, but I believe the tach is held in place with 2 screws on the back of the cluster(the white tub), and I think the face plate is held on the same way as the speedo face, with 2 small screws, one on either side of the needle. You've changed the bulbs before, so you know how easy it is to get to the cluster(try doing that on a newer bike! :comp13: ), maybe you forgot to tighten one of the screws the last time you changed a bulb?
Matt, do you still have that spare HID sitting around, and are you still happy with the one you installed?
EDIT: V4 BBS to the rescue! (another V4 site focused on older 'Ceptors and Magnas)
>>>
Quote
You want a 194 and you can order them from http://superbrightleds.com/ you want the 5 led style for best light distribution. You can also get them cheaper on ebay buy my experience is they only have about a 50% chance of lasting more than a week damn china knock off. [image: Posted Image]
Thanks to member Midias there for his quick reply! :fing02:
Here's the cross reference chart from www.superbrightleds.com, Rob(Veefer800Canuck) has used then before for his 5th gen dash conversion and is happy with the result and the product. He recommends the single LED (WLED -x) bulbs for his application, not sure if I want to get brighter ones since our clusters have those little tin hoods over the bulbs, leaving them in with a brighter bulb should reduce any spotting of intense light.
Seb-
Here is a pic of the stock VF IPC bulb next to a 194 bulb.
Note the difference in size of the base.
[image: Posted Image] DSC02510.JPG
[image: View Post]SEBSPEED, on Jul 22 2008, 01:44 PM, said:
EDIT: V4 BBS to the rescue! (another V4 site focused on older 'Ceptors and Magnas)
>>>
Quote
You want a 194 and you can order them from http://superbrightleds.com/ you want the 5 led style for best light distribution. You can also get them cheaper on ebay buy my experience is they only have about a 50% chance of lasting more than a week damn china knock off. [image: Posted Image]
Thanks to member Midias there for his quick reply! :fing02:
Here's the cross reference chart from www.superbrightleds.com, Rob(Veefer800Canuck) has used then before for his 5th gen dash conversion and is happy with the result and the product. He recommends the single LED (WLED -x) bulbs for his application, not sure if I want to get brighter ones since our clusters have those little tin hoods over the bulbs, leaving them in with a brighter bulb should reduce any spotting of intense light.
Do the contacts line up? Maybe a little creative grinding will help? To re-use a phrase I tossed around a lot while looking for our headlights - I can't imagine that Honda would engineer something as silly as that little light bulb just that bike... has to be compatible with something that was widely used in the 80's for lighting...
Seb-
They do not line up. The 194 is about twice as wide and thick as the proprietary bulb. I don't know if they are the only ones who use this style ( I can't imagine that they are), but all my searching has not panned out. I haven't really looked at the IPC off the bike too hard, but if you had room in there, you could simply ditch the smaller bulb connector and make a visit to your friendly GM dealer to get a 194 base. I doubt they give you enough room inside, but anything is possible on a 23 year old bike.
[image: View Post]SEBSPEED, on Jul 22 2008, 02:24 PM, said:
Do the contacts line up? Maybe a little creative grinding will help? To re-use a phrase I tossed around a lot while looking for our headlights - I can't imagine that Honda would engineer something as silly as that little light bulb just that bike... has to be compatible with something that was widely used in the 80's for lighting...
[image: View Post]chickenofsea, on Jul 22 2008, 02:51 PM, said:
Seb-
They do not line up. The 194 is about twice as wide and thick as the proprietary bulb.
That's weird. the guy over on the BBS just replied that he's had the 4 led versions in his Magna for a while now... can't imagine the bulbs being different between the two bikes... I'm going to have a look at the contacts in the connector and see what they look like, maybe they'll still work.
Having the 2 bulbs here in my hand, they don't look like they will fit, BUT, the connector terminals in the socket itself may be wider than the pins on the bulb and it may work. My experience with this has taught me not to try to force something made of glass into a space it wasn't designed to fit (picking glass bits out of your fingers isn't something I'd like to try again). I bet if you were able to take out those light diffusers, a 194 light would fight in just fine. You could even skip this whole process and cut the wires off the connector and solder it directly to the pins of the LED. Just a thought.
Let me know what you find out, I'd like to do something with the dash lighting.
I think we have done a fantastic job of hijacking this thread. :biggrin:
[image: View Post]SEBSPEED, on Jul 22 2008, 02:55 PM, said:
[image: View Post]chickenofsea, on Jul 22 2008, 02:51 PM, said:
Seb-
They do not line up. The 194 is about twice as wide and thick as the proprietary bulb.
That's weird. the guy over on the BBS just replied that he's had the 4 led versions in his Magna for a while now... can't imagine the bulbs being different between the two bikes... I'm going to have a look at the contacts in the connector and see what they look like, maybe they'll still work.
[image: View Post]chickenofsea, on Jul 22 2008, 03:06 PM, said:
Let me know what you find out, I'd like to do something with the dash lighting.
I think we have done a fantastic job of hijacking this thread. :biggrin:
Hey, it's for a good cause, and it is related... :biggrin:
Those metal hoods pop right out if you wiggle them, and the 5led bulb has a 220 degree array, so the light should spread nicely. The only other problem is that the single ones are $1.39ea, while the 5led bulbs are $3.94ea... If I use (5) white or red 5led bulbs for the backlighting and (6) singles for the indicators, that comes to $28.04 plus shipping... not too horrible I guess.
Edit: Midias said he had the 5led types in hand and would try to fit them in his Magna where he currently has the 4led types installed, I'm going to order these pending his feedback(or positive feedack from someone else).
Yes, he's got a bunch of parts. I contacted him about an axle, and he made me a nice price but I had already bid on another, which I won! Yay! Finally...
[image: View Post]SEBSPEED, on Jul 25 2008, 10:33 AM, said:
Anyone else making any progress?
Took the F out with the reworked shock, short ride. Just sitting on the bike was completely different, the rear didn`t sag 3 inches like it did before. Felt quite a bit more controlled and the bike felt more of a whole now. That`s really all the progress for me...
Good stuff nonetheless... I don't think I'm going to hit my goal of completing the 750 by mid August. Too much other stuff going on, and we're slowly creepig into firewodd season, followed abruptly by Old Man Winter... :mellow:
[image: View Post]SEBSPEED, on Jul 25 2008, 09:33 AM, said:
Anyone else making any progress?
I got a shipment in of new seals for the water pipes, all new exhaust gaskets, thermostat, new carb boots and new bushings for the RC forks. Already had the fork seals. It's all nicely laid out on the workbench waiting for the Honda assembly team to get to work. :rolleyes:
I only need a new spring for the shock to get a rolling chassis.
[image: Posted Image]Quit with the winter talk already!
Did a bit more challenging ride earlier this evening after a hot day of yard work.
Anyway, the rear shock is now working as it should, stiff enough so it keeps the bike balanced and I can tell what the rear tire is doing but not harsh at all. Now I can tweek in the front as it`s shortcomings are becoming obvious. Need to get the damping in front so it`s not so harsh but still firm. The rear was so good and the front is almost there tonight that I was _accidently_ riding like I was in the woods dodging trees...
Jesus, I almost forgot why I don`t ride in town anymore, I`m going to get a ticket with this, it f&cking rocks !!!
Another gratuitous pic, this one in front of my daughter`s pool, which of course had to be inflated tonight even though it was getting dark...so it`s spending the night in the garage...too funny! Dad`s work is never done...
[image: View Post]VF1000RS, on Jul 26 2008, 11:50 PM, said:
[image: Posted Image]Quit with the winter talk already!
Did a bit more challenging ride earlier this evening after a hot day of yard work.
Anyway, the rear shock is now working as it should, stiff enough so it keeps the bike balanced and I can tell what the rear tire is doing but not harsh at all. Now I can tweek in the front as it`s shortcomings are becoming obvious. Need to get the damping in front so it`s not so harsh but still firm. The rear was so good and the front is almost there tonight that I was _accidently_ riding like I was in the woods dodging trees...
Jesus, I almost forgot why I don`t ride in town anymore, I`m going to get a ticket with this, it f&cking rocks !!!
Another gratuitous pic, this one in front of my daughter`s pool, which of course had to be inflated tonight even though it was getting dark...so it`s spending the night in the garage...too funny! Dad`s work is never done...
[image: View Post]vfrcapn, on Jul 30 2008, 02:43 AM, said:
[image: View Post]SEBSPEED, on Jul 25 2008, 09:33 AM, said:
Anyone else making any progress?
Well, it's slowly coming together... [image: Posted Image]
Awesome!
You can punch me later, but I think that bike looks ready for VF750F tail, side panels, tank, and a brushed aluminum VTX headlight... bruiser style... :cool:
[image: View Post]SEBSPEED, on Jul 25 2008, 12:33 PM, said:
Anyone else making any progress?
All I've done is add some new mirrors. I never liked the stock ones. These are smaller but come up and out just a tad more so I can see past my arm a little better. Plus they look cooler.
[image: View Post]SEBSPEED, on Jul 30 2008, 05:19 PM, said:
All you've done?? Did I miss the post where you finished the front end and gave a ride report? :huh:
J/K, looks good! :laugh: I like the new headlight too.
You miss a post...is that even possible? Ok, I didn't give a ride report. I still have to play with the settings as it's a tad stiff now. Not sure what the offset difference in the triples does to trail but it does turn differently, kind of slow at first then really turns in. Not as smooth at very slow speeds as my stocker but that could be partly due to the 16 incher. I've relocated my ignition. You can just see it in the second pic. It's to the right of the temp gauge. Easy to get to and the keys don't scratch the triple. The 51 bars are at a different angle than stock. They are upside down so the angle is more upright. Took a little getting use to for my wrist but it's actually higher than stock so no complaints on long rides. I'm still waiting on 51 masters for brake and clutch. They are much narrower than the stock ones and will let me slide everything up so I can put on my bar ends. I'm sure the 51 master will make it stop as intended but it still out brakes stock by tons. I actually like the feel it has now. You can really modulate the front easier with a slightly longer lever travel before dead stop. It's not grabby at all but will brake hard when asked to. I've tried to make time to work on my other set of panels but I can't seem to find any. I'd really like to have it repainted by the Indy GP but that's coming up fast. Did you get your front axle? How's it coming?
Thanks Kel, I knew I missed something there... :goofy:
I got my axle! Haven't done anything with it yet. Been busy at work which leaves me pooped at the end of the day. Got my trip meter reset fixed and swapped out the backing tub on my gauges(one tab was broken), also cleaned that up and ordered LEDs to replace the bulbs in there. 5 big red ones for the backlighting and color-matched small ones for the indicator lights.
Also giving thought to tearing my harness down, yes the whole wiring harness; planned to at least re-wrap the whole thing to make it look new, and I have an entire CBR600F4i harness I am going to pillage for all the newer, smaller items like the starter relay, reg/rec, signal and light relays, fuse box, etc. Then I started reading about how in the early eighties copper values went through the roof and lots of companies went to cheaper, inferior alloys for wiring - now that has me thinking about making a whole new harness from scratch... it's gonna be a long road...
[image: View Post]Kel, on Jul 30 2008, 04:55 PM, said:
You miss a post...is that even possible? Ok, I didn't give a ride report. I still have to play with the settings as it's a tad stiff now. Not sure what the offset difference in the triples does to trail but it does turn differently, kind of slow at first then really turns in. Not as smooth at very slow speeds as my stocker but that could be partly due to the 16 incher. I've relocated my ignition. You can just see it in the second pic. It's to the right of the temp gauge. Easy to get to and the keys don't scratch the triple. The 51 bars are at a different angle than stock. They are upside down so the angle is more upright. Took a little getting use to for my wrist but it's actually higher than stock so no complaints on long rides. I'm still waiting on 51 masters for brake and clutch. They are much narrower than the stock ones and will let me slide everything up so I can put on my bar ends. I'm sure the 51 master will make it stop as intended but it still out brakes stock by tons. I actually like the feel it has now. You can really modulate the front easier with a slightly longer lever travel before dead stop. It's not grabby at all but will brake hard when asked to. I've tried to make time to work on my other set of panels but I can't seem to find any. I'd really like to have it repainted by the Indy GP but that's coming up fast. Did you get your front axle? How's it coming?
Just wait until you get the master, gotta love excellent brakes on these, really balances it better knowing you can stop as you wish, then you can use the motor more. If you drop the front some and raise the rear some, the front works better, more weight on the forks and steers better..........
[image: View Post]VF1000RS, on Aug 7 2008, 01:39 AM, said:
Wow...and I haven`t even done anything except get decals...you are much further along than I. What happened with the motor investigation?
The guy told me not to bid on it?? (not being able to see it and all) I sent an email again asking if he'd part out the goodies if it didn't sell, but haven't heard back yet.
My plan was to be done with it by now, and it hasn't come together for one reason or another. Between regular things, other side jobs, and the seasonal work I have coming up around the house to get ready for winter(mainly firewood), I am considerably short on time to spend working on the 750.
I've been planning this for 6 years, so what's another 6 months, right? One more year it can spend under 3000 miles... :rolleyes:
[image: View Post]SEBSPEED, on Jul 22 2008, 03:21 PM, said:
[image: View Post]chickenofsea, on Jul 22 2008, 03:06 PM, said:
Let me know what you find out, I'd like to do something with the dash lighting.
I think we have done a fantastic job of hijacking this thread. :biggrin:
Hey, it's for a good cause, and it is related... :biggrin:
Those metal hoods pop right out if you wiggle them, and the 5led bulb has a 220 degree array, so the light should spread nicely. The only other problem is that the single ones are $1.39ea, while the 5led bulbs are $3.94ea... If I use (5) white or red 5led bulbs for the backlighting and (6) singles for the indicators, that comes to $28.04 plus shipping... not too horrible I guess.
Edit: Midias said he had the 5led types in hand and would try to fit them in his Magna where he currently has the 4led types installed, I'm going to order these pending his feedback(or positive feedack from someone else).
K. Turns out the Magna bulbs and sockets are different from the Interceptor parts. Who woulda thought. Thanks Honda. :rolleyes: Got a friend looking into getting me some Magna harness parts so I can use the big LEDs in my cluster. The indicator bulbs I bought were also too large, but luckily they are available in a size that fits.
I broke a motor mount bolt off in the left side of my motor, then promptly broke an extractor off in it too - even though I knew better the entire time. :pissed: 3 Dremel grinding stones later and I have almost got the piece of the extractor out. One more ought to do it. Then I can use a REAL extractor and not a made-in-china piece of donkeydoo from Home Depot to get the rest of the bolt out.
S100 Engine Brightener is the bomb. My motor looks new! Once I get the bolt out I am doing the oil mod install and putting the motor in the frame, and putting the suspension back on. Then mess with the wheels and make sure they're lined up, also try out the VF500 hub I have to see if the rumors are true... might toss that 900rr wheel that I mentioned in there too for giggles.
Next large hurdles after that will be electrical and bodywork, still need to modify my 1kF side panels...
[image: View Post]SEBSPEED, on Oct 19 2008, 12:59 PM, said:
Then mess with the wheels and make sure they're lined up, also try out the VF500 hub I have to see if the rumors are true... might toss that 900rr wheel that I mentioned in there too for giggles.
It's no rumor. I have probably 5k hard miles on mine with no problems. Others have as well. You won't/can't out torque this hub, especially with a 750. The studs are smaller but I was lucky, my kR sprocket had 2 different hole sizes. Bingo!
[image: Posted Image] 500 cushdrive
[image: View Post]Kel, on Jul 30 2008, 10:10 PM, said:
[image: View Post]SEBSPEED, on Jul 25 2008, 12:33 PM, said:
Anyone else making any progress?
[image: Posted Image] New mirrors
Just wondering, those clipons look like they're barely clamped on to the fork tubes. Shouldn't you worry that they could come off while ridind your bike?
[image: View Post]SEBSPEED, on Oct 19 2008, 09:59 AM, said:
Mike, how're you making out?
Not much progress, been focused on summer house projects for the past few months and now I've been forced in to job hunting mode so the bike is pretty much on hold. What's that saying, 'Life is what happens when you're busy making other plans..'?
I'm still trying to sell the F but if it won't sell I am considering rebuilding the motor with the replacement cases I've found. The question I have is what are the basic parts I'd need to tear down and rebuild in the new cases? I see gasket kits are available, I assume new crank and rod bearings - are they available? (Jamie?) Should I have the cylinders honed and use new rings or can I get by reusing them? The idea is only to change out the motor case, no internal parts that aren't necessary. I want to keep the cost to a minimum but I'm worried I'll need some repalcement part that is no longer available.
[image: View Post]Beck, on Oct 19 2008, 08:11 PM, said:
Just wondering, those clipons look like they're barely clamped on to the fork tubes. Shouldn't you worry that they could come off while ridind your bike?
Beck
95 VFR
Beck, you'll need to go back a page or two and read what Kel's done. He actually has plenty of clamp area, but it's easier for you to read than for me to re-type...
[image: View Post]SEBSPEED, on Oct 19 2008, 08:01 PM, said:
Kel, is that the F2 wheel you're using with that hub? (160 rear?)
The VF500F sprocket carrier with an F2 wheel will line up the chain correctly on a VF700/750/1000F. For most guys it's easier to find an F2 part (or better yet, get an F2 wheel with the carrier) than it is to find a VF500 part. Combine that with the fact that CBR sprockets are more redily available. Those are the reason I've chosen to use the F2 carrier for my wheel swap kits. The cost for me to modify it is neglidable compared to the cost of the caliper bracket. Plus I think it looks better on there than the VF500 part.
[image: View Post]vfrcapn, on Oct 19 2008, 08:25 PM, said:
I see gasket kits are available, I assume new crank and rod bearings - are they available? (Jamie?) .... but I'm worried I'll need some repalcement part that is no longer available.
No, not all of the bearings are available. I'm not even sure the gasket kits are either. Swapping cases is not as simple as one might think. I'd say you are better off finding another complete engine. Or maybe even a 700 or 750, just to get it going.
[image: View Post]JamieDaugherty, on Oct 19 2008, 08:32 PM, said:
[image: View Post]SEBSPEED, on Oct 19 2008, 08:01 PM, said:
Kel, is that the F2 wheel you're using with that hub? (160 rear?)
The VF500F sprocket carrier with an F2 wheel will line up the chain correctly on a VF700/750/1000F. For most guys it's easier to find an F2 part (or better yet, get an F2 wheel with the carrier) than it is to find a VF500 part. Combine that with the fact that CBR sprockets are more redily available. Those are the reason I've chosen to use the F2 carrier for my wheel swap kits. The cost for me to modify it is neglidable compared to the cost of the caliper bracket. Plus I think it looks better on there than the VF500 part.
Yep, F2 wheel. I didn't want to send out a hub so I went with the 500. Instant chain alignment with he 500 carrier, plus it was pretty cheap and I had the sprocket. I've seen a few sprockets on ebay with multiple mounting holes. I feel just the opposite, I think the F2 carrier looks overly bulky.
[image: View Post]SEBSPEED, on Oct 19 2008, 08:29 PM, said:
[image: View Post]Beck, on Oct 19 2008, 08:11 PM, said:
Just wondering, those clipons look like they're barely clamped on to the fork tubes. Shouldn't you worry that they could come off while ridind your bike?
Beck
95 VFR
Beck, you'll need to go back a page or two and read what Kel's done. He actually has plenty of clamp area, but it's easier for you to read than for me to re-type...
[image: View Post]vfrcapn, on Oct 19 2008, 08:25 PM, said:
[image: View Post]SEBSPEED, on Oct 19 2008, 09:59 AM, said:
Mike, how're you making out?
Not much progress, been focused on summer house projects for the past few months and now I've been forced in to job hunting mode so the bike is pretty much on hold. What's that saying, 'Life is what happens when you're busy making other plans..'?
I'm still trying to sell the F but if it won't sell I am considering rebuilding the motor with the replacement cases I've found. The question I have is what are the basic parts I'd need to tear down and rebuild in the new cases? I see gasket kits are available, I assume new crank and rod bearings - are they available? (Jamie?) Should I have the cylinders honed and use new rings or can I get by reusing them? The idea is only to change out the motor case, no internal parts that aren't necessary. I want to keep the cost to a minimum but I'm worried I'll need some repalcement part that is no longer available.
Don't know about the bearings but I recently got a full gasket set for my F. Many small o-rings, gaskets, even exhaust gaskets. Non OEM but you do what you have to.
[image: View Post]Kel, on Oct 19 2008, 06:59 PM, said:
[image: View Post]vfrcapn, on Oct 19 2008, 08:25 PM, said:
[image: View Post]SEBSPEED, on Oct 19 2008, 09:59 AM, said:
Mike, how're you making out?
Not much progress, been focused on summer house projects for the past few months and now I've been forced in to job hunting mode so the bike is pretty much on hold. What's that saying, 'Life is what happens when you're busy making other plans..'?
I'm still trying to sell the F but if it won't sell I am considering rebuilding the motor with the replacement cases I've found. The question I have is what are the basic parts I'd need to tear down and rebuild in the new cases? I see gasket kits are available, I assume new crank and rod bearings - are they available? (Jamie?) Should I have the cylinders honed and use new rings or can I get by reusing them? The idea is only to change out the motor case, no internal parts that aren't necessary. I want to keep the cost to a minimum but I'm worried I'll need some repalcement part that is no longer available.
Don't know about the bearings but I recently got a full gasket set for my F. Many small o-rings, gaskets, even exhaust gaskets. Non OEM but you do what you have to.
The bearings are listed online and not marked as unavailable, but I'm sure I'll need to call to confirm that. You're probably right though Jamie, best to look for an R motor. Or part it out.
[image: View Post]Kel, on Oct 19 2008, 09:59 PM, said:
[image: View Post]vfrcapn, on Oct 19 2008, 08:25 PM, said:
[image: View Post]SEBSPEED, on Oct 19 2008, 09:59 AM, said:
Mike, how're you making out?
Not much progress, been focused on summer house projects for the past few months and now I've been forced in to job hunting mode so the bike is pretty much on hold. What's that saying, 'Life is what happens when you're busy making other plans..'?
I'm still trying to sell the F but if it won't sell I am considering rebuilding the motor with the replacement cases I've found. The question I have is what are the basic parts I'd need to tear down and rebuild in the new cases? I see gasket kits are available, I assume new crank and rod bearings - are they available? (Jamie?) Should I have the cylinders honed and use new rings or can I get by reusing them? The idea is only to change out the motor case, no internal parts that aren't necessary. I want to keep the cost to a minimum but I'm worried I'll need some repalcement part that is no longer available.
Don't know about the bearings but I recently got a full gasket set for my F. Many small o-rings, gaskets, even exhaust gaskets. Non OEM but you do what you have to.
Anyone have any feedback on Vesrah gaskets? Might be able to get a set at low cost...
I purchased the 84 VF1000F from capn, yesterday. He linked me to this forum, and I'm looking forward to gathering the info and parts to revive this project he started. :beer:
[image: View Post]SteveH, on Nov 8 2008, 05:58 PM, said:
I purchased the 84 VF1000F from capn, yesterday. He linked me to this forum, and I'm looking forward to gathering the info and parts to revive this project he started. :beer:
Welcome Steve. :beer: Be sure to post some pics of the progress, I'm guessing you'll finish that one long before I finish my '85.
[image: View Post]Kel, on Jul 27 2008, 07:29 AM, said:
[image: View Post]VF1000RS, on Jul 26 2008, 11:50 PM, said:
[image: Posted Image]Quit with the winter talk already!
Did a bit more challenging ride earlier this evening after a hot day of yard work.
Anyway, the rear shock is now working as it should, stiff enough so it keeps the bike balanced and I can tell what the rear tire is doing but not harsh at all. Now I can tweek in the front as it`s shortcomings are becoming obvious. Need to get the damping in front so it`s not so harsh but still firm. The rear was so good and the front is almost there tonight that I was _accidently_ riding like I was in the woods dodging trees...
Jesus, I almost forgot why I don`t ride in town anymore, I`m going to get a ticket with this, it f&cking rocks !!!
Another gratuitous pic, this one in front of my daughter`s pool, which of course had to be inflated tonight even though it was getting dark...so it`s spending the night in the garage...too funny! Dad`s work is never done...
Looks good Tom!
That bike is Beautiful! I had an '83 that I miss alot.
I bought an 85 engine complete, and will pick it up this week. My first thought is to rebuild it, and put it in this bike. It looks, though, that locating rings, bearings, and gaskets could be a challenge. Another option is to just replace the lower case on the 84 engine that's in the bike and hope for the best.
I just went to DMV this morning and found out I'll have to pay just shy of $500 in back fees to get it registered and in my name.
However, I just found a 84 parts bike with 2 mostly complete engines, a good front end assy, and carbs. Been sitting outside for a year with the rocker covers off. So we may have some parts to share here.
So, how difficult is it to find hard parts for these engines, and how do I tell calif carbs from 49 state? :fing02:
[image: View Post]SteveH, on Nov 10 2008, 07:27 PM, said:
I bought an 85 engine complete, and will pick it up this week. My first thought is to rebuild it, and put it in this bike. It looks, though, that locating rings, bearings, and gaskets could be a challenge. Another option is to just replace the lower case on the 84 engine that's in the bike and hope for the best.
I just went to DMV this morning and found out I'll have to pay just shy of $500 in back fees to get it registered and in my name.
However, I just found a 84 parts bike with 2 mostly complete engines, a good front end assy, and carbs. Been sitting outside for a year with the rocker covers off. So we may have some parts to share here.
So, how difficult is it to find hard parts for these engines, and how do I tell calif carbs from 49 state? :fing02:
I believe the CA carbs only have an additional vacuum port on each carb body. Just plug them up, as I did, and all should be ok?
Word back from my dealer after some research....main bearings/connecting rod bearings/crankshaft bearings whatever are all green...they all revert to the green part number. I know that`s a generic answer but I don`t feel like posting all the part numbers as far as what`s discontinued, etc.
I guess theoretically you could have the cases/and/or the crankshaft/rods machined so all take the green bearings...
[image: View Post]VF1000RS, on Nov 21 2008, 07:08 PM, said:
Word back from my dealer after some research....main bearings/connecting rod bearings/crankshaft bearings whatever are all green...they all revert to the green part number. I know that`s a generic answer but I don`t feel like posting all the part numbers as far as what`s discontinued, etc.
I guess theoretically you could have the cases/and/or the crankshaft/rods machined so all take the green bearings...
SteveH found a spare '84 motor, worked out the DMV paperwork and put it back up for sale. http://sacramento.cr.../923589382.html
I hope someone will take this and put it back together in to a nice running bike.
Not much progress on my '85. Got the forks rebuilt with new bushings and seals. Almost have the carbs mounted, still working to seat them and tried a few throttle cables until I had a pair the right lengths. Got the front brakes and clutch lines installed and bled. Wiring harness is about 50% on. Coolant hoses installed. SteveH was nice enough to give me a spare fuel pump so I don't have to worry about that. Was shooting for Thanksgiving completion, don't think I'm going to make it. :huh:
I put the VF 1000 on e bay and there are 25 people watching the auction, but only one person bidding on it. i am including the lower engine case, as well as the original engine and an 85 engine as well. I have waded through all the DMV and made it easy for someone to pick up this project for less than I paid for it ORIGINALLY, and take it to completion. If it doesn't sell, I'll put it in my name, and fix it. I just really don't have the time or place to do the fix. And, frankly I don't think it's the bike I want as a classic sitting around. Someone on this board, remotely near Sacramento, must want to take this project to a finish. It CAN be a cool bike for a minimum of $$$.
While stripping a third engine to get a good lower case, I gained a bunch of pieces from trans to alternator to misc frame pieces, and a front end. Send ma a list of needs, and I'll do a pay it forward. VFRCapn can attest to it.
[image: View Post]vfrcapn, on Nov 21 2008, 09:13 PM, said:
Not much progress on my '85. Got the forks rebuilt with new bushings and seals. Almost have the carbs mounted, still working to seat them and tried a few throttle cables until I had a pair the right lengths. Got the front brakes and clutch lines installed and bled. Wiring harness is about 50% on. Coolant hoses installed. SteveH was nice enough to give me a spare fuel pump so I don't have to worry about that. Was shooting for Thanksgiving completion, don't think I'm going to make it. :huh:
That is looking great! I like the blacked-out footrest hangers. Details, details!
No progress from me, after completing the 250 Interceptor, hauling a motor from the basement to replace the 85`s blown motor(which is sitting on the lift waiting), and months of pain, I finally gave in and had surgery on the tendons in my right hand a week ago. I`ll be out of any serious progress until Christmas...if I can stand it...bored and planning.
Well, some progress pics. It's getting there, waiting on a battery, spark plugs and air filter. May try firing it up by next weekend, I hope like heck it runs after all this.
I still need to graft the VFR switches in to the VF wiring harness, couple other minor electrical things, bleed the rear brakes and the big thing is still to strip and coat the gas tank and hope it doesn't start leaking after the rust is removed. I'm using the 1000F fuel pump and hope it outputs enough. It has smaller fuel lines and I ended up running all new smaller lines.
Spent countless hours now polishing nuts, bolts, exhaust, etc, sandblasting and painting brackets and other parts but I think I see some light at the end of the tunnel. Or maybe that's just my next project coming at me. :laugh:
I LOVE the all black look but I do have a concern that the forks are much beefier than the frame. Any thoughts about bracing? I haven't read the whole thread so maybe you have/did.
[image: View Post]FotoMoto, on Feb 8 2009, 07:50 PM, said:
I LOVE the all black look but I do have a concern that the forks are much beefier than the frame. Any thoughts about bracing? I haven't read the whole thread so maybe you have/did.
It is a lot of black now but it's basically all going to be covered by the bodywork. No bracing, hadn't thought of it really, some others are running the same forks so I'll defer to them if they feel it's needed?
[image: View Post]SEBSPEED, on Feb 8 2009, 08:03 PM, said:
Nice. I was gonna bump this today too, but I felt guilty about not having any progress of my own lately! :laugh:
Good luck Capn, I hope you get her done real soon!
What are you running for a clutch master?
It's the stock RC51 clutch master. Yeah, I walked away from it for a few months too, now I'm pushing to get it done but hoping I haven't forgotten something. Need to get moving on yours, spring's coming soon.
What are the options for a key/lock set for the 1000R? I'm just getting down to this now and realizing I don't have a key for the tank or the ignition.
Edit: Looked around and sounds like some/most dealers or better locksmiths can cut a key from the code stamped on the ignition/gas cap so I'll look in to that.
[image: View Post]vfrcapn, on Feb 9 2009, 01:24 AM, said:
Yeah, I walked away from it for a few months too, now I'm pushing to get it done but hoping I haven't forgotten something. Need to get moving on yours, spring's coming soon.
Tell me about it. I've been working & spending money on it, but the holdup is still that POS extractor that's broken off in the motor mount. I've gone through almost a dozen Dremel bits already. Grind, drill, grind, drill... breaking it out wasn't working. If I find out about someone with an EDM closeby, I might just throw in the towel. I can't stand the idea of getting "most" of it out and using a shorter bolt. :dry:
Once I get that bolt out, on goes the oil mod & in goes the motor. Should be all downhill from there, as I've got 99% of what I need to finish it.
Just sent my carbs out to BillyC fro mthe V4BBS for clean, polish and re-jet. Also got (4) oval carbon fiber exhaust sleeves on ebay yesterday, 12.5" long each, for $50 shipped!
I`ve got 2 big VF`s with RC51 forks and modern suspension/wheels/rubber. No additional bracing to the frame. I did replace the entire shock mount section of the frame of one of them though. Seems to work very well indeed either way.
Maybe if I was strictly racing, but then, Honda didn`t really brace the 750 frame when they went racing. I`ll have to look closer at the RS/FWS bikes and see if it is something to consider for the R/F bike I`ve been working on, but I don`t think it`s really necessary.
Well, got keys cut at a local locksmith just based off the code stamped on the ignition. Took 5 minutes and $35.
Got the bike started up last night. Started pretty much right away, the motor sounds good, no knocks or smoking. You never can tell with these eBay motors so I was sweating that a little even though the compression was good across all cylinders. One coolant leak from a pipe that needs a new o-ring and I need to change a couple fuel lines then get in and sync the carbs. I only ran it about 10 minutes but didn't detect any oil leaks, especially from the new lines I ran to the heads, that was another thing I was sweating. If I can get the tank stripped this week I may be able to get wheels on the ground next weekend.
I don`t know about the tank, I`ve got one in similar condition. I might take it to a radiator shop and get an opinion.
For the label, I haven`t had one that goof off couldn`t remove with a light touch and razor blade, except, one was fused with the paint such that there were several spots that looked like the crazed label as yours does, except in the paint itself.(not sure if that makes sense?), Wondering if a polishing pad and cutting compound might work?
I got a glue gun dent puller from harbor freight and it has done a pretty good job on dents similar, takes several times but gets the dent much shallower with less to fill. Would work well on those dents as they dont look creased. Cost around $20.
I think motorhead1977 might have a nice R tank to sell... might try him?
Your tank looks salvageable Mike, gonna take some time & effort though!
I would strip the tank entirely with aircraft stripper, then work the dents. Get all your metal work as close as you can, then coat the inside of the tank with RedKote or POR(or have a rad shop do it), then do your final fill/glaze and paint it.
You've put so much effort in already, why skimp now?
I'll give the glue-gun puller a try, $24 at HF. I'd like to avoid needing to repaint, at least right now, my project budget for this thing is just about drained. It's good to be making progress again, starting the motor up for the first time is the best moment!
I'm looking for a few small parts; anyone have lying around a right front turn signal bracket, right mirror or the air filter retainer clip for inside the air box (done, made my own) ? I can fab them up but if someone has extras it would be worth a few $ to me.
Also, does the carb air vent tube route to anything or is it just open to the atmosphere? The diagrams show it routing back to the fuel filter area but doesn't show any termination. Seems like it should have some sort of filter on the end (carbon canister?), or does it just hang down adjacent to the swingarm?
I probably have a right front turn signal bracket around here somewhere, let me look.
As far as the carb vent tube, goes in the front left side hole(the big holes) of the bracket the front of the seat tab tucks into, just above the shock mount. Should be a grommet for that hole. Just hangs out there, no filter or anything.
Found a right front turn signal bracket, PM me your address and I`ll send it your way.
[image: View Post]VF1000RS, on Feb 16 2009, 09:20 PM, said:
I probably have a right front turn signal bracket around here somewhere, let me look.
As far as the carb vent tube, goes in the front left side hole(the big holes) of the bracket the front of the seat tab tucks into, just above the shock mount. Should be a grommet for that hole. Just hangs out there, no filter or anything.
Thanks, that was as far as I could trace the vent tube but seemed like there should have been more to it. Did Honda design that late on a Friday and decide "eh, good enough, let's go for sake now."?
I gave the glue puller a shot, it took a couple tries but finally got it to stick enough to mostly pull the large dent out, then it released and the dent popped back minus the paint. :dry: Maybe I'll try it again after taking the paint off and see if that will work. Going to need repainting either way. No big deal, it'll get there one way or another, I've got a can of bondo if needed. :happy:
Thanks on the turn signal bracket, you wouldn't happen to have a shift lever too would you? The one that came with my bike is obviously for a different bike, it's 'upside down' and a little too long. Not sure if I can get my foot between it and the kickstand.
Bummer on the glue puller, maybe a little added heat around the dent, then pull?
I`ve also used a propane torch to heat a dent up nice and warm, then put a nice chunk of ice on it and it popped right out...of course, make sure there isn`t any gas or fumes that want to blow up first...
No joy on a shifter but the turn signal bracket will be on it`s way tomorrow.
Thanks again on the turn signal bracket Thomas. I had some leftover 600rr turn signals from a few years ago and mounted those. Similar to the originals but look a little more modern. I have some Ducati Monster mirrors on order, we'll have to see how those look!? Got a 900 lb Hypercoil spring for the Penske shock and had a local shop lengthen the remote reservoir line to about 18". It's strapped to the pillion peg now but I think I can move it up behind the tail fairing. Spring seems good on the sag, I'll have to see how it rides.
Main problem is the chain hitting the left exhaust pipe. Since I moved the chain out so far it's contacting the pipe. I figure I can have a new pipe bent up, I can tighten the chain a little and then pull the pipe and introduce it my hammer, or any other suggestions? I've tried rotating it without any improvement.
[image: View Post]VF1000RS, on Mar 1 2009, 01:56 AM, said:
Your bike is looking fantastic! Nice work.
Glad I could help.
As far as the pipe goes, possible to weld an indented section in that area to clear the chain ?
That would probably work. Would be nice to find a 4-1 right exit exhaust too.
[image: View Post]VF1000RS, on May 27 2008, 05:07 PM, said:
Kelly,
OK, with the bike on the sidestand, right side, from the center of the right side phillips head fairing bolt under the nose just in front of the turnsignal "opening" straight down to the floor is 27". Let me know if you want any more.
Hey, just reviewing some old posts and ran across this, were you guys talking about this bolt? [image: Posted Image]
27"-27.5" to the ground on the sidestand? I've got just over 25".
Seat height just behind the tank is right about 32", which I think is about stock.
[image: View Post]vfrcapn, on Mar 2 2009, 04:11 AM, said:
[image: View Post]VF1000RS, on May 27 2008, 05:07 PM, said:
Kelly,
OK, with the bike on the sidestand, right side, from the center of the right side phillips head fairing bolt under the nose just in front of the turnsignal "opening" straight down to the floor is 27". Let me know if you want any more.
Hey, just reviewing some old posts and ran across this, were you guys talking about this bolt? [image: Posted Image]
27"-27.5" to the ground on the sidestand? I've got just over 25".
Seat height just behind the tank is right about 32", which I think is about stock.
Took it around the block tonight and by the time I got back I was getting a deep knock out of the motor with the clutch out, I didn't take it out of first. Clutch-in the knock goes away. This didn't sound like the typical clutch noise I get on my VFR, this was a deep, hard knocking that was building louder and louder. You guys that have experience with these motors have any thoughts on that?
2" sounds like a lot to me. If you were to slide stock forks up on any bike, would you go 2" to drop the front? Probably not. Maybe if the back was equally low but the back must be high to get the seat height you have. Rake/trail numbers are probably not ideal but I guess only you can say if it turns in the way you want. Probably only notice it at slow speeds anyway. Looks killer regardless!
As far as the knock, I agree with Seb...uh-oh. Was this in the bike or purchased separately, did you hear it run pre-knock? I had a connecting rod bearing failure that knocked loud but it was only under power or deceleration and it slowly grew worse over time, not within a few minutes. Idle was much quieter. When you say "clutch out", is it also in neutral or in gear riding? It didn't knock at start up or for the first few minutes? Hmmm? I can't come up with anything in the clutch that would knock when loose or damaged but someone here might have an idea. Not the best luck with motors lately huh?
[image: View Post]vfrcapn, on Mar 2 2009, 02:11 AM, said:
[image: View Post]VF1000RS, on May 27 2008, 05:07 PM, said:
Kelly,
OK, with the bike on the sidestand, right side, from the center of the right side phillips head fairing bolt under the nose just in front of the turnsignal "opening" straight down to the floor is 27". Let me know if you want any more.
Hey, just reviewing some old posts and ran across this, were you guys talking about this bolt?
27"-27.5" to the ground on the sidestand? I've got just over 25".
Seat height just behind the tank is right about 32", which I think is about stock.
Took it around the block tonight and by the time I got back I was getting a deep knock out of the motor with the clutch out, I didn't take it out of first. Clutch-in the knock goes away. This didn't sound like the typical clutch noise I get on my VFR, this was a deep, hard knocking that was building louder and louder. You guys that have experience with these motors have any thoughts on that?
Yes, that`s the bolt. I have 1.0kg/mm springs in the front and some preload wound on. Forks are 2000-2001. Some of that may make a difference. I rode mine with the stock springs originally to test and touched the valve cover with the tire.
As far as the knock goes...if it happens under load, I think uh-oh also. Rod bearing maybe...
Gotta get the test rig up and running...
[image: View Post]SEBSPEED, on Mar 2 2009, 03:17 AM, said:
Ruh-roh!
Strange on the height. Forks have about 4.7" travel and static sag is about 1.25" now, I couldn't get 2" even if they were topped out. The front tire is pretty worn though.
Buddy and I got a 84 650 Nighthawk cheap, $400, nice shape, said it had a knock. Got it started and running with no issue or noise. He took it around the block and it started knocking. Would only do it under load.
Dumb question but did you do an oil mod on this motor? If so, check all lines/connectors and make sure she's getting oil where she's supposed to. I'm sure you have and I'm sure you know the difference between knocking and tapping. Knocking bad, tapping/ticking maybe not so.
[image: View Post]VF1000RS, on Mar 2 2009, 05:24 PM, said:
Buddy and I got a 84 650 Nighthawk cheap, $400, nice shape, said it had a knock. Got it started and running with no issue or noise. He took it around the block and it started knocking. Would only do it under load.
Did you measure with the bike on the sidestand?
Measured on the sidestand. I need to adjust everything still, the wheel is just grazing the coolant line on compression. I think that 900 lb spring might have been too weak, I may end up exchanging it. Just need to spend some time tuning it.
If the wheel grazes the coolant hose wire cover, no problem, been riding this way for years. Mine has several scrapes. As long as it doesn`t touch the valve cover on full brakes...
Dunno about the knock, but I`m convinced I will do a full teardown on the motors I have picked up over the years. Oh well...
Completed the DMV process today and got a new title/plate for the old girl, so she's legal to ride now. :ph34r:
The new 1100 lb shock spring is installed and I modded the mid pipe so the chain clears nicely. I put just a few miles on it and the engine knock seems to have subsided. I'm wondering if it just needed some oil circulating to work it's way through and any contamination out? Another oil change is on the schedule for this weekend.
Some pics of her out in the sun. The front fender needs paint, or, I'm considering laying carbon fiber over it. It's a fiberglass fender, under the black primer it was painted in Castrol colors with Castrol/Dunlop stickers. I don't recall the RC being available in a Castrol repli scheme? I've got the CF mat and I think I should be able to put a layer over the fiberglass once the paint is removed? (If that works out this fender would go on the VFR and the VF gets the stock red RC fender. ;) )
[image: View Post]SEBSPEED, on Mar 21 2009, 05:45 AM, said:
How's the clutch action with the '51 master? I'm going to be using a CBR1000RR master and am curious to see if it will work ok.
No problems, seems to work normally. Does the RR use a radial master?
So, small update. I dumped the whole RC front end, I just couldn't dial it in to anything resembling handling, safe or otherwise, maybe it was just me. So I'm switching back to stock forks. Arranged a deal to swap some stuff and picked the rest up on eBay. Forks were scratched to heck and rusted internally, one of the preload spacers had welded itself to the tube. Got everything torn down eventually and sent the triples and fork lowers out for powdercoat. New bushings, seals, c-clips awaiting the rebuild.
The powder is very close to the original red, I can't tell the difference with my eyes. Also getting an aerosol can of the same formulation to do the fender, I've been 'assured' it will match 100%. He got a little overzealous on the powder and did the clamping area of the triples. Easy to take care of with a fine flapper wheel on the dremel. I still need to chase some threads with a tap though. He also did the quick release clamps, which looks a little weird, but I'm not going to change it now.
Still undecided on GVE's and new springs. I need to drop the tubes off Monday to have the air holes welded closed. Still have to polish up the brackets, bolt heads, etc. [image: Posted Image]
As part of the swap deal got a powdercoated F2 wheel for the front. So I do get a speedo after all. :laugh: [image: Posted Image]
I'll be using the stock master cylinders but retaining the modern l&r switchgear. Also picked up some 1000F clipons to see if they'll fit with the fairing, they've got to be about 3" higher than stock. I didn't have straight, stock clipons either since the originals were bent. Someone tipped me that David Silver Spares had them for about $15 ea, excellent deal. If the F bars do work I'll probably need to swap in some longer ss front brake lines, maybe the clutch line too. Options... [image: Posted Image]
That's too bad about the 51 parts Mike, a real shame. Nice to see the detail work you're putting into the stock front end though! I wish you luck, and look forward to seeing if you got the bugs worked out of your spacer kit.
I have a spare set of CBR600F2/F3 clip ons that will work on the R tubes, if you want to try them too.
Also, I got a 900RR front end for some work I did. I'm wondering now, how that 16" RR wheel would look in the R forks(with big floating rotors)!
Looks good. You won't be disappointed with the f2 wheel/stock front end. With everything fresh, it will handle awesome. It's not you, the 51 front end is not ideal using the 51 triples. Keep up the good work.
[image: View Post]vfrcapn, on May 2 2009, 01:17 AM, said:
Still undecided on GVE's and new springs. I need to drop the tubes off Monday to have the air holes welded closed. Still have to polish up the brackets, bolt heads, etc.
If you had a 41mm cartridge fork, you could just swap the 1000r sliders onto it an call it a day. Anybody with the USD front end on a 5th gen looking to get rid of their leftovers?
[image: View Post]thx1139, on May 31 2009, 10:53 PM, said:
[image: View Post]vfrcapn, on May 2 2009, 01:17 AM, said:
Still undecided on GVE's and new springs. I need to drop the tubes off Monday to have the air holes welded closed. Still have to polish up the brackets, bolt heads, etc.
If you had a 41mm cartridge fork, you could just swap the 1000r sliders onto it an call it a day. Anybody with the USD front end on a 5th gen looking to get rid of their leftovers?
If you had a 41mm cartridge fork, you could just swap the 1000r sliders onto it an call it a day...Nice idea, but, the tubes are too short! :blush:
damn! even longer than a gen5? :blink:
:idea3:
sooo... anyone got leftovers from their frankenforked Valkyrie?
[image: View Post]thx1139, on May 31 2009, 10:53 PM, said:
[image: View Post]vfrcapn, on May 2 2009, 01:17 AM, said:
Still undecided on GVE's and new springs. I need to drop the tubes off Monday to have the air holes welded closed. Still have to polish up the brackets, bolt heads, etc.
If you had a 41mm cartridge fork, you could just swap the 1000r sliders onto it an call it a day. Anybody with the USD front end on a 5th gen looking to get rid of their leftovers?
I've mated a set of CBR600F4 internals to a set of 1000R forks on one of my bikes. So far so good! It's a little tricky getting everything setup correctly but luckily there are only a handful of parts that need to be machined to make it work. I'm in the middle of stocking some ZX9R internals into a set of VF500F forks. That might be more of a challenge, but still doable. Getting the valving correct is a little tough too, but fortunately I've got a decent amount of valving data to work from.
[image: View Post]JamieDaugherty, on Jun 1 2009, 10:08 AM, said:
[image: View Post]thx1139, on May 31 2009, 10:53 PM, said:
[image: View Post]vfrcapn, on May 2 2009, 01:17 AM, said:
Still undecided on GVE's and new springs. I need to drop the tubes off Monday to have the air holes welded closed. Still have to polish up the brackets, bolt heads, etc.
If you had a 41mm cartridge fork, you could just swap the 1000r sliders onto it an call it a day. Anybody with the USD front end on a 5th gen looking to get rid of their leftovers?
I've mated a set of CBR600F4 internals to a set of 1000R forks on one of my bikes. So far so good! It's a little tricky getting everything setup correctly but luckily there are only a handful of parts that need to be machined to make it work. I'm in the middle of stocking some ZX9R internals into a set of VF500F forks. That might be more of a challenge, but still doable. Getting the valving correct is a little tough too, but fortunately I've got a decent amount of valving data to work from.
You mean F3, right? F4's are 43mm, just like the F4i's & VTEC's.
[image: View Post]SEBSPEED, on Jun 1 2009, 10:37 AM, said:
You mean F3, right? F4's are 43mm, just like the F4i's & VTEC's.
No, I meant F4. The key thing to note is that swapped the internals, not the stanchion tubes. I replaced the damping rods with the cartridge assemblies. This required quite a bit of machine work and "figuring out" but in the end it's pretty slick. I posted a thread somewhere about it a couple of years ago when I did the work.
[image: View Post]JamieDaugherty, on Jun 1 2009, 12:23 PM, said:
[image: View Post]SEBSPEED, on Jun 1 2009, 10:37 AM, said:
You mean F3, right? F4's are 43mm, just like the F4i's & VTEC's.
No, I meant F4. The key thing to note is that swapped the internals, not the stanchion tubes. I replaced the damping rods with the cartridge assemblies. This required quite a bit of machine work and "figuring out" but in the end it's pretty slick. I posted a thread somewhere about it a couple of years ago when I did the work.
[image: View Post]JamieDaugherty, on Jun 1 2009, 12:23 PM, said:
[image: View Post]SEBSPEED, on Jun 1 2009, 10:37 AM, said:
You mean F3, right? F4's are 43mm, just like the F4i's & VTEC's.
No, I meant F4. The key thing to note is that swapped the internals, not the stanchion tubes. I replaced the damping rods with the cartridge assemblies. This required quite a bit of machine work and "figuring out" but in the end it's pretty slick. I posted a thread somewhere about it a couple of years ago when I did the work.
So you machined the F4 fork cap and re-threaded it to fit into the smaller tube, I can see that(too much effort for me though). What really throws me though, is the rebound adjuster. F3's had brass rebound adjusters, F4 and up have aluminum adjusters. :huh:
Try it out, I wanna know if the F3 cap threads right in. I have 2 sets of F3 forks, 900RR forks, and a spare set of R forks in the garage right now, but too lazy to check on my own. :blush:
[image: View Post]JamieDaugherty, on Jun 1 2009, 12:33 PM, said:
[image: View Post]JamieDaugherty, on Jun 1 2009, 12:23 PM, said:
[image: View Post]SEBSPEED, on Jun 1 2009, 10:37 AM, said:
You mean F3, right? F4's are 43mm, just like the F4i's & VTEC's.
No, I meant F4. The key thing to note is that swapped the internals, not the stanchion tubes. I replaced the damping rods with the cartridge assemblies. This required quite a bit of machine work and "figuring out" but in the end it's pretty slick. I posted a thread somewhere about it a couple of years ago when I did the work.
Here are some pictures that might help.
Internals installed:
<picture removed for space>
Machined F4 cap to fit VF1000R tubes:
<picture removed for space>
Now that, my good sir, is (to coin a younger generations word) "awesomeness".....
My compliments.
:cool:
Might that be a kit you would offer in the future? Sprung, valved and ready to install?
[image: View Post]VF1000RS, on Jun 1 2009, 07:32 PM, said:
Interesting. So how different are the F3 forks from the F4 forks?
Basically the same thing. The only real difference is that the F4's have low speed compression adjustment so the cartridge is a little different at the bottom. With a properly setup bleed hole and shim stack it works fine without the adjustment screw.
[image: View Post]SEBSPEED, on Jun 1 2009, 08:01 PM, said:
So you machined the F4 fork cap and re-threaded it to fit into the smaller tube, I can see that(too much effort for me though). What really throws me though, is the rebound adjuster. F3's had brass rebound adjusters, F4 and up have aluminum adjusters. :huh:
Yes, I machined the cap to fit. After checking my notes, the cartridges that I ended up using were 98 CBR900RR parts. The F4 set was a little too bent. They are all pretty much identical internally. Good eye!
[image: View Post]SEBSPEED, on Jun 1 2009, 08:20 PM, said:
Try it out, I wanna know if the F3 cap threads right in. I have 2 sets of F3 forks, 900RR forks, and a spare set of R forks in the garage right now, but too lazy to check on my own. :blush:
No, it doesn't thread right in. The F3 cap has a much finer thread.
Saw this was mentioned earlier... why not bolt a set of R sliders to F3 tubes and guts...? I`ll have to try it unless somebody has been there and gives me a good reason not to.
How much shorter are we talking? I`ll have to have a look.
EDIT:
Well, I have F2 forks, not F3. Still looks doable if inclined to go that way except you`d probably have to mount the clip-ons under the top triple clamp. I`d have to throw the R triples on the F2 forks to see how the longer steering stem affects things though.
[image: View Post]VF1000RS, on Jun 5 2009, 12:42 AM, said:
Saw this was mentioned earlier... why not bolt a set of R sliders to F3 tubes and guts...? I`ll have to try it unless somebody has been there and gives me a good reason not to.
How much shorter are we talking? I`ll have to have a look.
EDIT:
Well, I have F2 forks, not F3. Still looks doable if inclined to go that way except you`d probably have to mount the clip-ons under the top triple clamp. I`d have to throw the R triples on the F2 forks to see how the longer steering stem affects things though.
F2 & F3 forks are essentially the same; with one big difference - 1992 & 93 F2's had damping rod internals, while the 1994 F2 got cartridge internals. The 94 F2 fork became the F3 fork. They are quite a bit shorter, but I haven't measured the difference yet and all my F2/F3 forks are apart right now... I could measure the tube length for you to compare to your R if that helps(all my R forks are assembled!).
I think you would need a gullwing triple at minimum to end up with geometry that's close to stock, although I have seen them used as - is. (See Joep's trackbike thread on the BBS, he's got a complete F2 front end on his 750F) Joep has not made any mention of interference between the front fender/tire and the cylinder head or radiator, and that includes track use.
[image: View Post]VF1000RS, on Jun 5 2009, 12:42 AM, said:
Saw this was mentioned earlier... why not bolt a set of R sliders to F3 tubes and guts...? I`ll have to try it unless somebody has been there and gives me a good reason not to.
How much shorter are we talking? I`ll have to have a look.
EDIT:
Well, I have F2 forks, not F3. Still looks doable if inclined to go that way except you`d probably have to mount the clip-ons under the top triple clamp. I`d have to throw the R triples on the F2 forks to see how the longer steering stem affects things though.
It's quite a bit. I thought about this but determined that the internal parts/modifications as well as the machining of the fork caps was actually easier than trying to swap the stanchion tubes.
[image: View Post]SEBSPEED, on Jun 5 2009, 06:07 AM, said:
I think you would need a gullwing triple at minimum to end up with geometry that's close to stock, although I have seen them used as - is. (See Joep's trackbike thread on the BBS, he's got a complete F2 front end on his 750F) Joep has not made any mention of interference between the front fender/tire and the cylinder head or radiator, and that includes track use.
You can see he has the clip-ons under the triple to lower the tubes as much as possible, and had to trim the front fairing in order to accomplish that. I think if you do what he did, then add a nice Daytona or other dirt bike bar, you'd clear the fairing.
[image: View Post]VF1000RS, on May 2 2008, 06:32 PM, said:
I haven`t tried to mount the breather, but I`m pretty sure it won`t fit. I may just block off the breather that returns to the airbox and do something smaller for the crankcase breather. Did something similar on my Mutant R with a T and a small K&N.
Tom, any repercussions you can think of to blocking the airbox breather? Oil buildup in the box? I'm going through this right now with my 750, I have a filter & was planning to tee the airbox line into the case line, but haven't found a suitable size tee. A plug would be easier to make/find...
[image: View Post]SEBSPEED, on Aug 4 2009, 06:19 AM, said:
[image: View Post]VF1000RS, on May 2 2008, 06:32 PM, said:
I haven`t tried to mount the breather, but I`m pretty sure it won`t fit. I may just block off the breather that returns to the airbox and do something smaller for the crankcase breather. Did something similar on my Mutant R with a T and a small K&N.
Tom, any repercussions you can think of to blocking the airbox breather? Oil buildup in the box? I'm going through this right now with my 750, I have a filter & was planning to tee the airbox line into the case line, but haven't found a suitable size tee. A plug would be easier to make/find...
No repercussions have occurred. The airbox breather nipple is just a return from the puke box so any crankcase gases get run through the carbs and burned.
I used some epoxy made for plastic and a piece of fibreglass cloth(or maybe it was duct tape :laugh: ) to block off the airbox hole after I cut the nipple flush.
You will need to vent the breather on top of the rear valve cover though(does the 750 have this breather?)Place your filter so this breather will have access to the air. I used a T so if there is any oil blow-by from the engine, it drains to the bottom of a tube attached to the bottom of the T, then capped it with the stock puke box drain cap. I can still drain the tube if/when neccessary.
There is also a breather on the R that goes from the left side rear of the rear valve cover to the cases down by the tranny, leave this as is.
Hey Seb, btw, spoke to soon in your thread. Got the front end bits torqued down and the right rotor is dragging ever so slightly on the caliper bracket so I am going to have to mod it a little to get it lined up.
[image: View Post]vfrcapn, on Aug 6 2009, 12:22 AM, said:
Hey Seb, btw, spoke to soon in your thread. Got the front end bits torqued down and the right rotor is dragging ever so slightly on the caliper bracket so I am going to have to mod it a little to get it lined up.
Just a couple pics. The rotor here is just barely rubbing the right caliper bracket. [image: Posted Image]
Taking a couple mm's off the inside the bracket to move it outboard didn't look good, it's only 5 or 6 mm thick at that point. So I widened the slot the caliper runs through. Bad idea or ok? There's really more clearance than the pic shows. Is this what you ran in to Seb?
Got the brakes and calipers bled. Need to swap out the idiot light module, reinstall the exhaust and fairings and haul it to the highway patrol for a VIN inspection to finalize the title. Then take it for a spin.
I will find out what the deal is with mine soon, my calipers are rebuilt and all I need to do is clean up the bracket for the left caliper so I can get them on the forks. :fing02:
[image: View Post]SEBSPEED, on Sep 2 2009, 03:31 PM, said:
Riding it legally yet Mike?
I will find out what the deal is with mine soon, my calipers are rebuilt and all I need to do is clean up the bracket for the left caliper so I can get them on the forks. :fing02:
No, exhaust is still sitting in the corner. I'm on to painting now......a couple bedrooms, bathroom, hallway..... :dry:
[image: View Post]VF1000RS, on Apr 9 2008, 12:03 PM, said:
Don`t worry about the tire/chain clearance. You have plenty. When I did the Mutant I think I could get 3 sheets of paper in between the Dunlop D207(a notoriously wide 180, more like 190 something) and the chain. Never touched and I used it until I put a D208 on it. The D208 was significantly narrower than the 207 and this Michelin Pilot Power is the same way. Probably a true 180mm tire.
I am building a motorcycle from scratch and I am about ready to install the engine and weld the mount tabs.
I saw your story and found out about Krueger making the offset countershaft sprockets. That could really help me, but i need to ask a question. If the 9mm offset requires cutting of the clutch slave cylinder casting would the 7mm offset ALSO require cutting of the slave cylinder casting.?
[image: View Post]lucky, on Oct 12 2009, 01:30 PM, said:
[image: View Post]VF1000RS, on Apr 9 2008, 12:03 PM, said:
Don`t worry about the tire/chain clearance. You have plenty. When I did the Mutant I think I could get 3 sheets of paper in between the Dunlop D207(a notoriously wide 180, more like 190 something) and the chain. Never touched and I used it until I put a D208 on it. The D208 was significantly narrower than the 207 and this Michelin Pilot Power is the same way. Probably a true 180mm tire.
I am building a motorcycle from scratch and I am about ready to install the engine and weld the mount tabs.
I saw your story and found out about Krueger making the offset countershaft sprockets. That could really help me, but i need to ask a question. If the 9mm offset requires cutting of the clutch slave cylinder casting would the 7mm offset ALSO require cutting of the slave cylinder casting.?
Thanks!!!
I'm not sure, it would be very close. Best thing would probably be to give it a try. Or fab something up like VF1000RS did and eliminate the cover plate altogether. Are you fabricating a frame from scratch?
[image: View Post]vfrcapn, on Oct 12 2009, 03:37 PM, said:
[image: View Post]lucky, on Oct 12 2009, 01:30 PM, said:
[image: View Post]VF1000RS, on Apr 9 2008, 12:03 PM, said:
Don`t worry about the tire/chain clearance. You have plenty. When I did the Mutant I think I could get 3 sheets of paper in between the Dunlop D207(a notoriously wide 180, more like 190 something) and the chain. Never touched and I used it until I put a D208 on it. The D208 was significantly narrower than the 207 and this Michelin Pilot Power is the same way. Probably a true 180mm tire.
I am building a motorcycle from scratch and I am about ready to install the engine and weld the mount tabs.
I saw your story and found out about Krueger making the offset countershaft sprockets. That could really help me, but i need to ask a question. If the 9mm offset requires cutting of the clutch slave cylinder casting would the 7mm offset ALSO require cutting of the slave cylinder casting.?
Thanks!!!
I'm not sure, it would be very close. Best thing would probably be to give it a try. Or fab something up like VF1000RS did and eliminate the cover plate altogether. Are you fabricating a frame from scratch?
Yes I am building a frame from scratch. You would probably not like my project.
I used to be one of the top dirt track racers in Northern California and did well in Arizona as well.
I will post a pic . [image: Posted Image] [image: Posted Image]
[image: View Post]lucky, on Oct 13 2009, 06:45 PM, said:
[image: View Post]vfrcapn, on Oct 12 2009, 03:37 PM, said:
[image: View Post]lucky, on Oct 12 2009, 01:30 PM, said:
[image: View Post]VF1000RS, on Apr 9 2008, 12:03 PM, said:
Don`t worry about the tire/chain clearance. You have plenty. When I did the Mutant I think I could get 3 sheets of paper in between the Dunlop D207(a notoriously wide 180, more like 190 something) and the chain. Never touched and I used it until I put a D208 on it. The D208 was significantly narrower than the 207 and this Michelin Pilot Power is the same way. Probably a true 180mm tire.
I am building a motorcycle from scratch and I am about ready to install the engine and weld the mount tabs.
I saw your story and found out about Krueger making the offset countershaft sprockets. That could really help me, but i need to ask a question. If the 9mm offset requires cutting of the clutch slave cylinder casting would the 7mm offset ALSO require cutting of the slave cylinder casting.?
Thanks!!!
I'm not sure, it would be very close. Best thing would probably be to give it a try. Or fab something up like VF1000RS did and eliminate the cover plate altogether. Are you fabricating a frame from scratch?
Yes I am building a frame from scratch. You would probably not like my project.
I used to be one of the top dirt track racers in Northern California and did well in Arizona as well.
I will post a pic . [image: Posted Image] [image: Posted Image]
I asked Kruger about the 7mm offset and he said no modification would be needed. I just do not know if .275 thousandths is enough for me. Trouble is I still need to find the center of balance of the engine.
The battery position could be the deciding factor.
BTW- 3 sheets of copy paper is about .018 thousandths.
[image: View Post]lucky, on Oct 13 2009, 08:59 PM, said:
I asked Kruger about the 7mm offset and he said no modification would be needed. I just do not know if .275 thousandths is enough for me. Trouble is I still need to find the center of balance of the engine.
The battery position could be the deciding factor.
BTW- 3 sheets of copy paper is about .018 thousandths.
Very ambitious project. Looks like you know what you are doing though. Good powerplant choice.
As long as the chain and the tire didn`t touch it was fine. I have replaced that set of tires already with Bridgestone BT016`s. An interesting thing happened which has not happened with either of the previous two sets, after mounting the tire, same clearance as before. After riding a hundred miles or so I popped the rear in the air to check the chain run and tire...squeaked ever so faintly rotating by hand as the edge of the tire barely touched the edge of the chain rivets. I am guessing the tire has changed shape slightly as it has been ridden. Trimmed the edge of the rear BT016 2mm and no issues. Different tires react differently apparently.
[image: View Post]lucky, on Oct 13 2009, 07:45 PM, said:
[image: View Post]vfrcapn, on Oct 12 2009, 03:37 PM, said:
[image: View Post]lucky, on Oct 12 2009, 01:30 PM, said:
[image: View Post]VF1000RS, on Apr 9 2008, 12:03 PM, said:
Don`t worry about the tire/chain clearance. You have plenty. When I did the Mutant I think I could get 3 sheets of paper in between the Dunlop D207(a notoriously wide 180, more like 190 something) and the chain. Never touched and I used it until I put a D208 on it. The D208 was significantly narrower than the 207 and this Michelin Pilot Power is the same way. Probably a true 180mm tire.
I am building a motorcycle from scratch and I am about ready to install the engine and weld the mount tabs.
I saw your story and found out about Krueger making the offset countershaft sprockets. That could really help me, but i need to ask a question. If the 9mm offset requires cutting of the clutch slave cylinder casting would the 7mm offset ALSO require cutting of the slave cylinder casting.?
Thanks!!!
I'm not sure, it would be very close. Best thing would probably be to give it a try. Or fab something up like VF1000RS did and eliminate the cover plate altogether. Are you fabricating a frame from scratch?
Yes I am building a frame from scratch. You would probably not like my project.
I used to be one of the top dirt track racers in Northern California and did well in Arizona as well.
I will post a pic . [image: Posted Image] [image: Posted Image]
Looks like a hard tail chopper? With the V4? That is a cool project, I'd bet there'd be plenty of interest if you wanted to write up some details and start your own thread. You in the Sacramento area?
The oil kits provide additional oil to the heads, to prevent some of the cam burning issues typical with this era Honda V4. There's a 2 line kit that connects to an adapter that mounts between the oil filter and block, just like the old aftermarket oil cooler kits. http://www.holeshot....4/v4_oiler.html
The other option is to drill and tap in to the main gallery on the bottom of the motor and run the line up to the heads. That's what I ended up doing. You can get some Earl's fittings for this option, or a member here sells (sold?) a kit with the pieces you need, Jamie Daugherty. http://www.daugherty.../v4section.html Jamie, are you no longer selling them?
[image: View Post]vfrcapn, on Oct 13 2009, 07:43 PM, said:
[image: View Post]lucky, on Oct 13 2009, 07:45 PM, said:
[image: View Post]vfrcapn, on Oct 12 2009, 03:37 PM, said:
[image: View Post]lucky, on Oct 12 2009, 01:30 PM, said:
[image: View Post]VF1000RS, on Apr 9 2008, 12:03 PM, said:
Don`t worry about the tire/chain clearance. You have plenty. When I did the Mutant I think I could get 3 sheets of paper in between the Dunlop D207(a notoriously wide 180, more like 190 something) and the chain. Never touched and I used it until I put a D208 on it. The D208 was significantly narrower than the 207 and this Michelin Pilot Power is the same way. Probably a true 180mm tire.
I am building a motorcycle from scratch and I am about ready to install the engine and weld the mount tabs.
I saw your story and found out about Krueger making the offset countershaft sprockets. That could really help me, but i need to ask a question. If the 9mm offset requires cutting of the clutch slave cylinder casting would the 7mm offset ALSO require cutting of the slave cylinder casting.?
Thanks!!!
I'm not sure, it would be very close. Best thing would probably be to give it a try. Or fab something up like VF1000RS did and eliminate the cover plate altogether. Are you fabricating a frame from scratch?
Yes I am building a frame from scratch. You would probably not like my project.
I used to be one of the top dirt track racers in Northern California and did well in Arizona as well.
I will post a pic . [image: Posted Image] [image: Posted Image]
Looks like a hard tail chopper? With the V4? That is a cool project, I'd bet there'd be plenty of interest if you wanted to write up some details and start your own thread. You in the Sacramento area?
The oil kits provide additional oil to the heads, to prevent some of the cam burning issues typical with this era Honda V4. There's a 2 line kit that connects to an adapter that mounts between the oil filter and block, just like the old aftermarket oil cooler kits. http://www.holeshot....4/v4_oiler.html
The other option is to drill and tap in to the main gallery on the bottom of the motor and run the line up to the heads. That's what I ended up doing. You can get some Earl's fittings for this option, or a member here sells (sold?) a kit with the pieces you need, Jamie Daugherty. http://www.daugherty.../v4section.html Jamie, are you no longer selling them?
Thanks for all the info. I really appreciate it.
I have the VF1000R engine with gear driven cams and I thought the oiling problems were
fixed on the "R" engines.
I have an ongoing thread about my project on Club chopper forums >metric builds.
BTW I live in Guerneville CA., about 60 miles northwest of Golden Gate bridge.
Eight miles from the ocean on winding roads that go through the redwoods. Beautiful ride.
[image: View Post]SEBSPEED, on Oct 14 2009, 02:15 AM, said:
[image: View Post]veefer800canuck, on Oct 14 2009, 01:56 AM, said:
Also, there was one guy fitting a VFR engine into a small racecar, dunno whatever happened to him....... (anyone?)
Haven't seen or heard from beaulayman in a long time, he was fitting a 5th gen motor in an older Mini.
Thanks for the interest. A lot of great information.
I did not want to steal the thread about the VFR rebuild. It was a great story.
I liked the way it was presented.
Couple 'final' pics of the bike. Last fall I found the carbs gummed up from sitting for so long and I just got around to taking them off, cleaning and reinstalling. Started right up with just a little choke and seems to be running well.
Next step was to drag it to the DMV and Highway Patrol last week for final inspections on a new title. Everyone signed off, after the CHP spent a couple hours giving me a beat down, and it's all legal now. Even had a short ride on it yesterday.
Fender still needs painting, front brake master needs a rebuild, rear shock needs adjusting and the forks are sticking a little on rebound. I may need to check the alignment on the triples and reset the front end to see if that helps. I should have replaced the springs when I was in to the forks too.
The temp sender and fan sender don't appear to be working but I have the fans on a switch. I think the temp sender is still available so I may just order one. It needs a new front tire but I was surprised how well it turns in at speed. It's still a beast to push around the garage though! There's a lot I'd like to do still, like replacing signals & mirrors, but the project budget is on empty right now so that's about it. Everything is assembled and the spare parts put away, feels pretty good after dragging it out for 2.5 years.
High five for you buddy, congrats!! :fing02: :beer:
I was just looking at my 750 today, and was thinking about how I should start thinking about working on it again(yes, I intentionally wrote that...).
Too many other things in the works right now. I'm very excited to see your bike finished though! You even cleaned off your work bench, good man! Now pull up a lawn chair behind the bike and watch the sun set through the windshield and the bottom of a beer glass! :beer:
ps - one of the nicest looking $300 bikes I've ever seen! :cool: :goofy:
[image: View Post]Kel, on 06 February 2010 - 08:35 PM, said:
Looks really nice!! I see the mirror trick worked out good. :comp13:
It did work nicely, thanks! :pissed: Although those tiny mirrors are pretty much worthless to see anything behind you. I'm thinking some bar end mirrors may work in at some point.
[image: View Post]SEBSPEED, on 06 February 2010 - 09:29 PM, said:
High five for you buddy, congrats!! :fing02: :beer:
I was just looking at my 750 today, and was thinking about how I should start thinking about working on it again(yes, I intentionally wrote that...).
Too many other things in the works right now. I'm very excited to see your bike finished though! You even cleaned off your work bench, good man! Now pull up a lawn chair behind the bike and watch the sun set through the windshield and the bottom of a beer glass! :beer:
ps - one of the nicest looking $300 bikes I've ever seen! :cool: :goofy:
Thanks. I thought you were definitely going to finish before I did. I still have your license plate bracket I'll fit on pretty soon. And it's one of the most expensive $300 bikes I've every seen. :goofy:
Watching it now through the beer glass and cigar smoke. :wub:
edit: Also want to say thanks for everyone's tips, encouragement, ideas and everything else that contributed to getting this bike back together. Especially to SEBSPEED, VF1000RS, Kel, JamieDaugherty, Veefer800Canuck and motorhead1977.
[image: View Post]vfrcapn, on 06 February 2010 - 10:26 PM, said:
edit: Also want to say thanks for everyone's tips, encouragement, ideas and everything else that contributed to getting this bike back together. Especially to SEBSPEED, VF1000RS, Kel, JamieDaugherty, Veefer800Canuck and motorhead1977.
For me, I was just living vicariously through your thread. Kind of like being in an entourage of some rock star, you can sort of get a taste of what it's like(to to get a project done) without actually achieving it. :laugh:
[image: View Post]Kel, on 07 February 2010 - 08:18 AM, said:
[image: View Post]vfrcapn, on 06 February 2010 - 10:26 PM, said:
edit: Also want to say thanks for everyone's tips, encouragement, ideas and everything else that contributed to getting this bike back together. Especially to SEBSPEED, VF1000RS, Kel, JamieDaugherty, Veefer800Canuck and motorhead1977.
For me, I was just living vicariously through your thread. Kind of like being in an entourage of some rock star, you can sort of get a taste of what it's like(to to get a project done) without actually achieving it. :biggrin:
Wow Kel, think you just summed up my life in one sentence! hehehe
Top work Capn, it looks a treat. What's your next project? :biggrin:
[image: View Post]vfrcapn, on 06 April 2008 - 11:26 PM, said:
No worries on the thread, great info. I'm using the same hole on the subframe to eyeball the wheel alignment. I did notch the underside of the seat to clear the RC shock, no more than a 1"x2" cutout and it's just grazing the foam underneath. After looking at how bad the seat looked though, I had to fix that up today. [image: Posted Image] [image: Posted Image] [image: Posted Image] [image: Posted Image]
Still have to stitch up the rear strap. [image: Posted Image]
vfrcapn where did you find the material to recover the seat and bumper pad?
[image: View Post]rrjockey, on 06 March 2010 - 11:53 PM, said:
vfrcapn where did you find the material to recover the seat and bumper pad?
Just the local fabric shop, Jo-Ann's I believe. Just got lucky the color was a close match. It's not heavy marine type vinyl but should hold up well enough for a few seasons.
[image: View Post]SEBSPEED, on 27 February 2011 - 08:53 PM, said:
[image: View Post]vfrcapn, on 27 February 2011 - 08:10 PM, said:
Off to a new home...
:sad:
But, but...
[image: View Post]SEBSPEED, on 07 February 2010 - 07:52 AM, said:
Cheers buddy! All we need now is an ATGATT burnout video! :fing02:
:biggrin:
The new owner is a member here and once he gets back from his overseas deployment maybe he can show the ATGATT burnout. Although I wouldn't suggest it on those new PR2's! :biggrin:
Sorry to see it go. On to the 1000F project now.........
Thanks VFRCapn!!!! Can't say enough how accomodating he was in assisting a cross country purchase while I'm deployed. Can't wait to take leave in April to wax, shine, polish and tinker with it. White wheels and some racetech goodies in the forks sounds good. Oh yeah, ride it too. :biggrin:
I'll be posting pics once I get home. No burn outs!!!! Well, not yet at least. We'll need to bond before I start with the sillyness. Let the V4 collection begin. Next up, 86 VFR750. Anyone got any leads? My wife is gonna kill me :biggrin:
[image: View Post]smackdoogle, on 28 February 2011 - 01:09 AM, said:
Thanks VFRCapn!!!! Can't say enough how accomodating he was in assisting a cross country purchase while I'm deployed. Can't wait to take leave in April to wax, shine, polish and tinker with it. White wheels and some racetech goodies in the forks sounds good. Oh yeah, ride it too. :biggrin:
I'll be posting pics once I get home. No burn outs!!!! Well, not yet at least. We'll need to bond before I start with the sillyness. Let the V4 collection begin. Next up, 86 VFR750. Anyone got any leads? My wife is gonna kill me :biggrin:
[image: View Post]vfrcapn, on 06 February 2010 - 08:28 PM, said:
Couple 'final' pics of the bike. Last fall I found the carbs gummed up from sitting for so long and I just got around to taking them off, cleaning and reinstalling. Started right up with just a little choke and seems to be running well.
Next step was to drag it to the DMV and Highway Patrol last week for final inspections on a new title. Everyone signed off, after the CHP spent a couple hours giving me a beat down, and it's all legal now. Even had a short ride on it yesterday.
Fender still needs painting, front brake master needs a rebuild, rear shock needs adjusting and the forks are sticking a little on rebound. I may need to check the alignment on the triples and reset the front end to see if that helps. I should have replaced the springs when I was in to the forks too.
The temp sender and fan sender don't appear to be working but I have the fans on a switch. I think the temp sender is still available so I may just order one. It needs a new front tire but I was surprised how well it turns in at speed. It's still a beast to push around the garage though! There's a lot I'd like to do still, like replacing signals & mirrors, but the project budget is on empty right now so that's about it. Everything is assembled and the spare parts put away, feels pretty good after dragging it out for 2.5 years.
I'm so glad you have your bike back- I've been considering buying a VF for a couple years and your thread is part of the reason I pulled the trigger this weekend! I've had one motorcycle for 15 years, lots of time and energy/money invested, can't imagine letting it go, and to see you send the 1KR cross country and then get it back 2 thread pages later was a roller coaster! These are beautiful motorcycles- mine needs plenty of work, but I cant wait to get to it this winter. Right off the truck it has a wobble that wasn't there a week ago when I looked at it- guessing it was the trip down in the truck with tie-downs? Once I figure out the best way to get the front up I will loosen everything up and retighten, hoping that is the quick solution. Plan to go through the front end (and other things) properly over winter but was hoping to ride it until then! Keep us posted on how the riding is out in CA, I rode a bike out there once long ago...
Our 2 months of 95 degree+ summer heat is about done so I get a couple months now to hopefully enjoy a few rides before the cold and rain. Would like to respring and revalve the forks this winter, depending on my time and motivation.
Just completed reading this. Thanks to all the contributors to the thread.
I have to say, if feels great to have a VF1000F again. I put 50,000 miles on my last one.
The plan is to get it into 100% mechanical riding shape for the winter with some suspension improvements, and hoping it's a milder winter than we had last year, which was the worst riding winter I remember (been riding in NYMetro area since 1970).
I really like the way the modded bikes look, but right now I'm thinking I'll probably stay pretty close to stock. Yeah, I can hear some of you groaning "what's so fun about that?" lol, but I genuinely liked the characteristics and looks of the original.
And because this is titled as an R rebuild thread, I figured I may as well post a pic of the R that I had.
[image: VF1000R%203.jpg]
That tan lump behind it is a 76 Olds 88 ragtop. So that dates the picture around 1991
Bit of an old thread now when I look at the dates but some great information. I found a semi-decent runner today that I will should be able to ride it home in the coming days. They imported the European model to Australia with the twin headlights and square tank
Lots of cosmetic issues and parts missing, but I'm looking forward to stripping it down and paying some close attention. They are getting pretty expensive here in AUS and very hard to find. People are reluctant to sell them so it wasn't cheap.
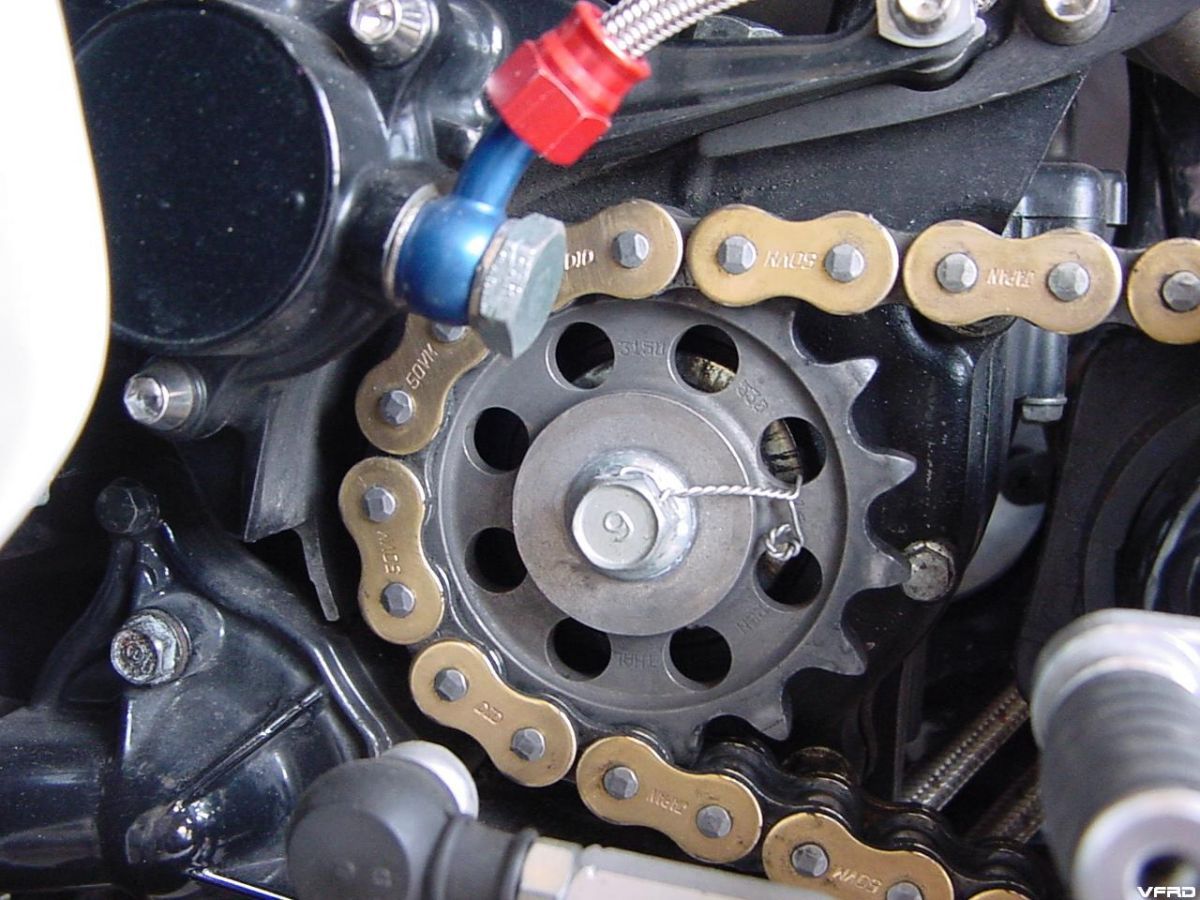
![[image: IMG_2242Medium.jpg]](http://i119.photobucket.com/albums/o124/capnspif/VF1000R/IMG_2242Medium.jpg)
![[image: IMG_2246Medium.jpg]](http://i119.photobucket.com/albums/o124/capnspif/VF1000R/IMG_2246Medium.jpg)
![[image: IMG_2249Medium.jpg]](http://i119.photobucket.com/albums/o124/capnspif/VF1000R/IMG_2249Medium.jpg)
![[image: IMG_2254Medium.jpg]](http://i119.photobucket.com/albums/o124/capnspif/VF1000R/IMG_2254Medium.jpg)
![[image: IMG_2250Medium.jpg]](http://i119.photobucket.com/albums/o124/capnspif/VF1000R/IMG_2250Medium.jpg)
![[image: IMG_2257Small.jpg]](http://i119.photobucket.com/albums/o124/capnspif/VF1000R/IMG_2257Small.jpg)
![[image: IMG_2258Small.jpg]](http://i119.photobucket.com/albums/o124/capnspif/VF1000R/IMG_2258Small.jpg)
![[image: IMG_2278Large.jpg]](http://i119.photobucket.com/albums/o124/capnspif/VF1000R/IMG_2278Large.jpg)
![[image: HPIM2861Medium.jpg]](http://i119.photobucket.com/albums/o124/capnspif/VF1000R/HPIM2861Medium.jpg)
![[image: HPIM2862Medium.jpg]](http://i119.photobucket.com/albums/o124/capnspif/VF1000R/HPIM2862Medium.jpg)
![[image: IMG_3688Medium.jpg]](http://i119.photobucket.com/albums/o124/capnspif/VF1000R/IMG_3688Medium.jpg)
![[image: IMG_3372Medium.jpg]](http://i119.photobucket.com/albums/o124/capnspif/VF1000R/IMG_3372Medium.jpg)
![[image: IMG_3853Medium.jpg]](http://i119.photobucket.com/albums/o124/capnspif/VF1000R/IMG_3853Medium.jpg)
![[image: IMG_3856Medium.jpg]](http://i119.photobucket.com/albums/o124/capnspif/VF1000R/IMG_3856Medium.jpg)
![[image: IMG_3859Medium.jpg]](http://i119.photobucket.com/albums/o124/capnspif/VF1000R/IMG_3859Medium.jpg)
![[image: IMG_4775Large.jpg]](http://i119.photobucket.com/albums/o124/capnspif/VF1000R/chassis/IMG_4775Large.jpg)
![[image: IMG_4778Large.jpg]](http://i119.photobucket.com/albums/o124/capnspif/VF1000R/chassis/IMG_4778Large.jpg)
![[image: IMG_4780Large.jpg]](http://i119.photobucket.com/albums/o124/capnspif/VF1000R/chassis/IMG_4780Large.jpg)
![[image: IMG_4774Large.jpg]](http://i119.photobucket.com/albums/o124/capnspif/VF1000R/chassis/IMG_4774Large.jpg)
![[image: IMG_4814Large.jpg]](http://i119.photobucket.com/albums/o124/capnspif/VF1000R/chassis/IMG_4814Large.jpg)
![[image: IMG_4795Large.jpg]](http://i119.photobucket.com/albums/o124/capnspif/VF1000R/chassis/IMG_4795Large.jpg)
![[image: IMG_4797Large.jpg]](http://i119.photobucket.com/albums/o124/capnspif/VF1000R/chassis/IMG_4797Large.jpg)
![[image: IMG_4793Large.jpg]](http://i119.photobucket.com/albums/o124/capnspif/VF1000R/chassis/IMG_4793Large.jpg)
![[image: IMG_4824Large.jpg]](http://i119.photobucket.com/albums/o124/capnspif/VF1000R/chassis/IMG_4824Large.jpg)
![[image: IMG_4786Medium.jpg]](http://i119.photobucket.com/albums/o124/capnspif/VF1000R/chassis/IMG_4786Medium.jpg)
![[image: IMG_4784Large.jpg]](http://i119.photobucket.com/albums/o124/capnspif/VF1000R/chassis/IMG_4784Large.jpg)
![[image: IMG_4791Large.jpg]](http://i119.photobucket.com/albums/o124/capnspif/VF1000R/chassis/IMG_4791Large.jpg)
![[image: IMG_4756Large.jpg]](http://i119.photobucket.com/albums/o124/capnspif/VF1000R/chassis/IMG_4756Large.jpg)
![[image: IMG_4867Large.jpg]](http://i119.photobucket.com/albums/o124/capnspif/VF1000R/chassis/IMG_4867Large.jpg)
![[image: IMG_4851Large.jpg]](http://i119.photobucket.com/albums/o124/capnspif/VF1000R/chassis/IMG_4851Large.jpg)
![[image: IMG_4847Large.jpg]](http://i119.photobucket.com/albums/o124/capnspif/VF1000R/chassis/IMG_4847Large.jpg)
![[image: IMG_4892Small.jpg]](http://i119.photobucket.com/albums/o124/capnspif/VF1000R/IMG_4892Small.jpg)
![[image: IMG_4897Small.jpg]](http://i119.photobucket.com/albums/o124/capnspif/VF1000R/IMG_4897Small.jpg)
![[image: IMG_4913Small.jpg]](http://i119.photobucket.com/albums/o124/capnspif/VF1000R/IMG_4913Small.jpg)
![[image: IMG_4915Small.jpg]](http://i119.photobucket.com/albums/o124/capnspif/VF1000R/IMG_4915Small.jpg)
![[image: IMG_4931Small.jpg]](http://i119.photobucket.com/albums/o124/capnspif/VF1000R/IMG_4931Small.jpg)
![[image: IMG_5024Medium.jpg]](http://i119.photobucket.com/albums/o124/capnspif/VF1000F/IMG_5024Medium.jpg)
![[image: IMG_5030Medium.jpg]](http://i119.photobucket.com/albums/o124/capnspif/VF1000F/IMG_5030Medium.jpg)
![[image: IMG_5093Medium.jpg]](http://i119.photobucket.com/albums/o124/capnspif/VF1000R/chassis/IMG_5093Medium.jpg)
![[image: IMG_5096Medium.jpg]](http://i119.photobucket.com/albums/o124/capnspif/VF1000R/chassis/IMG_5096Medium.jpg)
![[image: IMG_5147Medium.jpg]](http://i119.photobucket.com/albums/o124/capnspif/VF1000F/IMG_5147Medium.jpg)
![[image: IMG_5141Medium.jpg]](http://i119.photobucket.com/albums/o124/capnspif/VF1000F/IMG_5141Medium.jpg)
![[image: IMG_5159Medium.jpg]](http://i119.photobucket.com/albums/o124/capnspif/VF1000F/IMG_5159Medium.jpg)
![[image: IMG_5162Medium.jpg]](http://i119.photobucket.com/albums/o124/capnspif/VF1000F/IMG_5162Medium.jpg)
![[image: IMG_5276Large.jpg]](http://i119.photobucket.com/albums/o124/capnspif/VF1000F/IMG_5276Large.jpg)
![[image: forks2.jpg]](http://i119.photobucket.com/albums/o124/capnspif/RC51_forks/forks2.jpg)
![[image: IMG_5374Medium.jpg]](http://i119.photobucket.com/albums/o124/capnspif/VF1000R/chassis/IMG_5374Medium.jpg)
![[image: IMG_5399Medium.jpg]](http://i119.photobucket.com/albums/o124/capnspif/VF1000R/chassis/IMG_5399Medium.jpg)
![[image: SwingCU.JPG]](http://home.earthlink.net/~canyonrunr/sitebuildercontent/sitebuilderpictures/SwingCU.JPG)
![[image: IMG_0253.jpg]](http://i171.photobucket.com/albums/u301/Kees-Laguna/IMG_0253.jpg)
![[image: IMG_0255.jpg]](http://i171.photobucket.com/albums/u301/Kees-Laguna/IMG_0255.jpg)
![[image: IMGP0033.JPG]](http://www.winning-run.com/img-vf1000r-1/IMGP0033.JPG)
![[image: IMGP0038.JPG]](http://www.winning-run.com/img-vf1000r-1/IMGP0038.JPG)
![[image: IMGP0041.JPG]](http://www.winning-run.com/img-vf1000r-1/IMGP0041.JPG)
![[image: IMGP0039.JPG]](http://www.winning-run.com/img-vf1000r-1/IMGP0039.JPG)
![[image: IMGP0747.JPG]](http://www.winning-run.com/gall-cb954f-01/IMGP0747.JPG)
![[image: 6-16-08010.jpg]](http://i8.photobucket.com/albums/a49/SEBSPEED2003/Projects/6-16-08010.jpg)
![[image: 6-16-08011.jpg]](http://i8.photobucket.com/albums/a49/SEBSPEED2003/Projects/6-16-08011.jpg)
![[image: 6-16-08012.jpg]](http://i8.photobucket.com/albums/a49/SEBSPEED2003/Projects/6-16-08012.jpg)
![[image: 6-16-08009.jpg]](http://i8.photobucket.com/albums/a49/SEBSPEED2003/Projects/6-16-08009.jpg)
![[image: IMG_5538Medium.jpg]](http://i119.photobucket.com/albums/o124/capnspif/VF1000R/IMG_5538Medium.jpg)
![[image: IMG_5530Medium.jpg]](http://i119.photobucket.com/albums/o124/capnspif/VF1000R/IMG_5530Medium.jpg)
![[image: IMG_5564Medium-1.jpg]](http://i119.photobucket.com/albums/o124/capnspif/VF1000R/IMG_5564Medium-1.jpg)
![[image: dscf3844.jpg]](http://i119.photobucket.com/albums/o124/capnspif/VF1000R/Misc/dscf3844.jpg)
![[image: IMG_5572Medium.jpg]](http://i119.photobucket.com/albums/o124/capnspif/VF1000R/IMG_5572Medium.jpg)
![[image: IMG_5570Medium.jpg]](http://i119.photobucket.com/albums/o124/capnspif/VF1000R/IMG_5570Medium.jpg)
![[image: IMG_5679Large.jpg]](http://i119.photobucket.com/albums/o124/capnspif/VF1000R/IMG_5679Large.jpg)
![[image: Posted Image]](http://i119.photobucket.com/albums/o124/capnspif/VF1000R/IMG_5691Large.jpg)
![[image: Posted Image]](http://i119.photobucket.com/albums/o124/capnspif/VF1000R/IMG_5696Large.jpg)
![[image: Posted Image]](http://superbrightleds.com/products/car/wled-b5_on.jpg)
![[image: Posted Image]](http://i8.photobucket.com/albums/a49/SEBSPEED2003/Projects/SuperBrightLEDCrossReferencechart.jpg)
![[image: Posted Image]](http://www.superbrightleds.com/products/car/wled-x5.jpg)
![[image: Posted Image]](http://i119.photobucket.com/albums/o124/capnspif/VF1000R/IMG_5810Large.jpg)
![[image: Posted Image]](http://i119.photobucket.com/albums/o124/capnspif/VF1000R/IMG_5817Large.jpg)
![[image: Posted Image]](http://i119.photobucket.com/albums/o124/capnspif/VF1000R/IMG_6507Medium.jpg)
![[image: Posted Image]](http://i119.photobucket.com/albums/o124/capnspif/VF1000R/IMG_6731Large.jpg)
![[image: Posted Image]](http://i119.photobucket.com/albums/o124/capnspif/VF1000R/IMG_6715Large.jpg)
![[image: Posted Image]](http://i119.photobucket.com/albums/o124/capnspif/VF1000R/IMG_6722Large.jpg)
![[image: Posted Image]](http://i119.photobucket.com/albums/o124/capnspif/VF1000R/Misc/IMG_6742Large.jpg)
![[image: Posted Image]](http://i119.photobucket.com/albums/o124/capnspif/VF1000R/Misc/IMG_6752Large.jpg)
![[image: Posted Image]](http://i119.photobucket.com/albums/o124/capnspif/VF1000R/Misc/IMG_6751Large.jpg)
![[image: Posted Image]](http://i119.photobucket.com/albums/o124/capnspif/VF1000R/IMG_6784Large.jpg)
![[image: Posted Image]](http://i119.photobucket.com/albums/o124/capnspif/VF1000R/IMG_6824arrow.jpg)
![[image: Posted Image]](http://i119.photobucket.com/albums/o124/capnspif/VF1000R/IMG_6889Large.jpg)
![[image: Posted Image]](http://i119.photobucket.com/albums/o124/capnspif/VF1000R/IMG_6865Large.jpg)
![[image: Posted Image]](http://i119.photobucket.com/albums/o124/capnspif/VF1000R/IMG_6861Large.jpg)
![[image: Posted Image]](http://i119.photobucket.com/albums/o124/capnspif/VF1000R/IMG_6871Large.jpg)
![[image: Posted Image]](http://i119.photobucket.com/albums/o124/capnspif/VF1000R/IMG_6879Large.jpg)
![[image: Posted Image]](http://i119.photobucket.com/albums/o124/capnspif/VF1000R/IMG_6898Large.jpg)
![[image: Posted Image]](http://i119.photobucket.com/albums/o124/capnspif/VF1000R/IMG_6973Large.jpg)
![[image: Posted Image]](http://i119.photobucket.com/albums/o124/capnspif/VF1000R/IMG_6977Large.jpg)
![[image: Posted Image]](http://i119.photobucket.com/albums/o124/capnspif/VF1000R/IMG_6978Large.jpg)
![[image: Posted Image]](http://i119.photobucket.com/albums/o124/capnspif/VF1000R/IMG_6984Large.jpg)
![[image: Posted Image]](http://i119.photobucket.com/albums/o124/capnspif/VF1000R/IMG_6988Large.jpg)
![[image: Posted Image]](http://i119.photobucket.com/albums/o124/capnspif/VF1000R/IMG_6991Large.jpg)
![[image: Posted Image]](http://www.daughertymotorsports.com/temp/VF1000F_Cartridge_Forks_1.jpg)
![[image: Posted Image]](http://www.daughertymotorsports.com/temp/VF1000F_Cartridge_Forks_2.jpg)
![[image: Posted Image]](http://i281.photobucket.com/albums/kk219/PeterkeP/Joep.jpg)
![[image: Posted Image]](http://i119.photobucket.com/albums/o124/capnspif/VF1000R/IMG_7939Large.jpg)
![[image: Posted Image]](http://i119.photobucket.com/albums/o124/capnspif/VF1000R/IMG_7942Large.jpg)
![[image: Posted Image]](http://i33.tinypic.com/14ljats.jpg)
![[image: Posted Image]](http://i34.tinypic.com/2yv16xf.jpg)
![[image: Posted Image]](http://www.redmarque.com/bike/overallview.jpg)
![[image: Posted Image]](http://i119.photobucket.com/albums/o124/capnspif/VF1000R/vf1kr_left.jpg)
![[image: Posted Image]](http://i119.photobucket.com/albums/o124/capnspif/VF1000R/vk1kr_rear.jpg)
![[image: Posted Image]](http://i119.photobucket.com/albums/o124/capnspif/VF1000R/vf1kr_right.jpg)
![[image: Posted Image]](http://i119.photobucket.com/albums/o124/capnspif/VF1000R/IMG_9175Medium.jpg)
![[image: Posted Image]](http://i119.photobucket.com/albums/o124/capnspif/VF1000R/IMG_9197Medium.jpg)