VFRDiscussion ARCHIVE / READ-ONLYREAD-ONLY

My Vfr 750 Streetfighter Project :)

61 posts Started 15 May 2015 Last recovered post 15 Nov 2016 Wayback Machine snapshot 10 Jul 2017

#1

Hello, my name is Bart, and I live in Belgium.

I'm 24 years old and the vfr 750 is my first bike.

I really love the way it can be driven gently and also have a lot of power when needed.

When I wanted to take a ride last summer, I saw my rear light was hanging loose.

Then I saw my fairings were cracked all over and I couldn't repair them myself.

I wanted to buy new rear fairings, but they are so expensive, and hard to find.

And even if I bought some, my front fairings were starting to showing cracks as well.

So I never knew when I had to replace or repair them (if possible). I didn't wanted to sell

my VFR, because I just did some costs on it. So I looked around on google to look at some

vfr streetfighters, till I came on this forum. Then I saw Apex Andy and Zefarton44 their project.

And I was so inspired. I'm a CNC-milling worker, so I thought maybe this could work.

So here are some pictures.

And sorry if my English isn't perfect.

greetings

This is how he looked like when I just bought him. He was already re-painted from the last owner, the result wasn't that good when you looked closely.
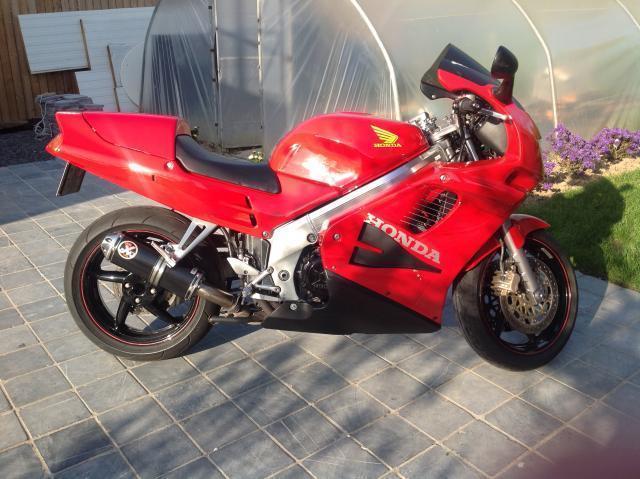
post-31522-0-49740000-1431714834.jpg

[image: post-31522-0-68158700-1431714889.jpg]

I worked with a ducati seat and when I got it, look how it fits.

[image: post-31522-0-89359200-1431715749.jpg]

then I made my own subframe

[image: post-31522-0-79872100-1431715817.jpg]

[image: post-31522-0-67376600-1431715848.jpg]

[image: post-31522-0-24368700-1431715894.jpg]

I didn't like the holes under the gas tank so I made some side panels, first in cardboard. Also I wanted a more relaxed way to ride the vfr, so I bought a streetfighter steer. I also bought the lsl urban headlight.

[image: post-31522-0-37938300-1431715984.jpg]

[image: post-31522-0-61860100-1431716008.jpg]

than started to clean up everything and make things ready to powdercoat. also made some pieces for the powdercoating as you will see on the pics.

[image: post-31522-0-89373700-1431716211.jpg]

[image: post-31522-0-57935300-1431716272.jpg]

[image: post-31522-0-58999600-1431716348.jpg]

[image: post-31522-0-18405200-1431716394.jpg]

[image: post-31522-0-99860200-1431716234.jpg]

When my parts turned back from the powdercoater, I mounted everything up, and then everything got professionally painted in candy red. So this is the final result. I hope you like it.

[image: post-31522-0-87523900-1431716767.jpg]

[image: post-31522-0-19249300-1431716976.jpg]

[image: post-31522-0-72859000-1431717034.jpg]

[image: post-31522-0-98272300-1431717097.jpg]

[image: post-31522-0-76797600-1431717152.jpg]

[image: post-31522-0-48823800-1431717270.jpg]

[image: post-31522-0-73729300-1431717344.jpg]

greetings from Belgium.

[image: post-31522-0-62770900-1431717231.jpg]
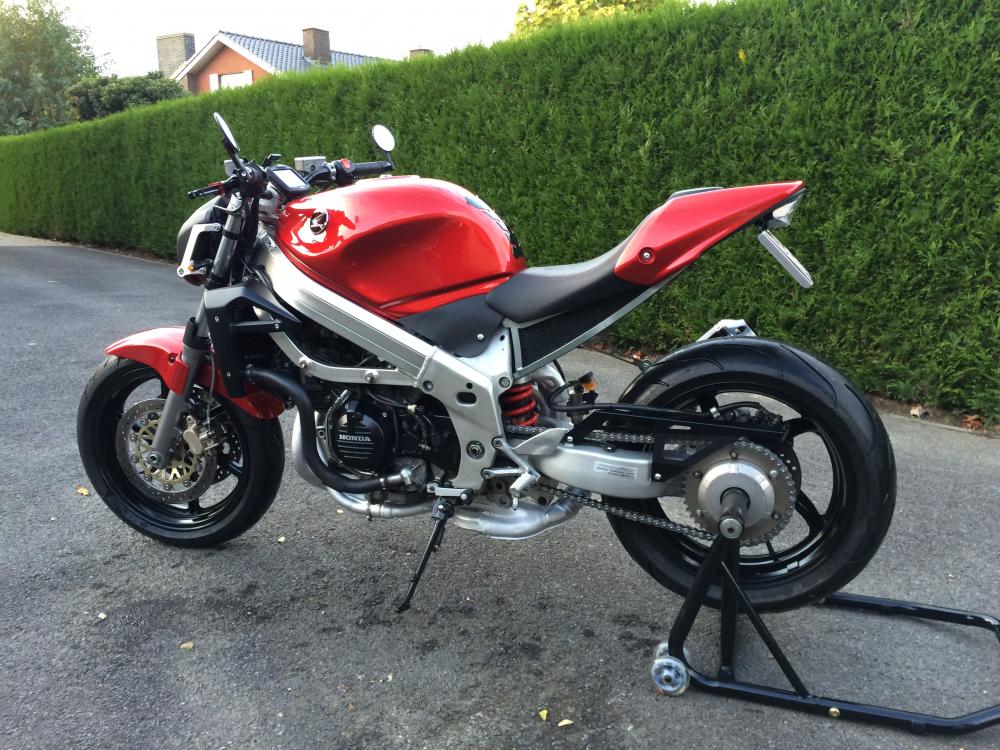
#2

What a great looking machine! Very well done.

#3

Your streetfighter looks amazing! Great job! Eventually, I will be getting onto doing this with my 93.

#4
mk2davis

What a great looking machine! Very well done.

KOCONUT

Your streetfighter looks amazing! Great job! Eventually, I will be getting onto doing this with my 93.

Thanks a lot!

#5

VERY Nicely done. Love the color and under tray details with the silver supports and the black panels. Adds some great visual effect.

#6

Absolutely beautiful! Great Job!!

#7

The red looks great. Red and blue are my favorite colors.

I love how all these nice naked 4th gen are popping up!

#9

Very well done! Good color choice too. Enjoy!!!!!!!!

#10

Needs a clear clutch cover though..... :goofy:

#11
Dutchy

Needs a clear clutch cover though..... :goofy:

Yes. I think we need a thread for all these naked bikes too.

#12
vfrAustin

Very well done! Good color choice too. Enjoy!!!!!!!!

thank you!
#13

I have one issue with the build. Not enough pictures! Can you do a batch of close ups? Where did you get the radiator shrouds? I need to see the details. Love Belgium, spent a little time there.

#15
vfrAustin

I have one issue with the build. Not enough pictures! Can you do a batch of close ups? Where did you get the radiator shrouds? I need to see the details. Love Belgium, spent a little time there.

Yes a few more detailed pics would be nice as it would be interesting to find out how exactly you handled the details on the build as the VFR are quite a challenge to turn into good looking street fighters because what's under the faring are quite messy on these bikes.

BTW, love Belgium too, and thank you for your country introducing me to one of the best beers I ever tasted when I visited Brussels this last new year...Westmalle Dubbel! Now my number 1 favorite beer!

Edited May 17, 2015 by Beck
#16

Another awesome 4th gen build. Looks like you're using GPS for your speedometer. What are the array of lights above it for? No tachometer or coolant temperature gauges I assume.

#17
Veefer800Canuck

great work! absolutely awesome!

thanks!
Beck
vfrAustin

I have one issue with the build. Not enough pictures! Can you do a batch of close ups? Where did you get the radiator shrouds? I need to see the details. Love Belgium, spent a little time there.

Yes a few more detailed pics would be nice as it would be interesting to find out how exactly you handled the details on the build as the VFR are quite a challenge to turn into good looking street fighters because what's under the faring are quite messy on these bikes.

BTW, love Belgium too, and thank you for your country introducing me to one of the best beers I ever tasted when I visited Brussels this last new year...Westmalle Dubbel! Now my number 1 favorite beer!

yes you are right, i am finally enjoying my bike, so I haven't been taking a lot of pictures, but I will do it next week. Thank you for the positive comments
auggius

Another awesome 4th gen build. Looks like you're using GPS for your speedometer. What are the array of lights above it for? No tachometer or coolant temperature gauges I assume.

the led lights are showing my direction indicators, my high beam light, my neutral, and an oil lamp. Indeed, I dont have a tachometer or temperaturemeter. For the fuell, I can give in the distance I can drive with a full tank of fuell, so he gives me an alert signal when it's almost empty (my garmin zumo). I will show pics next week. Grtz
#18

So as I promised, I'll post some more pictures of how some pieces are mounted, or what I made myself.

I'll start with my subframe, I milled my subframe at my work, and had to think about: how will my seat support everywhere? and how will I lock my seat without using a key?

So this is how my subframe looked when it was milled, and welded together:

[image: post-31522-0-73012100-1431965742.jpg]

[image: post-31522-0-12015500-1431966041.jpg]

the red arrow is where my seat will be support, and the blue arrow is the hole where the pin of my seat will fit in precisely. So I made a "lock".

[image: post-31522-0-39843500-1431966121.jpg]

[image: post-31522-0-84442700-1431966149.jpg]

[image: post-31522-0-56158100-1431966222.jpg]

I had to take attention to the fact the supports on the seat haven't the same height on each sides.

[image: post-31522-0-89549400-1431966427.jpg]

so when I milled the subframe, I measured up the height-difference, and made it also on my subframe for excellent support.

[image: post-31522-0-45823500-1431966670.jpg]

So far for the subframe, for the garmin zumo, I made a support in aluminium. So it could be mounted up close to the steer and in the middle.

[image: post-31522-0-85526600-1431966837.jpg]

Then I looked what the bike needed next, and to me, the holes under the gastank weren't so nice to keep it that way, also the coolant radiator in the front, was very wide, and messed up the line from the bike. So I made fairings to mount up under the gastank, and for the radiator, I used the radiator covers from a kawasaki ER-5, and made some pieces to mount them up.

[image: post-31522-0-34153500-1431967072.jpg]

[image: post-31522-0-95653900-1431967098.jpg]

[image: post-31522-0-85482600-1431967126.jpg]

[image: post-31522-0-03670900-1431967179.jpg]

[image: post-31522-0-42635000-1431967248.png]

And the pieces I made:

[image: post-31522-0-57952500-1431967296.jpg]

[image: post-31522-0-74720800-1431967371.jpg]

For the radiator covers, i used a full aluminium piece, and milled it in an U-shape, than made holes in it, so it could be pushed onto my radiator, and behind the bolts, I putted plastic strips, so the pressure isn't all on one place on my radiator, but is spread all over. Then, I led the pieces powdercoat in black.

[image: post-31522-0-09600400-1431967547.jpg]

[image: post-31522-0-34179700-1431967583.jpg]

[image: post-31522-0-17608900-1431967647.jpg]

[image: post-31522-0-01753300-1431967694.jpg]

So I hope I helped with showing some more pictures, here are some other random pictures.

Pieces that went to the powdercoater:

[image: post-31522-0-23110600-1431968299.jpg]

[image: post-31522-0-89346500-1431968324.jpg]

And all kind of pics:

[image: post-31522-0-67075600-1431968366.jpg]

[image: post-31522-0-80785800-1431968462.jpg]

[image: post-31522-0-08364200-1431968491.jpg]

[image: post-31522-0-25538300-1431968528.jpg]

[image: post-31522-0-68063900-1431968551.jpg]

[image: post-31522-0-94769300-1431968577.jpg]

[image: post-31522-0-34218800-1431968598.jpg]

[image: post-31522-0-11039100-1431968648.jpg]

[image: post-31522-0-92009500-1431968672.jpg]


[image: post-31522-0-74986100-1431969776.jpg]

[image: post-31522-0-62968000-1431969802.jpg]

[image: post-31522-0-30852600-1431969848.jpg]

[image: post-31522-0-36903000-1431968696.jpg]

#19

Brilliant work! Looks fantastic. I really like the ducati monster seat on these bikes. Sometimes I wish I had used one of those. And I know you are a more skilled builder than I am… you can mount tank badges the right direction.

#20

Another great naked 4th gen hits the internet! Love it. Great detail work.

#21

The thought and work put into the rear subframe and seat especially, is impressive and really clean.

Many do not put that much effort to modding those areas, but if one does, at the least, one will take a major amount of weight off the bike if it is done, especially if the boat anchor of a subframe is trimmed down down and/or re-bult with Aluminum tubing, which would then surely result in better handling.

Just one suggestion, Maybe you can find small domed covers for the not so pretty four bolt heads on the lower loop of aluminum framing below the main frame spars. It seems to be something that fighter bike builders miss to improve or cover up on 3rd and 4th gen VFRs. Either that, or maybe find replacement bolts with nicer looking Allen heads on them, which might not be easy.....

Edited May 18, 2015 by Beck
#22

Yes, you should weigh it with a full tank of fuel and let us know what it is!

#23
apexandy

Brilliant work! Looks fantastic. I really like the ducati monster seat on these bikes. Sometimes I wish I had used one of those. And I know you are a more skilled builder than I am… you can mount tank badges the right direction.

Thank you! But talking about skills.. You made your own plastic fairings, something I am absolutely not able to do. And I payed extra attention to the tank badges because of your mistake, so who knows I would make the same mistake :d.

FSAE

Another great naked 4th gen hits the internet! Love it. Great detail work.

Nice to hear, thank you
Beck

The thought and work put into the rear subframe and seat especially, is impressive and really clean.

Many do not put that much effort to modding those areas, but if one does, at the least, one will take a major amount of weight off the bike if it is done, especially if the boat anchor of a subframe is trimmed down down and/or re-bult with Aluminum tubing, which would then surely result in better handling.

Just one suggestion, Maybe you can find small domed covers for the not so pretty four bolt heads on the lower loop of aluminum framing below the main frame spars. It seems to be something that fighter bike builders miss to improve or cover up on 3rd and 4th gen VFRs. Either that, or maybe find replacement bolts with nicer looking Allen heads on them, which might not be easy.....

Thank you, yes, you are not the first person who told me this (about the four bolts on the main frame) so I will think about making something to cover up.
#24

Wow! Amazing! Great job buddy!

Love the ducati tail on it.

The switching of the emblem also did wonders for the overall look.

"it's all in the details, dunmy" ;-)

#25

Love that, can't help but think the front forks could do with a swap out to complete the package though! Wish I had the skills to mill my own subframes etc, I'd make a career out of it!

#27

I know the whole "Whats in a name thing, but" I wouldn't call this, or the other upper caliber VFR builds, a "Streetfighter". This trend is toward a "Naked custom" VFR. I love what I am seeing lately!!! Nice work and I look forward to more and more tasteful and practical Naked customs to come.

I would vote to have a specific category on the site for ease of research and viewing pleasure.

#28
rancarney

Wow! Amazing! Great job buddy!

Love the ducati tail on it.

The switching of the emblem also did wonders for the overall look.

"it's all in the details, dunmy" ;-)

Thx ;)
johnlondon

Love that, can't help but think the front forks could do with a swap out to complete the package though! Wish I had the skills to mill my own subframes etc, I'd make a career out of it!

Thank you, yes, I regret I did not used an upside down front fork, but when I do now, I have to place another front wheel that fits, and a fender. And respray them both. So for now, I am happy I can finally drive my vfr. But maybe when it's winter I will have new courage for a little rebuild.

ericbthomas22

Nice job,great looking naked bike! !!

Thank you

#29

Wow that is really nice looking, Congrats & Cheers!

#30
xfrickx

Wow that is really nice looking, Congrats & Cheers!

Thank you

[image: post-31522-0-70602100-1432553950.jpg][image: post-31522-0-68727300-1432553996.jpg][image: post-31522-0-85317500-1432554022.jpg]

#31

Sweet work mr. Barcas. The Best remaking I ever saw on a VFR. Any Honda engenieer would be impressed by your work, I'd bet. Keep it 'simple' like this without any kitsch special parts

#32
Alin0

Sweet work mr. Barcas. The Best remaking I ever saw on a VFR. Any Honda engenieer would be impressed by your work, I'd bet. Keep it 'simple' like this without any kitsch special parts

Thank you for your nice comment. I did my best ;).

#33

Hi Bart - Great looking bike indeed! Live in the Netherlands and have just bought a RC36 91 as a project bike - could use your experiences (from a European supply point of view)

#34

Looks good, well done :fing02:

#35
V4 Rosso

Looks good, well done :fing02:

Thank you

Ronskie60

Hi Bart - Great looking bike indeed! Live in the Netherlands and have just bought a RC36 91 as a project bike - could use your experiences (from a European supply point of view)

Thank you, I'm there when you have questions. Noorderbuur

#37

Looks bloody brilliant that mate. Reckon you'll bother with an USD front end at any point?

#38

I though I heard the the VTEC kick in .

Your size makes it look like a Grom . Great Bike !

Roll On ..

#39

Hello, thank you for the nice comments. Maybe I will place an usd front end later. Now I'm just enjoying the VFR as much as I can.

I have done a little update. As coolant reservoir I used an empty plastic medicine bottle, but cause of the engine heat, the bottle started to melt. So I wanted something in glass, But that wouldn't look nice so I made an aluminium shell. I milled it in a way so I can still see my coolant level in my reservoir. I mounted the aluminium shell to my frame at the place where the old one was mounted. You can see the little flat part at the picture with the threaded hole. I only use one bolt, so that's the reason of the flat part so the reservoir can't turn around.

[image: post-31522-0-08909900-1436627953.jpg]

[image: post-31522-0-98966300-1436628096.jpg]

[image: post-31522-0-13174000-1436628111.jpg]

[image: post-31522-0-22069500-1436628142.jpg]

[image: post-31522-0-40579900-1436628165.jpg]

[image: post-31522-0-61685400-1436628204.jpg]

[image: post-31522-0-51671000-1436628218.jpg]

[image: post-31522-0-39239600-1436628237.jpg]

[image: post-31522-0-11181500-1436628248.jpg]

[image: post-31522-0-13012900-1436628265.jpg]

[image: post-31522-0-63159900-1436628287.jpg]

[image: post-31522-0-68250600-1436628301.jpg]

[image: post-31522-0-91504500-1436628312.jpg]

[image: post-31522-0-69211000-1436628335.jpg]

[image: post-31522-0-62442600-1436628348.jpg]

[image: post-31522-0-62345300-1436628625.jpg]

[image: post-31522-0-40983000-1436628274.jpg]

[image: post-31522-0-10642800-1436628657.jpg]

Edited July 11, 2015 by barcas90
#40

sweet work on the coolant reservoir. I think the bike looks great.

#41

Wow, that might be the trickest coolant res I've seen.

#42

Echt wijs gedaan!

Verstuurd vanaf mijn A0001 met Tapatalk

#43

Why don't I know how to mill things! Must learn....so much potential to build something epic

#44

That bottle looks fantastic! Love it. I'm not a fan of really up-turned tails that a lot of Street Fighters seem to have, but yours keeps the area where the rider sits at a reasonable angle before it turns up. You're not slamming your "package" against the tank while riding. Nicely done. Looks like something Honda would build if they knew how to please the public.

#45

I want to thank everybody who posted my forum. Thank you all for your nice compliments. It feels good ?

#46

Hi, great bike, like what you've done. I am new to the forum and would like to ask, where did you relocate the front 2 coils, and how much did you have to modify the Monster seat at the front?

I'm just starting a similar project and like the look of the monster rear unit

Thanks

#47

Hi RudV4

I'm sure the OP will reply but I think that most people find room around the front of the air box (perhaps to the sides of the snorkel?) for the relocated coils.

I think the monster seat fits without many mods at all, but again, the OP will confirm that for you hopefully...

I'm doing a SF project on an FV just now... just splashed out on a 916 subframe and seat unit from the UK as I have seen some photos of other VFRs with these and I reckon they look the business. The monster seat was on the list of possibilities, too, though.

#48

Thanks bigmalcy - I appreciate your comments. I have looked at the space near the airbox 'snorkel' and should be able to relocate the front two coils in there.

Now, the Ducati Monster seat, is it from a 695 model as this seems to have a wider, squarer shape at the front whereas the 696 is more rounded. Which one fits the profile of the VFR tank best?

I'm looking to re-fabricate a subframe using the existing item, that why i'm concerned which model seat to use.

Thanks

#49

Hi - to be perfectly honest I have absolutely no idea! :) my gut instinct would be that the more round profile would be a better fit, but I really don't know. The OP hasn't been around for a few months now so he may not give you any tips any time soon. I suppose the ideal solution would be to find a local breaker with one that you could try, but that also may take a little time...

Sorry, not much help...

On the subject of coils, I also remembered that some people fit smaller 'stick' coils from GSXRs I think... if you read Sebspeeds build thread I think he talks about using these.

Edit: just checked and Sebspeed used stick coils for the rear cylinders, not the fronts...

Edited February 2, 2016 by bigmalcy
#50
RudV4

Thanks bigmalcy - I appreciate your comments. I have looked at the space near the airbox 'snorkel' and should be able to relocate the front two coils in there.

Now, the Ducati Monster seat, is it from a 695 model as this seems to have a wider, squarer shape at the front whereas the 696 is more rounded. Which one fits the profile of the VFR tank best?

I'm looking to re-fabricate a subframe using the existing item, that why i'm concerned which model seat to use.

Thanks

Hi mate, best thing you can do is get to a breakers or ask a Ducati dealer if they can grab one off a demo bike for you to line up

#51

Very well done!!!

Excellent craftsmanship on the coolant reservoir and the build.

Bike looks amazing!

#52
RudV4

Hi, great bike, like what you've done. I am new to the forum and would like to ask, where did you relocate the front 2 coils, and how much did you have to modify the Monster seat at the front?

I'm just starting a similar project and like the look of the monster rear unit

Thanks

Hi there I am sorry but I havent been on the forum since a while. I sure want to help you when having questions. I bought my ducati seat brand new and the only thing I had to do was cutting of the "lips" so they dont touch the vfr tank. The seat fits almost good but you have to make sure you use the right angle and pressure to the tank to have a excellent fit. Its a matter of searching ;). I dont know what you mean with the coils. My language is actually dutch ;). Grtz
RudV4

Hi, great bike, like what you've done. I am new to the forum and would like to ask, where did you relocate the front 2 coils, and how much did you have to modify the Monster seat at the front?

I'm just starting a similar project and like the look of the monster rear unit

Thanks

Hi there I am sorry but I havent been on the forum since a while. I sure want to help you when having questions. I bought my ducati seat brand new and the only thing I had to do was cutting of the "lips" so they dont touch the vfr tank. The seat fits almost good but you have to make sure you use the right angle and pressure to the tank to have a excellent fit. Its a matter of searching ;). I dont know what you mean with the coils. My language is actually dutch ;). Grtz
Rush2112

Very well done!!!

Excellent craftsmanship on the coolant reservoir and the build.

Bike looks amazing!

Thank you ?!
#53

<Translation-intrusion>

Coils => bobine/bobijn

De vraag is dus waar U de voorste 2 bobines heeft geplaatst.

<\Translation-intrusion>

#54
koekum

<Translation-intrusion>

Coils => bobine/bobijn

De vraag is dus waar U de voorste 2 bobines heeft geplaatst.

<\Translation-intrusion>

Dank je :). Dacht even dat dit een afkorting was van iets.

#55
RudV4

Hi, great bike, like what you've done. I am new to the forum and would like to ask, where did you relocate the front 2 coils, and how much did you have to modify the Monster seat at the front?

I'm just starting a similar project and like the look of the monster rear unit

Thanks

on this picture you'll see the two "lips" that have to be cut off. The original intention of these lips are to hook up under the ducati tank so the seat can't get up at the front. When I made my subframe, I made sure I have to use pressure on my seat against the tank at the front to lock my seat. I hope you know what I mean.

[image: post-31522-0-67673100-1455817625.jpg]

And for my coils I made a kind of U-shape in stainless steel that can be mounted up at each side behind my radiator.

[image: post-31522-0-71197300-1455817738.jpg][image: post-31522-0-07122100-1455817749.jpg][image: post-31522-0-70896400-1455817756.jpg]

Edited February 18, 2016 by barcas90
#56

Hi barcas90, apologies for my delayed reply, been busy building!

Thanks for the information about moving the 'coils' - i may end up with them both under the tank next to the air filter intake pipe, it looks like there is enough space.

I currently have built a complete rear subframe similar to yours, (Steel box section, welded) and have fitted a lithium lightweight battery, re-wired the components under the seat and made new brackets for the fuel pump etc.

I've fitted a stainless steel exhaust and fitted a Micron race can, but this may get cut down to give a 'short, stubby look' later!

I've made a small number plate bracket that also houses a Ducati style rear light.

The front forks, rear shock and brake calipers are now being stripped, serviced and re-painted. The wheels will be powder coated next.

I have 'hidden' a lot of the wiring, and re-routed various wires and fuel pipes to give a 'cleaner' look

I'm keeping the standard handle bars to start with, as i want to concentrate on the mechanics first, to ensure the bike runs and rides well.

I will now have to fit a better coolant bottle, having seen your excellent version!

I also had to cut off the 'lips' of the Ducati seat, but have added my own 'lip' to the front that wedges underneath the front of the tank.

I'm currently re-spraying the engine covers, and have made an oil cooler link pipe as I removed the original cooler.

I must say that i often look at your bike as inspiration, and to see how you modified things to give a really clean look to the bike. Thanks very much for your information. I'll keep you updated as i continue my build. I intend to have it running ready fro the English summer!

Just one question... just how and where did you put all the wires when you fitted the single headlamp?? - as that will be my next job.

Thanks

#57
RudV4, 12 april 2016 at 2:50 PM

Hi barcas90, apologies for my delayed reply, been busy building!

Thanks for the information about moving the 'coils' - i may end up with them both under the tank next to the air filter intake pipe, it looks like there is enough space.

I currently have built a complete rear subframe similar to yours, (Steel box section, welded) and have fitted a lithium lightweight battery, re-wired the components under the seat and made new brackets for the fuel pump etc.

I've fitted a stainless steel exhaust and fitted a Micron race can, but this may get cut down to give a 'short, stubby look' later!

I've made a small number plate bracket that also houses a Ducati style rear light.

The front forks, rear shock and brake calipers are now being stripped, serviced and re-painted. The wheels will be powder coated next.

I have 'hidden' a lot of the wiring, and re-routed various wires and fuel pipes to give a 'cleaner' look

I'm keeping the standard handle bars to start with, as i want to concentrate on the mechanics first, to ensure the bike runs and rides well.

I will now have to fit a better coolant bottle, having seen your excellent version!

I also had to cut off the 'lips' of the Ducati seat, but have added my own 'lip' to the front that wedges underneath the front of the tank.

I'm currently re-spraying the engine covers, and have made an oil cooler link pipe as I removed the original cooler.

I must say that i often look at your bike as inspiration, and to see how you modified things to give a really clean look to the bike. Thanks very much for your information. I'll keep you updated as i continue my build. I intend to have it running ready fro the English summer!

Just one question... just how and where did you put all the wires when you fitted the single headlamp?? - as that will be my next job.

Thanks

Nice to hear your project is building up that nice! I am sorry for not being on this forum that much, I am renovating my house at this moment...😉 Feels good to hear I am inspiring you for your build! I will take pictures soon from my headlight when you still need them? The wiring was done by a professional electrician because I dont have any knowledge of electricity. Excited to see pics!

#58

Seems like someone has exactly the same taste... How unique🤔

[image: image.png]

[image: image.png]

#59

image.jpeg

[image: image.png]

[image: image.png]

[image: image.png]

[image: image.jpeg]

[image: image.jpeg]

#60

Hello , can you send me the deatils from your frame (Rear) +  the exact dimensions ( to reconstruct the rear) (sketch) ?

where do you get the seat and the ducati rear ?

Email adresse : pascal.plihal@gmail.com

 Thanks 

#61

Could I ask were you mounted the oil cooler mate?

End of thread · 61 posts recovered Wayback Machine snapshot 10 Jul 2017