Tokkie that is fantastic bro beer.gif Shit wish i had the fab abilities you do. Something i loved about the new suzuki 750 was their shortie exhaust, and well youve done a great job on the 5th gen. Sound file forthcoming? beer.gif
I like it! nice work. wish I could hear it though.
With that cat gone, I can imagine she breathes a lot better. Cool mod. beer.gif
I like it... good creative work.... fing02.gif
incredible work. have you looked at a flowmaster muffler internal? they use angled baffles to dampen sound without any internal packing material. some actually claim they flow better than a open pipe? don't know the truth of that but ive owned several and the exhaust note is awesome
flowmaster[image: user posted image]If you don't mind, I'll break up your questions and answer with whatever I can offer. unsure.gif
tok tokkie, Mar 12 2006, 08:47 AMHow about two more walls in the muffler to separate the inlet & outlet sections of each side?
I like this option better than a spud.
tok tokkie, Mar 12 2006, 08:47 AMShould I make two small straight-through mufflers with perforated pipes & fiberglass (I would suspect they need plenty of volume to be effective)?
I think you've already built a great muffler with sufficient interior volume to cut more volume without a complete re-think. The internals of a Flowmaster are certainly interesting, but I'd try adding two more walls first. Honda (on 6th gens, and you probably already know this) uses tubes from the inlet that go all the way to the rear-most chamber, double back to the mid-chamber, and then double back again to exit. And they're
too quiet!
If you use the same principles with larger diameter pipe than Honda uses I think you'll nail your target.
tok tokkie, Mar 12 2006, 08:47 AMHow noisy is your under tail exhaust Magellan?� Can you blast about your neighbourhood or do you have to use a delicate hand on the throttle & short shift?
The honest answer to this is longer than you'd think. I still have the second 6th gen muffler on a shelf (I only used one), and may build another muffler with slightly less gutting.
Here's why: On my first high-speed run I quickly realized that I had used too much steel wool and was blocking flow (I worry about this on yours, especially if a piece of wool gets shoved or blown up against an outlet). My sweet-sounding, fairly quiet muffler was stealing power and strangling the engine. So I reached in with a wire hanger and started yanking out strands of steel wool until I was certain I had removed all offending wool that was sitting against the upstream end of my outlet pipes (of the three full pieces of steel wool that I had initially stuffed into the muffler, I ended up removing
two. One is still suspended among the drilled-out remains of the stock middle wall and seems to be fine).
Now the bike is quite a bit louder but is still civilized with low revs and short-shifting. On the other hand, it goes like stink! And because it exits at the tail and is deflected downward by my license plate heat shield, it's never very loud
to my ears. It's the guy behind me that I pity when I let 'er rip!
Keithbob rode my bike and noted that he likes a quieter muffler. I don't mind the noise so much (and at freeway cruising you can't hear it at all above wind noise), but I think I could get the same power increase and still drop some volume under WOT if I tried again.
How does it breathe under full load and high revs with all that wool in there?
BTW, I feel a strong affinity for your design philosophy for the entire bike. Clean, smooth, elemental, and very sporting. This is what the 5th gen should have looked like in the first place! I noticed the windscreen too. How's the buffeting now?
SWEEET!!!
I Like it! beer.gif
WOW
I want that.
L8 wink.gif
Now if you just swap for an MV Agusta swingarm and do a little more trimming of the rear fender (all it takes is a little flap little to hold the license plate firmly), I believe I'd be entirely speechless. 5th gen nirvana! fing02.gif
Wow... well done!
Now you just need to build some more and sell them biggrin.gif
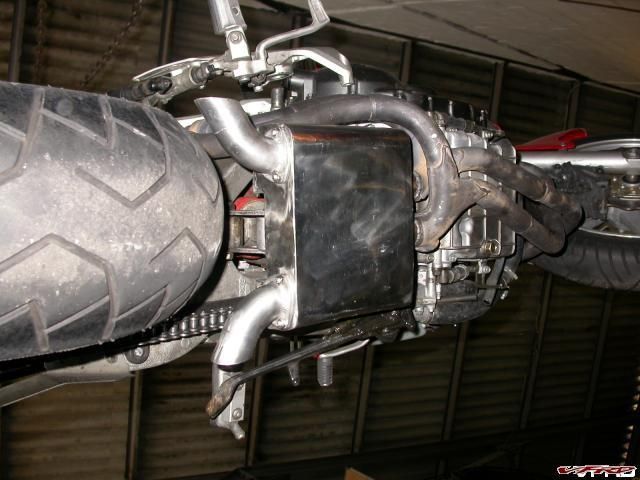
I have made a low level exhaust for my 5th gen. I will describe it backwards; first the end result, secondly how I did it & finally why I did it this way & what alternatives I considered. You can bail out as soon as you lose interest.
THE END RESULT
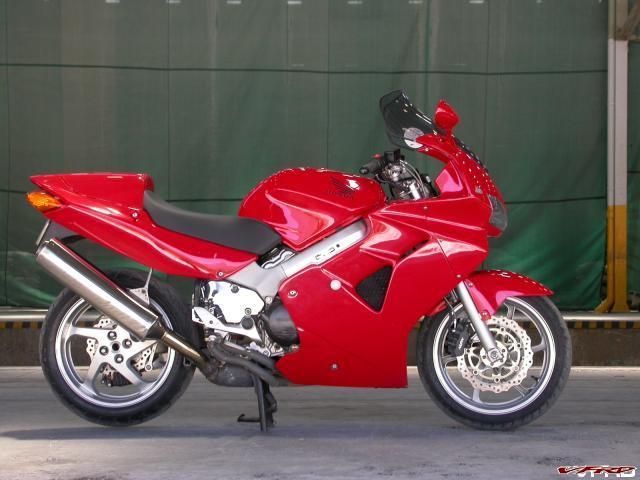
RH 1.jpg
Before
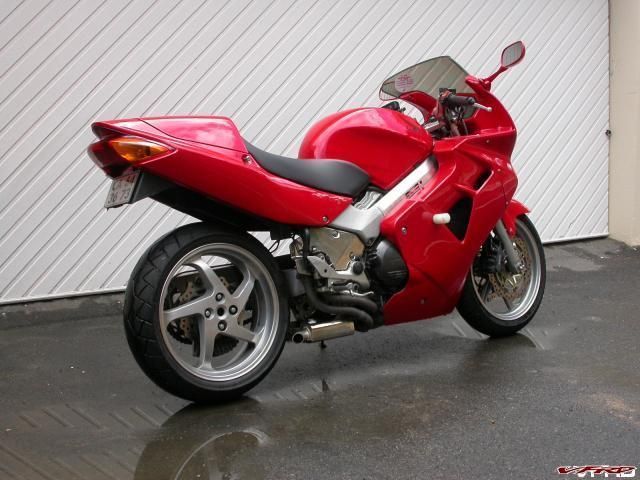
Done RH 3.jpg
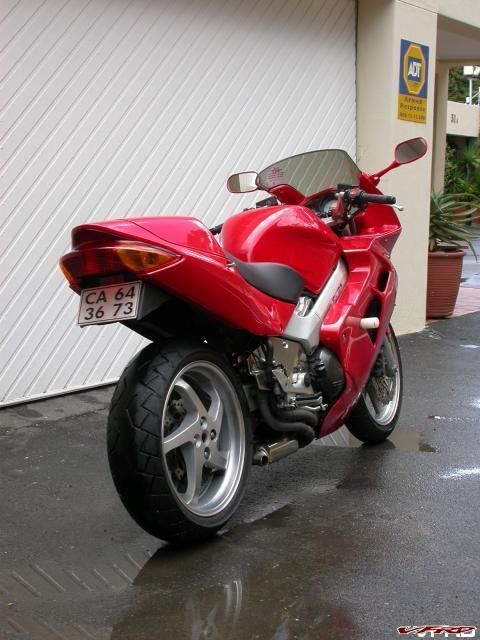
Done RHR quarter 1.jpg
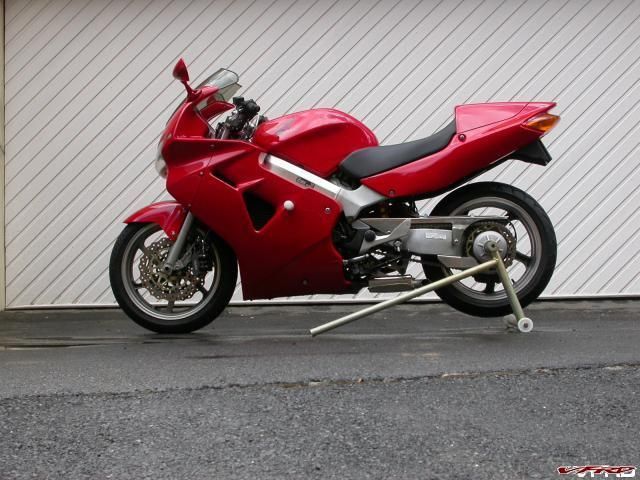
done LH 1.jpg
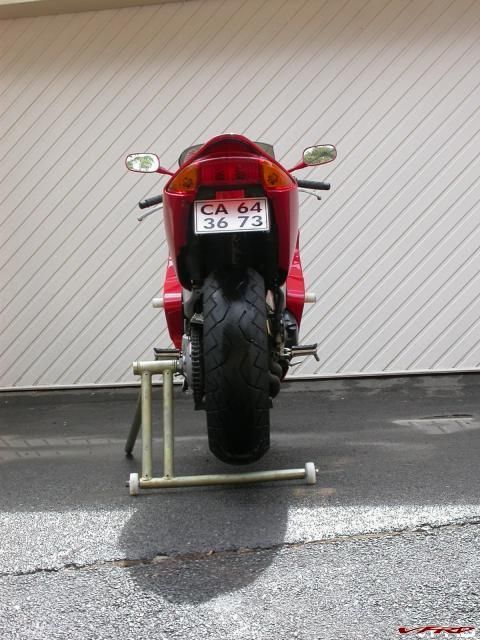
Done behind.jpg
.
I have taken the center stand off & cut the headers just before the catastrophic converter.
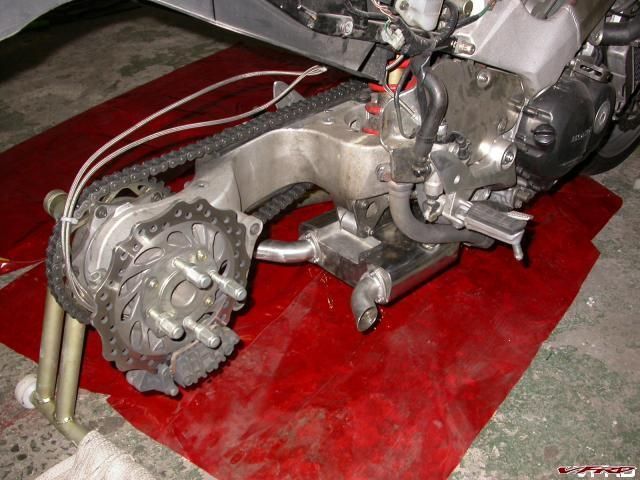
I have made a two chamber muffler out of 1.6mm stainless steel with separate right & left low level exit pipes which fits where the cat-con used to be.
I wanted my bike to sound like two-small-bore-Ducatis- running-in-tandem and I wanted to expose as much of the rear wheel on the right side as possible.
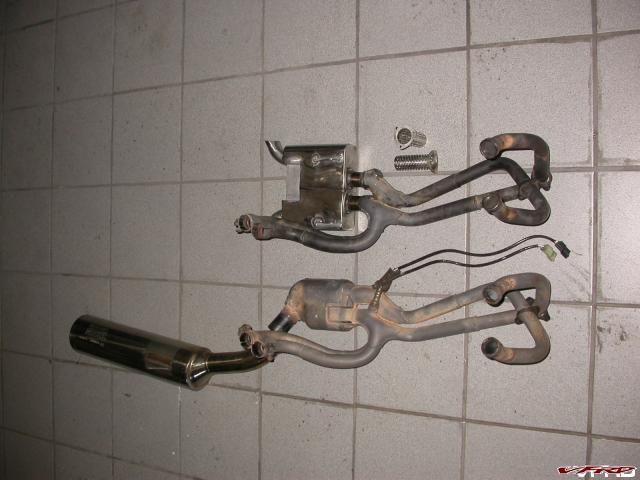
original & new 1.jpg
new from below 2.jpg
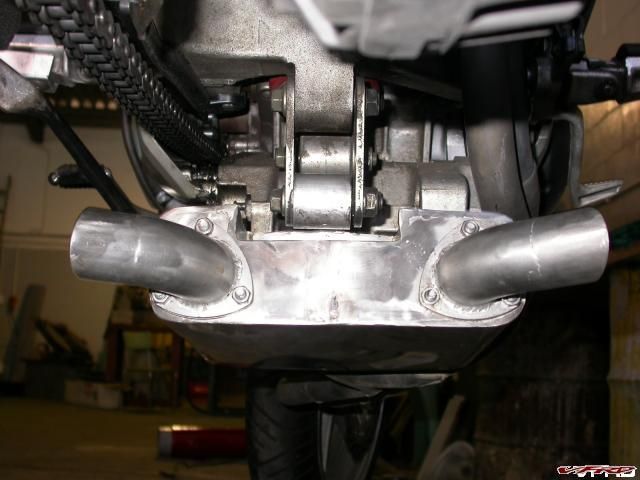
new from below behind 1.jpg
.
new from RHR quarter 3.jpg
WHAT IS IT LIKE?
Wonderful!
It is noisier than I wanted. At idle it sounds perfect: no even regular boring purr of a ?stinky I4? (BLS expression, acknowledged) but all lopey, irregular and impatient ? just what I wanted. Give it some gas and it sounds like a box full of angry hornets ? there is a real prospect of carnage if it gets loose ? wonderful; yoohoo, here we go. Below 5000 rpm it is still somewhat civilized but above that it?s a barbarian. So I can ride in my dignified neighbourhood at small throttle openings & short shifting & not disturb the peace; can burble around town below 5000 rpm & not annoy everyone but get out of town & blast about so every motorcyclist in the vicinity will immediately stop what he is doing & try to find out what the fuc? is that?
I would like it to be a little quieter. But the sound quality is perfection, just the volume is a tad high.
I am delighted with the looks. To me there are 2 defining things about a VFR: SSA & V4. This exposes the rear wheel to the maximum & the sound certainly is distinctive ? just that a wild V4 on the loose is not usually heard. Swiffer coined a nice compound word: audio-cosmetic; this is just that ? I was not looking for performance, just sound & appearance.
Must be breathing easier as the idle speed has gone up from 1200 to 1500 with no other changes made & my seat-of-the-pants dyno says it has significantly more get-up-and-go. (I am running the stock Honda air filter.)
Ah this is the piece that causes the bomb-out so I will split it up more until I find the error.
HOW I DID IT
I got a spare set of headers posted to me by Trace.
I was going to make the muffler out of 0.9mm stainless cold bent to shape. Fortunately I read the thread on de-gutting a 6th gen exhaust where I saw that those mufflers have quite a thick wall.
6th gen de-gut thread
Magellan & Lobster answered my query about the wall thickness so I changed to 1.6mm stainless.
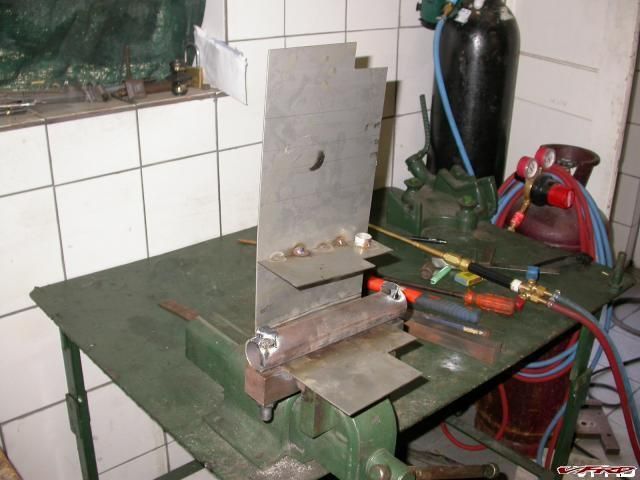
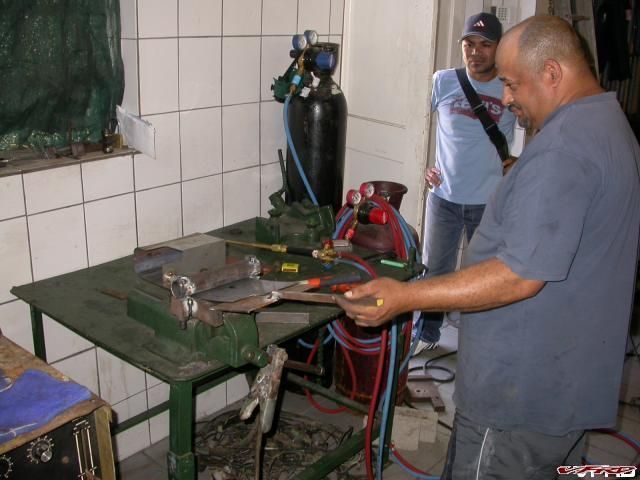
Now I needed to heat the stainless with oxy/propane to bend it. I had made a bending jig of a piece of 40x40 square bar & 41mm heavy wall pipe bolted together with 2 @16mm bolts.
I have CAD/CAM & a cnc machining center so I modeled the muffler & cut the stainless to shape on the cnc machine. I scribed the bend start & finish on the inside of the blank, clamped it in the bending jig, heated it up & hammered it round the jig. Not a success. Gives a very beaten up looking bend. So made a paddle with a sharp edge & welded on 2 extensions to the jig so that I could lever the steel round the jig with the paddle. Tried again ? worked really well. Get very good conformation of the steel to the jig.
first bend & jig 2.jpg
The first bend has been made. The separating wall between the two chambers was welded in first. Note the port through the wall ? it gives a bit of cross-talk to complicate the sound. The black mark is soot from lighting the torch (looks like a hole)
bending jig & paddle.jpg
This is Ridwaan who did all the welding. Photo is not very clear. There are two pieces of square steel welded on sticking out forwards. The paddle is used to lever the stainless around the pipe section of the bending jig.
Originally I had allowed for a bit of spring in the material when I was planning on cold forming the thinner material. Now the bends have no spring in them so you will notice that the top surface of the muffler is not parallel to the bottom because the blank was cut too long (it allowed for spring at the bends which is not there with hot bending).
The divider between left & right does not run down the center line because the headers are slightly offset & the muffler is not centered either. I did not want to bend the headers.
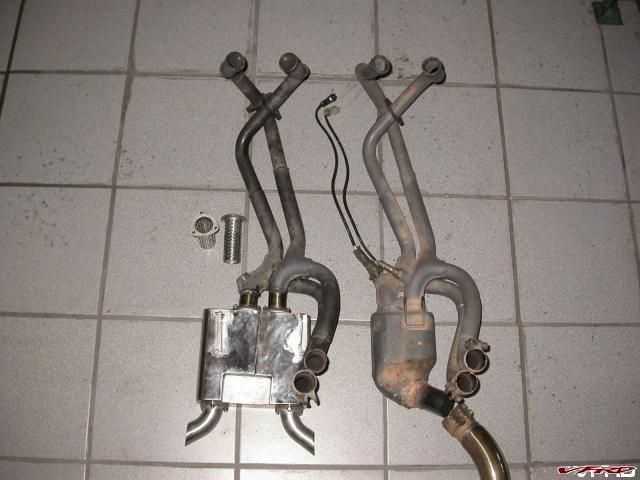
The muffler is bolted to the old center stand lugs. I had two goes at this. Initially I welded the flanges directly onto the headers (which had been elegantly cut by Trace just before the cat-con) but that presented problems with fitting the nuts and there is a lug under the engine that the cat-con was mounted to that sticks down lower than the center stand lugs. So I moved the muffler back behind the cat-con lug which allowed it to fit up higher from the ground. I also cut the headers shorter and fitted short stub tubes between the headers & the flange at the muffler. This way I was able to firstly weld on the lugs for mounting the muffler onto the center stand lugs (now free because the center stand has been ditched).
original & new 4.jpg
Note the little stub tubes between the headers & muffler
With the muffler now bolted to the bike I was able to tack the stub tubes to the headers & also to the flanges bolted in place on the muffler. Big advantage as everything was aligned before final welding and there is no need to force things into place when fitting it all together ? custom made in situ. Had to trim the stub tubes off level with the flange when all was done (had cut them long so they were sticking inside the muffler when we tacked it all together.
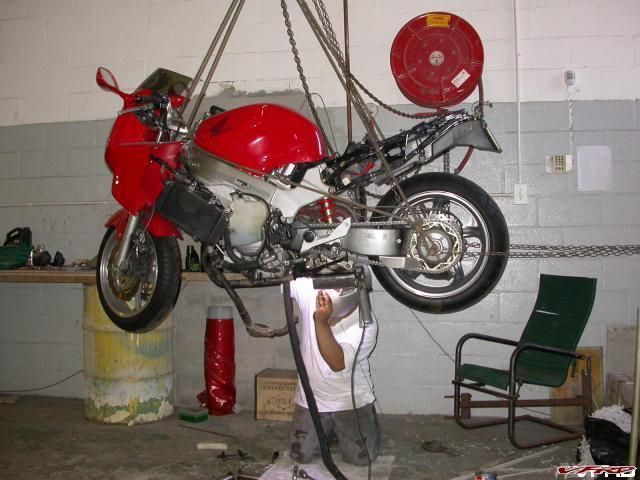
welding in the sky 3.jpg
I removed the ECU & R/R completely from the bike & disconnected the battery before welding & always had the earth close to the weld.
The headers start as 32mm od pipe but change to 34mm od about half way. After the 2:1 join just before the cat-con they are 40mm od. I have used 38mm od stainless pipe because I can get short radius elbows for it; next size up is 50.8 which I felt was too big & there is a space limitation in front of the back wheel so the tighter smaller bend is a help there. 44.5mm pipe is available here but no bends.
I hoped the bike will sound like two v-twins running together. The headers are joined correctly for this; two left cylinders join up before the cat-con as do the two right cylinders which is what I wanted.
Because I wanted the bike to sound like a pair of twins running together I have made a small port linking the two chambers in the muffler to allow some of the sound from the opposite bank to get across to the other side; I was worried that the outlets face away from the bike so separate the two sound paths a lot. I reasoned that it would be easy to close the port if I was unhappy with the result ? in fact I am delighted ? you can hear there is more than just a potato -potato Hardly here; a much more complicated sound.
There used to be a Ducati in my neighbourhood which thudded past with a nice mellow tone. There are several Harleys with open exhausts which I detest. I have made the muffler without baffles but with tubes inside (there is a separating wall down the middle). These tubes are flanged from the outside so I can fit different lengths and also perforate them if needs be.
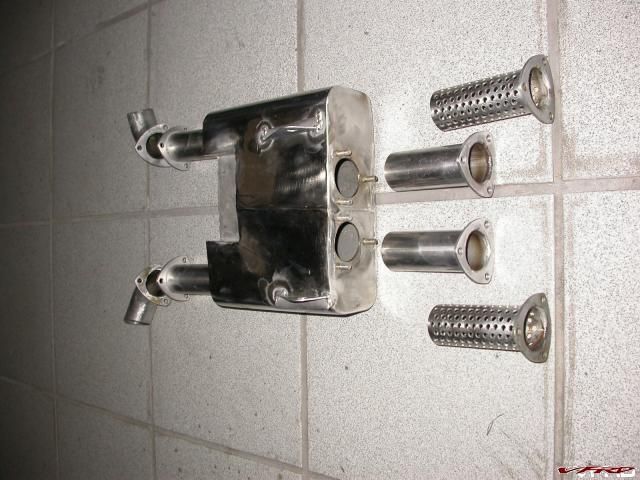
muffler & innards 2.jpg
For a start I made the ones in the photos. The muffler is 190mm long so I made the tubes 100 long so the inlets and outlets were just longer than half the muffler length. This means that the exhaust gasses have to double back to get out of the box. When I tried these the noise was too much. Magellan had shown in his write up of his 5th gen under tail exhaust that stainless pot scourers stuffed into the muffler helped reduce the noise so I bought some & rammed them in.
Here is one of my posting problems. I had a link to Magellans photo of a pack of pot scourers which causes this thing to bomb-out when I try to post.
Magellan's scourers. They are much fuller than mine. I had to ram in 12 per side to fill the space.
That helped as it lowered both the frequency & amplitude of the sound but I still wanted it quieter. I tried the perforated tubes on the outlets but that was marginally noisier than the plain tubes. I then made 150mm long tubes for both the inlet & outlet and rammed in as many pot scourers as I could. That is how I am now running the bike.
I made a pocket for the suspension linkage on the upper surface. It is 20mm deep but need only be 6mm for the way I have the bike set-up. I am a skinny rat & run the shock on the second softest pre-load setting.
I have made a one man paddock stand for oiling the chain & cleaning the oil off the wheel. (BLS, how are you doing with the belt conversion- still no reply from Gates?)
Edited December 26, 2009 by HispanicSlammerSPECIFICATIONS
Muffler : Length 190
Width 220
Thickness 75
1.6mm stainless steel
Pipes: 38mm diameter, 1.2mm wall stainless
Flanges: 3mm stainless
Bolts & Nuts: M6 stainless
Weights: Original headers, cat & O2 sensors 5.3kg
Original muffler 5.2kg
Center stand 1.5kg
New headers, muffler & outlets 5.5kg (that was with 100mm stub pipes inside & no pot scourers)
MY QUESTIONS
How could I make this thing quieter? Staintune have a ?spud? that fits in the end of their pipe. Can I fit something like that here? What does it look like & how does it work?
How about two more walls in the muffler to separate the inlet & outlet sections of each side?
I have had a look at How Stuff Works
Linky
Would it help to make something more like that?
Should I make two small straight-through mufflers with perforated pipes & fiberglass (I would suspect they need plenty of volume to be effective)?
How noisy is your under tail exhaust Magellan? Can you blast about your neighbourhood or do you have to use a delicate hand on the throttle & short shift?
WHAT ALTERNATIVES I CONSIDERED
I have admired what Eric Buell has done. He may use a peculiar engine but he works from first principles to are at an optimum solution utelising modern materials. I have particularly liked his low level exhaust and belt drive.
I saw this photo of a racing VFR done by BLS:
That image also causes this to bomb out when posting. I obviosly don't know how to use the IMG posting button. I BLS's gallery there is a photo I wanted to post here.
There is no chain fitted and I assume the up pipe to the muffler is missing but I really liked the look with nothing behind the footpeg on the right side: display as much of the rear wheel without a swing arm as possible.
My original thought was to run two mufflers each side under the sump exiting at the front. That would have meant cutting the bottom of the fairing off ? I was prepared for that. I made a plywood template of the fairing so I could measure the space available. There really was very little space. At that stage my thoughts were of a muffler with perforated pipe & fibreglass packing ? the usual straight through exhaust design. I was worried that this would be very noisy because the muffler would be triangular 50x113 on the shorter sides with a 38mm pipe inside there would be very little fibre-glass.
I then thought about adding a chamber where the cat-con is so that the gasses expand into it & change direction before getting into the muffler section. Not too difficult as it would simply be cutting the headers apart & re-arranging the components before tiging them together again.
It was when I came to look into this idea properly that I saw that there would be quite a lot of space if I removed the center stand. I then removed the headers, hoisted the bike up in the air & measured things. I made a rough mock-up of the muffler out of particle board and checked things out. (To get the center stand off you have to remove the headers ? RH bolt can?t be taken out as it jacks up against the rear cylinder headers). It all seemed to fall into place when I did this. I modeled the thing in my CAD/CAM while I was about it ? lots of back & forth measuring things to get the model right. Working upside down means that what is measured on the right is plotted on the left so it is easy to make mistakes.
There are numerous advantages to this lay-out over the previous idea. The oil drain is not covered so oil changes can be done without removing the muffler. The muffler is behind the gearbox so there is no radiant heat onto the underside of the sump. It will be easy to change the internals of the muffler to experiment to get the sound I am hoping for. The exits will be further away from my head so I will not hear the drone of the exhaust so much. Finally I think it will look better especially if the pipes can exit at an angle so I can slash cut them to give an oval exit.
I had also thought about joining the front headers in front of the engine with a muffler down the right side exiting near the RH footpeg and joining the rear cylinders to a muffler running under the LH side of the engine exiting toward the front (Bimota had an under engine exhaust like that). This allows for larger mufflers as there are no headers running under the engine. Trouble is the front headers are much shorter than the rear ones so fueling will be different front to rear. Also it would now be a pair of 180 degree parallel twins to each muffler ? not the sound I was looking for.
Bravo! That has got to be the best exhaust mod I've ever seen - it even trumps the 4-into-4 system that was on a Third Gen on ebay a couple of years ago fing02.gif (by the way does anyone have any pics of said Third Gen?)
I was expecially surprised to see this today as last night I was sharing a beer with my VFR and considering the feasibility of an underslung muffler (yeah yeah, I know - finish the bloody system you've already got first!).
The only question is WHEN DOES PRODUCTION START??? 491.gif
Edit:
Finally I think it will look better especially if the pipes can exit at an angle so I can slash cut them to give an oval exit.
I agree, and can I make a suggestion - it would look fantastic if you were to extend the bellypan (either using ABS stock and Plastex, or just making an extension from aluminium and painting it red) so it was long like on the NR (and the CBR1000RR), and have the slashcut pipes coming out through a hole in each side...
yeah looks great.
And with the body mods already done I think The Phantom's idea about the NR-style bellypan would look great too.
The Phantom, Mar 12 2006, 06:06 PMBravo! That has got to be the best exhaust mod I've ever seen - it even trumps the 4-into-4 system that was on a Third Gen on ebay a couple of years ago fing02.gif (by the way does anyone have any pics of said Third Gen?)
Ooh, I do, I do! ( I think )
Wasn't that the red 'fightered one with the 2 mufflers under the bike and two out the back?
But alas, they're are home and I'm, not.
PM me and I'll try to get them to you in a day or two.
As you probably know, in muffler design, more volume and longer pipes are beneficial. I think you could add some volume by making the canister a bit longer, and also more of an inverted-triangle in section (would not compromise cornering clearance). Looks great, would love to hear the sound!
Hey, what did you do with the muffler hanger? Where did you get it? Make it yourself?
tok tokkieMY QUESTIONSHow could I make this thing quieter?
Tok, I've got an idea.
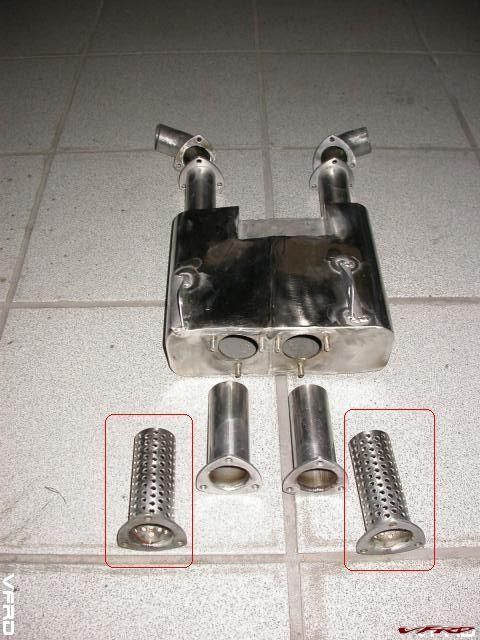 border='0' alt='user posted image' />
tokkie exhaust 3.jpg
In the above photo, modify the perforated inlet pipes which are circled in red.
Weld a solid blank plate over the end of each perforated tube so that the exhaust is forced to exit through the holes in the sides and cannot go straight out the end.
That should make it quieter without stuffing steel wool into the muffler chamber.
If that doesn't quiet it enough for you, do the exact same with the 2 outlet tubes. Remove the solid outlet tubes, drill them like the perfed ones and blank off the ends.
Restriction should not be an issue as the overall surface area of all the drilled holes in one given tube should far exceed the cross-sectional area of the 38mm pipe itself.
Of course, you could easily calculate that given the area of one drilled hole x (the number of holes) as compared to 1133 sq. mm of one 38mm dia. pipe.
And for communication between the two chambers, I would probably have made 2 separate holes, each as big as one of the pipes, again 38mm. But that's just me trying to be all symmetrical and junk.
magellan, Mar 12 2006, 08:39 PM
I think you've already built a great muffler with sufficient interior volume to cut more volume without a complete re-think. The internals of a Flowmaster are certainly interesting, but I'd try adding two more walls first. Honda (on 6th gens, and you probably already know this) uses tubes from the inlet that go all the way to the rear-most chamber, double back to the mid-chamber, and then double back again to exit. And they're too quiet!
If you use the same principles with larger diameter pipe than Honda uses I think you'll nail your target.
Having slept on it I think I will make another one along these lines. More or less a standard muffler but smaller. I will make the change Veefer800Canuck suggests as an interim step to see what that brings as it is not much work.
KPerham, Mar 13 2006, 05:46 AMHey, what did you do with the muffler hanger? Where did you get it? Make it yourself?
If you mean the one shown in 'Before' that is just a piece of 12mm (from memory but I am pretty sure it was 12) stainless tube flattened at each end with holes drilled for the mounting bolts.
tok tokkie, Mar 13 2006, 08:44 AM One of the other bikes that inspired me was the KTM RC8
But your bike looks soooo much better!
Darn, I thought I was almost finished with my modifications...
Excellent work!
Would the welding of the ends like Rob suggests not reduce the flow too much and thereby engine performance?
Whats wrong with stuffing it with glass wool?
Swiffer, Mar 13 2006, 03:05 AMWould the welding of the ends like Rob suggests not reduce the flow too much and thereby engine performance?
Whats wrong with stuffing it with glass wool?
I'm thinking as long as the total area of all the drilled the holes is =to or >than the area of the inlet pipe, it should not be too bad.
Of course, with his setup, he can create different inlets/outlets and experiment with them.
767fixerincredible work. have you looked at a flowmaster muffler internal? they use angled baffles to dampen sound without any internal packing material. some actually claim they flow better than a open pipe? don't know the truth of that but ive owned several and the exhaust note is awesomeflowmaster
[image: delta_tech_thumb.jpg] border='0' alt='user posted image' />
<{POST_SNAPBACK}>
Many thanks for the idea. I have looked around the site. The sound clips are great & just what i would like to replicate. Trouble is i can't find any diagrams of the internal layout of the mufflers. 'Picture' appears on screen but it never resolves into anything more. I would very much like to see what is inside their mufflers.
veefer800canuckTok, I've got an idea. border='0' alt='user posted image' />
tokkie exhaust 3.jpg
In the above photo, modify the perforated inlet pipes which are circled in red.
Weld a solid blank plate over the end of each perforated tube so that the exhaust is forced to exit through the holes in the sides and cannot go straight out the end.
That should make it quieter without stuffing steel wool into the muffler chamber.
If that doesn't quiet it enough for you, do the exact same with the 2 outlet tubes. Remove the solid outlet tubes, drill them like the perfed ones and blank off the ends.
Restriction should not be an issue as the overall surface area of all the drilled holes in one given tube should far exceed the cross-sectional area of the 38mm pipe itself.
Of course, you could easily calculate that given the area of one drilled hole x (the number of holes) as compared to 1133 sq. mm of one 38mm dia. pipe.
And for communication between the two chambers, I would probably have made 2 separate holes, each as big as one of the pipes, again 38mm. But that's just me trying to be all symmetrical and junk.
<{POST_SNAPBACK}>
Thanks Rob, that is a great idea. I will try this idea & see what happens.
The PhantomEdit:I agree, and can I make a suggestion - it would look fantastic if you were to extend the bellypan (either using ABS stock and Plastex, or just making an extension from aluminium and painting it red) so it was long like on the NR (and the CBR1000RR), and have the slashcut pipes coming out through a hole in each side...
<{POST_SNAPBACK}>
You are right on it there. One of the other bikes that inspired me was the KTM RC8
Look Here
As for production: Ridwaan is fired up to make these things but lets get it sorted out first.
Too Loud?
You might try that suggestion Rob gave you about welding on a cap on the end of the drilled pipes. Thats basically how a spark arrester is on a dirt bike, and it is much quieter than a strait pipe without losing too much flow, you will get a bit more back pressure but no more than the oem for sure. Or perhaps a small hole on the end, of course a dirt bike wraps with stainless steel screen. Nice fabrication there, I moved it to feature on the homepage tec.
This is sort of how the industry is going with exausts now anyway, starting with buell those belly pan mufflers are getting popular, lowers COG and is generally more effiecient, more cost effective. Looks like it don't stick out any more than the collector pipes do should not be a dragging issue there. I thought you modified a car muffler at first but then I read you fabricated it from scratch.
HispanicSlammer Or perhaps a small hole on the end
<{POST_SNAPBACK}>
HS is going the right direction with this, I believe. Going back to my Hardley days, the baffles were removed completely and replaced with a 1/4" bolt to provide sufficient backpressure- they still ran like crap, but boy were they load!!! :goofy:
Ok, I digress, if you completely block off the end, you will have too much back- pressure and the bike will not run correctly. If you drill a whole in the end, you may improve this, but you may also induce a whistling noise that is annoying at best. What I have seen done that appears to work well is to crimp the leading edge of the baffle. This splits the exhaust airflow, some will go through the baffle end, some is redirected to the outside surface where it will enter the perforated section of the baffle.
To do this, heat the baffle with the torch and bend the leading edge in to form more of a cone shape. Its kind of hard to explain without a pic, so think about it like this. Imagine what would happen if you squeezed the end of the baffle equally around its circumfrence (provided you were strong enough). It would taper down to a cone, which is what you want.
Oh, I forgot the most important thing- AWESOME MOD!!! :beer:
OK. I did Veefer800Canuck's mod.
Stub tubes are 150 long. Firstly I cut the inlet stubs down to 75 & welded on 75mm cut off the perforated stubs I had & blanked off the ends. Fitted these back on the inlet side & left all the pot scourers inside. Result: significantly quieter & deepr tone.
Then I drilled 5mm holes over the last 85mm of the outlet stubs & blanked off the ends. Fired her up: a bit louder than with just the inlet stubs perforated & blanked off.
So I am now running with the inlets perforated & blanked off, the outlets plain pipe with open end & pot scourers in there. This is better.
I will read & consider the end hole suggestion & the tapered end suggestion. I don't follow them after a quick read. I am pretty certain I will fabricate another muffler with 3 chambers each side along conventional lines except the stub tubes will still fot in from the outside so i can adjust them. But the bike is usable as it is & there are other things (non biking) that need to be done.
Any more advice or suggestions will be much appreciated.
magellanTok,If you get the decibels down to a mellow volume approximately that of a Staintune's, you'd better get ready to take orders. I may even play with variations on your design myself (just for me).
I won't copy it directly unless I just want to buy one of your T.T.S.S. (tok tokkie super sport) production units. I have too much respect for your work!
Out of curiosity, what would be a fair price for one of these with shipping from S.A.?
<{POST_SNAPBACK}>
There is no patent or copyright on this thing. Anyone is free to make these things for themselves or others. The more the merrier as far as I am concerned.
Ridwaan, who did all the welding for me is a tennant in my building. He has just split from his wife & lives right on the premises. He has also just started as a one-man business doing high quality welding (aluminium cylinder heads etc) but is scratching for work. He is keen to make a batch of these. The problem is making the connection between the existing headers & the new muffler. This requires welding on site. That is going to be a big discouragement I feel as it is not a simple bolt-on (or slip-on) mod.
I went for a decent ride in the mountains today. The dog-bone link just above the new muffler gets very hot. It is not a complete surprise. The cat-con has a heat shield which has a very small air-gap. I will make a heat shield that fits inside the depression on my muffler. That is partly why I made the depression so big. I also considered fitting the heat shield to the dog-bone itself.
I would be interestd in knowing if the linkage gets too hot to touch on the standard set-up as I never checked that out before doing this mod.
dudeTokkie that is fantastic bro :pissed: Shit wish i had the fab abilities you do. Something i loved about the new suzuki 750 was their shortie exhaust, and well youve done a great job on the 5th gen. Sound file forthcoming? :beer:
<{POST_SNAPBACK}>
So others too agree with me
http://www.vfrdiscussion.com/forum/index.p...topic=17881&hl=
99RC4MeThat is awesome smile.gif Me thinks that you have a large customer base for that mod.
<{POST_SNAPBACK}>
Ok. I would be happy to have this thing spread around.
My intention is to make drawings for a muffler with 3 chambers each side similar to the one shown in the link I gave to 'HowStuffWorks' near the start of this thread (it will not have the resonator chamber). The other change is it will have 3@22mm tubes between the first & third chambers (not the ports shown in 'HowStuffWorks). Also, it is not necessary to angle the center dividing wall as the muffler can fit in slightly closer to the headers coming down from the rear cylinders. I will also fit a heat shield to protect the suspension dog-bone bearings (getting hot with current set-up).
With the removable inlet & outlet tubes I believe we will be able to tailor the noise volume as we choose by adding holes to these tubes in the first & third chambers (both tubes need to have holes in the second chamber if there is to be any gas transfer there). You can even cut the tubes out completely if you wish.
I will take the drawings to a couple of laser cutting places to get quotes for all the bits. Riedwaan wants about $80 for bending, welding & polishing. I will charge cost of materials + 10%. I had headers airmailed to me by Trace which cost $53 so I expect it will be similar to that. I will make up my one & check it out before assembling the rest (possibly leave out 1 or more of the 22 tubes). I will supply with 2 extra internal tubes with flanges so you can experiment with different sounds.
Please be aware that you will have to cut your headers just after the 2:1 join, fit in the stub tubes I will supply & weld the stubs to the headers & flange. You must remove the ECU & R/R from the bike before welding and disconnect both leads from the battery.
WarriorRacer#13 is wanting to offer an exchange program on headers to fit this muffler. That has not been finalised yet.
Magellan is, I think, also wanting to make similar mufflers so they may be available ex the US. I have absolutely no problems with anyone using this idea and offering to make similar mufflers. I see VFRD as a co-operative site where I have received lots of advice & help so I am pleased to be able to make a contribution in the same spirit. Anyone wanting a copy of the drawings (as a plot file) is welcome.
I would like some indication of how many are interested so I can get quotes for that number of components & come back with firmer pricing.
[image: gallery_4545_662_249732.jpg] border='0' alt='user posted image' />
Mark 2 with baffles.
..
[image: gallery_4545_662_19103.jpg] border='0' alt='user posted image' />
Gas Flow Options
I have made the new design. I have ended up using gas flow path shown in lowest sketch & am entirely happy with it - not too noisy at all. I have also plugged the cross-talk port & prefer the more v-twin less stinky I4 sound.
Riedwaan, the welder, has taken a fabulously paying job on oil rigs in Nigeria & will be away for 30 days so I wont be making any more. (I just need to polish the one for VolatileVFR & it is done).
Drawings are available to anyone who wants them.
TunerDudeabout what size are the holes coming in and out of the baflesas many have stated this is by far the switest exhaust iv seen for the vfr
what did it do along the lines of power
<{POST_SNAPBACK}>
Header pipes & 2 big ones inside each side of the can are 38 OD. Three little ones are 22OD.
If you mean the perforation holes in the pipes; 5mm
I really don't think there is much power difference but the idle speed went up from 1200 to 1500 initially.
What are your impressions after living with the system on your bike for a while now? Is the Db level comparable to an aftermarket slip-on (you have Mark II on the bike now, right?), or louder? Any clearance or fit issues? Are you content to be without a centerstand while far from home? And of course we'd love another pic or two... wink.gif
magellanWhat are your impressions after living with the system on your bike for a while now? Is the Db level comparable to an aftermarket slip-on (you have Mark II on the bike now, right?), or louder? Any clearance or fit issues? Are you content to be without a centerstand while far from home? And of course we'd love another pic or two... wink.gif
<{POST_SNAPBACK}>
I am delighted with it as it now is- Mark 2. I have not heard the bike go by as only I have ridden it. Only clearance issue is left side outlet I have dragged a couple of times - I have a shorter outlet pipe which I will fit (muffler is offset to left) - remeber we also ride on the opposite side so this is when I am riding on the inside lane of a bend. I only go for day rides so centerstand is no issue - I have the paddock stand at home & chain block at work.
With all those baffles inside I would make the body of 1.2mm stainless instead of 1.6mm if I did it again (as long as your welding technique is up to it) as it would make it quite easy to cold bend the body around the walls & baffles tacking it in place in stages.
[image: gallery_4545_662_249732.jpg] border='0' alt='user posted image' />
Mark 2 with baffles.
Picture of walls & baffles before starting to bend & tack body around them - but fit the big tubes into the holes before tacking the guts into place so it is all correctly lined up - no need to ask why I say this.
I wish Jet Hot was available here as the headers are crying out to be shiny silver to finish the job off.
magellan, Jun 9 2006, 03:01 AMHi Ralph,
I got the muffler bits today and it certainly looks like it will be easy to assemble a complete muffler. The setup I've got here appears to utilise gas flow option #1 in the above picture, with the exception that I'll rotate the inlet and outlet pipes so that the drilled areas are as far away as possible from one another. With a pot-scrubber in each of the middle chambers I predict a nice mellow rumble. I have also plugged the cross-talk port to go for more of the v-twin sound.
The only problem I see so far is that the '98 headers on my bike are shaped differently from the '00-'06 headers with catalytic converters. Where I would cut the headers, the pipes are far from level with one another - as they are on the cat-equipped headers. I'm thinking I'll need to just buckle down and get a cat-equipped header from somewhere to chop up.
Anyone have a set they can part with?
I sent what I had which is option 1. Since the pipes are rammed in from the outside you can make option 2 or 3 & try them also. I included extra flanges for that plus blanking disks for the pipe. Your idea of pot scourers may work but I think it wont be much different to option 2 above unless you fit the scourers into the LH &/or RH chambers in the diagram.
Sorry that the non-cat headers are so different. Look at the photos of the short connection between where I cut my headers & the muffler - they are not quite straight. They were tacked into place on the bike (remoce the ECU & R/R before welding & disconnect the battery). Must have 2 flanges on the inlet - inner one simulates the flange of the baffle pipe; without it you will be 3mm long).
Your headers are very sought after. I responded to your request for headers before seeing this post. Glad the bits have arrived - The Long Way Round 2.
tok tokkie, Jun 9 2006, 12:59 AMGlad the bits have arrived - The Long Way Round 2.
So
that explains why Ewan McGregor hand-delivered the package... goofy.gif
TOKIE, can you post a audio clip of what it sounds like? (or if I missed it somewhere please point me in the right direction)
I must hear this thing.
I have no idea how to do it or where to post it. I have only heard it from inside my helmet so I would be quite interested to hear it also. My favourites are the lumpy idle at traffic lights & on the overrun around 7000 rpm & above - quite simply gorgeous. Over about 100 kph I don't hear it at all during cruising because of the helmet wind noise.
Wait patiently & I am sure Magellan will post something.
tok tokkie, Jun 10 2006, 01:57 AMI have no idea how to do it or where to post it. I have only heard it from inside my helmet so I would be quite interested to hear it also. My favourites are the lumpy idle at traffic lights & on the overrun around 7000 rpm & above - quite simply gorgeous. Over about 100 kph I don't hear it at all during cruising because of the helmet wind noise.
Wait patiently & I am sure Magellan will post something.
Yes, wait
very patiently, because I'm working 7 days a week at the moment. The muffler is sitting on my bench unassembled, and I can't wait to get to work on it. sad.gif
That was a month ago Magellan...anything yet? I'm interested in how this mini Flowmaster sounds on a VFR smile.gif
JoeAsheville, Jul 15 2006, 07:32 AM
That was a month ago Magellan...anything yet? I'm interested in how this mini Flowmaster sounds on a VFR smile.gif
The honest short answer: I'm riding and working too much to take time to fab an exhaust right now. I'm excited about doing it, but not about having my bike down for a week.
wheel.gif
JoeAsheville, Jul 16 2006, 08:53 AM
Looks fantastic! smile.gif
Those pics were before we got around to polishing all the welds. It looks much better now.
I think I'm gonna go ahead and put the new headers on today and line everything up. I've got the itch to tinker. idea3.gif
Life has a weird way of changing one's expectations.
I don't weld stainless, so I called a friend of a friend yesterday to see when I might schedule an appt. He asked, "What are you doing this afternoon?"
So, much to my surprise, we spent all afternoon and evening welding up and polishing my Tok Tokkie Special . It's a beauty!
[image: gallery_5128_669_141978.jpg]
2006_0715_192406AA.JPG
[image: gallery_5128_669_275059.jpg]
2006_0715_192438AA.JPG
[image: gallery_5128_669_117717.jpg]
2006_0715_192346AA.JPG
This is Fred, the evil welding genius.
Now all I have to do is cut the cat off my spare headers, weld on the flanges that mount to the muffler, line everything up on the bike, tack it all into position, and do the final weld-up. I think I can do it all this week with only several hours of downtime.
Looks fantastic! smile.gif
Well, if you've been desperately bored enough to follow the story of my difficult choice of headers ('98-99 larger diameter pipe vs. '00-06 smaller diameter pipe but perfect alignment of pipes for tok tokkie style muffler), I can finally say I've gone for the easier fit of the late-model cat-equipped headers. My catless exhaust may very well be sold this weekend (if I can bear to part with them).
As it stands, Fred has my muffler tonight and is slightly adjusting the position of the mounting brackets. Everything went smashingly until we realized that the inside of the rear headpipes was rubbing against the engine casting where it curves under to join the front head pipes. I also wanted to more precisely center the muffler with the bike's longitudinal centerline. Anyway, it should be done tomorrow (fingers crossed).
Interesting note: I cut the loop the cat bolts to off the bottom of my block (yes, it's on the '98s too. Mmmm...), seeing as how my bike didn't have one and won't be needing one. Removing this obstruction allowed the muffler to be mounted further forward than tok tokkie's (he left the loop in case he ever wanted to go back to the stock exhaust), so I didn't need stub tubes to be welded to the headers. I simply welded flanges to the carefully flattened end of the headers and voila, I'm ready to bolt on the muffler.
Weld like the wind, Fred!!
[image: gallery_5128_669_652882.jpg]
2000_0310_011620AA.JPG
Busy day today. I got the system gasketed, put together and mounted without a whole lot of fuss, but it was a royal pain to get the right-side (used to be) centerstand bolt in past the headers. Oddly, it was much easier with the larger-diameter 5th gen headers in place. I'm very happy with the result visually, but it's no quieter than my underseat setup was (minor issue), so I may play with some stainless steel wool between the inlet and outlet pipes and see what that does.
As for practicality, I no longer have to worry about loading up the luggage and wife on the back and hitting the exhaust with the rear wheel.
Thank you Ralph, for designing this remarkable muffler and sharing your ingenuity. I'll never fail to mention that this wasn't my idea when people see it (besides, it's kind of fun to let them know it was custom-designed for me in South Africa http://www.vfrdiscus...tyle_emoticons/default/wink.gif )
[image: Posted Image]
The Whole Shebang.JPG
[image: Posted Image]
Front.JPG
[image: Posted Image]
Lovely Profile.JPG
[image: Posted Image]
Rear Three-Quarter View.JPG
[image: Posted Image]
Side View Close-Up.JPG
[image: Posted Image]
Mrs. Magellan.JPG
I'll post up a .wav file as soon as my laptop comes back from the repair shop ( I use it to record)
So whaddya think?
Have you really left the O2 sensors on?
Now who is going to be first to extend the fairing right to the back? Would look nice but difficult with headers on right sticking out slightly but can on left even more in the way & also the side stand. Not high up my priority list but very high on my wish list. Your turn?
You say it is noisy. What tubes have you got inside at this stage?
tok tokkie, on Jul 23 2006, 12:02 AM, said:
Have you really left the O2 sensors on?
Now who is going to be first to extend the fairing right to the back? Would look nice but difficult with headers on right sticking out slightly but can on left even more in the way & also the side stand. Not high up my priority list but very high on my wish list. Your turn?
You say it is noisy. What tubes have you got inside at this stage?
I have perforated tubes both for inlet and outlet. I may go ahead and leave it loud for a while and see if it bothers me. I certainly love the quality of the sound, but I may want to take it down a few decibels with solid outlet tubes.
The O2 pigtails are of course connected to nothing. I simply didn't go to the effort of finding or making plugs yet.
Rode 300 miles or so today and the exhaust is pretty loud, louder even than my underseat system, so I'll replace the outlet tubes with solid ones and see how that sounds. Here's the real problem:
[image: IPB Image]
2000_0312_205559AA.JPG
I touched the tip down on the left side and both the tip and muffler on the right. Yikes! I'm pretty sure I can move the whole muffler to the left 1/4" and grind an angle into the tips to avoid hitting again, but I wish I'd dished out the relief in the top of the muffler (for the suspension link) more deeply so the whole thing could go up 1/4" at the rear.
I hope I don't have to weld in angled reliefs on both sides, but it looks like I might. It may be either that or learn to ride like an HD rider (no leaning) tongue.gif .
Thats a bummer! I am sorry about that. I scrape the other side (whch is camber positive side as we drive on the left) but only occasionally but then I obviously don't charge as hard as you.
[image: IPB Image]
Chicken strip frilly edge
What do you weigh? I am a skinny rat running on just 1 click of rear pre-load.
I weigh 175, but my wife was on the back with me. However. I had the preload one click off max to compensate. Unfortunately, I really need this muffler to work under those circumstances, so I'll likely just buckle down and move the whole muffler to the left slightly, then cut and weld in angled reliefs at the rear lower corners. That ought to do it.
Me, a hard charger? Naww, that's my wife... The guys we rode with yesterday say she hangs off farther than me! biggrin.gif
I am so relieved the back wheel wasn't levered off the road by that touch-down. I have had some scary thoughts of what might have been.
The Phantom wrote me months ago suggesting a tapered shape ( \____/ is the ASCI diagram he sent). It was part of his suggestion for extending the fairing backwards but certainly a good idea for anyone else who makes one of these. Mounting is really close to the underside of the gearbox would also help; remember that from 2000 on there is the cat/con under there but it has a heat shield which both protects the gearbox & keeps the cat/con hot. Really close to the gearbox plus a thin heatshield may be the way to go. It is getting messy.
I thought about that shape as well, but retroactively. I think it would be fairly easy to cut the sides right off the muffler and weld in two flat pieces angled out as you've shown.
I think I've probably got mine situated now. I was able to move the whole thing up about 1/4" at the front and 3/8" at the rear (had to lose most of the clearance between the suspension link and heat shield). Then I took a body hammer and very carefully hammered a taper into the lower right rear corner of the muffler, filed and sanded it smooth, and called it good. I'll have to load up and go for a ride to see if it's the final solution, but I think it'll do.
I had a look at my set-up after writing my last post. My last post is all rubbish. Muffler is behind the gearbox under the swing arm pivots. It is jacked up tight against the center stand lugs & can't go any higher unless pockets are made for the lugs in the muffler.
Yours is the only option available at this stage. Starting again we could fab a differently shaped muffler with better clearance.
[image: View Post]tok tokkie, on Jul 26 2006, 01:25 AM, said:
unless pockets are made for the lugs in the muffler.
I also found myself wishing for this. Additionally, about 4mm could be shaved off the bottom of those lugs without compromising their strength at the threads. Might be worthwhile for that extra little vertical adjustment if I touch down again.
On a funny note, I had a guy looking the muffler over yesterday and admiring the handiwork. Then he said, "But I don't like the outlets. They look cheesy. They should come up beside the tire, like this..." and with his hand drew a line up to the hub center. "...like on a Harley with the tips of the pipes turned upward." :huh:
Sure glad
he didn't design this system! :blink:
New pics:
Notice the street sign...
[image: Posted Image]
2000_0323_201251AA.JPG
[image: Posted Image]
2000_0323_201313AA.JPG
[image: Posted Image]
2000_0323_201529AA.JPG
1. What are your current thoughts on Jet Coating?
2. WHERE'S THE SOUND CLIP EVERYONE WANTS?
Nice work/idea! Any plans for makeing this for the 94-97's?
Tok - any plans to produce more of these? That is one sweeeeeet rig. Would it fit a 6th gen?
huxtablejones, Sep 5 2006, 03:26 PM
Tok - any plans to produce more of these? That is one sweeeeeet rig. Would it fit a 6th gen?
I am not goiung to make them but I can supply the drawings as printer files. Take them to a laser or water jet cutter for the kit. Then a tig welder to assemble.
They will fit a 6th gen as the cat & headers are the same from 2001 (2000?) onwards.
tok tokkie, Sep 5 2006, 10:12 AM
I am not goiung to make them but I can supply the drawings as printer files. Take them to a laser or water jet cutter for the kit. Then a tig welder to assemble.
They will fit a 6th gen as the cat & headers are the same from 2001 (2000?) onwards.
Keep in mind of course how strange the 6th gen tail will look without cans under it, but it sounds like a great opportunity for custom tail fab. As for the muffler itself, if you're the kind of guy to really rail through corners, you may want to build it with tapered sides. I've repeatedly touched mine down on both sides and had to modify it and move it upward almost an extra 1/2". I haven't hit since, but I think even more deeply dishing out the area where the rear triangular suspension link comes down and tapering the sides from the get-go is a great idea.
On the other hand, the sound of the muffler alone may be enough to convince you it's worth the effort. Here's the proof:
VFR_w_Tok_Tokkie_Exhaust.wav ( 761.04k )
Number of downloads: 89
magellan, Sep 5 2006, 01:23 PM
Keep in mind of course how strange the 6th gen tail will look without cans under it, but it sounds like a great opportunity for custom tail fab. As for the muffler itself, if you're the kind of guy to really rail through corners, you may want to build it with tapered sides. I've repeatedly touched mine down on both sides and had to modify it and move it upward almost an extra 1/2". I haven't hit since, but I think even more deeply dishing out the area where the rear triangular suspension link comes down and tapering the sides from the get-go is a great idea.
On the other hand, the sound of the muffler alone may be enough to convince you it's worth the effort. Here's the proof:
VFR_w_Tok_Tokkie_Exhaust.wav ( 761.04k )
Number of downloads: 89
I will definitely want to taper the sides. From what I can hear through my laptop speakers it sounds like hot sex and a bag of pretzels - how would you say it compares to say, a set of staintunes?
huxtablejones, Sep 5 2006, 10:59 AM
I will definitely want to taper the sides. From what I can hear through my laptop speakers it sounds like hot sex and a bag of pretzels - how would you say it compares to say, a set of staintunes?
Very comparable, except that 'Tunes mellow out the exhaust pulses on decel a little more and you can almost hear the exhaust valves opening and closing with the Tok Tokkie system, it's that immediate. Similar decibels and overall pitch, though.
magellan, Sep 5 2006, 03:53 PM
you can almost hear the exhaust valves opening and closing with the Tok Tokkie system,
I was wondering about that, too...I had always hear that running pipes that are TOO open could harm the exhaust valves...what's yall's feeling on that with this rig? I would imagine there's a big reduction in the backpressure? I don't wanna screw up my motor sad.gif
Magellan, Tokkie
If you want close up shots of a NR's underpan (or any other body panels) to help you fabricate one, let me know.
My local Honda dealer (Arie Molenaar) is just a few miles up the road and he has a NR on permanent display.
Or if a video (.WMV) is more helpfull, no problem.
Leon
lookin for some sound files myself.
HS brought this out of the darkness so I thought I'd add a post to bring it back to life on the forums. :goofy:
Still a great project! :fing02:
[image: Posted Image]
BTW whatever happened to Tok??? :goofy:
I wander if I could make something similar to that to fit under my streched fairing? I really like the clean look of his bike. Here would be the space I would have to work with. Do you think it would be possible to do without melting my plastic?
[image: Attached Image: img_0008.jpg]
[image: Attached Image: img_0006.jpg]
[image: Attached Image: img_0021.jpg]
[image: View Post]Baileyrock, on 26 December 2009 - 12:12 PM, said:
HS brought this out of the darkness so I thought I'd add a post to bring it back to life on the forums. :goofy:
Still a great project! :fing02:
[image: Posted Image]
BTW whatever happened to Tok??? :goofy:
Unfortunately, Ralph crashed his bike and basically broke the frame in half.
http://www.vfrdiscus...showtopic=29004
[image: Posted Image]
Toro1 now has Ralph's RC51 front end and is installing it on his blown 5th gen.
I get a kick out of this thread because the pipes he used to build his exhorrrst system came off of my bike. I had bought another set to JetHot, and after installing them, Tokkie asked about my originals. So I took those pipes, cut them just above collector to make for easier packaging for a trip from Florida to South Africa and because Tokkie obviously didn't need anything except the headpipes. Also in that box I had procured for him some TemperPedic foam (seat), the Factory Pro shift kit, RC51 head bearings, a seat cowl (so he could paint it to match his custom bodywork color), some Gorilla Glue (he loved that stuff!) and a few other items that aren't readily available for a 5th Gen in South Africa.
It was great fun to see his ideas become a very cool bike, and I was quite bummed when he had his crash and the bike was no more. http://www.vfrdiscus...tyle_emoticons/default/sad.gif
I wander if I could make something similar to that to fit under my streched fairing? I really like the clean look of his bike. Here would be the space I would have to work with. Do you think it would be possible to do without melting my plastic?
I, like you, want to do this (although not on this bike) and want to keep the aero look. My 93 rear lower fairing though is metal. So, may I suggest you make your undercan WITH lower fairing built in/on in metal. No plastic to burn.
Larry
VFRrider
I wander if I could make something similar to that to fit under my streched fairing? I really like the clean look of his bike. Here would be the space I would have to work with. Do you think it would be possible to do without melting my plastic?
I, like you, want to do this (although not on this bike) and want to keep the aero look. My 93 rear lower fairing though is metal. So, may I suggest you make your undercan WITH lower fairing built in/on in metal. No plastic to burn.
Larry
VFRrider
That muffler is in Canada complete with the headers. I retrieved it from the crashed bike & sent it to Canadian Ken (?) who gave it as a gift to someone who liked the idea. Instead of simply bolting it onto his bike he decided against the idea & it is either wasting its time in his den or has been thrown out.
This should make you lot smile. I have now downscaled to a single 200cc cylinder = 1/4 of a VFR.
[image: Posted Image]Where I now go. I also do multi day solo trips on very deserted gravel roads in the boondocks.
[image: Posted Image]
This should make you lot smile. I have now downscaled to a single 200cc cylinder = 1/4 of a VFR.
[image: Posted Image]
Where I now go. I also do multi day solo trips on very deserted gravel roads in the boondocks.
Mate you are almost as far removed from your Scarab VFR800 as it's possible to get with that little number. Is it a TW200? I only know them through a shop in Sydney that customises them but I haven't seen many other 200cc bikes with tyres like that.
[image: Posted Image]I take it you're on www.advrider.com? Some great reports there set in your neck of the woods from
MetalJockey, of Eastern Cape.
This should make you lot smile. I have now downscaled to a single 200cc cylinder = 1/4 of a VFR.
[image: Posted Image]
Where I now go. I also do multi day solo trips on very deserted gravel roads in the boondocks.
Mate you are almost as far removed from your Scarab VFR800 as it's possible to get with that little number. Is it a TW200? I only know them through a shop in Sydney that customises them but I haven't seen many other 200cc bikes with tyres like that.
[image: Posted Image]
I take it you're on www.advrider.com? Some great reports there set in your neck of the woods from MetalJockey, of Eastern Cape.
I am on ADVRider but only the Jo Moma forum regularly. Yea it is a TW. I also have a BMW F650 Dakar but I much prefer the TW.
Metaljockey! What a civilised man (though he is an animal when drunk I hear). He sets such a high standard locally which means the pricks who want to show off and be antisocial are kept somewhat in check by his example. I have met him. His most well known trip was through Angola:
http://www.wilddog.z...p?topic=10359.0But his latest was together with his wife and child; check where she took her bike.
http://www.wilddog.z...p?topic=39411.0Here's one I did on the TW
http://www.wilddog.z...p?topic=39398.0
Ralph,
Great to see you back no matter what your riding! :biggrin:
Keep posting w/pics, we love it! :beer:
BR
If you look at some of the early V4 collectors, for that is what he has built here, they enclose much of the primary header, so what looks like very short primaries are actually much longer ! You could do the same with this setup, thus giving more baffle area to play with. It's a nice first try, but could be improved as far as sound control is concerned.
Bumped, for CornerCarver and Mohawk. You're welcome :beer:
End of thread · 84 posts recovered Wayback Machine snapshot 22 Aug 2025
![[image: user posted image]](http://www.flowmastermufflers.com/images/delta_tech_thumb.jpg)
![[image: Posted Image]](http://farm3.static.flickr.com/2740/4133291425_26b20d50d5_o.jpg)
![[image: Posted Image]](http://farm5.static.flickr.com/4053/4221726708_e5dbdeca62_o.jpg)
![[image: Posted Image]](http://www.rollaclub.com/board/gallery/1233651160/gallery_2873_162_9831.jpg)