VFRDiscussion ARCHIVE / READ-ONLYREAD-ONLY

Beware the Yellow Peril

59 posts Started 9 Jun 2011 Last recovered post 2 Feb 2026 Wayback Machine snapshot 22 Apr 2026

#1

gallery_362_5959_127829.jpg

IN THE BEGINNING (which was December 2008), I purchased a California-spec Y2K VFR800Fi as the bike on which to install an A&A supercharger kit (aka "Torocharger"). I was never a big fan of the the 5th-gen VFR, but had ridden them in the past and respected them as very good bikes, but when I started to read about Dan's development of the "Torocharger" on VFRD I was so impressed that I decided I just had to buy the kit as soon as it became available--and a suitable bike to fit it on! I've already got a couple of red VFRs, so I was happy that my research indicated that the "Y2k" yellow model (in the USA) would be perfect for my needs. Soon enough, a fellow member of the venerable VF/VFR Mailing List mentioned that his was for sale on Craigslist, and I flew up to San Jose, helmet in hand...
gallery_362_5959_21029.jpg

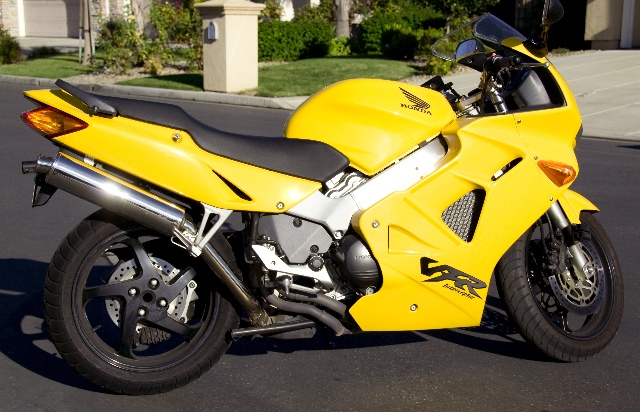
Brett's RC46-RHS This was the bike essentially as purchased by me.
gallery_362_5959_115675.jpg

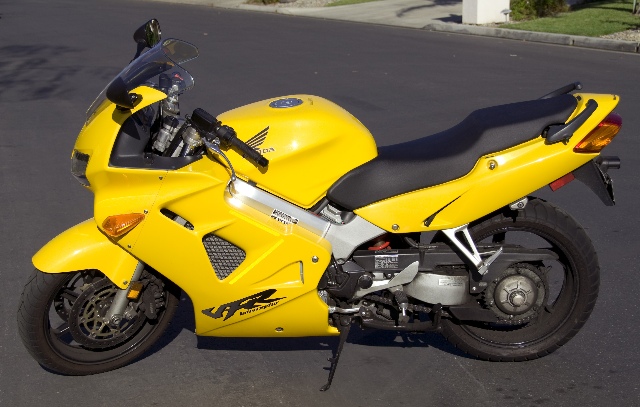
Brett's RC46-LHS Hmmm. Looks like those wheels could use a bit of a clean... ohmy.gif

My Y2K came with a perfectly decent Staintune slip-on, but at some point I decided that such a special bike really needed a special underseat exhaust, so I posted a plea for help on VFRD, which was soon answered by sa1713 (Jim), who was instrumental in getting Dan Dreisbach (http://www.naked-scu....com/index.html) to weld-up a custom y-pipe for me to use with my Erion headers and Laser Xtreme end cans. Many thanks, Jim! :beer:

These two significant mods occupied most of my free time during my recent two-week vacation in California. At the same time I installed some silicone water hoses and fitted a Power Commander V and Autotune unit. I also generally cleaned everything as I ecountered it--including what seemed to have been about eight years' worth of chain lube spooge all over the LHS of the bike... I've also got a pile of other cool parts and mods waiting to go onto this bike, but wisely decided not to try to do EVERYTHING at once--just a more manageable several things at once! cool.gif

Anyway, this is what $950 buys you these days (Laser Xtreme end cans not included!):

[image: gallery_362_5959_180004.jpg]

RC46 Laser Dreisbach Erion Package Y My Laser underseat system and undertray, fabricated by Dan Dreisbach.

(The Lasers are not even because I asked Dan to leave the final trimming of the tubes to me, once I had decided how much I wanted the exhaust to protrude from the rear of the bike.)
gallery_362_5959_111696.jpg

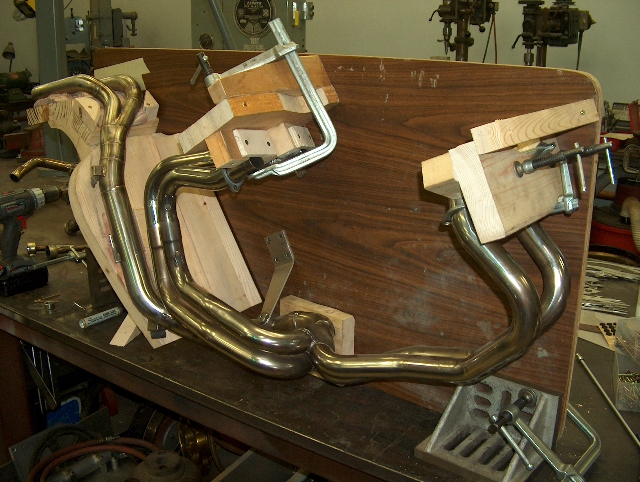
RC46 Laser Dreisbach TBR In Fixture (Jim This shows the jig made by Dan Dreisbach to duplicate Jim's Laser underseat y-pipe. (This photo actually shows Jim's TBR exhaust--my Erion was very similar, but the outlet was about 50mm longer, and had to be cut-down.)

With this jig, Dan can make as many similar y-pipes as he wants. Too bad the number of people with TBR or Erion full systems and Laser Xtreme end cans handy is somewhat limited! I imagine if other exhausts could be provided to him, he could probably fabricate other underseat exhausts as well, but I don't know for sure about that.

The Erion full system was purchased via eBay from Dynojet Research (of all sellers!) a couple of years ago. I suspect they had used it to dial-in their Power Commander map for the RC46-I and then put it on a shelf.

So, after dithering a bit, selling a house, putting the bike in storage for nine months, buying another house and messing with that for a while, it was time to get down to business with the VFR:

[image: gallery_362_5959_154451.jpg]

P1020921x Starting to strip the bike down for the installation adventure...

A freshly powder coated RC36-I rear wheel almost goes w/o saying on a project like this! (The RC51 SP1 front wheel in the background was done at the same time, for some strange reason.) cool.gif
gallery_362_5959_74132.jpg

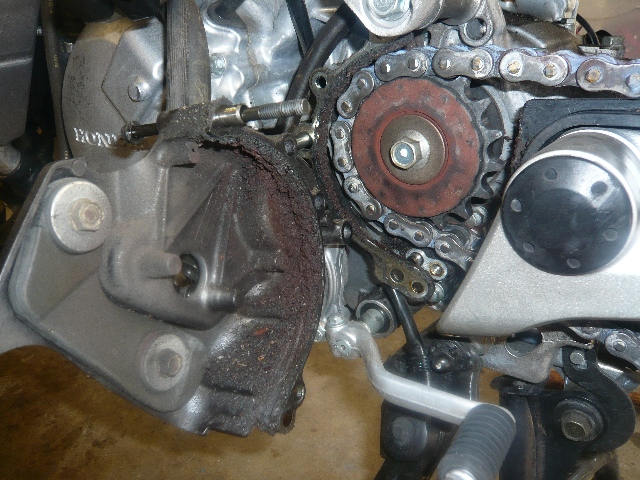
P1020930x The entire left side of the bike was covered in chain spooge and gravel. (Photo taken AFTER degreasing with GUNK or equivalent.)

Fortunately, I just love cleaning chain lube spooge. angry.gif

[image: gallery_362_5959_22778.jpg]

P1020932x Countershaft and sprocket area cleaned and ready for the installation of the new OEM front sprocket, DID chain, new OEM rubber chain guide, Sidewinder titanium alloy 43T rear sprocket and Penske shock.

Ah, that's better. (Still need to clean the insides of the fairings--oh, joy!)

Despite the fact that nobody will ever see them, I decided to fit mega-bling blue silicone water hoses to the bike. There are no kits for this bike that I am aware of, but inspired by this post by IDA71 on the UK-based Honda VFR Club, I decided to wring a few more pounds out of the credit card and ordered up all of the bulk hoses I needed. Oddly, the hoses are generally cheaper in the UK than in the USA, so I bought them before I came over to California and brought them with me. Because I was installing them on a bike with an A&A supercharger kit, I needed to order three more 45-degree elbows (two for the oil cooler and one for the blow-off valve) and generally ordered a bit more of each of the straight hoses, just in case. (If I had to do it again, I might also order the missing bits noted below.)
gallery_362_5959_79690.jpg

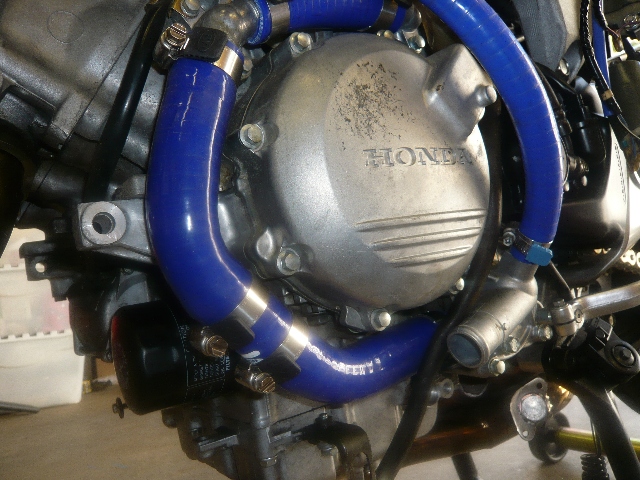
P1020972x Fitting the silicone hoses to the left-hand side of the engine.

I should point out that the smaller blue hose (which runs from the pump to the thermostat housing) ultimately needed to be clamped much closer to the engine so that the overflow bottle would fit properly. The one OEM rubber hose visible in the photo below goes to the "fast-idle wax unit", which is only found on the Y2k and 2001 models, and I did not change it for silicone because the bend was too tight and I hadn't ordered a 90-degree or 180-degree elbow and joiner to replace that hose. Oh, well! (Didja notice the cool rubber hose clamp "jackets"?)

[image: gallery_362_5959_184256.jpg]

P1020978x Top of the engine, within the vee, showing some of the silicone hoses.

As you can see, the silicone hoses are a throttle body-off job, so it made a certain amount of sense to install them at this point, rather than after all of the forced induction gubbins had been levered into the frame. In case you're wondering, my sources for these hoses were AP MotorStore and Demon Tweeks (for the 25mm billet Samco hose joiner) in the UK, and I also ordered some missing bits and silicone vacuum lines from Flex Technologies in Torrance, California.

Then it was on to the supercharger install... I can report that the supercharger and all of its related plumbing _just_ barely fits!
gallery_362_5959_37769.jpg

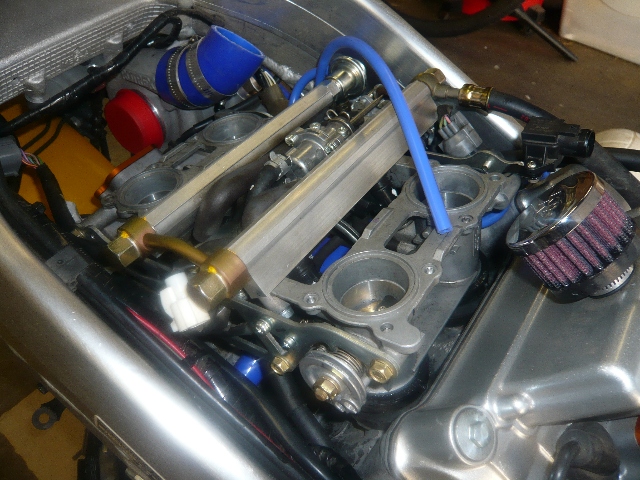
P1020980x A&A Supercharger kit being installed--just installed the throttle bodies back onto the engine.

Dan (Toro1) highly recommends having the fuel injectors professionally cleaned before installing the supercharger, so I actually bought a spare set of throttle bodies on eBay in the UK, pulled the injectors and had them cleaned some time ago.

[image: gallery_362_5959_182887.jpg]

P1020982x A&A Supercharger kit being installed--the spacers go between the throttle bodies and the top plate.

[image: gallery_362_5959_62939.jpg]

P1020983x A&A Supercharger top plate, as modified for a Y2k VFR (the temperature sensor has to be relocated from the center of the plate, due to the fast-idle wax unit otherwise causing interference).
gallery_362_5959_86884.jpg

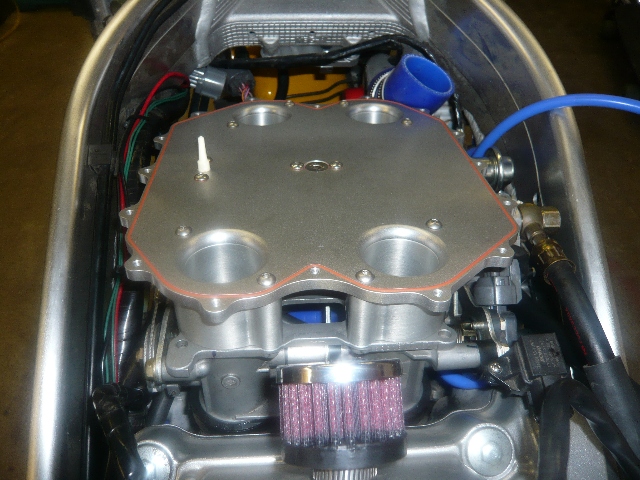
P1020989x A&A Supercharger top plate.
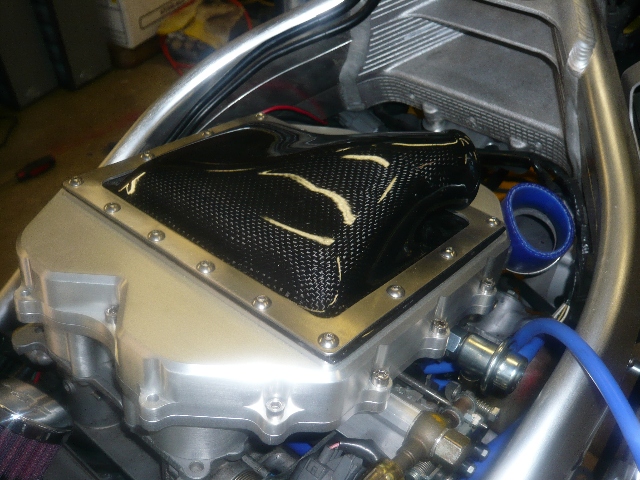
gallery_362_5959_108713.jpg

P1020992x Shows the Rotrex's output--as I said, it's a bit of a tight fit! Subsequent adjustment allowed it to squeeze in there without distortion.

[image: gallery_362_5959_14722.jpg]

P1020994x Top rear of the engine. Shows the K&N breather, the relocated rear-cylinder coils and the PAIR valve block-off plates (among other things!)

I ended up swapping the No. 1 and No. 4 coils, because the spark plug wire for the No. 4 cylinder was a bit short, once the Rotrex was installed. I had noticed that the No. 1 spark plug wire was a bit long, so swapping them worked out perfectly. The OEM spark plug wires actually have "1" and "4" marked on them in white, but a few dabs from a black Sharpie should eliminate any subsequent confusion!

[image: gallery_362_5959_51820.jpg]

P1020996x Above front of the engine. This photo was taken just before the installation of the Rotrex oil reservoir. The supercharger pumps and uses its own dedicated oil supply, so that means a separate reservoir (and maintenance schedule) is required. (Special oil, too!) All supplied in the A&A kit, though.
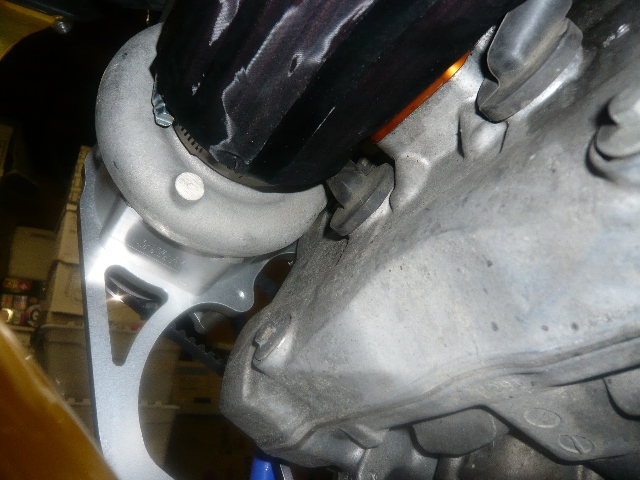
gallery_362_5959_57392.jpg

P1020999x Top front of the engine at the end of Part 1. The K&N air filter (with "pre-charger" sock) attaches to the Rotrex supercharger, but it squeezes right up against it (and is actually slightly deformed by the valve cover). To say it's a "tight fit" is one hell of an understatement...
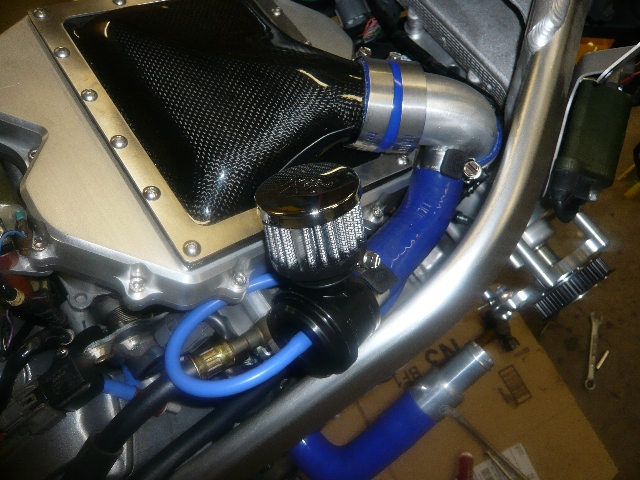
gallery_362_5959_56285.jpg

P1030003x Test-fitting of the blow-off valve.
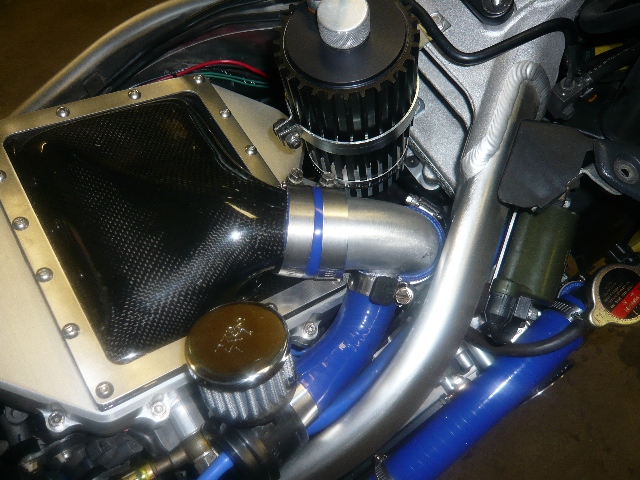
gallery_362_5959_183736.jpg

P1030013x A&A Supercharger (almost) fully installed. What's missing are the Rotrex oil lines, which go to and from the cylindrical oil reservoir in front of the "airbox". It looks like it might have been better to attach the lines to the Rotrex unit prior to its installation, because doing it at this point would be very tricky without removing things to get access (and re-torquing various bolts and re-tensioning the belt). It might be possible to get the lines on without doing that, but I haven't yet tried that.

The only other significant supercharger install steps necessary from this point relate to the fitting of the upgraded fuel pump (naturally, supplied in the A&A kit) into the fuel tank, loading the Power Commander maps and hitting the starter button...

[image: gallery_362_5959_22027.jpg]

P1030014x A&A Supercharger crank drive...

[image: gallery_362_5959_78178.jpg]

P1030011x Left front of the engine at the end of Part 1.

[image: gallery_362_5959_133098.jpg]

P1030017x Right front of the engine at the end of Part 1.

Let's take a look at the Laser underseat install.

Jim's RC46 Laser underseat system was completed last year, but I'd had a couple of sets of Laser Xtreme end cans sitting around the workshop for some time, purchased with a view to installing them on my UK-based FP (as shown in that thread). However, the custom welding was always the sticking point, so they never got installed. But I did like the look, so when Jim responded to my "WTB" thread with a link to his install thread, I was hooked! There are several versions of Laser Xtreme CBR600RR exhausts, with mine having been made for the '05-'06 model [."]http://shop.laserexh..._CBR600RR.pdf]. They are helpfully stamped with the appropriate homologation numbers and symbols (though that is somewhat irrelevant in the 'States), even though these particular end cans are supposed to be used with a separate resonance chamber and a pair of "road legal" inserts (oops...) However, Dan Dresibach welded-up some inserts of his own for me to experiment with, should I choose to muzzle any of the exquisite Honda V4 music in the future.

Initially I had some trouble getting the end cans to mount high enough, which was caused by the y-pipe contacting the bottom of the right side of the undertray, but a simple modification I did to the undertray solved that. The final installation steps will be to (carefully) mark and drill the holes and cut the spacers supporting the end cans from the top. I didn't want to rush this step, as I will only really have one good shot to get it perfect.

[image: gallery_362_5959_96068.jpg]

P1030041x Test-fitting of the Lasers, showing the front/side brackets Dan welded on (awaiting final fitting and drilling of the holes).

[image: gallery_362_5959_21168.jpg]

P1030039x Clearancing of the undertray to clear the y-pipe.

[image: gallery_362_5959_57812.jpg]

P1030031x This is the stainless heat shield Dan devised to keep the undertray cool. It was originally riveted and separated from the aluminum undertray by washers. I had to remove it (and fit additional washers) to clear the button-head cap screws I used to mount things to the top of the undertray (e.g., the battery box and the Penske reservoir). I hope it will still work!

[image: gallery_362_5959_23084.jpg]

P1030035x Another shot of the Lasers' rear mounts, which will attach to the stainless steel plate above, using the captive nut brackets mentioned below.

[image: gallery_362_5959_86281.jpg]

P1030030x Intermediate shot of the undertray, showing the trimmed side (back of the shot) and the side yet to be trimmed in the foreground.

I had noticed that the sides of the aluminum undertray would be visible at certain angles, and it was not necessary to have them so long, so I trimmed them back a little bit--cutting a template out of card stock and using that to mark both sides.

[image: gallery_362_5959_111754.jpg]

P1030024x This is a prototype of a rear fairing support idea. They willl attach to the new stainless steel plate I fitted to the rear of the undertray.

After a horrible experience making a stainless steel custom undertray for my FP, I absolutely loathe working with the stuff, but I decided it was necessary to use stainless for these parts. McMaster-Carr made it all so easy (but not particularly cheap!) to order stainless steel stock, as well as the hose clamps and most of the A2 stainless fasteners I used.

As I've eliminated the OEM plastic read fender entirely (well, except for the battery box I carved out of it!) the two locating lugs in the taillight housing have nothing to fit into, so brackets like these will support it instead. The locating lugs actually may be more to locate the taillight than support the fairing, but I think it's a good idea to pull everything together using the OEM mounting points/lugs.

[image: gallery_362_5959_102566.jpg]

P1030034x The Lasers will mount to the stainless steel plate above, using the captive nut brackets Dan fabricated and welded onto them. (Unfortunately, sized perfectly for UNC nuts! I will have to grind down some M8 nuts to make them fit.)

One reason I didn't drill the mounting holes was because I had to find the right stainless steel fasteners to go with those captive nut holders... I decided to use 55mm M8 fully threaded cap screws in conjunction with several locking nuts in order to achieve a degree of adjustability and sufficient support. (Looking at the nuts again, I think both of the middle ones should be locknuts.) I would have preferred socket caps, but could not find them fully-threaded, and I need the thread to accomplish the adjustment. M8 stainless "allthread" would have worked, too.

[image: gallery_362_5959_12892.jpg]

P1030063x M8x55 A2 stainless steel fully threaded cap screw & nut arrangement for supporting the rear of the Lasers

[image: gallery_362_5959_146786.jpg]

P1020947x Laser underseat y-pipe, fabricated by Dan Dreisbach (and polished by Jim!).

[image: gallery_362_5959_129231.jpg]

P1020948x Laser underseat pipework.

[image: gallery_362_5959_101660.jpg]

P1020961x Top of the undertray, showing cut-down battery box, Penske reservoir, PowerCommander V and Autotune.

The undertray's location was determined by the clearance necessary for the Lasers, and doesn't leave much space under the seat, but all of the electronics fit, as well as the Penske remote unit, the tool kit and even the lug wrench, extension and owner's manual. The battery box was cut out from the OEM rear fender and attached to the alloy undertray with two M5 button-head cap screws. It actually rests on the subframe crossbar, so apart from the angle (which is close), the battery effectively sits in the OEM position. I've also got a Corbin Smuggler (single seat w/trunk), which pretty much color-matches the rest of the bike, but the fit is apalling. Something's warped--and I'm not sure what or who... dry.gif

Dan also welded a bung into the final collector section of my Erion headers, into which the Autotune sensor fits. I intend to set-up the fueling using Dan's PCIII maps, converted to PCV format, and not hook-up the Autotune until I have a good base map for the supercharger. After that, it may be useful--or for sale!

[image: gallery_362_5959_60178.jpg]

P1020965x Dynojet Power Commander Autotune sensor installed in Erion header (custom location)

So, this is how the bike currently sits in my California garage:

[image: gallery_362_5959_39135.jpg]

P1030052x Right-front of the bike at the end of Part 1.

[image: gallery_362_5959_164693.jpg]

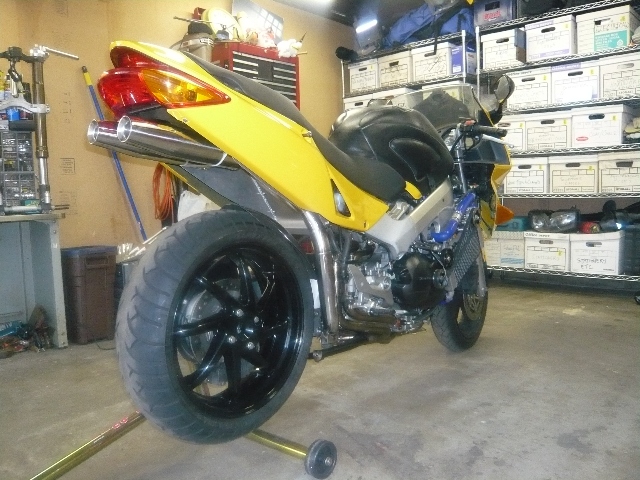
P1030049x Left-rear of the bike at the end of Part 1.

gallery_362_5959_127829.jpg

P1030050x Right-rear of the bike at the end of Part 1.

[image: gallery_362_5959_110790.jpg]

P1030048y Some things to come. RC51 SP1 forks, lower triple, axle, spacers and wheel, 900RR yellow mudguard (same color code as the Y2k VFR) and 929/954 upper triple clamp. Lurking behind is my prototype xenon retrofit headlamp.

Sometimes, I do finish my motorcycle projects...

...but not this time! This is end of Part I of this story; sadly, family and other commitments meant that I simply ran out of time and decided it would be best not to rush the last couple of supercharger install steps and break-in, or the finalisation of the Laser underseat install. Part II will follow in a few months, when I return to California, and will include (hopefully) a running bike, as well as a "Frankenviffer" RC51 SP1 fork conversion and (possibly) my Xenon retrofit headlight conversion. Perhaps then we shall all see just how dangerous is the Yellow Peril...

Ciao,

#2

All I can say is "Wow..."

#3

Everything looks groovy, except the name..............

#4

One word.

Drool.

#5
maddog

One word.

Drool.

I was thinking Schwwwaaaiiiinnnnggggg.............

#6

You made me puddle :mellow:

Now all you need to do is crate her up and send to meeeee!

Although I'd settled for that SP1 lower.

We really need more video of these... hint hint :biggrin:

#7

When you are all done with it, it would be so much nicer if you'd sell it to me, and I'll give you mine, and swap my white/black bodywork onto the supercharged Y2K!!!! :cheerleader:

Bravo Sir, nice work!!!!!!!!! Colour me Yellow with envy. Or Green, or summat. :fing02:

#8

Who here has two thumbs and is jealous? Yea. That would be me.

Man. I'd love a bigger set of pipes.

Edited June 10, 2011 by Ranger77
#9

That's one helluva way to turn fuel and air in to horsepower. The hoses / plumbing / exhaust looks like it belongs on the Space Shuttle . . .

#11

The Mother Of all Flying Bananas :fing02:

I think that after 13.5 years, I wil have to clean my sprocket area............. :biggrin:

#12
Dutchy

The Mother Of all Flying Bananas :fing02:

:laughing6-hehe: :laughing6-hehe:

Nice Bike!!!! Can't wait to read about Part II...

#13

Fantastic project, thanks for the great write up :fing02:

#14

I'm not sure which I'd enjoy more... having the financial freedom to take a project to that level, or being satisfied without it and having my bike 30 feet away and ready to ride every day. Hmm...

#15

Love it... it's wicked... now you just need to custom paint the fairing... after all, it is no longer a stock Y2K VFR.

#16
SEBSPEED

I'm not sure which I'd enjoy more... having the financial freedom to take a project to that level, or being satisfied without it and having my bike 30 feet away and ready to ride every day. Hmm...

It appears he has plenty more in his garage to pick from to ride every day. :blush:

It is quite a project though. :fing02:

#18

This was fun helping a fellow board member with a project. He even got his underseat fab'd cheaper than mine!

Dan has a 5th gen OEM set of headers and can make this for anyone now, OEM, TBR or Erion.

John is a great guy to get this done for.

#19

I suck at waiting and to see this finished in a couple of months....ugh. :dry:

Totally worth the wait though. Great job thus far. Looking forward to the finished project and break in ride report. :fing02:

#20
vanion2

I suck at waiting and to see this finished in a couple of months....ugh. :dry:

You're tellin' me?!? :biggrin:

I was considering waiting on the build thread until it was actually done, but no way could I have survived even a few months without some sort of catharsis!

So, you guys get half a build thread, and I am able to digest food again... :fing02:

Seriously, thank you all for the kind words. I think the project is coming along nicely and I'm currently trying to get back over there ASAP to finish it...and go for a ride!

I've got a long list of bits and bobs that I noted during Part I that were missing or would have been nice to have, so I'll be rounding up those things (e.g., o-rings, OEM fairing fasteners, more suitable stainless fasteners, a CompuFire reg/rec) in the mean time. I'd also like to prep for the fork swap a bit more (it's been a while since I collected the parts), so this breathing space will be useful. Stay tuned!

Ciao,

#21

[image: View Post]The mailman, on 11 June 2011 - 02:36 PM, said:

[image: View Post]timmythecop, on 09 June 2011 - 06:47 PM, said:

Everything looks groovy, except the name..............

Killer bike mods but who's in peril? ...sorry... ?

I'm guessing mostly his driver's license . . . :biggrin:
#22

[image: View Post]The mailman, on 11 June 2011 - 02:36 PM, said:

[image: View Post]timmythecop, on 09 June 2011 - 06:47 PM, said:

Everything looks groovy, except the name..............

Killer bike mods but who's in peril? ...sorry... ?
I probably should have mentioned that!  It's mostly a pun on the bike's color, "pearl yellow", and the potential of the modifications to endanger life and limb--but it's also partly my most sincere two digits for the PC mob.   :wink:

Ciao,
#23

[image: View Post]JZH, on 11 June 2011 - 04:04 PM, said:

[image: View Post]timmythecop, on 09 June 2011 - 06:47 PM, said:

Everything looks groovy, except the name..............
I probably should have mentioned that!  It's mostly a pun on the bike's color, "pearl yellow", and the potential of the modifications to endanger life and limb--but it's also partly my most sincere two digits for the PC mob.   :wink:

Ciao,

...and Timmy should have mentioned that he made the comment because he's been calling his bike "the yellow peril" since he joined the board...   :biggrin:
#24

[image: View Post]SEBSPEED, on 11 June 2011 - 05:37 PM, said:

[image: View Post]JZH, on 11 June 2011 - 04:04 PM, said:

[image: View Post]timmythecop, on 09 June 2011 - 06:47 PM, said:

Everything looks groovy, except the name..............
I probably should have mentioned that!  It's mostly a pun on the bike's color, "pearl yellow", and the potential of the modifications to endanger life and limb--but it's also partly my most sincere two digits for the PC mob.   :wink:

Ciao,

...and Timmy should have mentioned that he made the comment because he's been calling his bike "the yellow peril" since he joined the board...   :biggrin:
Who'd a guessed!

Ciao,
#25
sa1713

This was fun helping a fellow board member with a project. He even got his underseat fab'd cheaper than mine!

Dan has a 5th gen OEM set of headers and can make this for anyone now, OEM, TBR or Erion.

John is a great guy to get this done for.

Looks great, congrats! :fing02:

That underseat would be so nice with my TBR system.... <drool>

#26

Bike porn. Well done, sir!

Cheers! Bravo!

#27

Ya know. You could be super cool and find a machinist/exhaust guy to copy those lovely pipes since no one makes any more for us. I'm sure some would like to have a set. :bliss:

Edited June 11, 2011 by Ranger77
#28
rangerscott69

Ya know. You could be super cool and find a machinist/exhaust guy to copy those lovely pipes since no one makes any more for us. I'm sure some would like to have a set. :bliss:

You didn't see this pic:

gallery_362_5959_111696.jpg

And the accompanying text?

With this jig, Dan can make as many similar y-pipes as he wants. Too bad the number of people with TBR or Erion full systems and Laser Xtreme end cans handy is somewhat limited! I imagine if other exhausts could be provided to him, he could probably fabricate other underseat exhausts as well, but I don't know for sure about that.

plus this?

sa1713

This was fun helping a fellow board member with a project. He even got his underseat fab'd cheaper than mine!

Dan has a 5th gen OEM set of headers and can make this for anyone now, OEM, TBR or Erion.

John is a great guy to get this done for.

#29

I thought he was just talking about the mid pipe and cans.

Would like to know what the price would be to have a set made with regular exit port position. I'm sure high but a number thrown out just so we can know.

Edited June 11, 2011 by Ranger77
#30
rangerscott69

I thought he was just talking about the mid pipe and cans.

Would like to know what the price would be to have a set made with regular exit port position. I'm sure high but a number thrown out just so we can know.

Scott, I think you were right the first time! AFAIK, Dan wouldn't be able to fab a complete set of headers: You'd have to have either TBR, Erion or OEM headers, already (Motad/Predator should also work, as they are copies of OEM), and he could supply the connector pipe and the undertray (if desired). I would expect the y-pipe only would cost somewhere in the $5-600 range (but would likely depend on volume). You'd also have to sort out the undertray yourself and find a set of Laser Xtremes like Jim and I did. I think Jim's were two from a VTEC set of four, but mine were from a CBR600RR, and I think Laser still makes them for many different bikes.

Some of you may have noticed that I have yet to tackle the "license plate problem", but Jim had Dan make a neat titanium bracket. I'm not sure what approach I'm going to take for that--something else to think about during these coming weeks... :blush:

Ciao,

#31

I thought he was just talking about the mid pipe and cans.


Oh sorry, I was reading that wrong. Carry on then........
#32
<==== making his "oh" face and looking at these pics. :wub: Fantastic.
#33
So it is true then...Yellow VFRs are the fastest!

Isn't it a little tough living in London and the US? A 10 hour plane ride just to go hop on the Viffer must be brutal!

The bike looks friggin awesome...no doubt about that. But do you have to undo all that SC plumbing to change the oil filter? (geez...I sound like my Dad...)
#34

Everything looks groovy, except the name..............


Killer bike mods but who's in peril? ...sorry... ?
#35

[image: View Post]Veefer800Canuck, on 11 June 2011 - 06:14 AM, said:

[image: View Post]rangerscott69, on 10 June 2011 - 11:25 PM, said:

I thought he was just talking about the mid pipe and cans.

Oh sorry, I was reading that wrong. Carry on then........

Sorry for the delay but I will check with Dan in about a week to see if he'd be interested in fabing up headers.
#36
Digging the coolant hoses!  I have to do mine as I have a leak in the V (again).  Thinking of going this route.

Any tips?  I culled the list from the thread you mentioned, I'll source them locally if I can.

Quote

If you want to copy this you will need to order the list below. I tried using armoured flexi hose for the hose that wraps round the front of the generator & the lower hose from the right rad to the Y piece, but it would not seal on the upper mount or the Y, so it got replaced with straight hose & 2 x 45degree bends.

The list;-
3 x 45degree 25mm id elbow (one for lower left rad to Y, 2 to make hose round generator cover)
1 x 90degree 25mm id elbow (Thermostat to right rad fill cap, lower half)
1.5M straight 25mm id hose (Thermostat to right rad fill cap, upper half / Rad to Rad top hose / Water pump to Y / Right rad lower to Y )
0.5M straight 11mm id hose (Water pump to Thermostat bypass hose)
0.25m straight 19mm id hose (Front & Rear cylinders to Thermostat / Front to Rear cylinders above generator. Just enough so measure carefully)
1m straight 6.5mm id hose (Thermostat bleed to front inside top of right Rad)
0.25M straight 25mm OD Alloy Tube (to use as joiners on 2 piece right rad hose (75mm) & 2 piece round the generator hose (62mm)
4 x 25-35mm Hose clamps (to join the 2 piece replacement hoses)
Any additions to the list above?
Edited by y2kvfr, 18 January 2012 - 09:25 AM.
#37

[image: View Post]Cogswell, on 11 June 2011 - 02:59 PM, said:

[image: View Post]The mailman, on 11 June 2011 - 02:36 PM, said:

Killer bike mods but who's in peril? ...sorry... ?
I'm guessing mostly his driver's license . . . Posted Image
Having gotten to compare the Phase I Torocharger to a stock bike, I'd say that punk up the road on a zx10/gsxr1000 or that ilk.


[image: View Post]sa1713, on 15 January 2012 - 02:13 PM, said:

Sorry for the delay but I will check with Dan in about a week to see if he'd be interested in fabing up headers.
Please do as finding copies of the Erion or TBR headers is getting harder and harder
I'd love a reasonably priced copy of the Erion or TBR. I'd love to do the underseat exhaust, but I've already seconded that space for my HHO cell so I'm stuck with either a narrow oval high pipe or standard angle low pipe option.


[image: View Post]y2kvfr, on 16 January 2012 - 09:23 AM, said:

Digging the coolant hoses!  I have to do mine as I have a leak in the V (again).  Thinking of going this route.
Any tips?  I culled the list from the thread you mentioned, I'll source them locally if I can.
Any additions to the list above?
JZH said there was a smaller diameter hose that needed a 180 bend that he did not source.

And Trav, can you post where you manage to source them please?
My local source is hung up on the Samco hoses.
#38
There's a pic of that hose in my first post.  I think it's the one for the fast-idle wax unit, so only on Y2k and '01 bikes.  My US source was Flex Technologies in Torrance, CA.

Ciao,
#39
Yup, one o them there eye-Talian dew-catties. I seen one before.
#40
That's good news. I hope you have enough spare time to finish her up and put some miles on her before heading back to HK.
#41
Pics or it didn't happen! :tongue:
#42
That exhaust is amazing!


I have the Two Brothers Titanium full system from back in 2000.
It would have been nice if they could have run the pipes under the bike.
I have one which drags the road often.
#43
Hey JZH - um, well gotta ask - Are you going to do any dyno runs and charts? How 'bout a few quarter mile runs for grins. - I bet I'm not the only curious foole on this stuff.... :rolleyes:
#44
It's a good question! Firstly, I wouldn't know where to take it for a dyno run. It's been a long time since I've lived in this area, so the only shop I know (and actually did use for set-up work many years ago) is Vance & Hines, but I don't know if they actually work on customer bikes these days. Secondly, while it would be interesting to see the numbahs, I've seen others' numbers, so it'd only really be for bragging rights--and I don't really care about that. But we'll see. Maybe once I've got some miles on the bike I'll be more curious to get objective confirmation of the results of spending all that money!

Ciao,
#45
Well if you put it on the dyno, You should be able to see the flat spot you mentioned.
As well as deal with any single cell anomalies in the PCV map worked out.

Congratulations on getting it running in the end. I just had a freshly cleaned injector fail on a friends car, sticking wide opened.
It's very frustrating when that happens, particularly when its a vendor you deal with often and they do provide before/ after documentation.

I'm about to swap the RC51 for another 5th gen, so that I can keep riding while I take care of projects.


Any updates on the HID projectors??
#46

Pics or it didn't happen! :tongue:

[image: P1030904x.JPG]

Now it happened! :happy:

Ciao,
#47

Well if you put it on the dyno, You should be able to see the flat spot you mentioned.
As well as deal with any single cell anomalies in the PCV map worked out.

Congratulations on getting it running in the end. I just had a freshly cleaned injector fail on a friends car, sticking wide opened.
It's very frustrating when that happens, particularly when its a vendor you deal with often and they do provide before/ after documentation.

I'm about to swap the RC51 for another 5th gen, so that I can keep riding while I take care of projects.


Any updates on the HID projectors??


In my experience, more bikes just means more unfinished projects! :tongue:

I just realised that I probably don't have a map installed in the PCV, which could explain the poor fueling... :ohmy: This is what happens when there are long delays between days working on the install, I guess. Time to steal the wife's laptop for a little garage action!

As for the next stage, it will probably be the front forks, as the Penske out back is making the OEM front forks feel entirely inadequate. Hope I've got all of the RC51 swap parts...

Ciao,
#48
Well, you could always let it go for a song after you've gotten it all running well.

After all, you'll be in the Far East, and it'll need a good home.

How much are one-way tickets to LA anyhow......... :tour:
#49

In my experience, more bikes just means more unfinished projects! :tongue:

I just realised that I probably don't have a map installed in the PCV, which could explain the poor fueling... :ohmy: This is what happens when there are long delays between days working on the install, I guess. Time to steal the wife's laptop for a little garage action!

As for the next stage, it will probably be the front forks, as the Penske out back is making the OEM front forks feel entirely inadequate. Hope I've got all of the RC51 swap parts...

Ciao,

Oh agreed, more bikes or more anything else equals more projects....
That's why I'm swapping my RC51 that I never had time to make a track bike out of for a second 5th gen.
It not gaining a new bike so much as gaining another VFR.
It will be good for running around town on AND as a mockup dummy for projects.
#51
Update: By "poor fueling" I meant it stumbled all over the rev range, but in particular just over 5,000rpms. Went for a ride yesterday--and before the ride I had re-loaded the PCV map, but nothing changed. Riding in the twisties with an fluffy throttle response is no fun at all! So...what's the update, then? :huh:

Well, when I got back home I was wondering what I could do to solve this problem when I remembered that I had an un-used PCIII USB (which I had purchased before learning that the PCV/Autotune could be used on a 5th-gen), so I swapped that for the PCV and loaded the same (but unconverted) map I had been using in the PCV: The bike now runs great!

So, maybe the PCV's map conversion feature doesn't work entirely? Or maybe my PCV is faulty? Clearly, I still have some problems to work on...but I also now have a properly running bike! :tongue:

Ciao,
#52
I would love to see and hear a canyon ride recorded with an on-board cam! Congrats on success with your project...
#53
Update: Bike with PCIII runs great; bike with PCV runs bad (same A&A-modified base map, which was created as a PCIII map). I've converted the PCIII map using the PCV software a couple of times, so at least it is consistently bad, but I have no idea what is wrong at this point.

One potential cause I'm considering is the PCV's requirement (?) to tap into the speed sensor and water temperature sender wires on the VFR: the PCV instructions are written for an '09 VTEC, but I've determined which of my Y2k's wires are the equivalent (it was pretty easy, given access to wiring diagrams for both bikes and the fact that Honda used the same wire colors) and tapped into those wires at the gray PGM-FI connector. However, I managed to damage my gray connector whilst removing the wire terminals, such that one of these wires backs out of the connector when it is attached to the PGM-FI unit. Accordingly, my speedo readout and odometer do not get the speed signal. (Wiring harness from eBay on its way...) When I first got the bike running with the PCV I did not have either of these sender wires connected, either, so I'm wondering if the problem isn't the PCV map conversion, but the lack of these signals being fed to the PCV?

One other thing I can try is to take the Autotune out of the circuit (I'm not sure it's even working at this point), but I think I tried that in the beginning with no difference.

Ho hum, another project bike day at the office... :smile:

Ciao,
#54

Update: Bike with PCIII runs great; bike with PCV runs bad (same A&A-modified base map, which was created as a PCIII map). I've converted the PCIII map using the PCV software a couple of times, so at least it is consistently bad, but I have no idea what is wrong at this point.

One potential cause I'm considering is the PCV's requirement (?) to tap into the speed sensor and water temperature sender wires on the VFR: the PCV instructions are written for an '09 VTEC, but I've determined which of my Y2k's wires are the equivalent (it was pretty easy, given access to wiring diagrams for both bikes and the fact that Honda used the same wire colors) and tapped into those wires at the gray PGM-FI connector. However, I managed to damage my gray connector whilst removing the wire terminals, such that one of these wires backs out of the connector when it is attached to the PGM-FI unit. Accordingly, my speedo readout and odometer do not get the speed signal. (Wiring harness from eBay on its way...) When I first got the bike running with the PCV I did not have either of these sender wires connected, either, so I'm wondering if the problem isn't the PCV map conversion, but the lack of these signals being fed to the PCV?

One other thing I can try is to take the Autotune out of the circuit (I'm not sure it's even working at this point), but I think I tried that in the beginning with no difference.

Ho hum, another project bike day at the office... smile.png

Ciao,


I'd bet that there are a bunch of cells that have funky trims after the conversion from the pcIII map.
When I got my PCV on my VFR, I forget who's map I copied and converted, only to have it run like crap.
Then I hand copied the cells from the PCIII to the PCV and surprise it was a world better.
Also don't forget to get Coderiter's vacuum switch to cycle the autotune off on long closed throttle operations.
Otherwise you will have a stumble that seems to move all over the place.

I wish there was a way to convert PCIII map to a target AF table.
My '99 is supposed to have one of the best PCIII maps in existence for TBR exhaust.
But if I want to run the Autotune, I have to translate each of the cells to an AF ratio.

Anybody out their have a way to do that???
#56

Might not be mine.  He did at least two!  Only one way to find out if he's still got the jig. 

It's certainly a shame that A&A isn't in the kit business anymore--just as its a shame Dynamo Humm isn't making 870cc kits anymore...

Ciao,


#57

The e-mark on the exhausts is a plus.

As for "household goods", 30+ years ago (yes, a long time) I relocated back to the Netherlands from Scotland. Brought my Uk bought/regististerd Lemans 1000 with me. Bone stock with Lafranconis with the "turbine blade" exit.

The RDW inspector was a mc bike nut, but did mention that the Db test might just prove a bit tricky.

It proved to be the case, so he moved the microphones back, enough the reach the allowed limit (yes, Dutch like rules, but where needed, try and be reasonable).

 A recent visit to the RDW with a pal (Waddinxveen station) proved that there is less realistic RDW staff around.

The Italian paperwork stated manufacturer "Moto Morini SPA", model "350 X3"

He registered model "SPA 350 X3", unwilling to accept (or check) that  in Italian, S.p.A. stands for Società per Azioni, which is a public limited company by shares.  We got the registration, so goal achieved. But WTF?

The bike's blue so Marco is now known as Smurf riding SPA Blue.... 

[image: IMG-20251129-WA0001.thumb.jpg.9b6bf3cb9dd0cf0183422700314acb57.jpg]

:goofy:

And oh yes, Morini did not assign/stamp an identification/serial # in its 350 engines. 

Well, this guy knew better, made up a number and told us that we'd had to stamp that in ourselves (some day)... yeah right.

Cue the end of RATM's "Killing in the name of"...

(None of my Morini pals (me included) were ever told to do this when taking a 350 to the RDW.)

Ergo? Your mileage may vary, just do not start arguing with the RDW.

You've dealt with many of these types before in your line of business no doubt 🙂

FYI only:

Arguing with the police is OK in my country and won't get you shot BTW...  :laugh:

#58

Just realised...

Your "household inventory" apllies being exempt to the luxury goods tax (BPM) on motorvehicles.

[image: Screenshot_20260201_163547_Chrome.thumb.jpg.332e23b5c1d96726b44a7b3c34e0a565.jpg]

#59
Dutchy, 2/1/2026 at 4:36 PM

Just realised...

Your "household inventory" apllies being exempt to the luxury goods tax (BPM) on motorvehicles.

Indeed, it does!  It's the only "economical" way to import expensive items into NL (and presumably, other EU countries).  It isn't very economical, though, because I still have to pay for (a) customs clearance, (b) RDW vehicle inspection and (c) annual road tax for each vehicle.  If I had to pay BPM, too, I'd have had to stay in the UK! 

(Thanks for the warning about Waddinxveen RDW--that's my closest inspection station!)

In any case, I think I will also take your advice about doing the mods after the inspection.  It's also easier and quicker to just get the bike roadworthy (so, new tyres, battery, brakes bled, etc.) than trying to "perfect" the bike in one go.

Ciao,

JZH

End of thread · 59 posts recovered Wayback Machine snapshot 22 Apr 2026