[image: med_gallery_554_5200_1287797.jpg]
This here is a fixit story, one with a sad beginning and hopefully a happy ending.
For everyone who told me to buy another bike and move on, you were right. :beer:
I should have bought my wreck back for $650, bought another used Viffer, transferred over my mods and farkles over time, then EBAYED anything leftover that had any value or worth. :blush:
Instead, I trusted the "structural engineer" from the insurance company who never said that the frame was bent. In my narcotic-addled mind, fresh out of the horsetable, it looked to me like the forks were bent. And I ASS-umed that if the frame had been bent, it would have been given "non-repairable" status rather than "repairable salvage" that they assigned to it. :mad:
Had I known it was the frame, I would have gone another route. There is a 5th gen on canadatrader.com with ONLY 12,000km at the moment. They want FAR too much money for it, but it's at a dealer, so you know, everything is negotiable, right? :491:
So here I am with a roomful of boxes, boxes full of shiny new (and grimy used) parts, bought and paid for, and I'm so far down the river now that it's too late to turn back.
The only upside is that I'm still spending insurance company money, and not my own. I had figured already (if not for the bent frame) that I'd have about $1500-$1800 surplus from the insurance money, but at this point, as reality is setting in, I'll be right about the break-even point by the time I pay to get a new VIN assigned to the new frame, and pay for a safety inspection. sad.gif
Could be worse, I could be upside-down on the whole deal but I'm not.
Which brings me to my thread title:
GET BENT
(or, how I learned to stop worrying and love my bike!)
Where to begin, aaah, how about here:
[image: gallery_554_5200_1052713.jpg]
I am now the "official keeper of the sport-touring dot net cane". :biggrin:
Sidestory:
And, well, I probably would have had a better handle on this whole GET BENT! deal had I not inherited a BIG problem from my stunningly beautiful eldest daughter late last year.
Seems that she blew the motor in her car, ran it right out of coolant, probably from a leaky head gasket, and seized the motor solid. SO, Daddy spent all of December and most of January yanking the motor from her car WITH A BROKEN FOOT! and installing a new (used) one.
A: I move slow, B: my friggin foot and shoulder hurt so I could only work on it for short periods, then rest for a couple of days C: I was also back at work full time since Oct 23rd, so that leaves only 15 days per month free to do anything at all, so you can see why it took so damn long. Add in Xmas, New Years, blah blah, blah, good thing I don't charge by the hour. Actually, I did it for free. I must be nuts. :blink:
Good news is that the 1997 Fjord Tortoise lives again with a low-mileage, solid engine, and my daughter's "social life" only suffered a minor setback. :rolleyes:
Thanks Dad!
/Sidestory.
Now where were we? Oh yeah, time to GET BENT!
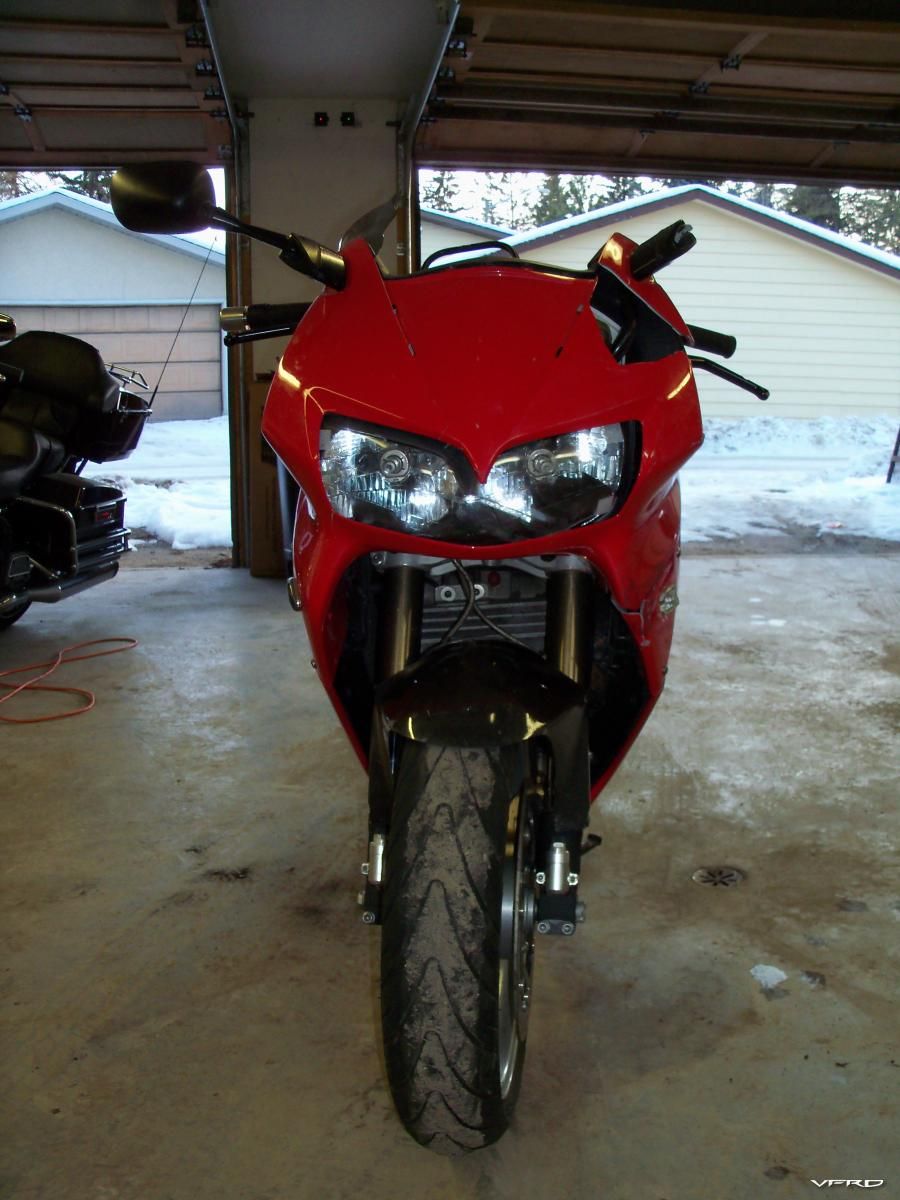
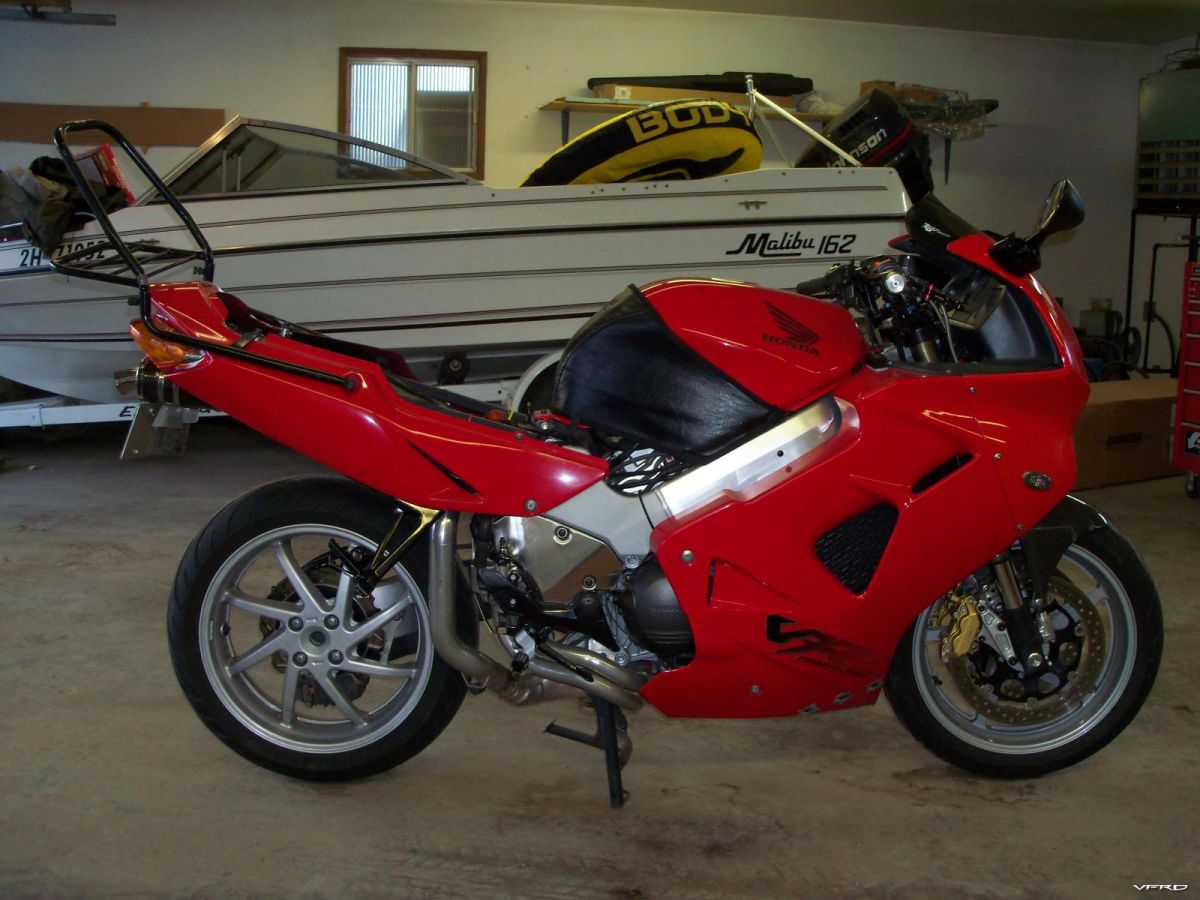
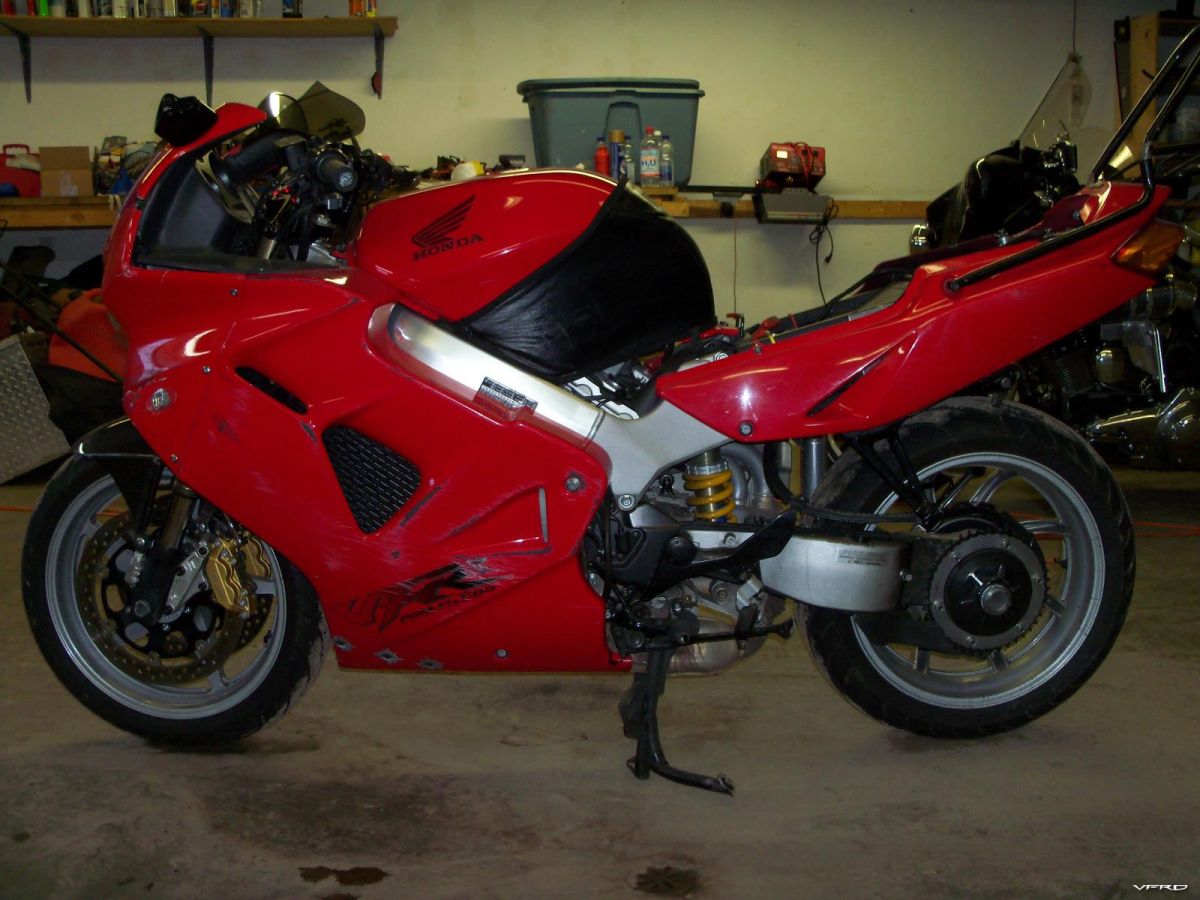
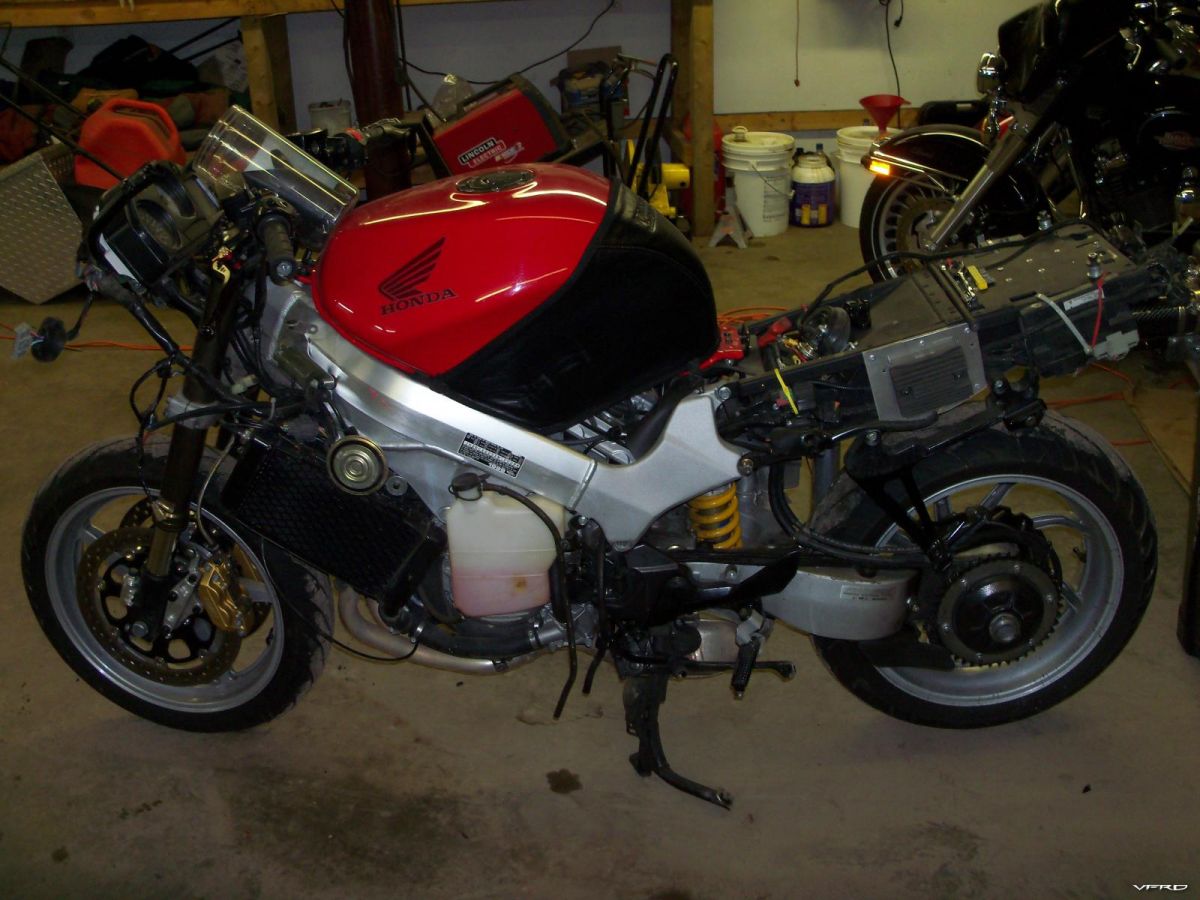
After stripping off all the plastics (and I still had my original cowl left from before the De-dumbo mod) here is what I have left for serviceable plastics:
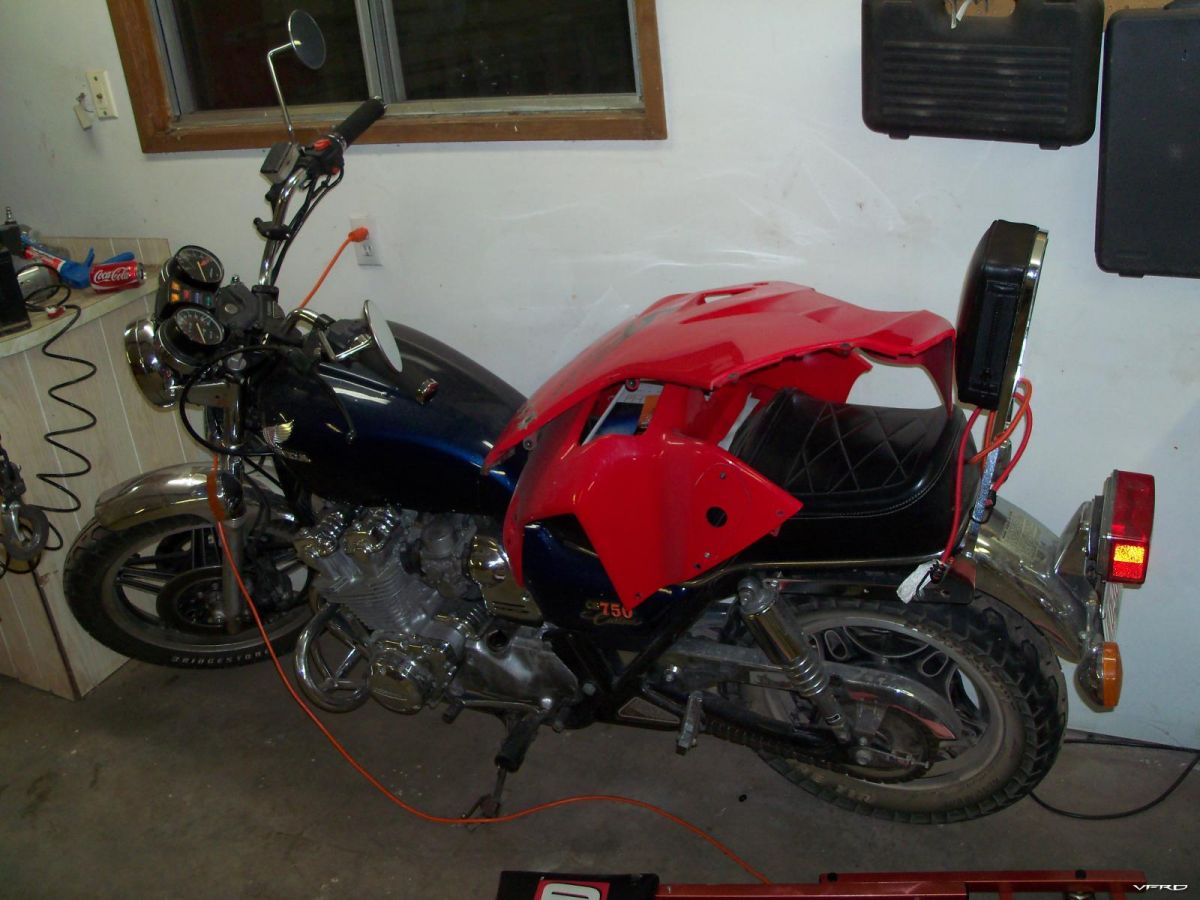
No, the CB is not mine. It belongs to my buddy Wes.
I already have a new/used rear cowl, left cowl and VTEC tank, as well as a gauge surround and inner fairing "V" panel. Thenks EBAY.
And that's the best part, those two good body panels. It goes downhill from there. Well, more like a permanent right-hand turn than downhill....... :goofy:
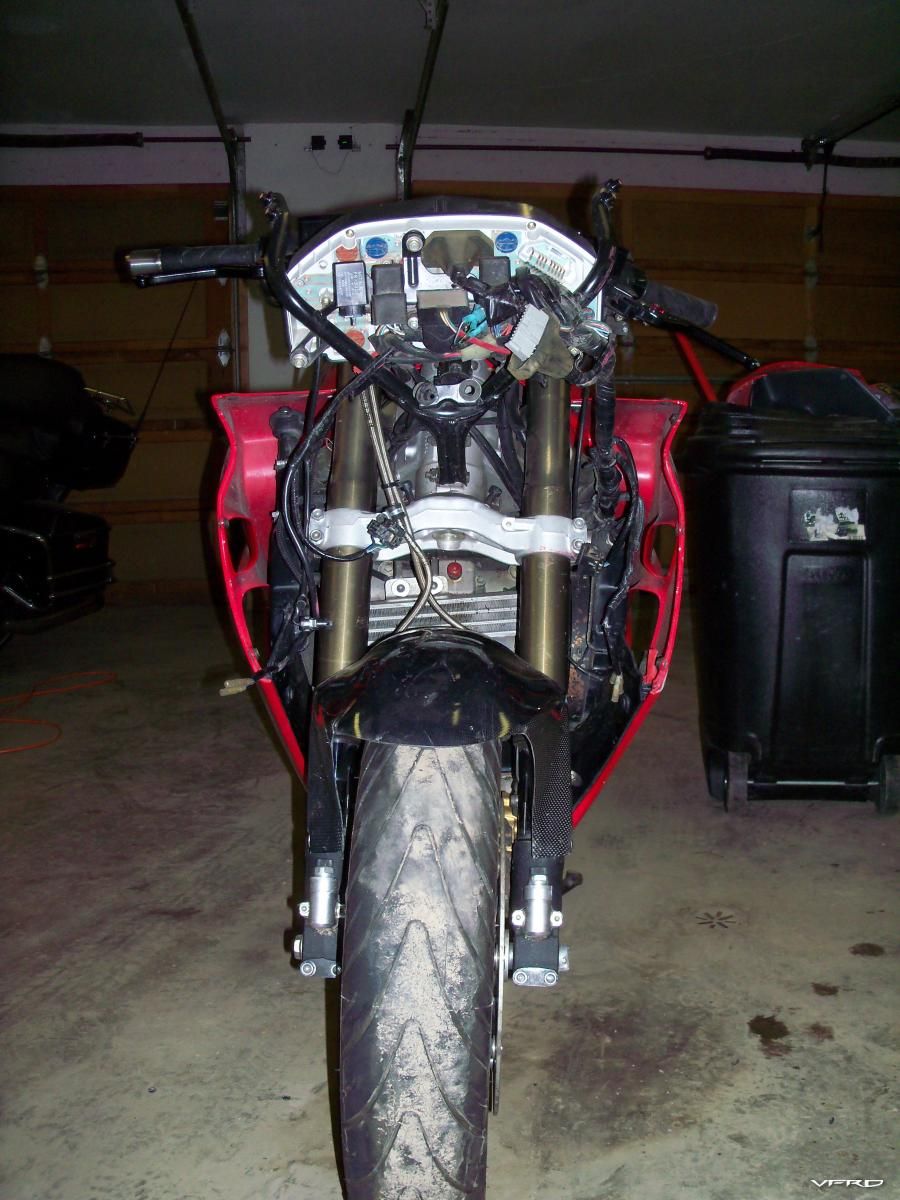
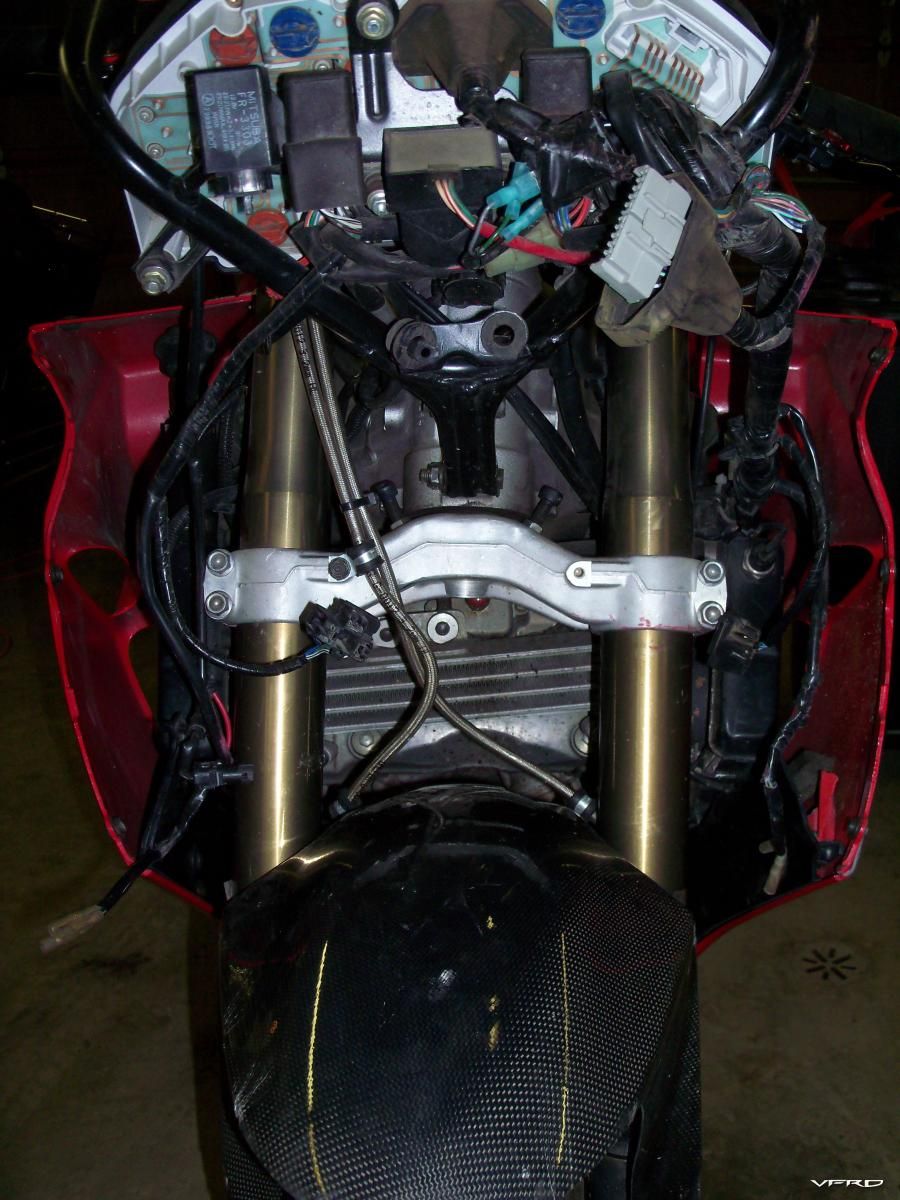
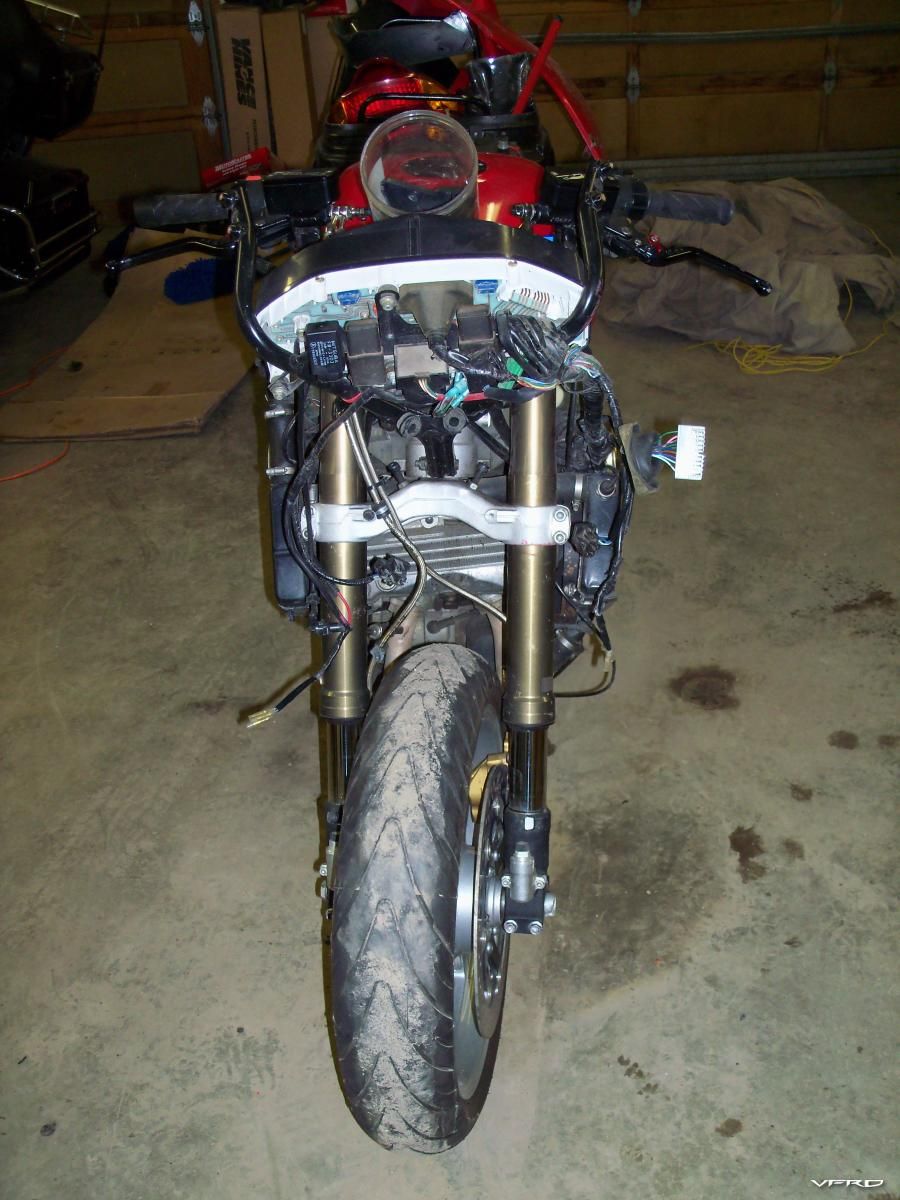
And that is how she sits at the moment. Monday, call the insurance company, enquire about Ubuilt assigned VIN# and how it may/may not affect the insurance coverage/rates, then order new frame from RonAyers.com.
After that, siphon the fuel from the tank and see how the VTEC tank mounts up. You might be able to see a slight dent in the tank, just below the Honda wing:
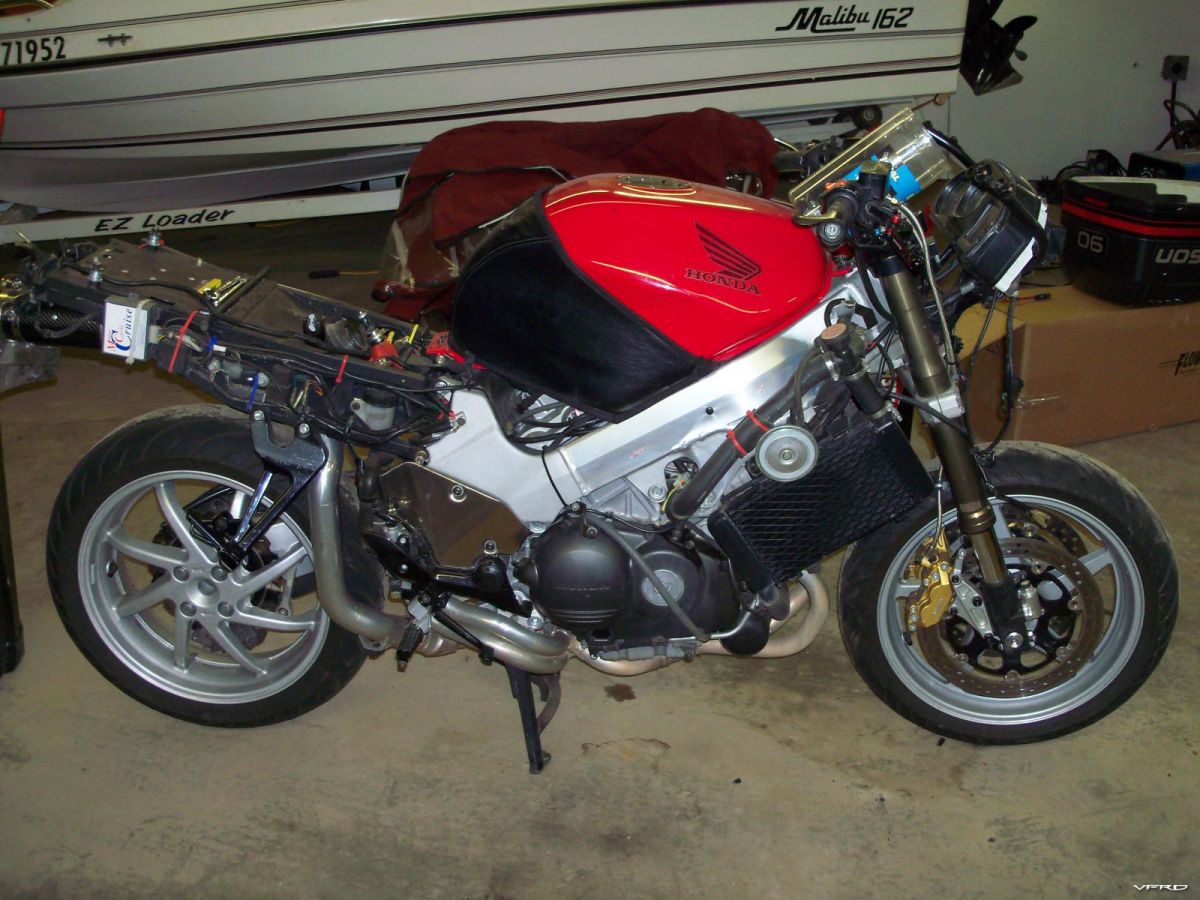
Once I get the VTEC tank fitted (I even bought a rear tank hinge for a VTEC as well), then it box up all the parts and send them to Andrew Swenson for paint.
Stay tuned for more updates as things happen. :comp13:
Edited February 23, 2010 by HispanicSlammer
edited to feature, removed emoticons that interfered with charactor cutoff
As always, best of luck Rob. These things happen. About buying a new frame, are you having no luck at all finding a used one? How long have you been looking?
I'm wondering if you'll be better off by biding your time a bit with trying to find a used one. I'm sure you're anxious to work on it, but is it worth spending an extra thousand bucks for the pleasure of doing it NOW, when you can't even ride it yet anyway? New frames will always be available, but a good deal only comes around once in a while.
In the meantime, there is plenty to keep you busy! Clean, polish, paint, repair, restore, etc... maybe take a page from my book? I've been reassembling my 83 750 for what, 2 years now? :beer:
Good luck Rob, that's going to be a fair amount of wrenching. Does give you that chance for custom paint. Any possibility you can go back to the ins. co. for more money to cover the frame since it was their oversight?
How did the forks come through? They look twisted in the triples but not obviously bent.
SEBSPEED
As always, best of luck Rob. These things happen. About buying a new frame, are you having no luck at all finding a used one? How long have you been looking?
I'm wondering if you'll be better off by biding your time a bit with trying to find a used one. I'm sure you're anxious to work on it, but is it worth spending an extra thousand bucks for the pleasure of doing it NOW, when you can't even ride it yet anyway? New frames will always be available, but a good deal only comes around once in a while.
Well, I've been researching used frames, and all the ones I can find are already listed on CARFAX as having been in a wreck. SO, I takes my chances on a frame that may or may not be straight, has a salvage title, pay ~60% of new for it, pay $180 shipping on top of that, and the RIV doesn't recognize it as being a "vehicle", therefore I cannot "import" it, so I have to get a newly assigned VIN anyhow for $400, THEN after it's all assembled, the reassembled bike will STILL bear a salvage title for the rest of it's life, as the used frame came from a donor vehicle that was in an accident.
At least with a NEW frame, I am guaranteed it'll be straight, and the procedure for getting a VIN is the same, but when I'm done, since the frame is not from a salvage vehicle, I only have to pass a safety inspection, not a salvage inspection, and will have a clean non-salvage title on the bike.
{sigh} As well, it's still insurance money I'm spending, none out of my own pocket.
The only way I could get around this is to find a Canadian frame with no salvage designation, and the only way I can think that might happen is if the owner had an accident like a simple lowside, didn't report the accident, and parted out the bike. Highly unlikely. OR, the motor went and he parted out the bike. Again, highly unlikely to have a blown motor in a 5th gen.
I can call Re-cycle in Stony Plain tomorrow and ask, but I'm not holding my breath.
In the meantime, there is plenty to keep you busy! Clean, polish, paint, repair, restore, etc... maybe take a page from my book? I've been reassembling my 83 750 for what, 2 years now? :beer:
Yeah, I could be like you or Murray, but I don't have anything else to ride, and I really, REALLY want to go the the PNWVFR meet in Oregon in August.
vfrcapnGood luck Rob, that's going to be a fair amount of wrenching.
Actually, I'm going to take a cue from rufrydrsc2 and leave the majority of the bike intact and just lift the frame off the motor like he did here:
And if I can pop out a 3.0 V-6 with one leg, I should be able to tackle this. Speed records will be not be set however. NASCAR pit crews will not pheer for their jobs just yet. :happy:
Does give you that chance for custom paint. Any possibility you can go back to the ins. co. for more money to cover the frame since it was their oversight?
How did the forks come through? They look twisted in the triples but not obviously bent.
The property damage claim is signed off as complete, and in the fine print of course, it says that there is NO legal recourse for further damage claims whatsoever on into infinity, etc........
The bodily damage is a whole different kettle of fish and entirely separate from the property claim.
The forks I have not measured yet, but will when they are removed. The LH one has the forward fender mount tab snapped off, but I have the tab, and it would be possible to JB weld it into place and repaint the lower portion of the fork.
I DO have another set of RC51 forks in good shape.
I don't have any fancy V-blocks or such for measuring, but I was thinking of gently chucking the fork legs up into the metal lathe at work, on the topmost part of the fork where the upper triple and clipon normally mounts, then starting the lathe VERY slowly, and work it up easy to a reasonable (slow-ish) speed that would show any bend in the fork as an off-center wobble. Clamping say, a popsicle stick in the lathe's tool mount should show any runout as increasing/decreasing clearance, no?
Do you think this would work? :comp13:
And custom paint, yeah, that's still in the pipe. White/black RC51 scheme like I had planned.
She'll be a KEEPER by the time I'm done! :huh:
Veefer800Canuck
Do you think this would work? :comp13:
I don't see why not.
Bummer about the frame being bent, by the time you find a good used one, you'd be better off just buying a used bike. sad.gif So how do you get your VIN onto the new frame and get it registered?
Good luck either way!
Ryanme17
Veefer800Canuck
Do you think this would work? :comp13:
I don't see why not.
Bummer about the frame being bent, by the time you find a good used one, you'd be better off just buying a used bike.
Yeah, that's what I was thinking...... time or money, one or the other.
sad.gif So how do you get your VIN onto the new frame and get it registered?Good luck either way!
A new frame comes without a VIN, and you cannot "transfer" your old VIN over to the new frame as that is akin to forgery or counterfeiting. Highly illegal and frowned upon. :happy:
I have to apply to Alberta Transportation, who works on behalf of the Insurance Bureau of Canada and recieve a brand-new (assigned) VIN as a "custom-built motorcycle", just like you would do if welding a custom frame for a bobber or a chopper and putting an old Harley 45 in it.
I already called Alberta Transportation and asked, the procedure is quite straightforward, only it isn't exactly free. :huh:
Veefer800Canuck
I don't have any fancy V-blocks or such for measuring, but I was thinking of gently chucking the fork legs up into the metal lathe at work, on the topmost part of the fork where the upper triple and clipon normally mounts, then starting the lathe VERY slowly, and work it up easy to a reasonable (slow-ish) speed that would show any bend in the fork as an off-center wobble. Clamping say, a popsicle stick in the lathe's tool mount should show any runout as increasing/decreasing clearance, no?
Do you think this would work? :comp13:
You should be perfectly ok checking the fork legs in a lathe. I would think that if your work has a lathe, there should also be a dial indicator floating around somewhere. A popsicle stick would show you an obvious bend, but the tolerance on the fork tubes is .008". For reference, the hair on your head is on average .010". To know for sure, you need an accurate way of measuring deflection.
Harbor Freight has cheap & decent dial indicators, maybe Princess Auto does too?
SEBSPEED
You should be perfectly ok checking the fork legs in a lathe. I would think that if your work has a lathe, there should also be a dial indicator floating around somewhere. A popsicle stick would show you an obvious bend, but the tolerance on the fork tubes is .008". For reference, the hair on your head is on average .010". To know for sure, you need an accurate way of measuring deflection.
Harbor Freight has cheap & decent dial indicators, maybe Princess Auto does too?
Actually, now that you mention it, they do have a dial indicator with a magnetic base in the millwright's tool room.
I should be able to rig that on the tool rest of the lathe. Thanks Sebby!
I am now downloading the RC51 service manual to double-check your runout measurement. :comp13:
OK, so I checked in the FSM for the RC51 and indeed, Seb is correct, it's 0.008 inches for the tube runout, but that's the INNER tube.
There is no spec for the OUTER tube whatsoever.
At least I saved the RC FSM to my flash drive for future reference. :comp13:
[image: post-554-126678280646_thumb.jpg]
Veefer800Canuck
OK, so I checked in the FSM for the RC51 and indeed, Seb is correct, it's 0.008 inches for the tube runout, but that's the INNER tube.
There is no spec for the OUTER tube whatsoever.
At least I saved the RC FSM to my flash drive for future reference. :comp13:
I would hazard to guess that the spec for the outer tube(more specifically, the BORE of the outer tube) will be the same, or tighter. Tolerances on mating/interacting parts don't generally vary from part to part. Makes sense, no? Why hold the tube to .008" and the slider to .030"?
Edit: On the other hand, if you find the tube to be in spec, your slider should be fine. It's stiffer, so the tube should bend first. If enough force was applied to the tube to bend it, you'd also see wear marks or scores in the slider bore.
Drained the fuel tank tonight, siphoned it out as far as I could get, then ran the bike for about 20 min to get all the fuel out that the pump could get.
Propped the tank up as it was dying to get the last dregs and kept it sputtering until it finally died right out and would not restart.
Drained the oil and removed the filter, might as well while it's hot eh?
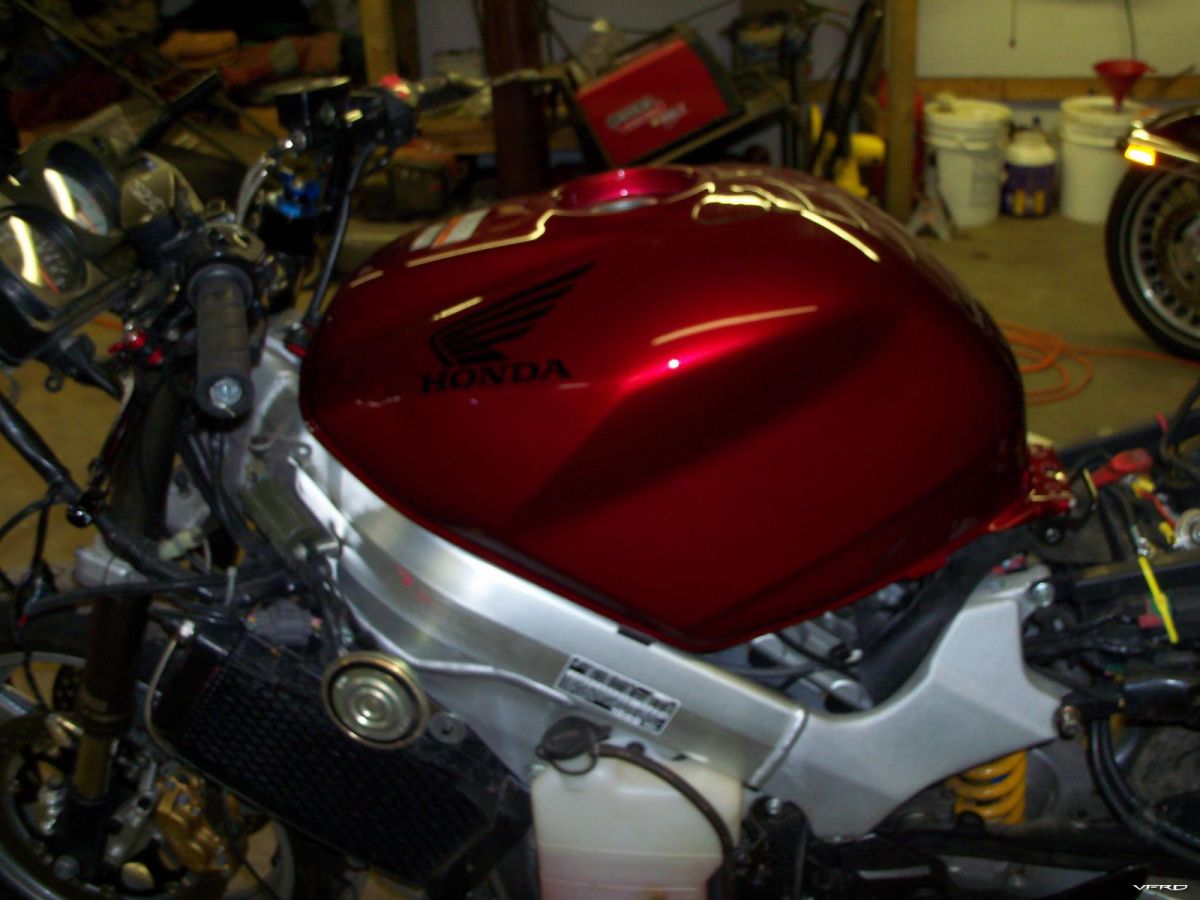
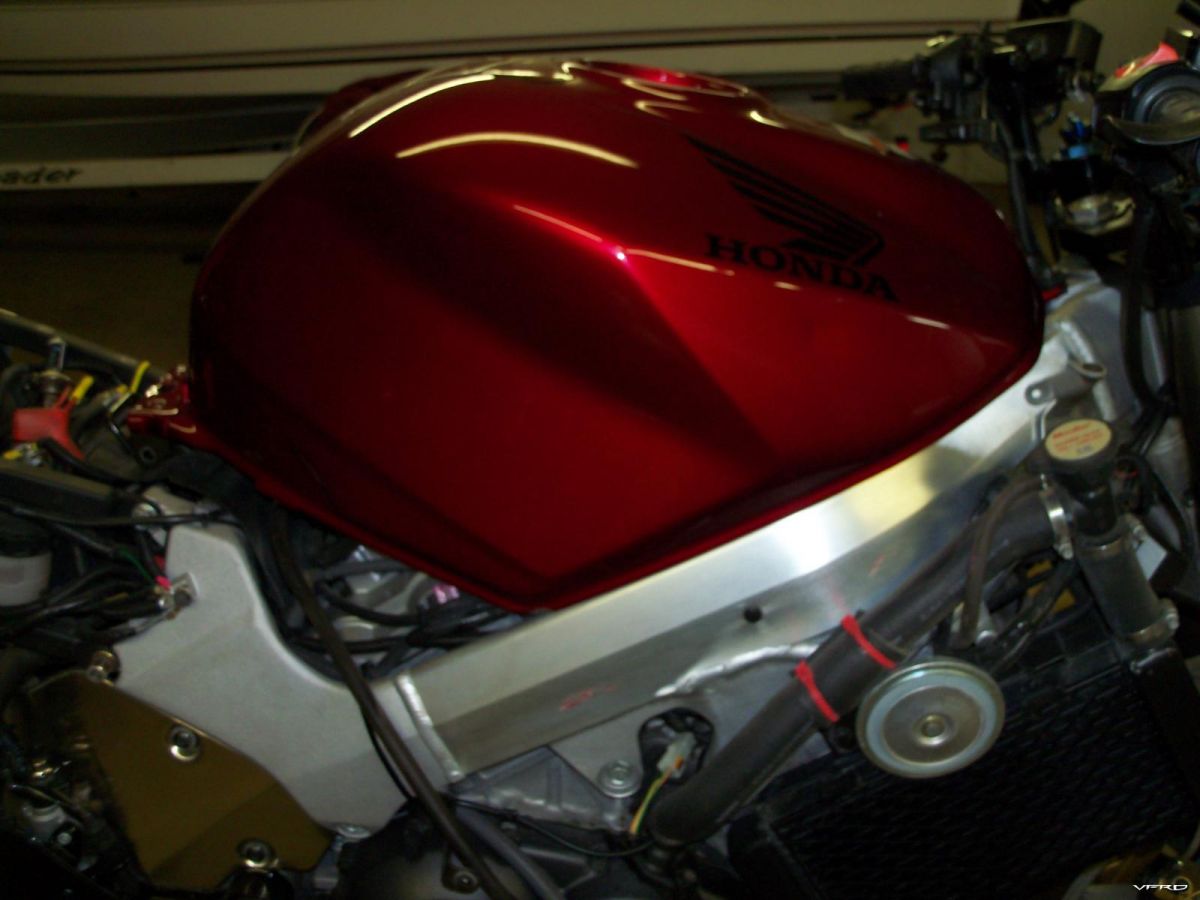
So huge props to VFRD member FROZEN for tipping me off to this mod. I like the shape of the VTEC tank better, and the increased fuel capacity can only help.
012.JPG
016.JPG
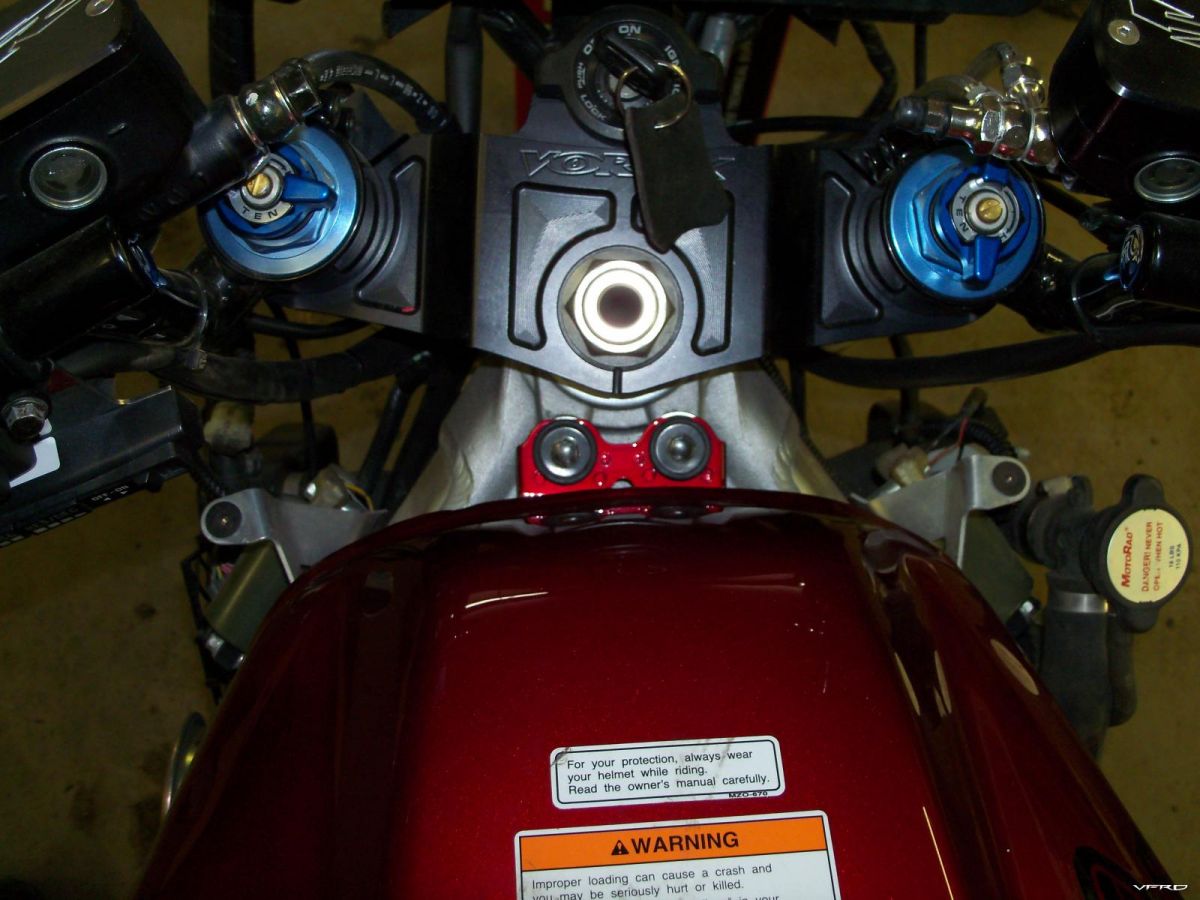
The front of the tank lines up perfectly, the spacing of the bolts is bang on.
015.JPG
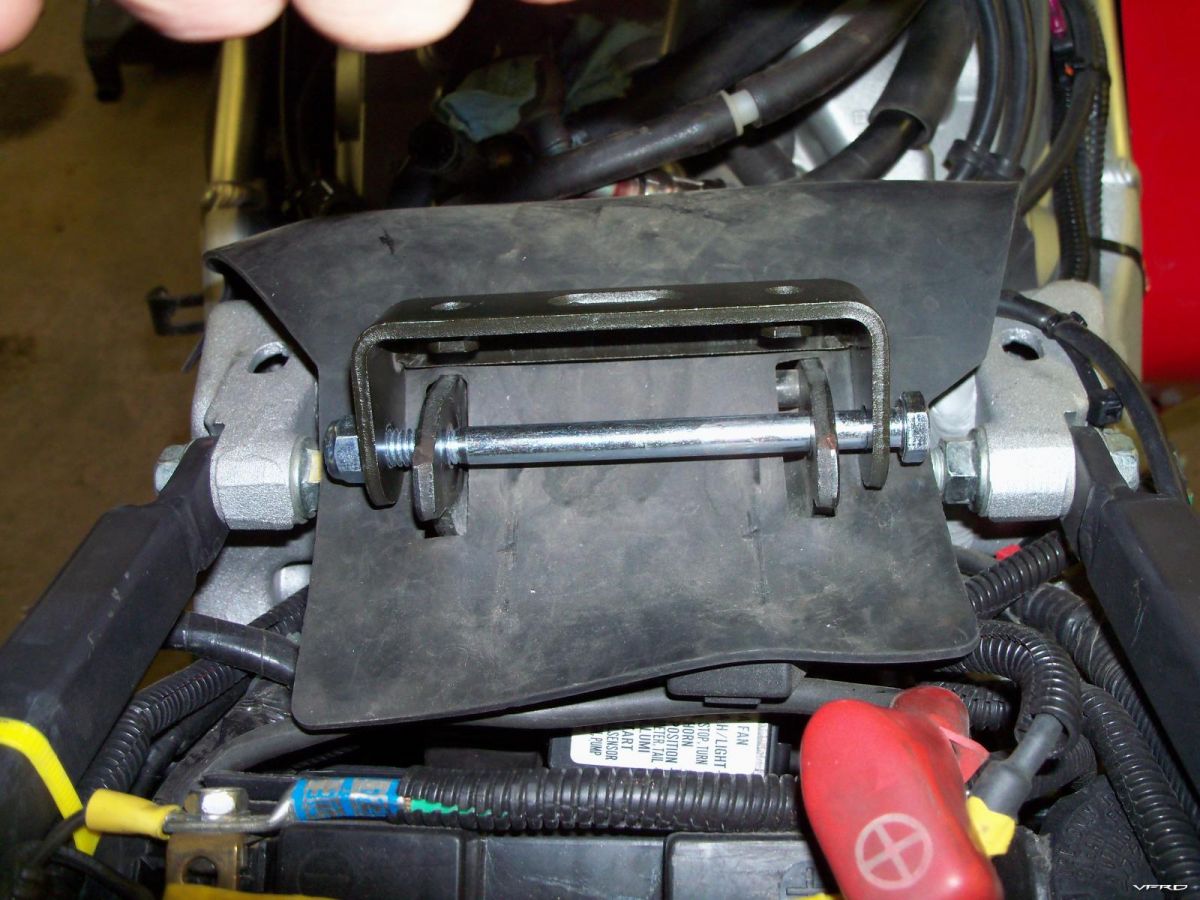
The rear, not so much. The two bolts are much further apart. What I did was to buy half of a 6th gen mount and will use a longer bolt to attach it to my 5th gen lower hinge.
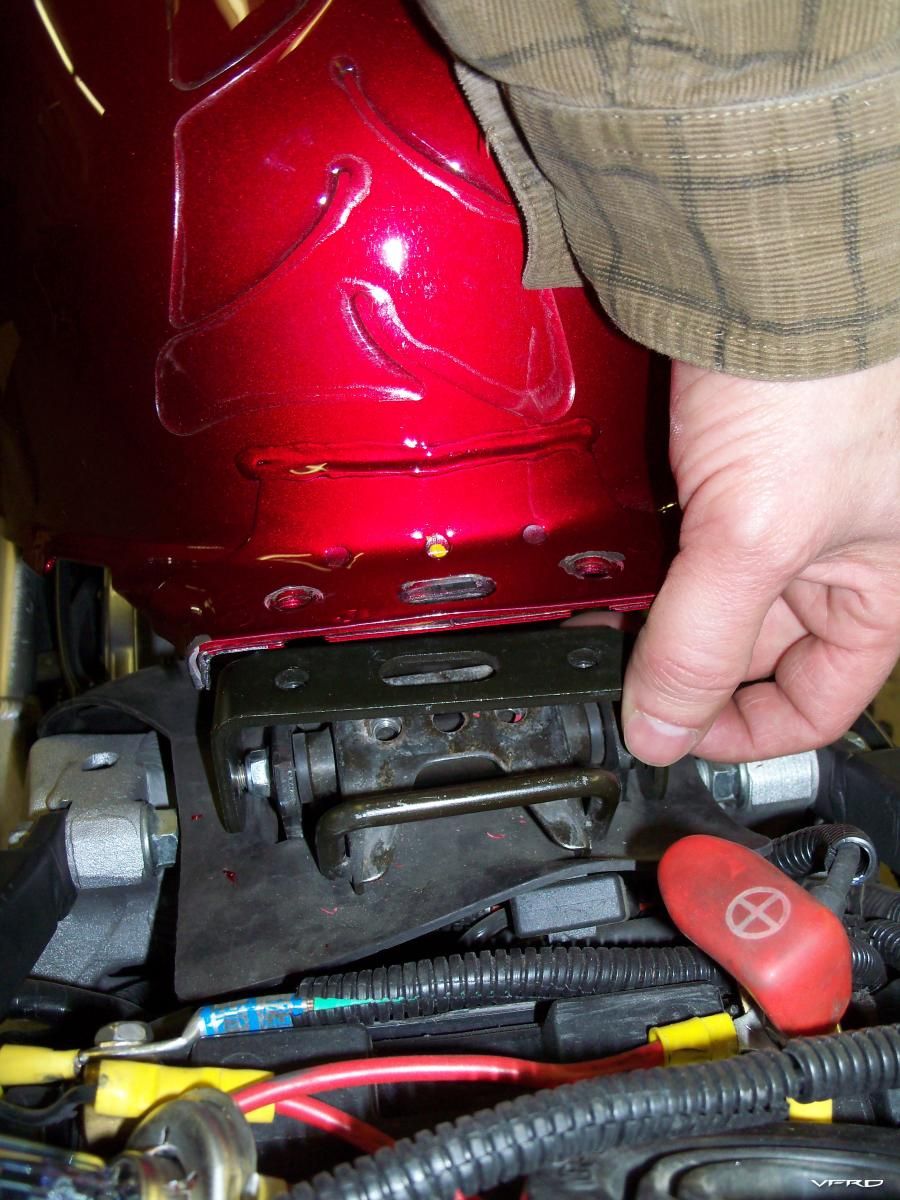
013.JPG
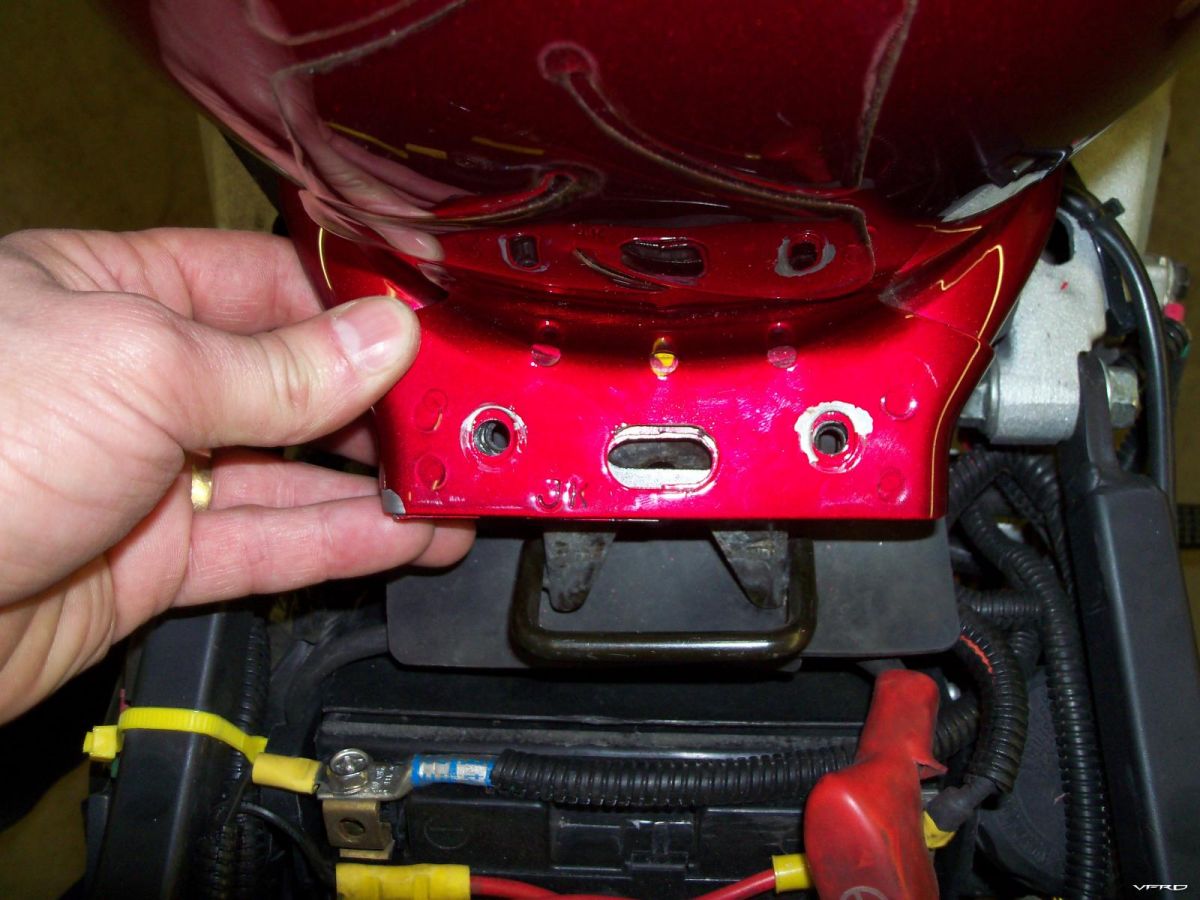
014.JPG
You can see that it lines up perfectly, I did have to bend the rear tank flange downwards ever so slightly to get the hinge bolt lined up just so:
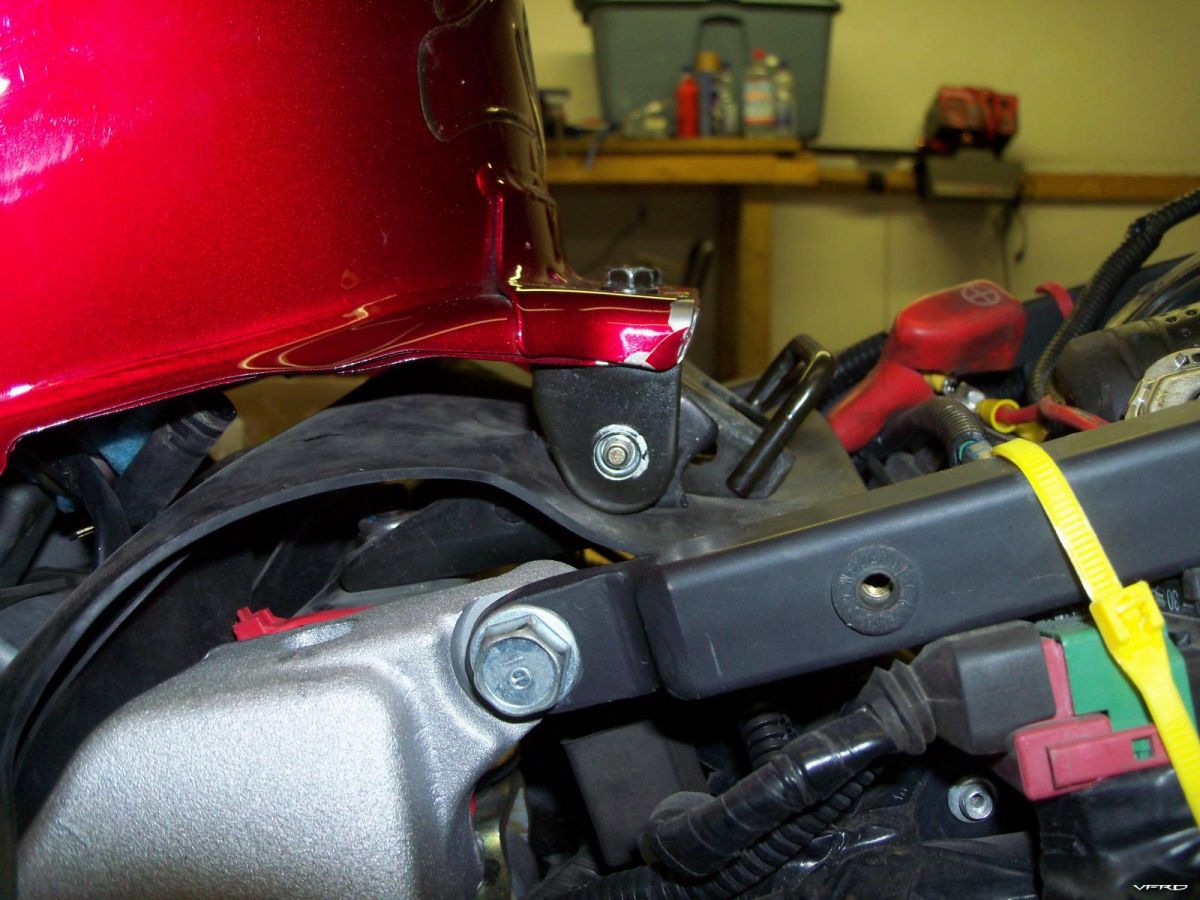
017.JPG
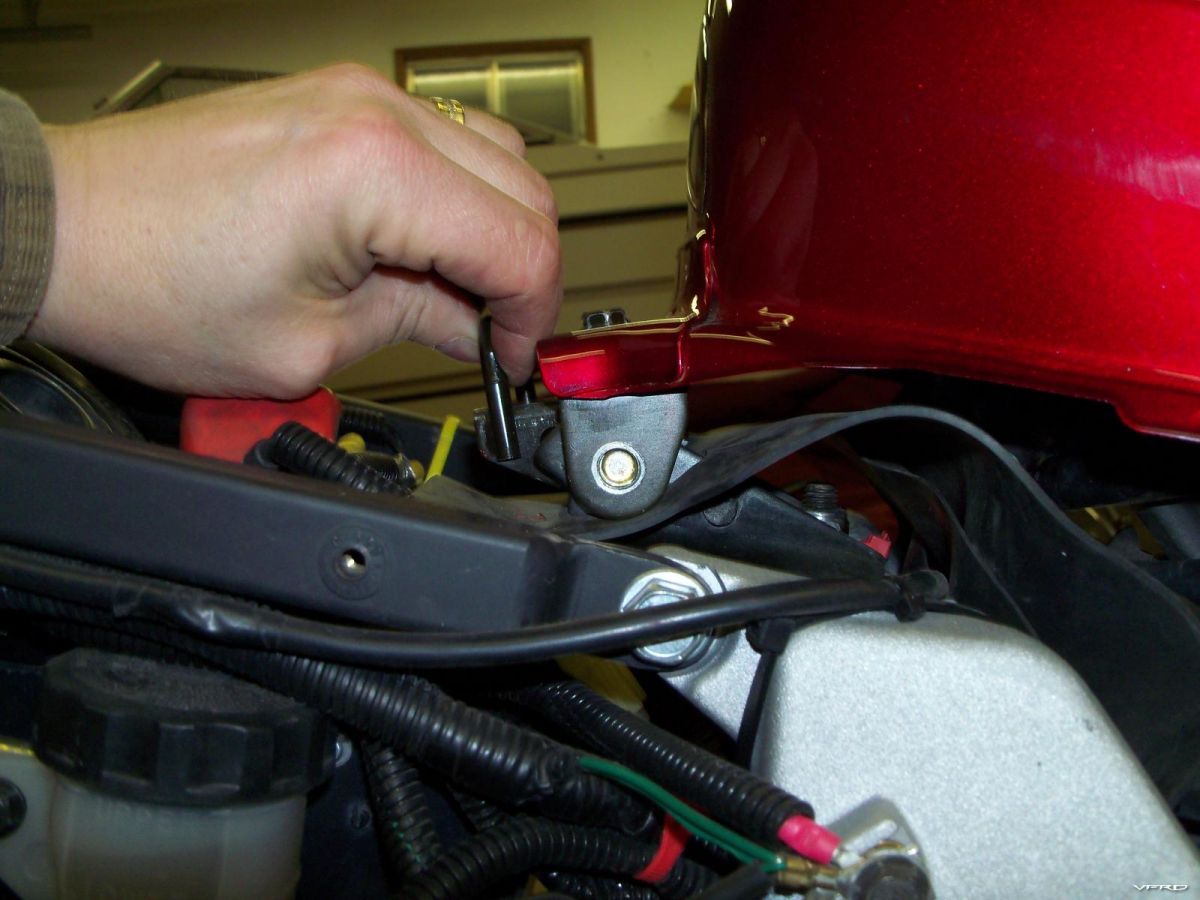
018.JPG
Finished product:
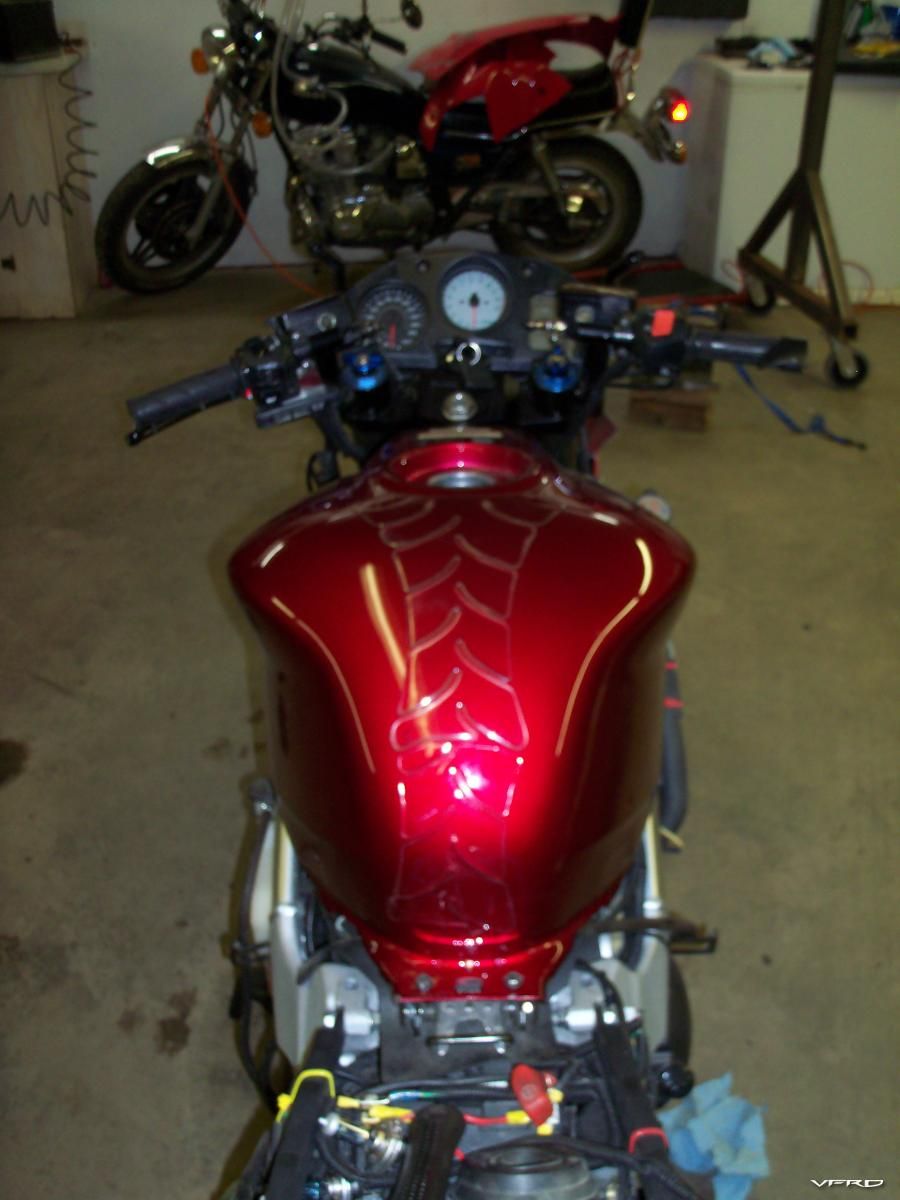
019.JPG
And the 5th gen fuel cap bolts right in as well:
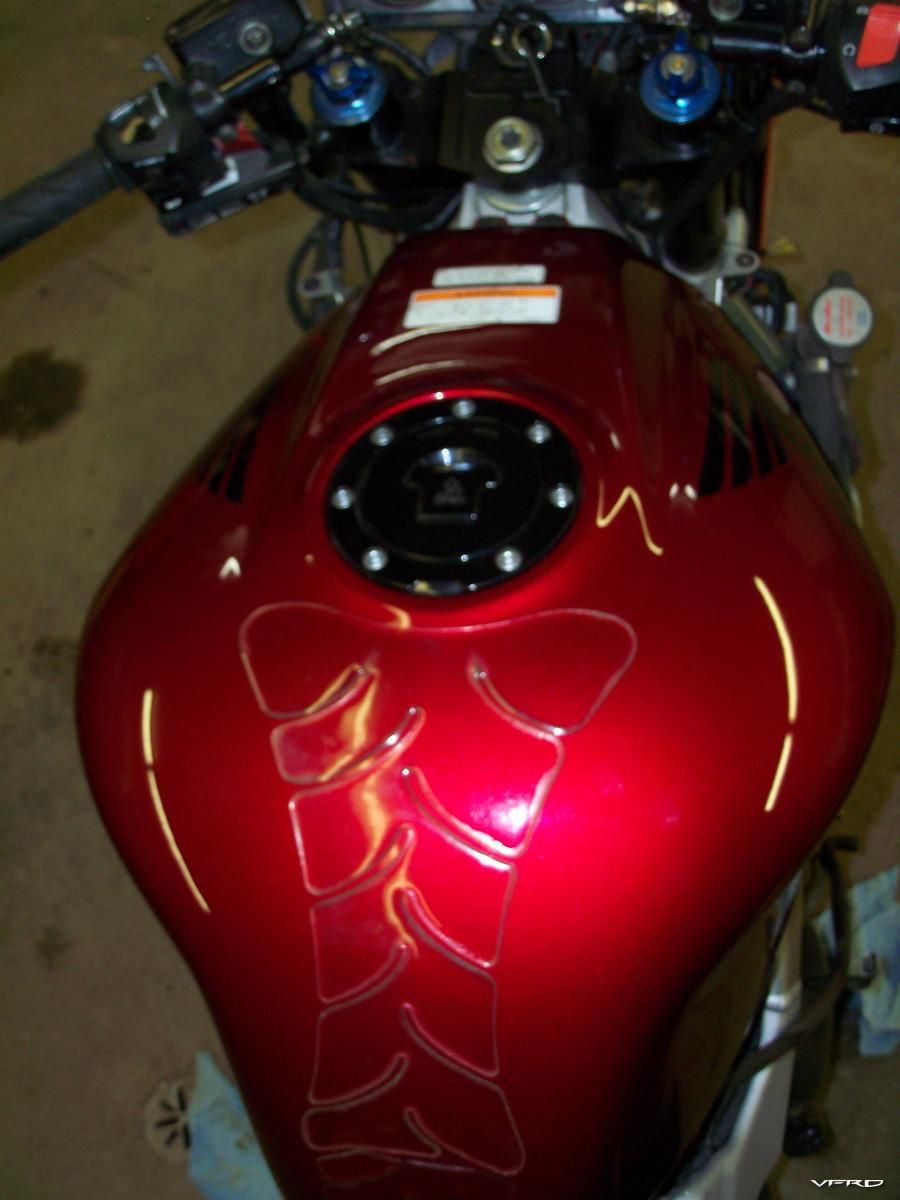
020.JPG
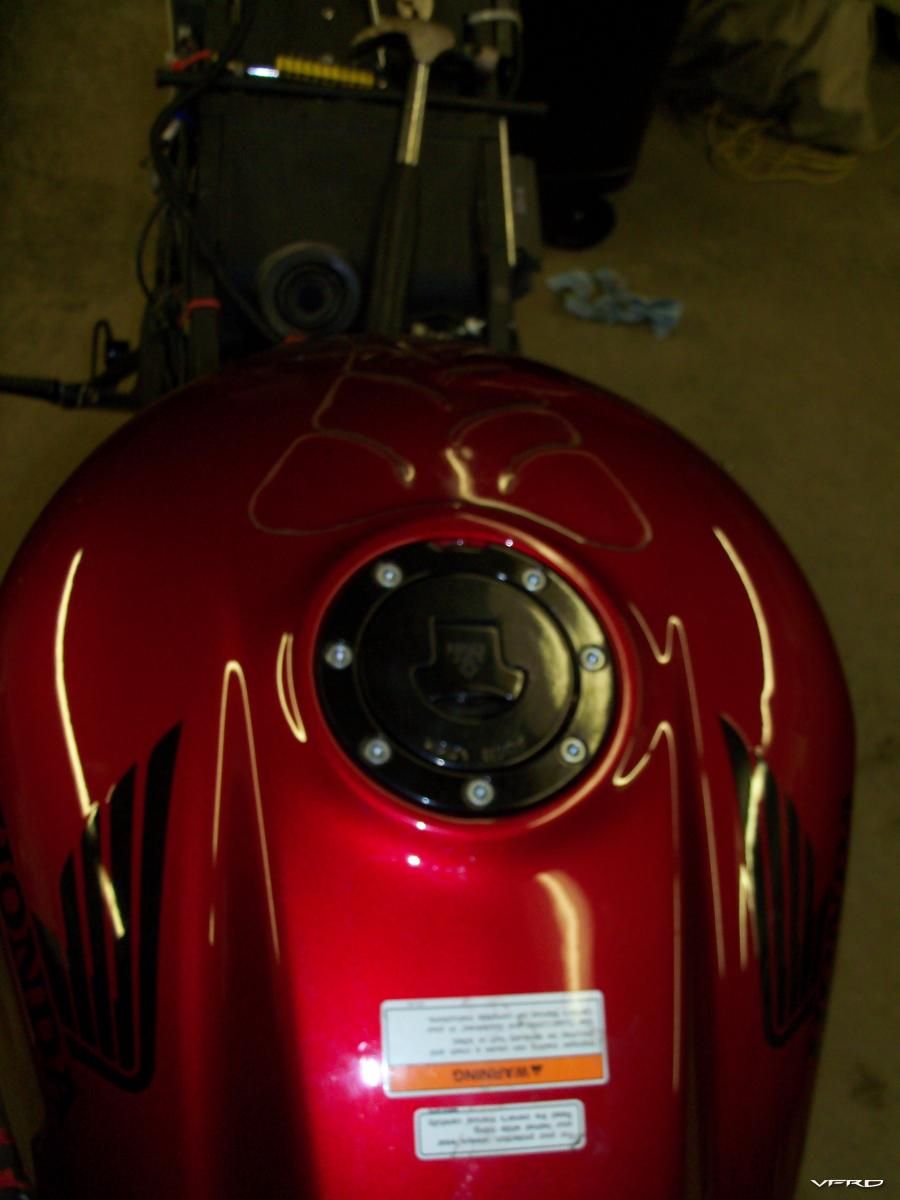
021.JPG
Now tomorrow, I have to check the fit of the seat, and if that's a go, I'm all set for a new look fuel tank!
It is a tad wider at the front of the tank, and juts out a teensy bit from the framerails, but it's most apparent when the bike is stripped, and should be far less noticeable when the bodywork is on.
Looking good. :wheel: I'm keeping an eye out for a 6th gen tank too. Are you using the 6th gen fuel gauge sender or do they interchange?
Looks great Rob. Of course, you've checked with Dan to be certain that the 5th Gen blower top hat will fit under the 6th Gen tank... smile.gif
vfrcapn
Looking good. :wheel: I'm keeping an eye out for a 6th gen tank too. Are you using the 6th gen fuel gauge sender or do they interchange?
They are interchangeable.
The Phantom
Looks great Rob. Of course, you've checked with Dan to be certain that the 5th Gen blower top hat will fit under the 6th Gen tank... smile.gif
Well, since the 5th gen and 6th gen share the same air filter, I'm thinking that it would fit! :wheel:
:wheel:
Stunningly beautifull eldest daughter.............
this thread is useless without pictures......... tongue.gif
And I guess you put that cane to good use to put the fear of God into boys that come calling eh?
So how did your custom underseat exhaust come out of all this?
Veefer800Canuck
For everyone who told me to buy another bike and move on, you were right. :fing02:
I should have bought my wreck back for $650, bought another used Viffer, transferred over my mods and farkles over time, then EBAYED anything leftover that had any value or worth. :rolleyes:
Instead, I trusted the "structural engineer" from the insurance company who never said that the frame was bent. In my narcotic-addled mind, fresh out of the horsetable, it looked to me like the forks were bent. And I ASS-umed that if the frame had been bent, it would have been given "non-repairable" status rather than "repairable salvage" that they assigned to it. :rolleyes:
So here I am with a roomful of boxes, boxes full of shiny new (and grimy used) parts, bought and paid for, and I'm so far down the river now that it's too late to turn back.
Sounds like their mistake, Rob.
Tell them to make it right.
HispanicSlammer
So how did your custom underseat exhaust come out of all this?
No problems, just the license plate bracket is bent, I'll have to remake that, minor in the grand scheme of things.
SAFE-T
Sounds like their mistake, Rob.
Tell them to make it right.
Well, he never said that the frame WASN'T bent, and he didn't say that it WAS bent either.
Just that the bike was "repairable".
I guess everything is "repairable" if you replace 100% of the parts, one at a time, with new, eh?
I already signed off on the insurance settlement for the 'property damage', and in so doing, released them from all further claim in the matter, of course, 'bodily damage' is separate from that.
Right then.
How about selling the stuff you bought and wouldn't need if you just went and got a bike that works ?
Veefer800Canuck
So huge props to VFRD member FROZEN for tipping me off to this mod. I like the shape of the VTEC tank better, and the increased fuel capacity can only help.
Good luck first of all!
But, you should have read my last post in the tank topic. The new tank with old pump and sensor picks up only 20 liters (before the swap I got to the 20.8 liters refueling..)... I think It's maybe a different tank angle. I raised it's front a little, hope it may help..
Edited February 22, 2010 by FrozenGood luck Rob - quite a wrenching project you got ahead of you. The 6th gen tank looks cool.
MD
More good news:
I was thinking about getting a new frame from Ronayers.com, and it would have been $1164 shipped. But that's US pricing, then there's tax and duty, plus they said that Honda USA wanted my frame's headstock sawn off and sent to them, plus a copy of the title, plus a copy of my driver's license, I'm surprised they didn't want a kidney to boot.
But, the person answering the email was quick to reply and frank with me, so good customer service, even though I didn't buy anything.
With much fear and trepidation, I called my local Honda dealer and asked the price of the frame, and SHOCK AND AWE! $1140 Canadian!!!
Good thing I called now, because delivery is slated for late March, early April!!!!!!
Anyhow, I had to give a 50% deposit, and so now I wait.......
Off to the garage to test-fit the used bodywork with the new tank, some minor mods will be required to the fairing uppers, good thing I figured that out BEFORE paint. But really, it's just rounding off a couple of corners, pics to follow!
Frozen
Veefer800Canuck
So huge props to VFRD member FROZEN for tipping me off to this mod. I like the shape of the VTEC tank better, and the increased fuel capacity can only help.
Good luck first of all!
But, you should have read my last post in the tank topic. The new tank with old pump and sensor picks up only 20 liters (before the swap I got to the 20.8 liters refueling..)... I think It's maybe a different tank angle. I raised it's front a little, hope it may help..
Hmmm, I see, well I like the shape of the new tank better, the styling will really change up the look of the bike for the better, I think. So I'll keep it.
Will report back on the fuel range when I can.
Today was a day to test-fit the bodywork and boy am I glad I did.
Removed the 5th gen rear tank hinge and temporarily fitted the 6th gen one:
100_0467.JPG
I will have to make some spacers later so that the rear part of the tank cannot shift side to side, the spacers will go here:
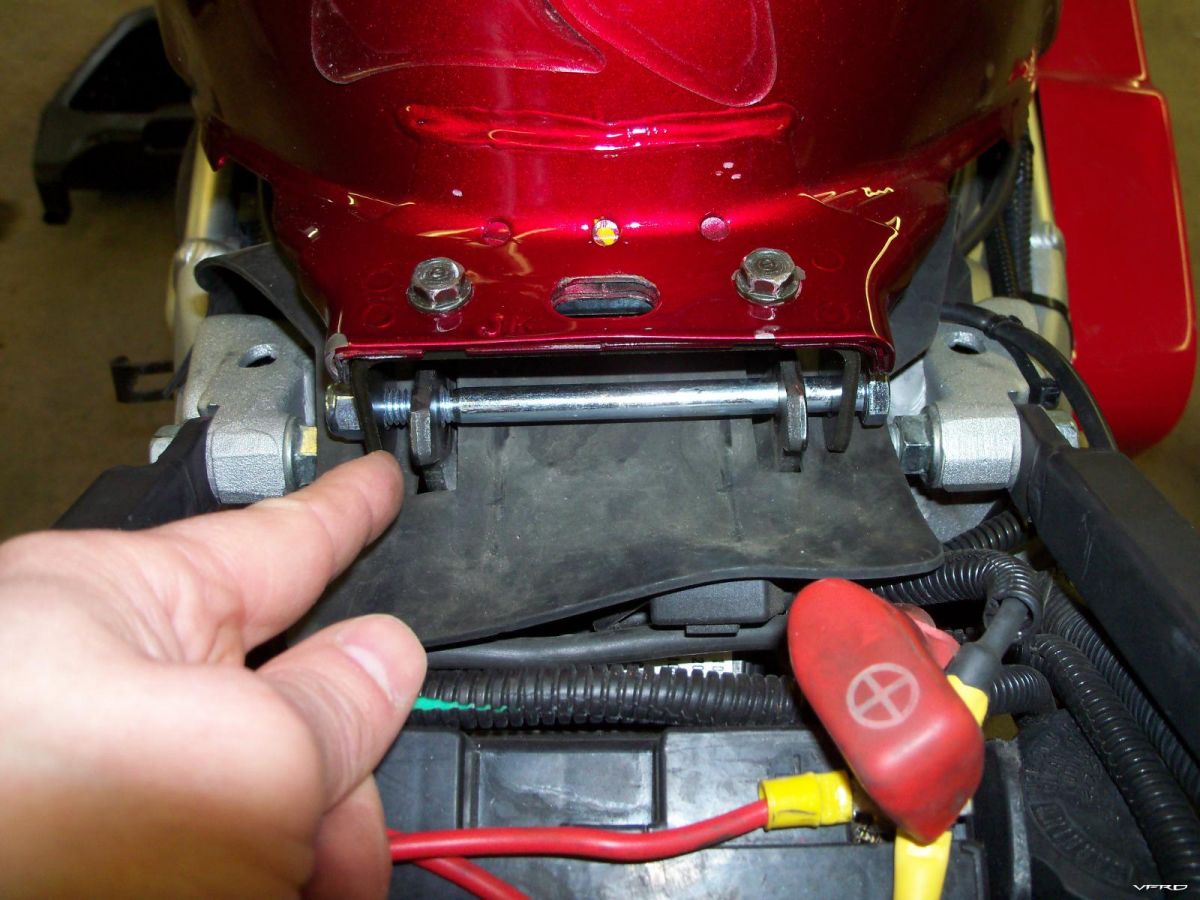
100_0468.JPG
It looks like the bolt is hitting the tank flange, but it's not.
The seat junction worked out quite nicely:
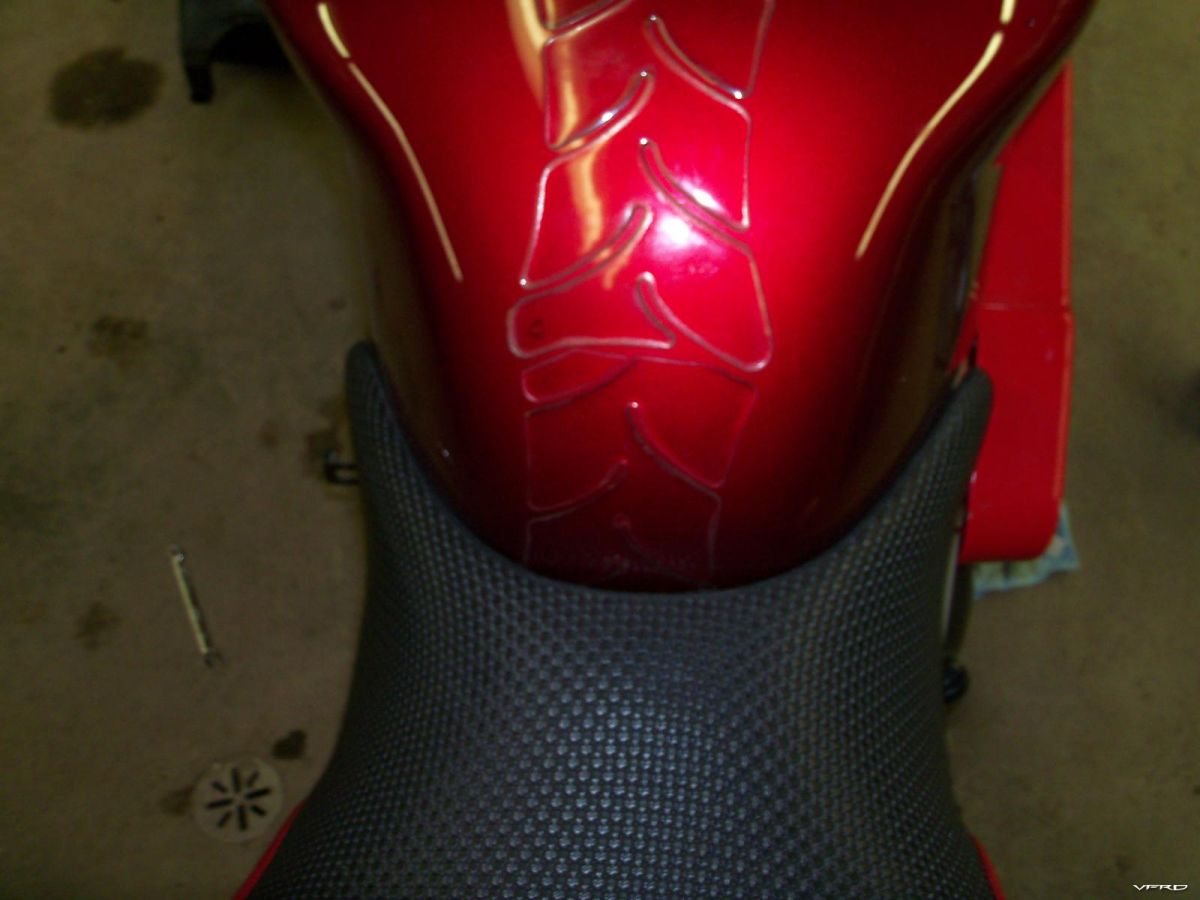
100_0471.JPG
Seems that the wider front portion of the 6th gen tank causes interference with the fairing lowers here:
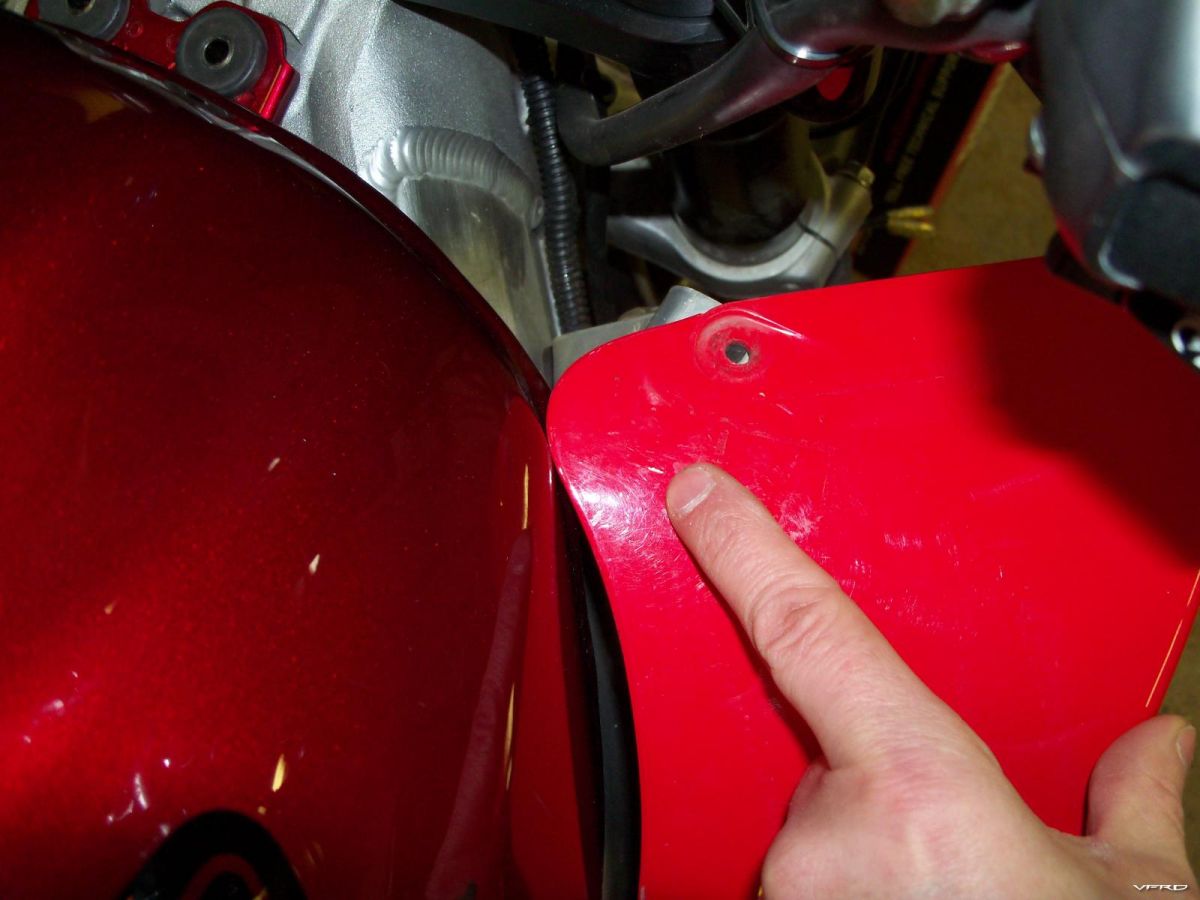
100_0469.JPG
So what else could I do but MOD THEM! (one good mod deserves another....)
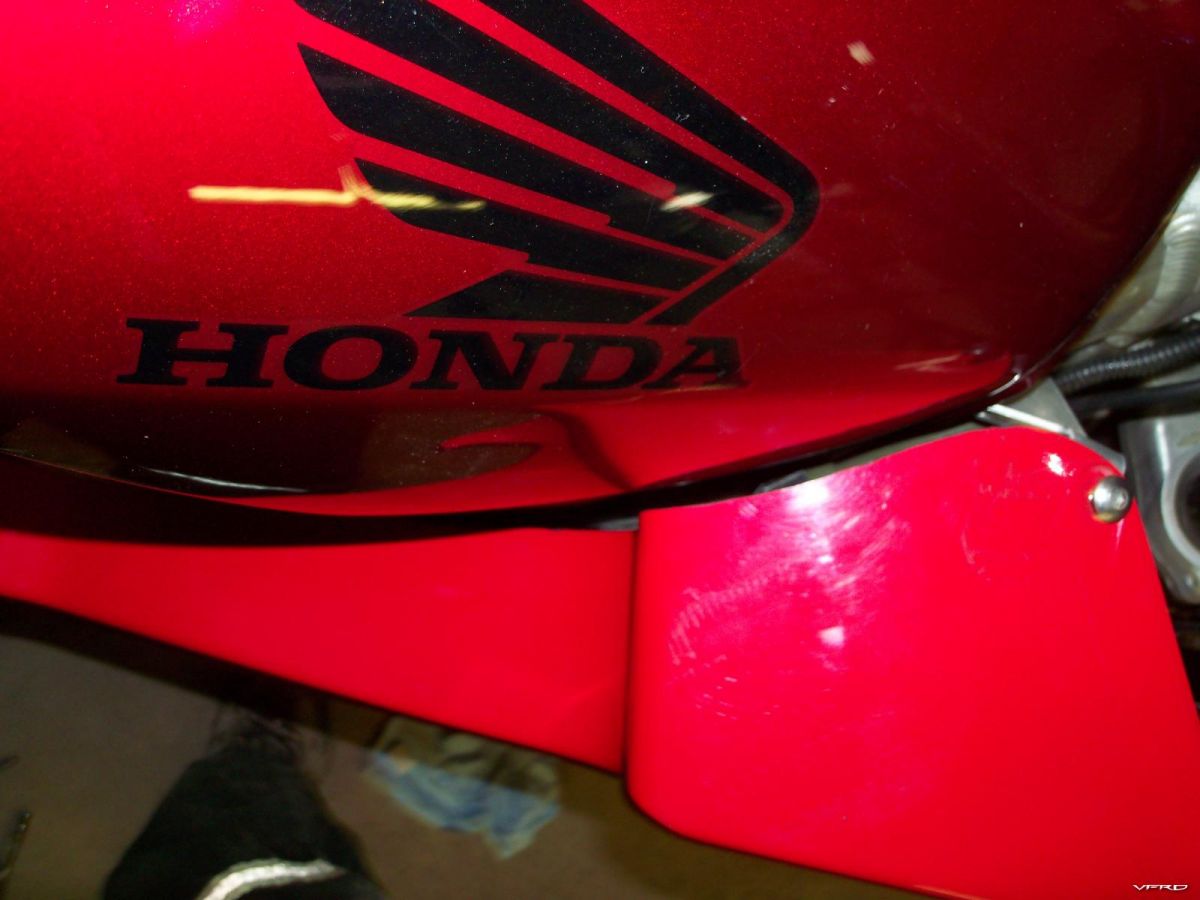
100_0472.JPG
Other side, same thing:
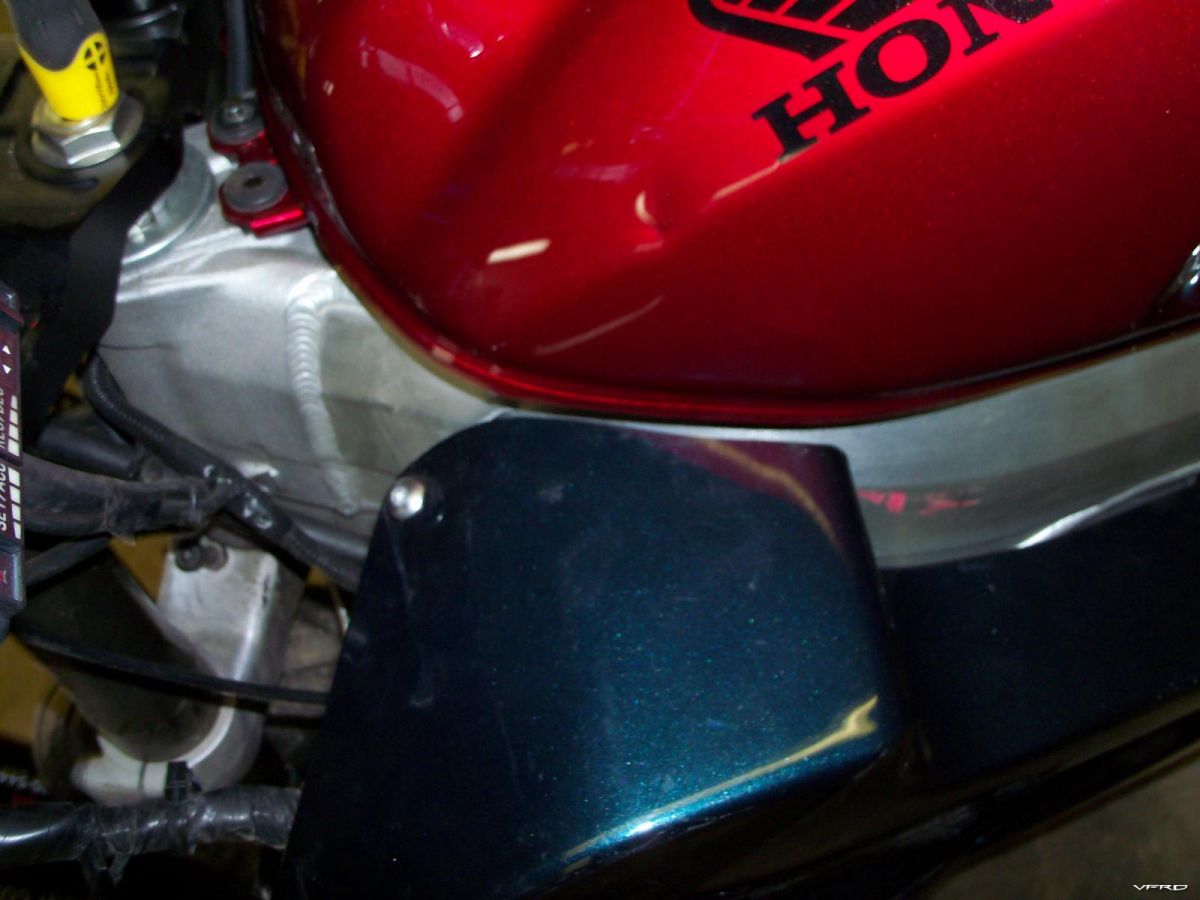
100_0474.JPG
I'll hit them with some hand sandpaper to smooth the edges, as I did that with an angle grinder of all things. Slow and careful.
The gauge surround will need the same treatment on both sides, so I marked it off and will do it tomorrow, as I'm totally beat now.
Went to the doc and got my staples out before lunch, and it was about 7 hours of activity and walking after that, my legs are jello and my ankle is bitchy!
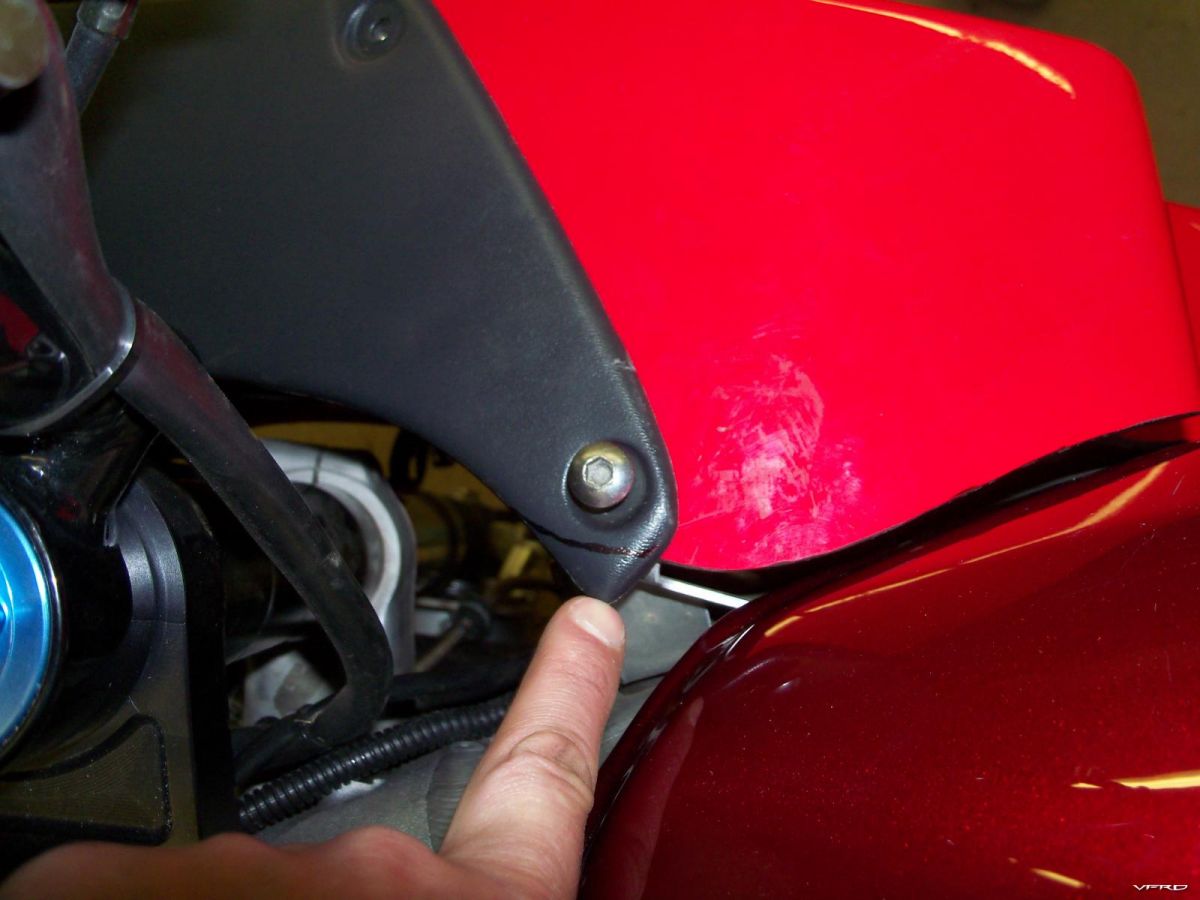
100_0475.JPG
So here is how it stands at the moment:
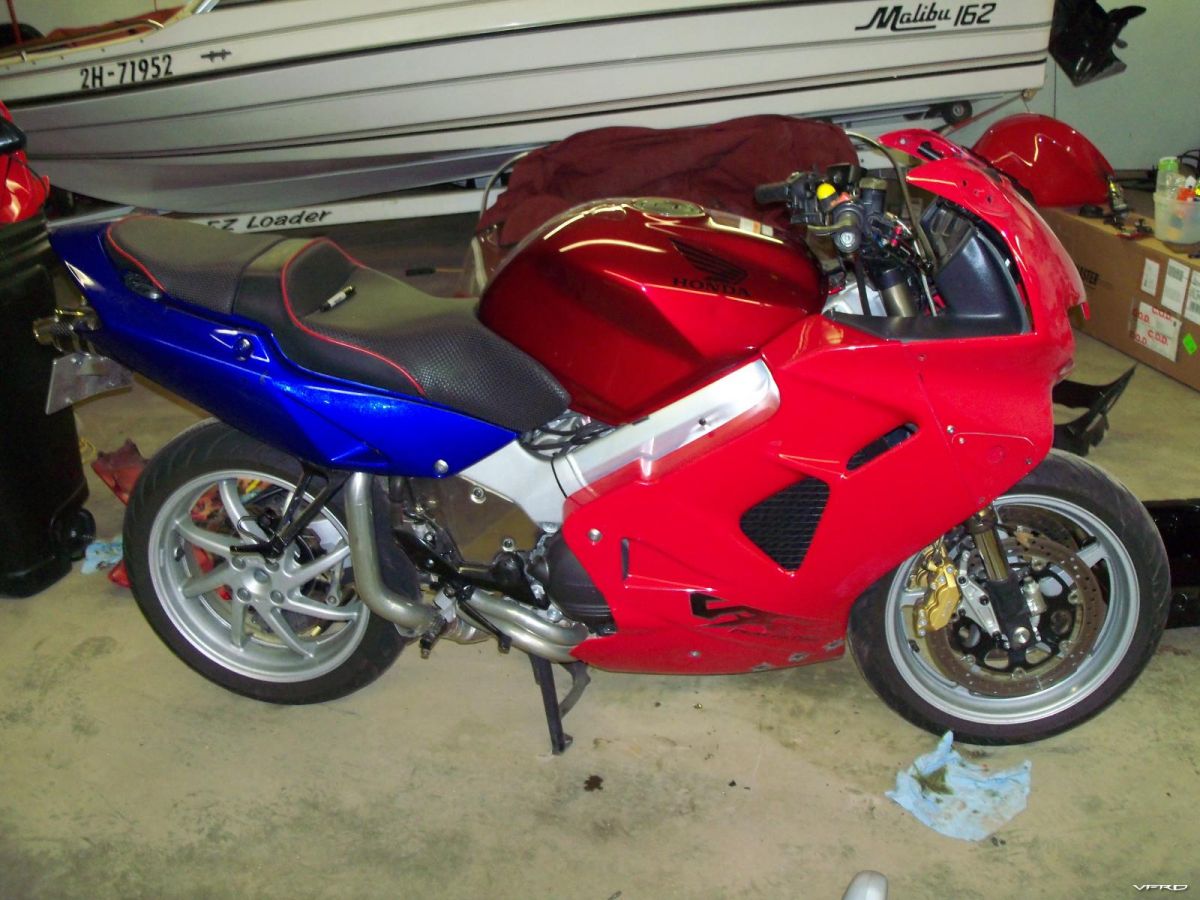
100_0476.JPG
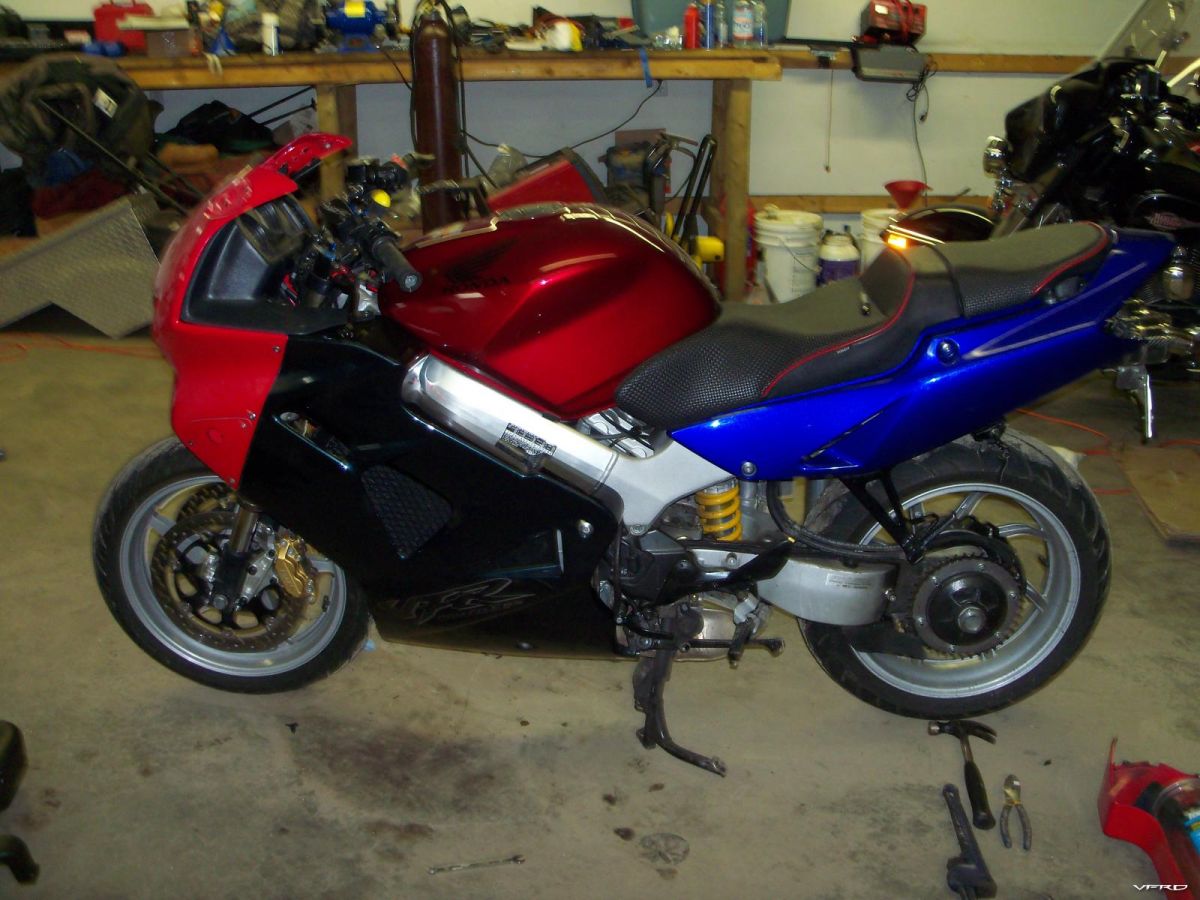
100_0477.JPG
Rainbow bike.
Veefer800Canuck
Rainbow bike.
:comp13:
Not so bad actually, but funny. (a yellow front faring would sute better thro, and black lowers on both sides :biggrin: ) Volkswagen made some rainbow car models in the early 90s, every part on it was diffrent color. was not a sucsess thro.
The 6th gen tank looks cool, and I think +1.gif on a new frame.
Gona be a great looking bike when ready for road again (after the frame and paint) :fing02:
Edited February 23, 2010 by kenykeny
Veefer800Canuck
Rainbow bike.
:comp13:
Not so bad actually, but funny. Volkswagen made some rainbow car models in the early 90s, every part on it was diffrent color. was not a sucsess thro.
The 6th gen tank looks cool, and I think :fing02: on a new frame.
Gona be a great looking bike when ready for road again (after the frame and paint) :biggrin:
Ah yes, the very rare Harelquin Golf! Only 246 made worldwide!
[image: 47184929-607e-02000180-.jpg]
If it was me, I'd put centres in the head and tailstocks and rotate the tube by hand, checking with a dial indicator at the middle and quarter positions. Or put a piece of scrap in the chuck and machine a larger taper if you don't have a large enough centre.
Powering something which is overhung and possibly bent sounds like a not-good idea.
Glenn
Veefer800Canuck
I don't have any fancy V-blocks or such for measuring, but I was thinking of gently chucking the fork legs up into the metal lathe at work, on the topmost part of the fork where the upper triple and clipon normally mounts, then starting the lathe VERY slowly, and work it up easy to a reasonable (slow-ish) speed that would show any bend in the fork as an off-center wobble. Clamping say, a popsicle stick in the lathe's tool mount should show any runout as increasing/decreasing clearance, no?
Do you think this would work? :fing02:
I love the cane and the foot shot!
rdguy
If it was me, I'd put centres in the head and tailstocks and rotate the tube by hand, checking with a dial indicator at the middle and quarter positions. Or put a piece of scrap in the chuck and machine a larger taper if you don't have a large enough centre.
Powering something which is overhung and possibly bent sounds like a not-good idea.
I don't have any machining skills, just know enough to turn the damn thing on, and I hear you about the rotating mass thing, which is why I would have the lathe in "first gear" at idle, not "sixth" at redline.
SEBSPEED
Ah yes, the very rare Harelquin Golf! Only 246 made worldwide!
[image: 47184929-607e-02000180-.jpg]
I wonder why? :comp13:
"Instead, I trusted the "structural engineer" from the insurance company who never said that the frame was bent".
Stevie Wonder???????
Can't wait for paint!! Look'n pretty slick.
Hey Rob, I have a 5th gen Frame you can have, just pay shipping! :goofy:
BaileyRock
Hey Rob, I have a 5th gen Frame you can have, just pay shipping! :goofy:
I already ordered one from my local Honda dealer for $1100.
What is the title status on yours?
Veefer800Canuck
BaileyRock
Hey Rob, I have a 5th gen Frame you can have, just pay shipping! :wheel:
I already ordered one from my local Honda dealer for $1100.
What is the title status on yours?
Non-rebuild-able, but I would be tempted to..........
Can't you get a title easily up there with a Bill of Sale?
Sorry I'm late to the party! :goofy:
BaileyRock
Non-rebuild-able, but I would be tempted to..........
Can't you get a title easily up there with a Bill of Sale?
Sorry I'm late to the party! :goofy:
Nah, they will trace it and find the non-rebuildable status in the USA. I have to fill out a comprehensive form and present it to Alberta Transportation before they will allow the bike to be registered again.
We don't have "titles" per se, you just own the bike outright with a bill of sale, like a reciept for a pack of gum.
Also, your registration (license plate) documents show you as being the registered owner, which is about as close to a title as you get here.
I am required to report the VIN of donor vehicles on the rebuilding worksheet along with photographs of the damage before and after repairs. Anything that has been declared non-rebuildable is strictly off-limits.
http://www.transportation.alberta.ca/680.htm
I mean, I could use a signal light, that's fine, but wrecked chassis components bearing a VIN are Verboten.
Stripped the bodywork off in anticipation of paint.
Fixed this corner first though:
Rounded it off nicely to match.
Next will be sorting out some minor wiring issues and connectors that got messed in the accident.
Luckily I have a second wiring harness to use as parts.
Wait for the frame to arrive and while that is happening, check both front wheels for runout.
LH brake disc is toast, but the RH one I think is fine and resellable.
I crashed a couple track bikes with conventional forks and bent them pretty easily. I was excited to finally get a more modern track bike with USD forks, so as to (hopefully) not worry about bending the forks in a minor get off. Someone soon told me that the thicker USD uppers would more than likely bend the frame before the forks. Combine that with an older frame designed for conventional forks, and I guess the bent frame was inevitable in your case...
Progress looks good, so far! :fing02:
SEBSPEED
Ah yes, the very rare Harelquin Golf! Only 246 made worldwide!
[image: 47184929-607e-02000180-.jpg]
Hmmm... I've seen 2 different ones here (unless he got in it, and drove to the other end of town faster than I could). Maybe someone just made one themselves...
Glad to hear of the progress on the bike. I really like the way the 5th gen fairings sorta flow into the flat side portion of the 6th gen tank. I'm also shocked on that canadian frame price. Good find.
How much longer in the healing process?
magicman
Glad to hear of the progress on the bike. I really like the way the 5th gen fairings sorta flow into the flat side portion of the 6th gen tank. I'm also shocked on that canadian frame price. Good find.
Thanks, I took off the gauge surround and "shaped" the edges as shown above so they are more rounded and flow better with the sidepanels.
How much longer in the healing process?
Off topic, but I've abandoned the crutches completely and have gone 100% to the cane. Staples and sutures are out from the last surgery almost 3 weeks ago.
I'm walking better every day, and went to the gym today and worked out on the recumbent bike for ~30 mins.
Then, tried my hand on the elliptical machine, really, really easy going with no resistance, just seeing if it could be done. A little premature perhaps, as there is still a fair bit of pain during extension and flexion of the ankle joint, but the mid-stride feels fine on the elliptical. Maybe another week or two and it'll be better. It's doable, I just have to take it easy and be REAL careful getting on and off the machine. Good hand-holds are essential, and thinking of every move. In my state, you don't just "hop off" of anything!!
Good to hear you are getting around better, man.
Been off the forum for a while (new job is busy), but the bike looks cool with the 6th gen tank.
Bummer about the frame being bent.
I guess you are in it for the long haul now, he he.
Just thinking crazy here, but if your rebuild is the same as dealing with a custom bike, what about having a truss frame welded up for you? How much would that cost? Is your deposit on the frame non-refundable if you happen to find another deal for a frame?
Veefer800Canuck
Off topic, but I've abandoned the crutches completely and have gone 100% to the cane. Staples and sutures are out from the last surgery almost 3 weeks ago.
I'm walking better every day, and went to the gym today and worked out on the recumbent bike for ~30 mins.
Then, tried my hand on the elliptical machine, really, really easy going with no resistance, just seeing if it could be done. A little premature perhaps, as there is still a fair bit of pain during extension and flexion of the ankle joint, but the mid-stride feels fine on the elliptical. Maybe another week or two and it'll be better. It's doable, I just have to take it easy and be REAL careful getting on and off the machine. Good hand-holds are essential, and thinking of every move. In my state, you don't just "hop off" of anything!!
Great stuff Rob!
I'm two weeks support free! Get in the Pool my friend, just walking in the pool made a major improvement for me and I'm doing a bunch more in the pool now improving every day. :rolleyes:
Just do it!
BR
Q-Dawg
Just thinking crazy here, but if your rebuild is the same as dealing with a custom bike, what about having a truss frame welded up for you? How much would that cost? Is your deposit on the frame non-refundable if you happen to find another deal for a frame?
Well, it's a special order item, and judging from the lead time, it's coming from japan, so I cannot really fathom them welcoming a return.
I bought the bike to ride it, not sell it, so I guess I've got a LOT of riding to do! tongue.gif
Wicked to see your progress on all fronts, both mechanical and biomechanical... you and BR are my heroes!!
Can't you appeal the insurance report?? After all they were wrong!!
Auspañol
Wicked to see your progress on all fronts, both mechanical and biomechanical... you and BR are my heroes!!
Can't you appeal the insurance report?? After all they were wrong!!
It would be like fighting city hall as I've already signed a document months ago stating that it's a done deal.
The mechanical engineer from the insurance co. never said the frame WAS bent and he never said it WASN'T bent either.
Just that the "bike" was "repairable".
Really, anything is "repairable" if you replace each and every part, one at a time, with new! :goofy:
I know you are committed to the replacement path, but just for the sake of the discussion and future occasions to VFR riders, did you check into the relative cost of frame straightening? There are quickly Googled several businesses that guarantee exactly straight frames from wrecks, like Dr. John's that quotes $400-500 to straighten Japanese bikes. Adding in the cost of shipping and exchange rates makes it more, but versus cost of parts, re-titling makes it less....maybe. They also say they straighten rotors, fork tubes and sliders for pretty nominal prices. Mayhaps some VFRD'rs have actual info on success in these repairs. A number of the shops spec very precise measurements to their repairs, so I would tend to believe that repair adequacy is not in doubt. Anyone?
On the right frame spar, where the factory puts a hole for a screwdriver to adjust the idle, there are three stress marks radiating out from the hole, north, east and west.
I personally would not feel comfortable riding on a repaired frame that has been straightened, but that's just me.
I've bent enough things made from aluminum, then had them snap when I tried to srtaighten them. Simplistic analogy, yes, and I'm not saying that the frame would snap when bending it back, just that I don't like the thought, and this way, I won't have to think it because the bender frame is going to the recycle bin.
Next time I crack open a cold one, I just might be drinking out of my old frame! :beer:
Bodywork went in for paint today.
He's going to do the pearl white base and the black accents, then put the bodywork up and away safely until I get a rolling chassis together, then I'll bring the bike to him, we'll put the bodywork on temporarily, and he'll project the wing graphics onto the bike and trace them out to get everything aligned properly.
Since the wing graphics go across the fairing and up onto the fuel tank, simply painting them on the loose bodywork would invite serious misalignment and they'd probably look wonky.
This way, everything will line up 100%
Gotta love the ole projector trick! :blink:
Hope it comes out looking and running better than ever, Rob. :blink:
If I ever wreck a bike, I think I'll part it out.
Full coverage insurance is priced way too high, I don't buy that junk.
With the money I save in 5 years I can buy a good used bike. :wheel:
VFR4Lee
Hope it comes out looking and running better than ever, Rob. :blink:
If I ever wreck a bike, I think I'll part it out.
Full coverage insurance is priced way too high, I don't buy that junk.
With the money I save in 5 years I can buy a good used bike. :wheel:
I don't have full coverage either, just $1M in basic liability, plus fire and theft.
I wouldn't even have the fire coverage, but they roll it in together with the theft insurance.
It's her insurance that's footing the bill.
I don't have full coverage either, just $1M in basic liability, plus fire and theft.I wouldn't even have the fire coverage, but they roll it in together with the theft insurance.
We're only are required to have liability.
Theft fire collision and comprehensive are all bundled together iirc.
Take all or none. I say none.
Then there's uninsured motorist for the idiot that doesn't have the "required" liability ins...
Fak, don't start me up. I'm paying to cover the uninsured jackaxe. :blink:
Fak, don't start me up. I'm paying to cover the uninsured jackaxe. :beer:
And his rent or mortgage, and his medical expenses, and his food, and his...
VFR4Lee
I don't have full coverage either, just $1M in basic liability, plus fire and theft.I wouldn't even have the fire coverage, but they roll it in together with the theft insurance.
We're only are required to have liability.
Theft fire collision and comprehensive are all bundled together iirc.
Take all or none. I say none.
Then there's uninsured motorist for the idiot that doesn't have the "required" liability ins...
Fak, don't start me up. I'm paying to cover the uninsured jackaxe. :beer:
In NY, I can get 3 separate levels of coverage - liability only, liability + comprehensive, or liability + comp + collision. Comp covers acts of nature like falling tree branches, flood, DEER, etc, :fing02: Comp is cheap here and good to have, IMO.
Acts of Deer aren't much of an issue around here, there's not all that many. :3:
And I have doubts any vehicle insurance would cover a bike falling over due to an earthquake. :fing02:
I think it was when I got the CBR and they wanted around $2k a year to cover a $7k bike that I decided to drop full coverage. :goofy: Between the bikes I've had during the last 5 years, I bet I've saved $10k by going liability only. :goofy:
Of course, I haven't wrecked one either.
Scrubbed the swingarm, cleaned and flushed the bearings, will repack bearings tomorrow and reinstall swingarm except for torquing the pivot bolt.
The replacement LH footpeg holders and shift lever are at the powdercoating shop currently, should get them back Tuesday, then I can install both peg hangers and torque the swingarm pivot.
Guess what I got today???? :beer: :lurk:
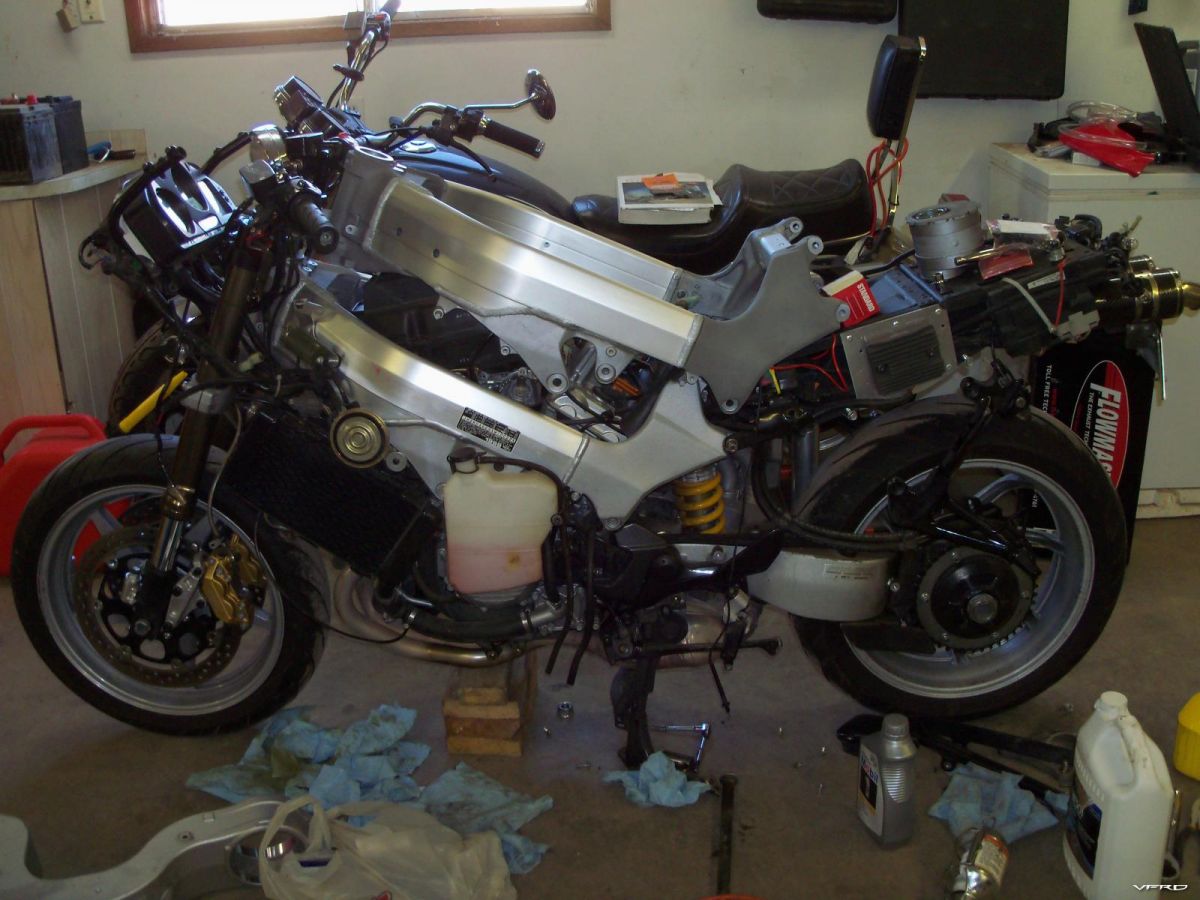
WOW, I wasn't even expecting it at all. Got a phonecall from Greyhound, parcel to pickup, what the heck could that be?
I wasn't expecting it for another month!
True to form, no VIN on the frame, it's totally blank on the steering head, and no stickers of any kind on the frame.
Notice the different finish on the frame? The cast portions are really grey whereas the original frame is silver-ish. ???
The color diff is odd? I wander if the cast sections are protected in any way?
You're going to be rolling again in no time. :wheel:
Hypothetically speaking, what's to stop someone from transferring the VIN plate, punching the vin #'s in the head tube and presenting it for a salvage/repaired/recovered title? "Here's my bike, I fixed it.."
Glad to see it.
Hopefully, you'll have this on the road for the two-three really nice weeks of weather you'll get this summer. :wheel:
vfrcapn
You're going to be rolling again in no time. :wheel:
Hypothetically speaking, what's to stop someone from transferring the VIN plate, punching the vin #'s in the head tube and presenting it for a salvage/repaired/recovered title? "Here's my bike, I fixed it.."
Hypothetically, nothing. But then I would still have a "repaired salvage" status as that is attached to my original VIN # at the moment.
BUT, if they ever caught wind of that, it's a total fraud case and you're in Doo-Doo with the Dep't of Transporation.
I don't wanna find out.
Veefer800Canuck
vfrcapn
You're going to be rolling again in no time. :wheel:
Hypothetically speaking, what's to stop someone from transferring the VIN plate, punching the vin #'s in the head tube and presenting it for a salvage/repaired/recovered title? "Here's my bike, I fixed it.."
Hypothetically, nothing. But then I would still have a "repaired salvage" status as that is attached to my original VIN # at the moment.
BUT, if they ever caught wind of that, it's a total fraud case and you're in Doo-Doo with the Dep't of Transporation.
I don't wanna find out.
That's why I said it was only a hypothetical... wink.gif
Good point, a clean title in the end will be worth it.
Not only has Rob made the beast with two backs, he's put a photo of it on a public forum :wheel:
Good work. I like that dark cast bit, looks purposeful.
Getting the rear end sorted, slowly working towards the front.
Replacement Fleabay swingarm all cleaned and greased:
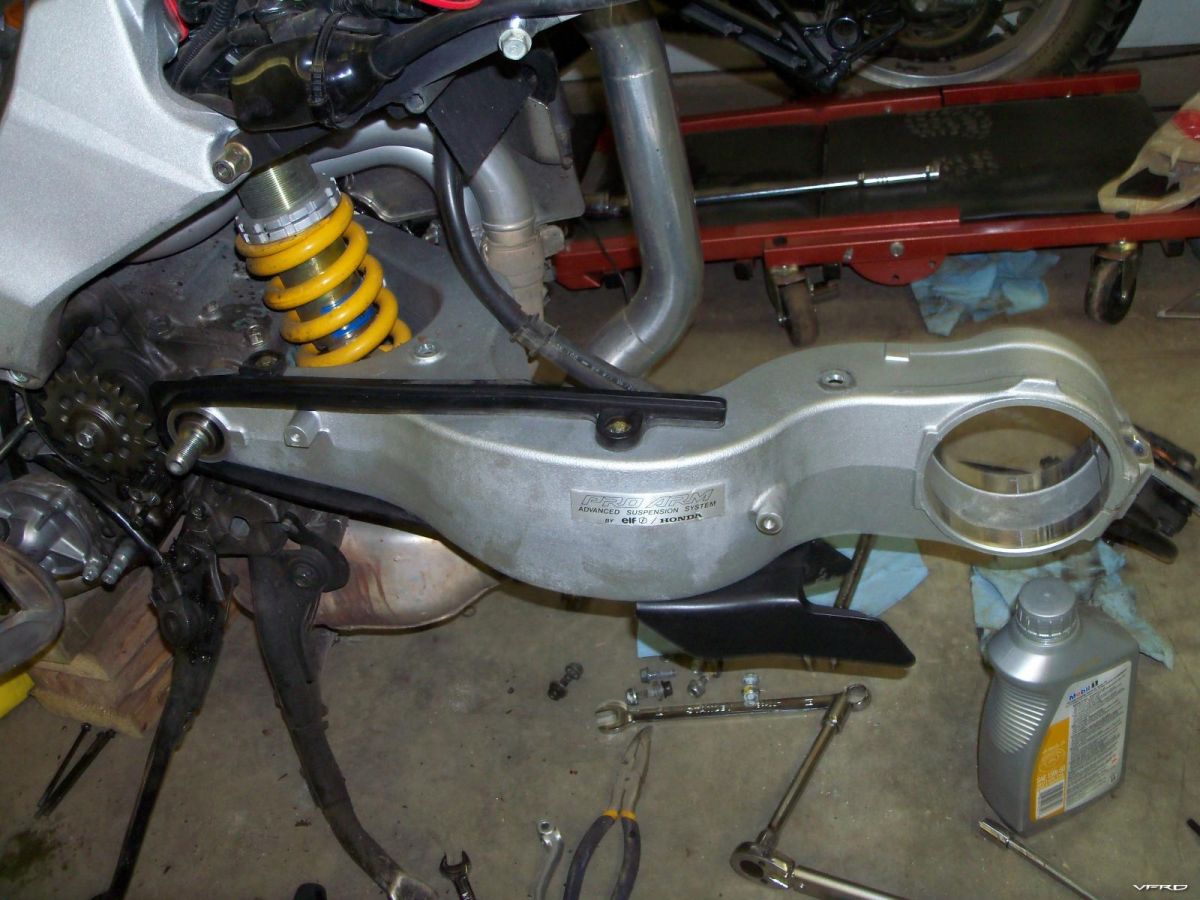
100_0508.JPG
New chain and sprockets fitted as well as a fresh Harris Hugger in CF.
Replacement footpeg hangar and shift lever fitted:
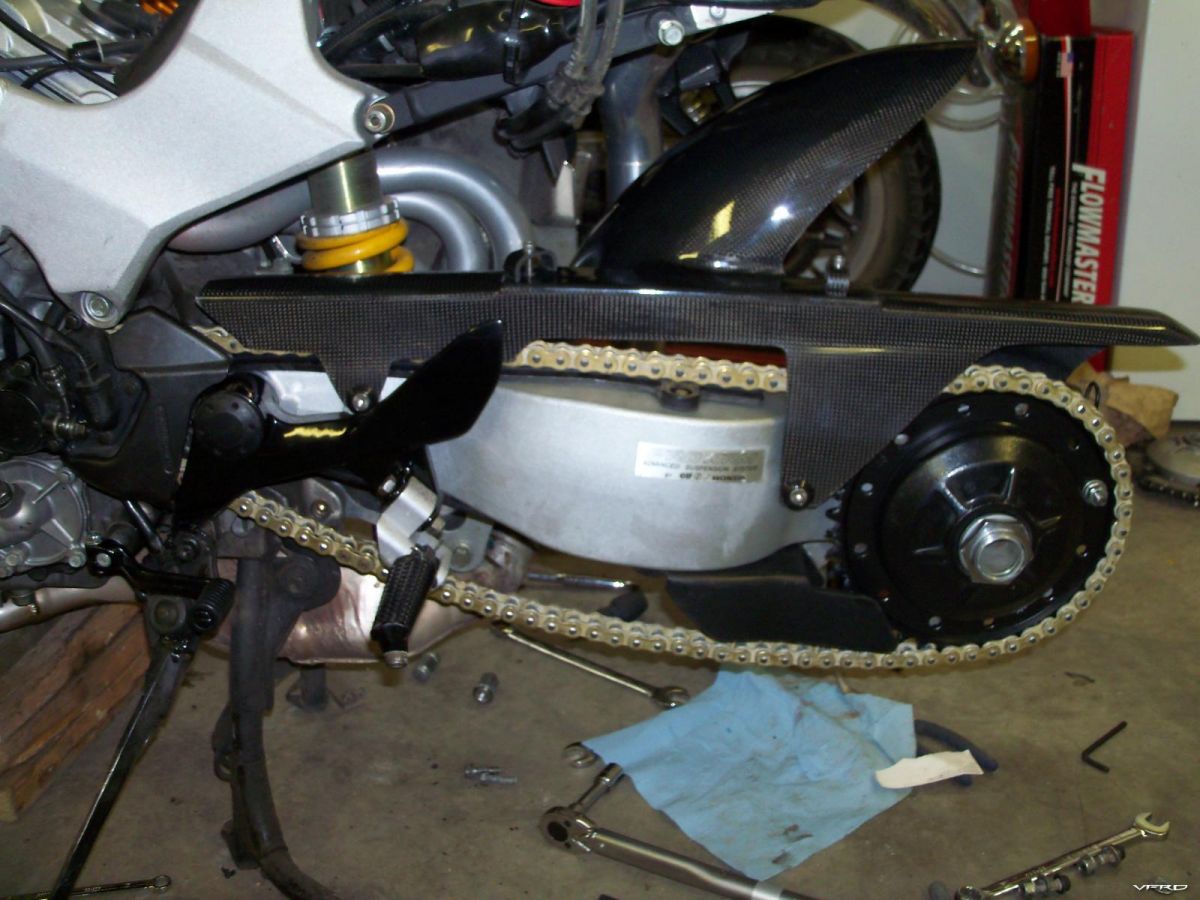
100_0509.JPG
Dang OE sprocket bolts are now too long with my (thinner) aftermarket sprocket.
Went to jet downtown and get some shorter ones, no dice, it was 9:02PM sad.gif
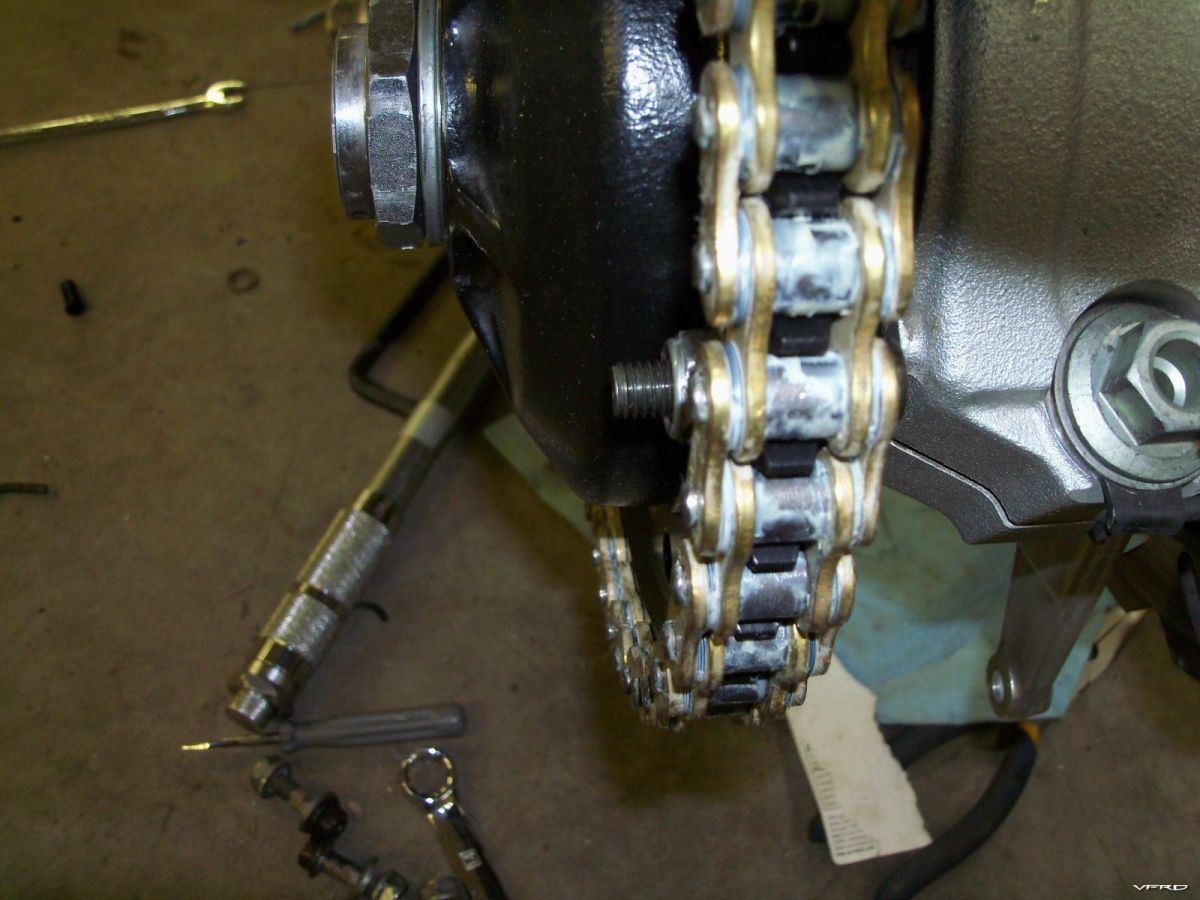
100_0510.JPG
Dubious Chinese Wavy rotor refitted on new/used axle.
First thread on the other side of the axle was dinged in one small spot, had to break out the jeweler's file and file it down so the 46mm nut would thread freely. OK now.
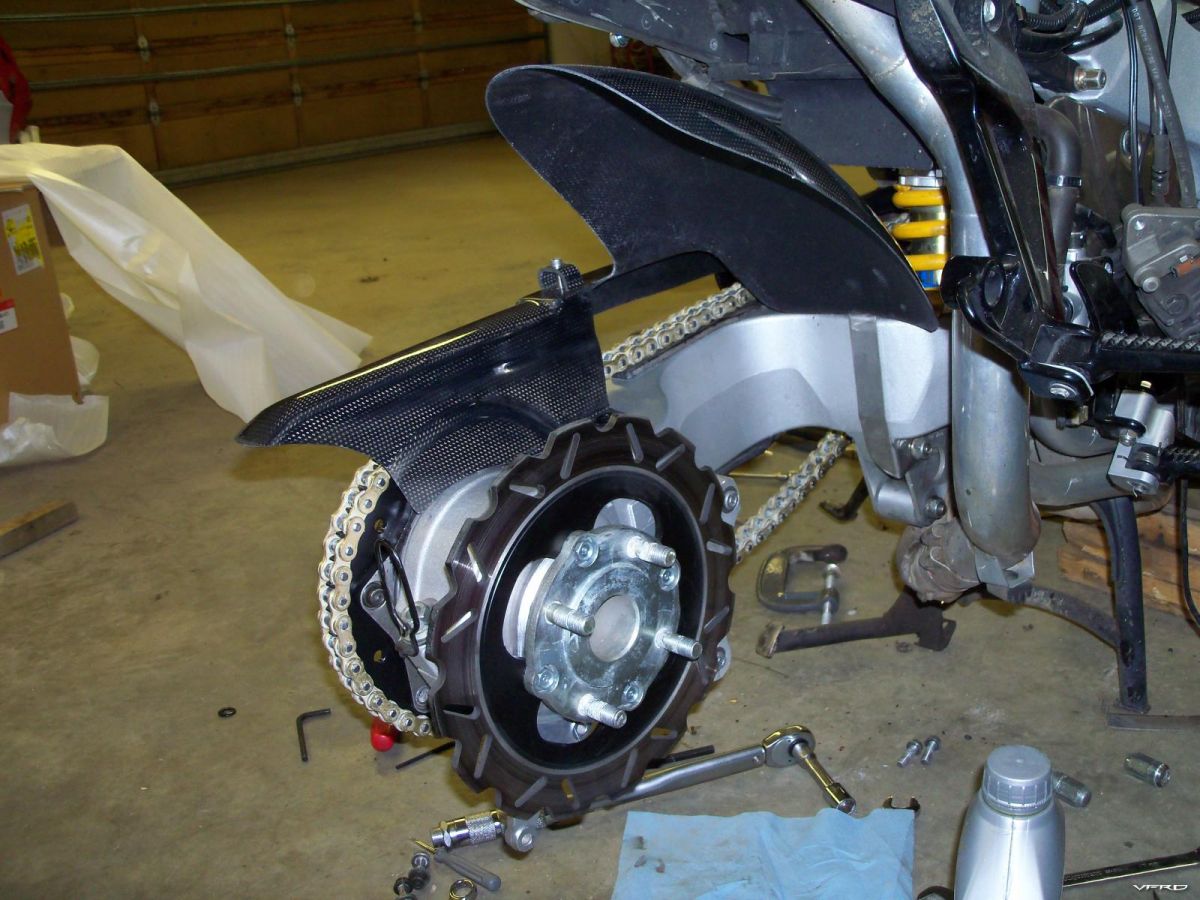
100_0511.JPG
Have to fit new shorter bolts for sprocket, will use grade 12.9 for peace of mind.
Also clean rear rotor, bolt up rear caliper, then onto removing the subframe and cleaning everything, straighten one subframe rail, reinstall exhaust, repair bent license plate bracket.
After that, remove front end and swap frame.
Stay tooned!
Go Robbie! :cheerleader:
:lurk:
ps - not sure if you want to lengthen your work list, but Redmarque adapted a single piston RR rear caliper to his bike - it would work perfectly with your F4i rear master. :cheerleader:
SEBSPEED
ps - not sure if you want to lengthen your work list, but Redmarque adapted a single piston RR rear caliper to his bike - it would work perfectly with your F4i rear master. :beatdeadhorse:
Well, I have a spare brake caliper bracket, so maybe next winter........
Interesting thread and story.
Great job, and so far a great looking rebuild.
Sounds like the advice to just buy a second bike is well-founded. In my situation I'd just swap parts and not worry about numbers -moving a VIN plate from bike to bike doesn't bother me at all but I'm a cowboy. I've never heard of any cop ever checking the stamped VIN numbers on the frame. That sounds like more work than buying a dozen donuts and sitting out behind the tasty-freeze with the feet up on the dash with the radar gun running.
And since I only carry liability this whole "salvage vehicle" thing becomes moot. My current bike was thrashed but since there was no insurance involved I just picked it up from the towing company and brought it home. Lucky I didn't need to replace the frame but I wouldn't have made a deal of it if I had. No paperwork other than transferring the title to my name and buying plates. Nobody ever had any records of it being crashed and it never ended up in a salvage yard with a besmirched title.
We've got High School kids here beating each other to death with scrap lumber -they really don't pay much attention or have time to look at what numbers you have stamped on your headstock behind all those cable bundles... I doubt even if someone did notice that they'd send anyone to jail here for putting together a bike that the numbers don't all match here in the USA unless the parts had been reported stolen at one point. That's the whole point of the VIN anyhow -to discourage theft. I guess things are different up there.
It does look like you are getting to really know the bike with this rebuild and it will be time well spent IMHO whenever it comes time to work on it in the future as you'll know the bike like the back of your hand. Basic maintenance will be a snap for you after all this. The fact that you are going to have a completely unique bike with cross-generational parts will make it something special and "yours" more than anything you could ever buy in a catalog! I look forward to seeing the final product and the paint color/scheme you settle on to finish off all your hard work. I went cheap with my bike and just rattle-canned it with tractor paint after I found all the replacement bodywork on fleabay/VFR forums. Took me 4 years after I got it all together before I finally painted all to match -but I'm a procrastinator. I'm pretty happy with the way it works.
Rob,
Have you started the Frame yet?
It's not too bad a job! Pull the forks, actually looking at the pics we just left everything semi attached and worked the frame off. If I remember correctly the brake lines can remain intact front to rear as you guide the frame off the engine swingarm assm. An extra Body makes this a much easier job!
Got pics somewhere! :laughing6-hehe:
[image: post-301-126867204892_thumb.jpg]
[image: post-301-126867206083_thumb.jpg]
[image: post-301-12686720834_thumb.jpg]
[image: post-301-126867212072_thumb.jpg]
BR
BaileyRock
Rob,
Have you started the Frame yet?
It's not too bad a job! Pull the forks, actually looking at the pics we just left everything semi attached and worked the frame off. If I remember correctly the brake lines can remain intact front to rear as you guide the frame off the engine swingarm assm. An extra Body makes this a much easier job!
Got pics somewhere! :unsure:
Those are some NEAT pics of the rare yellow spineless Jellyfish VFR!
You just slid the frame off and left everything more or less connected by cables, wires, and the engine???
These photos made my day. I think it's the most amazing thing I've seen this whole winter. Being able to roll up one's sleeves and wade into a job like this is the kind of thing that impresses me more than most other things. I'm glad you got some pics of that. I need to start taking more pics of my projects. Pics or it didn't happen...
It HAPPENED! :laughing6-hehe:
Veefer800Canuck
Dang OE sprocket bolts are now too long with my (thinner) aftermarket sprocket.
Went to jet downtown and get some shorter ones, no dice, it was 9:02PM sad.gif
Mo bettah:
[image: gallery_554_5200_132098.jpg]
They are grade 12.9 so should be plenty strong enough. And no, the axle nut is not torqued nor staked yet. It's on the list.
I've been working 4 nightshifts, so progress is almost at a standstill save for the sprocket bolts. Yeah, I know, Big Whoop. :lobby:
BaileyRock
Rob,
Have you started the Frame yet?
It's not too bad a job! Pull the forks, actually looking at the pics we just left everything semi attached and worked the frame off.
Not yet, on nightshifts. Soon.
If I remember correctly the brake lines can remain intact front to rear as you guide the frame off the engine swingarm assm.
What you don't remember correctly is that I have no LBS. Heck, you rode the bike last year in CO, dincha? :lobby:
Srsly, yes, I do plan on lifting the frame just as you pictured. I got the clue from the fella that painted his Vtec frame this past winter.
Thanks for the pix, it shouldn't be too bad. I just wanna finish up the swingarm and rear subframe first and then work the frame. That way, I don't have too much disassembled at the same time. :goofy:
I need to remove the subframe, take it to work and put it in the big press and straighten the LH lower rail which is slightly tweaked. While that's off, I'll clean everything in sight as it's philthy. :blush:
Veefer800Canuck
Mo bettah:
[image: gallery_554_5200_132098.jpg]
What make is that rear sprocket? Black looks cool :cheerleader:
keny
What make is that rear sprocket? Black looks cool +1.gif
Got it from Sprocket Center:
http://www.sprocketcenter.com/c/16175/1/vfr-800f1-98-01.html
[image: 538923-3.jpg]
Veefer800Canuck
keny
What make is that rear sprocket? Black looks cool +1.gif
Got it from Sprocket Center:
http://www.sprocketcenter.com/c/16175/1/vfr-800f1-98-01.html
[image: 538923-3.jpg]
From the pic looks like the logo on the sprocket is Drive Systems
I have a couple of questions: Doesn't running a fuel injected bike damage the injectors and the pump as it does with cars? I didn't quite catch the thing about fuel pumps and capacity/angle of the tank; what is the new fuel capacity with this mod, can you get it all out of the tank? Keep up the posts I'm watching this one with great interest.
Total capacity is 5.8 gal, up from 5.3 (as per Honda specs)
Dunno if I'll be able to get all of it out, member FROZEN says no on his.
I never run it right down anyhow, I always like to stop early for fuel when I'm on tour.
Mainly I like the look/angles of the tank as compared to the original one.
It'll make the bike more unique.
I will report back when I figure out the actual fuel range/capacity/refill amount.
Not much to report.
Did up the rear caliper, installed the rear wheel, torqued the 46mm Hay-soos nut on the rear axle. 150 ft/lbs!!! :excl:
Removed the back half of the exhaust system and the rear subframe. Need to straighten the RH lower subframe rail as it's pushed in about 6mm.
Doesn't sound like much, but it's making the passenger peg sit way off-kilter. I'll take it to work and use the big shop press.
Tried bending it back while ON THE BIKE, using the old, wrecked passenger peg hanger as leverage, but just cracked the hanger. Oh well, worth a try.
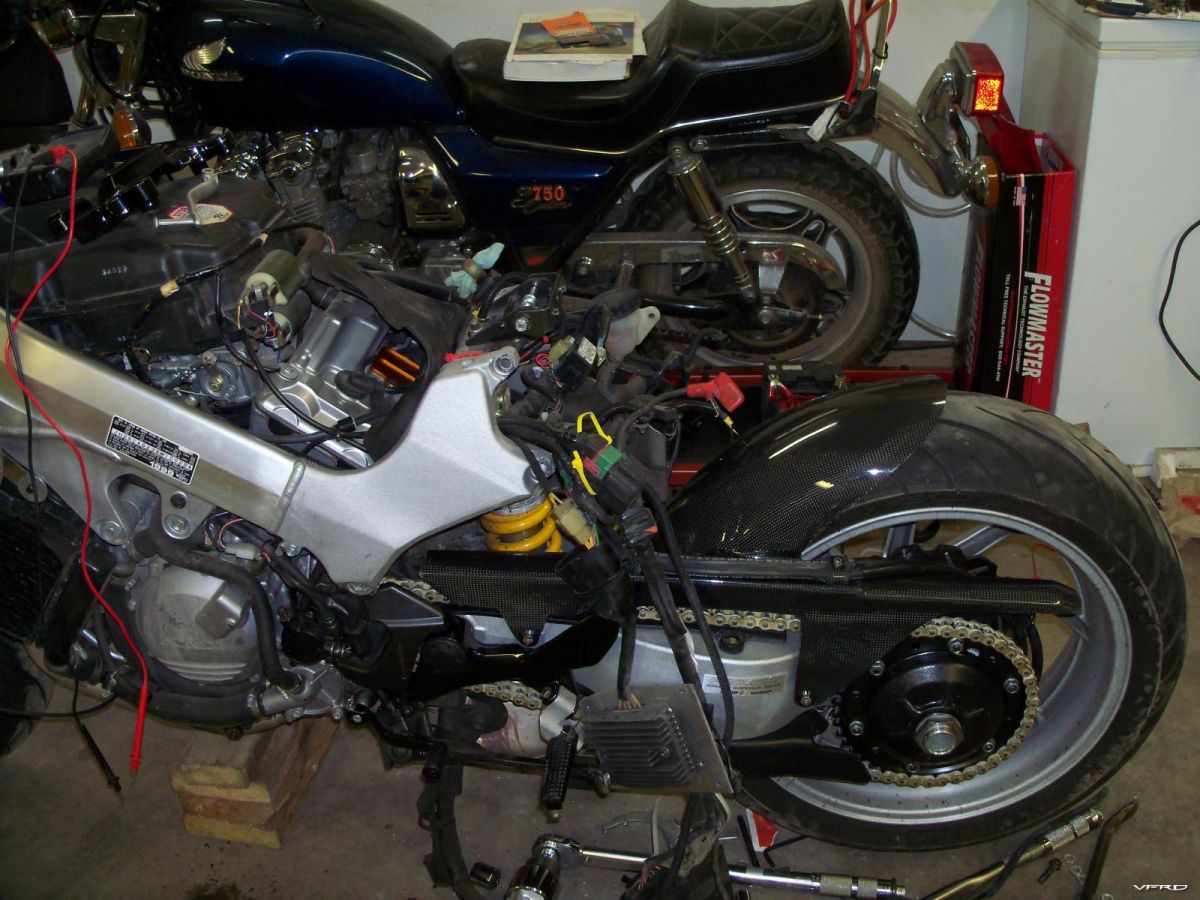
Frame swap is next on the agenda.
Straightened out the slight inward bend in the subframe. It isn't perfect, but it's really, really close. It's about 2mm further out than standard. Close enuf!
I put it in the press at work and it popped right back into shape with no probs. It was actually harder finding some scrap steel material and a couple of big sockets to use as props to direct the force where I wanted it to go.
A small alteration to the footpeg hanger bracket inner mounting surfaces should restore the last bit of alignment so the passenger peg will sit level and proper.
Better by far than getting another subframe and re-doing the aluminum undertray!
The photoshopped red line on the left was where the slight bend was. All the undertray rivets on that side popped out when I pressed it back, so I'll have to run about a half dozen new rivets in, then clean it up B4 install.
Still have to straighten the license plate bracket and clean up the exhaust system, swapping the frame should be on Monday/Tuesday.
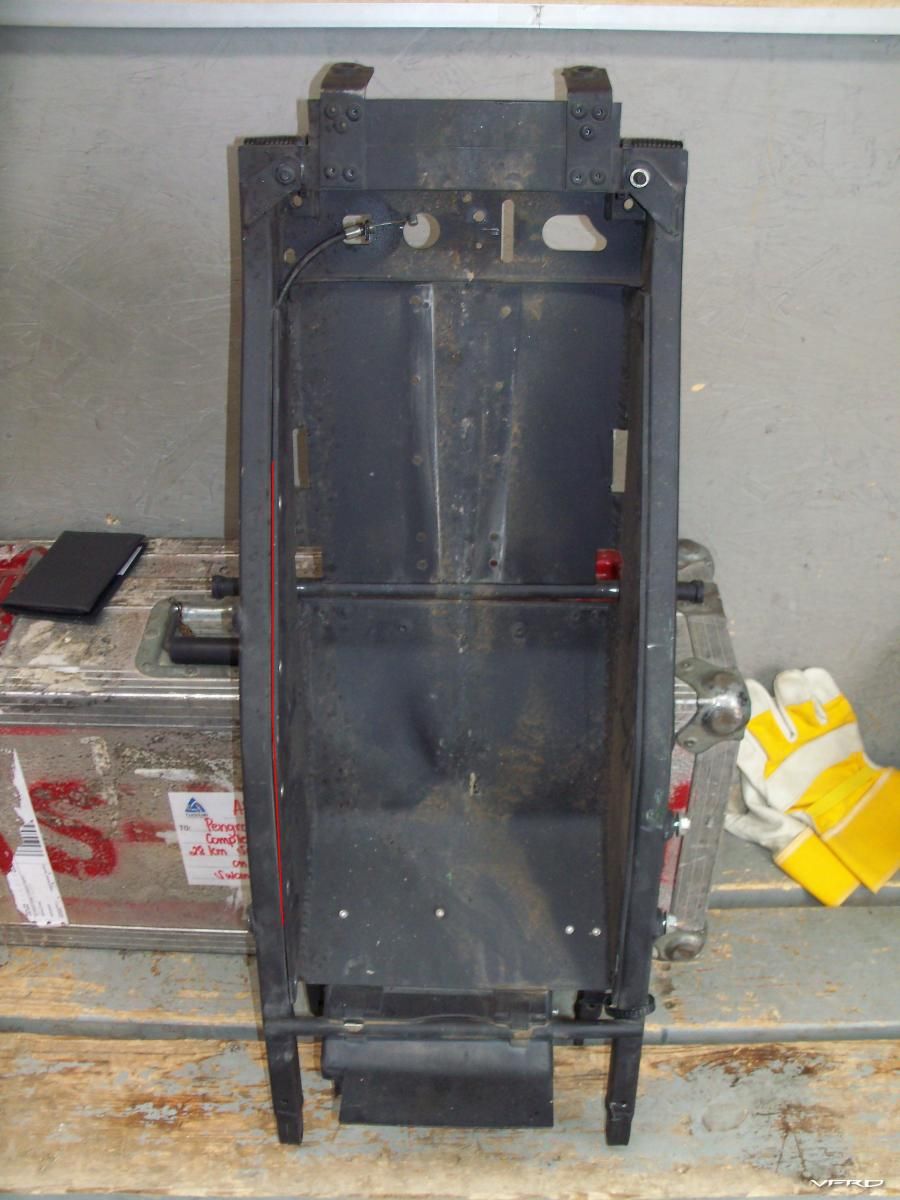
Keep at it. You're almost there...
Sorry for your bad break with no humor intended at all. Yeah you're right, it could be worse. Right now you are making plans to rebuild your bike and in my book you've won the biggest lottery of all - LIFE! Okay, pep talk is over and here is to your speedy recovery! JD
Edited March 21, 2010 by leanitHey Rob, looks like its all starting to come together. looking fwd to seeing it person in troutdale..Right??. see you have a CB750custom had a black one until i crashed it, brings back fond memories.
Rob, I see you sourced a replacement swingarm. I don't recall you saying the original had been damaged, was it bent??
On the gas tank are you using the 6G fuel pump and/or sender? Or just your original 5G parts? I'd like the fit a 6G tank for the extra capacity but if I can't suck it out it isn't much worth it.
Looking good, best of luck the frame swap goes easily. :fing02:
jfviffer
Hey Rob, looks like its all starting to come together. looking fwd to seeing it person in troutdale..Right??. see you have a CB750custom had a black one until i crashed it, brings back fond memories.
Not my CB750, it belongs to my co-worker Wes.
He also has a VTX1800 and a Harley bagger, you can maybe see some of those bikes in the other pix.
He had a KLR650 too, but sold it semi-recently. He's single in case you couldn't figure that out. :laughing6-hehe:
vfrcapn
Rob, I see you sourced a replacement swingarm. I don't recall you saying the original had been damaged, was it bent??
On the gas tank are you using the 6G fuel pump and/or sender? Or just your original 5G parts? I'd like the fit a 6G tank for the extra capacity but if I can't suck it out it isn't much worth it.
Looking good, best of luck the frame swap goes easily. :laughing6-hehe:
Swingarm: the end of the axle and the 46mm nut took a hit. I removed the chain and put a 3 foot metal straightedge against the rear sprocket, right tight. It didn't line up with the front sprocket no-how. Was right in the MIDDLE of the front sprocket teeth. Made no matter if I shifted the front sprocket left to right in it's (limited) freeplay, it was still out of whack.
So, for the sake of being safe, I replaced the swingarm with a used unit. Sprockets now line up.
Gas tank: using 5th gen pump. My old tank had a (slight) dent in it from my right knee upon impact.
I like the styling of the 6th gen tank better, and I've already sold the original tank to a VFRd member who really really needed a decent tank.
Really, the dent was more of a slight depression, and it was only visible if you looked alongside the tank at certain angles.
It wound up to be quite a low-cost mod, once I deduct what I recouped from the original tank. Like about 40 bucks net. I'll buy that for the improved styling alone.
As for the range, I'll report back once I'm able to get the tank filled and emptied on the road.
Sorry to disappoint, but got called into work on my only day off this week, so no-fixie on the bikey. :unsure:
On the plus side, it's double-time, so whining about it isn't really an option! tongue.gif
Saturday, I promise!
Hi veefer800Canuck.
I'm new to these boards but since I live in your general area I thought I'd say hello and show you some pics of my bike before and after my get-off in Montana...
The new color is by Porsche - it's called 'Deep Olive Metallic'.
Good luck with your project and I hope my pictures give you a bit of added inspiration!
Before....
[image: post-19755-126931680138_thumb.jpg]
After the get-off...
[image: post-19755-126931687764_thumb.jpg]
Same bike - new parts and a new paint job...
[image: post-19755-126931698716_thumb.jpg]
Back on the road again...
[image: post-19755-126931729399_thumb.jpg]
Wow, you just joined today! Welcome CAFAN. :goofy:
Your bike sure looked messed up. So it was Pearl Conifer Green before?
Hopefully we can get together sometime and ride. :tour:
Veefer800Canuck
Wow, you just joined today! Welcome CAFAN. :goofy:
Your bike sure looked messed up. So it was Pearl Conifer Green before?
Hopefully we can get together sometime and ride. :tour:
It was Pearl Conifer Green (Teal Green) before. I guess my saving grace was that the stock forks were designed to bend much easier than the frame, so the frame was ok. Lots of other parts didn't fare so well, so from a purely monetary perspective it still cost me too much to fix (most parts were purchased new from the states). In the end it was worth it because the bike looks, runs and handles like new again - and we had a long history together, so I wasn't going to give up on it without a fight smile.gif
Hopefully your bike turns out just as well and we will get a chance to ride/tour together sometime. I'll try to keep up on your progress...
All the King's Horses and all the King's men......
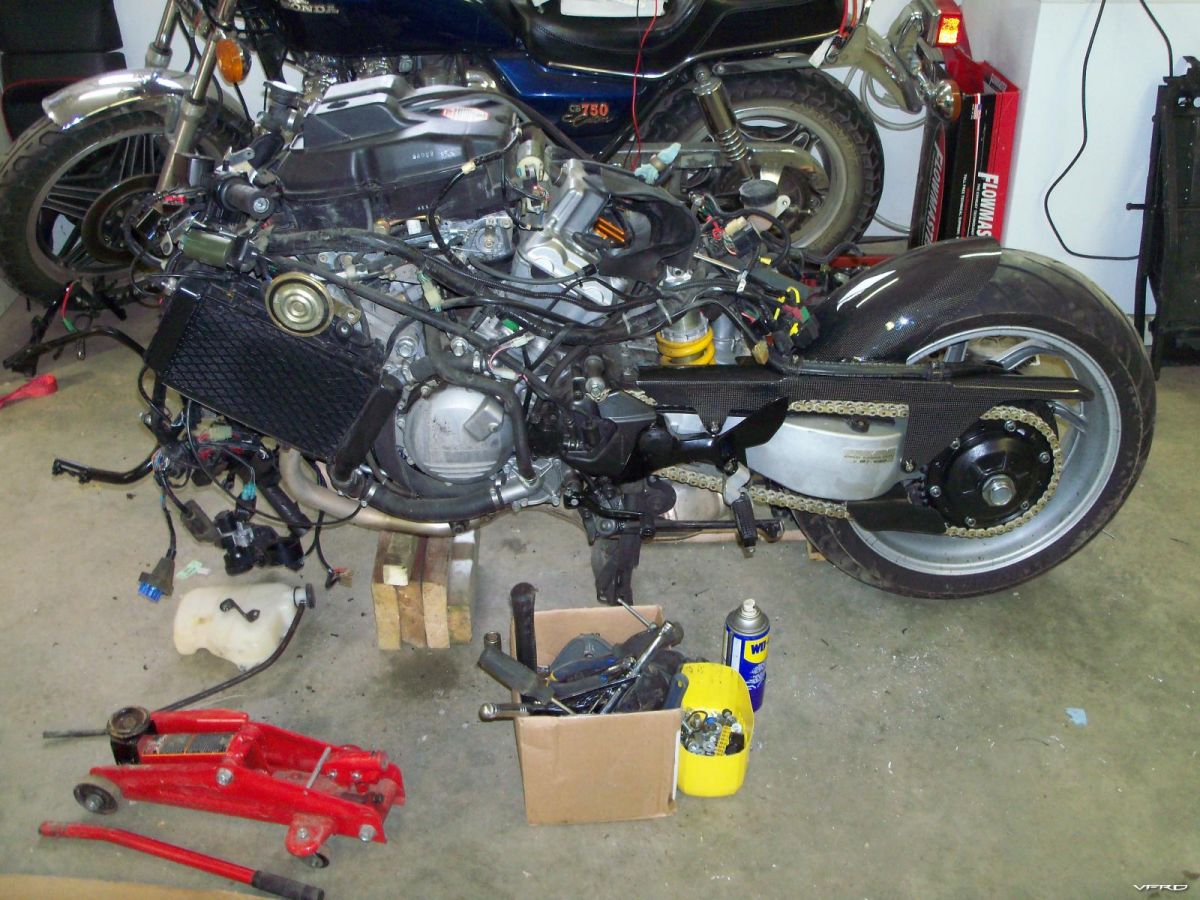
The new VFR Interceptor Invertebrate!
Veefer800Canuck
All the King's Horses and all the King's men......
Oh dear!
Now is not the time to lose motivation! Keep at it!
Embedded videos don't seem to be working, they just sit and buffer forever.
For bent wheel spin videos, click here:
bent wheel videos on photobucket
Silver wheel with tire is the crashed bent rim.
Black wheel with no tire is the replacement EBAY rim (not bent).
Any movement of the black rim is likely due to my shoddy camera work, cuz I didn't see any movement in person.
Damn steering head bearings. :laughing6-hehe:
Bottom race was brinelled, top race had some corrosion on it. :biggrin:
Called the giant industrial bearing supply place in Edmonton, they can get the bottom bearing, but it's in Toronto, and I'd have to pay shipping.
Top bearing they cannot get, the 26mm I.D. makes it "special".
There are a Zillion kits on EBAY, but the sellers are all located in the UK or Australia.
So, I just ordered another kit from All Balls. Hopefully they have switched suppliers and I don't get the KML brand bearings this time out.
I was HOPING to have the bearings on hand sooner so I could install them before putting the frame on the bike, but I guess I'll have to do it the hard way. :laughing6-hehe:
Oh, and on another note, I could see where the upper bearing was riding on the stem from the grease mark when I removed it. It's nowhere near hitting the step in the stem, so I'm going to forego the spacer in the frame and just use the one on the lower triple!
Thanks for the insight into the bearings Rob!
[image: View Post]SEBSPEED, on 30 June 2010 - 05:40 AM, said:
How did the new brake rotors do over those 3 miles?
Didn't even notice them. Worked like brakes should oughta.
Although I was tiptoeing around at legal speeds so as to not attract attention from Johnny Law.
Also, my brake pads are the same ones from before, I just sanded them and reused them, so it's going to take awhile for them to conform to the new discs.
Finally got all the fairings on plus the "V" cowl inbetween the lowers:
[image: Posted Image]
fairings on 001.jpg
[image: Posted Image]
fairings on 002.jpg
Sorry they are still garage pics, but it's very dark out just now. :wink:
Didn't hear back from my insurance company today, and tomorrow is Canada Day, so I'm screwed there, I'm hoping for Friday.
[image: Posted Image]
fairings on 005.jpg
[image: Posted Image]
fairings on 008.jpg
Some of you might remember my bullet holes from the previous incarnation of the GL800RR-SP2.
I like to inject a bit of whimsy into my bike somewhere, just a little bit of fun. That's what the bullet holes were for, a bit of the lighter side.
So this time, I thought long and hard about how I was going to do it with the new version.
Behold, I give you "Faux-lins" forks. :goofy:
[image: Posted Image]
fairings on 003.jpg
Since the new forks are that lovely gold colour like Ohlins, I figured I'd have a bit of a laff with it. :bliss:
Actually, it's not 100% false advertising, there IS an Ohlins shock out back, I just seem to have, er, misplaced the stickerz. :fing02:
Looks great!
Happy Canada Day :comp13:
Your bike looks awesome :comp13: . I was thinking about your earlier posts where you said you were thinking about painting the wheels and the swingarm black. Then someone suggested that would hide your rear wheel. I wonder how it would look if you painted the swingarm black and the wheels the same dark metallic grey color, like the color of the wings on your fairings? In one of the pictures, the color of the rear wheel came out as dark grey (probably because of light) and I thought that looked handsome...
Black out the heatshield perhaps?
nice touch with the Faux-lins :) I have similar stickers on my golden SP2 forks, but then I did fit Ohlins valves to them :comp13:
[image: View Post]SEBSPEED, on 01 July 2010 - 05:26 AM, said:
Black out the heatshield perhaps?
There's a thought. Maybe get another on EBAY and have it stripped and black chromed?
[image: View Post]arrow, on 01 July 2010 - 05:22 AM, said:
Your bike looks awesome :fing02: . I was thinking about your earlier posts where you said you were thinking about painting the wheels and the swingarm black. Then someone suggested that would hide your rear wheel. I wonder how it would look if you painted the swingarm black and the wheels the same dark metallic grey color, like the color of the wings on your fairings? In one of the pictures, the color of the rear wheel came out as dark grey (probably because of light) and I thought that looked handsome...
I'm somewhat leaning towards the black swingarm and charcoal grey metallic wheels yes.
Have all summer to decide because nothing is happening until after the snowmen arrive.
[image: View Post]Veefer800Canuck, on 01 July 2010 - 01:46 PM, said:
[image: View Post]SEBSPEED, on 01 July 2010 - 05:26 AM, said:
Black out the heatshield perhaps?
There's a thought. Maybe get another on EBAY and have it stripped and black chromed?
I was thinking more along the lines of satin black rattle can... :fing02:
[image: View Post]SEBSPEED, on 01 July 2010 - 02:01 PM, said:
[image: View Post]Veefer800Canuck, on 01 July 2010 - 01:46 PM, said:
[image: View Post]SEBSPEED, on 01 July 2010 - 05:26 AM, said:
Black out the heatshield perhaps?
There's a thought. Maybe get another on EBAY and have it stripped and black chromed?
I was thinking more along the lines of satin black rattle can... :laughing6-hehe:
Nein :excl:
[image: View Post]Veefer800Canuck, on 01 July 2010 - 02:17 PM, said:
Nein :excl:
I said SATIN, not FLAT!!! :laughing6-hehe:
Lookin' better all the time...
I know I'm a minority here but I like the wheels the way they are now :) Looks nice and great job!
Woohoo!!! Put on about 100 miles today as a shakedown cruise!
Bike is running fine! Handles just like before, though I have yet to set up the front fork. Still on "mystery" settings as I recieved it.
BUT, there is a detail I have to rethink.
The rear tank mount: It was rubber mounted in it's original configuration. I eliminated that and went metal to metal. There is still a hinge, just no rubber in the hinge.
I am getting a fair amount of vibration through the fuel tank, and it doesn't matter if the tank is empty or full. I think if I can reingineer the rear tank mount to incorporate the original rubber mount, it'll go away. Thank heck I saved all the spare parts during the rebuild.
And I still hate aftermarket front sprockets without the OEM rubber cushion. This is the second time I've used an aftermarket front sprocket, and around town, at normal cruising speeds, when you are just keeping a steady speed, neither accelerating nor decelerating, there is an annoying noise coming from the countershaft area. Goes away if you roll on the throttle or roll off the throttle.
Last time around, I swapped the sprocket for an OEM one and the problem disappeared. Looks like I'll have to do it again, as it annoys me.
Oh well, minor gripes all in all. And everyone that sees the bike says "Wasn't it RED before???"
But they like it. :rolleyes:
Pics or it never happened.
[image: View Post]SEBSPEED, on 03 July 2010 - 08:14 AM, said:
Pics or it never happened.
Camera at home, Sry.
Pics L8R. :biggrin:
Looking good Rob :biggrin:
I think I'm leaning to the grey wheels too, I think it'd balance out the black frame etc. better. Looks awesome as it is already, can't wait to see it in person this August, I'm expecting to see a lot of that rear clear light assembly, might have to see if I can get some for a winter project mmmm........
[image: View Post]SEBSPEED, on 03 July 2010 - 08:14 AM, said:
Pics or it never happened.
OK, I know you're all bored to death with garage photos, so I photoshopped a nice lake into the background to fool you all. :offtopic:
[image: Posted Image]
on the road finally 001.jpg
[image: Posted Image]
on the road finally 003.jpg
[image: Posted Image]
on the road finally 004.jpg
And then staged a shot where I had it running on the centerstand in the garage, then photoshopped a highway into the pic.
Really, there is no bike, I've been making it up as I go along...... :pinocchio:
[image: Posted Image]
on the road finally 005.jpg
MAN, that looks good! My vote is for the black swing arm and silver wheels. I still think the Euro VFR badges would really make the silver wings 'pop'. :offtopic:
U would think with the REBUILT status you could reset the ODO :)
Looks great ..... I will pipe in on the next seasons project... Black rims... BUT get Michilin to produce GREY rubber for there next run of PR2's
Looking great, those tail lights and dumbos really work with the grey wings and wheel. I vote for grey/silver wheels too. Here's to another 70K! :cheerleader:
So I got around to ordering my decals today, this is what I chose:
Tank wings with these exact colours, from a 1984 VF700F:
[image: Posted Image]
Front fairing decal, above the headlight and underneath the windscreen in these colours:
[image: Posted Image]
Rear tailsection decal above the taillight, behind the seat in these colours, and curved as shown:
[image: Posted Image]
RC51 SP2 decals above the front turnsignals in these colours:
[image: Posted Image]
And below the SP2 decals, these ones in black/red from a Blackbird (ignore the blue background):
[image: Posted Image]
The large HONDA script on the very bottom of the lower fairing, in charcoal metallic from a Euro VF1000FII:
[image: Posted Image]
Large side fairing VFR logo from a 2003 VFR in black/red with hollow centre so the white paint shows through, but I'll remove the "V4 VTEC" portion prior to installation:
[image: Posted Image]
And I may/may not replace the "V4 VTEC" above with this decal here, in charcoal metallic, but I ordered them anyhow, they were only 3 bucks each:
[image: Posted Image]
Hope it all looks good in the end, wish me luck!
Damn Rob, that looks great!
Superb job mate.
I think that'll look great. I'd definitely add in the "Gear Driven Cams V4" logo. :fing02:
[image: View Post]vfrcapn, on 04 July 2010 - 09:11 PM, said:
I think that'll look great. I'd definitely add in the "Gear Driven Cams V4" logo. :fing02:
Yeah, I'm pretty sure I will. Have to see how it looks. I ordered it significantly smaller than the larger VFR logo that would be above it.
Like about half the length.
[image: View Post]Veefer800Canuck, on 04 July 2010 - 09:03 PM, said:
So I got around to ordering my decals today, this is what I chose:
Front fairing decal, above the headlight and underneath the windscreen in these colours:
[image: Posted Image]
RC51 SP2 decals above the front turnsignals in these colours:
[image: Posted Image]
Hope it all looks good in the end, wish me luck!
Clearly you chose the red accents to work in with the seat ... nice one :fing02:
Looks really stunning!
Just the rim black as swingarm it would be the dot on the I
[image: View Post]Veefer800Canuck, on 03 July 2010 - 01:43 AM, said:
BUT, there is a detail I have to rethink.
The rear tank mount: It was rubber mounted in it's original configuration. I eliminated that and went metal to metal. There is still a hinge, just no rubber in the hinge.
I am getting a fair amount of vibration through the fuel tank, and it doesn't matter if the tank is empty or full. I think if I can reingineer the rear tank mount to incorporate the original rubber mount, it'll go away. Thank heck I saved all the spare parts during the rebuild.
I removed my hybrid 6th/5th gen tank mount and reinstalled the original 5th gen mount, drilled the 6th gen tank flange and bolted it up.
Vibration GONE. :fing02:
Pic showing both rear fuel tank mounts on the bike, the upper one is the 6th gen's and has been taken off:
013.JPG
I also adjusted my shifter downwards 1 more spline, that's now 2 down from standard.
Needed because of the BLS peg lowering blocks.
I had the shifter at -1 before, but upshifting was tough, I could do it, but the ankle really had to stretch a lot.
Downshifts were almost ridiculous, like lifting your foot way up to clutch a kenworth. But that's mostly the ankle business.
SO, with the shifter at -2, I can now upshift almost perfectly, and downshifts still require me to remove the foot from the peg, but only a little bit now.
I'll have to perfect my Rossi "Leg Dangle" on corner entries to look cool now. :fing02:
Attached Images
-
[image: n498581_ROSSI01_2_preview_big.jpg]
Wow what a story, I've been following this since about page3 and think its one heck of a tail about a man that loves his bike. I did a ground up rebuild on my XR600 Christmas before last and even though it wasn't under the same circumstances, I can appreciate the hard work you put in and the fact you did it all with the injury makes it even more special. I know that since spending all that time learning every detail of the machine you'll never let it go willingly because you now have an even deeper bond with this machine than you ever would have before, just as I do with my XR. or do I just get too attached to my toys? :wub:
Anyway good GREAT job from a far away VFRD member in North Queensland Australia. You sir are an inspiration to us all :fing02: :fing02:
PS: I've never really liked the 5th gen styling but dam that white with the charcoal wings and the black frame, wow you have created something special.
I like your bike!!
What was your address again??
:cool:
1050 West Addison. :laughing6-hehe:
(bonus points to the first to "get it")
Nice one Elwood. Isn't the address @ Wrigley Field 1060?
Nice one Elwood. Isn't the address @ Wrigley Field 1060?
Dayum, it was early. Shoot. :owned:
Dayum, it was early. Shoot. :owned:
What do I win? :D
Dayum, it was early. Shoot. :owned:
What do I win? :D
A free can of high temperature synthetic racing air for your tires. It's on the way.
Arrgh! Now that I get to putting the front wheel back on the bike, I see that the RH fork seal is leaking (ever so slightly, but it ain't going to heal itself magically).
Didn't see it ALL WINTER LONG as the bike was parked with the RH side facing towards the garage wall, tucked into a corner!
And I didn't notice any leaks at all at the end of last season.
Dammit, that's what you get for being a nice guy and saying YES to doing everything for everyone else all winter long, and procrastinating working on the bike because I only have these three, four, five, six, ten things to do. :pissed:
Well, MAYBE I'll be ready for Nelson, at this rate, maybe not. :lobby:
You can do eet!
Make sure yo uhave a second set of hands when you do those forks, they are a mother to get apart/back together by yourself!
Good lookin rotors !!!!!!!!!!!!!!!!!!!!!!!!!!
Due to numerous other commitments, lack of motivation, late discovery of leaking fork seal, and various other lame excuses, I am FINALLY getting the bike back together. :comp13:
Well, except for one more lame excuse: I have no more locktite :pissed: , and so could not assemble the front end beyond just loosely. Grrrr. And of course, nowhere to get some after midnight.
Got my lovely black steel lug nuts, which you can't see, because, well, they're black.
Should be better in the sunlight, and even betterer when I get my THURN VFR logo center cap (black with silver VFR logo), which is currently en route from Deutschland, for way, way too many Euros.
[image: Posted Image]
IMG 0037
Who likes Carbon Fibre? I DO I DO!!!
[image: Posted Image]
IMG 0038
[image: Posted Image]
IMG 0036
And finally, my attempt at making a "double pronged" shifter to work with my (non) ankle. I just need to finalize the position, remove the rubbers, clamp it together and have it welded solidly, then paint same.
I hope it works well enough that I don't need the electric shifter, because I would rather shift myself, if at all possible.
[image: Posted Image]
IMG 0040
[image: Posted Image]
IMG 0041
Winter of 2011 the plan is to remove and powdercoat the swingarm to match the frame, and get some smoke black braided steel lines for all the hydraulic plumbing, front, rear, and clutch. :fing02:
Then, I think I'm done. Maybe. :comp13: :biggrin:
Oh, and probably a set of new PR3's. :beer:
The double prong looks interesting. Lemme know if you run into any trouble getting it welded, I could handle that for you if needed.
The double prong looks interesting. Lemme know if you run into any trouble getting it welded, I could handle that for you if needed.
Thanks, there is a shop local to me that does specialty welding, and they also manufacture custom aluminum truck toolboxes and such for industry.
I'll warn them that it's cast, and not pure aluminum, and be sure they weld it all the way around for max strength.
And finally, my attempt at making a "double pronged" shifter to work with my (non) ankle. I just need to finalize the position, remove the rubbers, clamp it together and have it welded solidly, then paint same.
I hope it works well enough that I don't need the electric shifter, because I would rather shift myself, if at all possible.
[image: Posted Image]
IMG 0041
Nice work. Looking good on the bike, hope winter is almost done there and you can ride soon? We're still stuck in February down here in Cali, snowing in the mountains. :pissed:
Oh yeah, 2 weeks ago it was scorching hot and sunny. Today, it's right at the freezing mark and snowing.
Canadian weather, if you don't like it, wait 5 mins and it'll change!
Oh yeah, 2 weeks ago it was scorching hot and sunny. Today, it's right at the freezing mark and snowing.
Canadian weather, if you don't like it, wait 5 mins and it'll change!
Reminds me of Scotland :laughing6-hehe:
Well, being super-busy, working 7 days straight, and having zero motivation was not helping me get this thing back together, and it's already Father's Day! :pissed:
I did an epic all-night thrash to reassemble the bike tonight, doesn't look any different, just all in 1 big piece now. :comp13:
Last and only thing to do is get the shifter welded, which should be Monday or Tuesday, then we'll see if'n it works. :fing02:
Oh, and I need another baggie of fairing clips, a couple of them were buggered so I quit arguing with them for now. Monday also. :owned:
Still waiting on my Thurn center cap for the rear wheel. Was shipped from Das Vaterland on the 11th, and we've got a postal strike on here, whenever it gets to port. :mad:
Pouring rain outside, so more garage pics, sorry, you'll have to imagine a historic castle and neat, well-manicured estate in the background. :laughing6-hehe:
Oh, and I don't think I'll need the funky double-prong shifter after all.
Seems I can get by with adjusting the shift lever to suit, and deliberately modifying my technique, using my whole leg instead of mt non-existant ankle to effect shifts.
Won't be setting any 1/4 mile records, nor shifting like the RC212V, but it gets the job done.
[image: Posted Image]
IMG 0159
[image: Posted Image]
IMG 0154
[image: Posted Image]
IMG 0160
[image: Posted Image]
IMG 0163
Looks good Rob!
(DON'T MENTION THE WAR!)
Inquiring minds want to know.
I hear they get pissy if you mention their history.
Looks and sounds great, excellent job on the rebuild.
Not being a fan of mirror extenders myself, have you considered getting a pair of BMW R1100S mirrors? They are a straight swap and a bit wider than stock 3rd-5th gen VFR mirrors.
[image: Posted Image]
Okay you got me now, will those BMW mirrors really fit on the 5th gens?
I need a mirror thanks to going down Saturday and I'm tired of looking at my elbows and bags.
Okay you got me now, will those BMW mirrors really fit on the 5th gens?
I need a mirror thanks to going down Saturday and I'm tired of looking at my elbows and bags.
They are very expensive, even used.
If they fit a 3rd gen they should fit a 5th gen too.
Okay you got me now, will those BMW mirrors really fit on the 5th gens? I need a mirror thanks to going down Saturday and I'm tired of looking at my elbows and bags.
They are very expensive, even used.
Well, I'm looking at a single mirror at least and some new extenders this time.. So if its not a whole lot more than a couple of Honda mirrors and ugly, chunky extenders then I'd go for it..
I mean I'm seeing mirrors for 83 on ebay.
two of them would only be a couple bucks more per side than oem's mirrors and extenders.
Its right up there with not putting the break the plastic in a tip over dumbo signals back on.
Hey Rob, what did you ever do with the stock gas cap?
Mine has snapped off the trim ring, so, I get to swap my lock set over to another one.
If you still have yours, how much do you want for it.
PM me, before I buy the 2001 on Ebay in delaware for parts.
I've got it, it's powdercoated black. I'll get you a pm sometime today.
I got some time tonight to strip off the swingarm in preparation for powdercoating.
Gonna take it to work and use the press there to press out the bearings for the swingarm pivot and shock linkage.
It's gonna be satin black, exactly the same as the frame.
Wow, I can't believe I've put over 10,000km on the rebuilt bike thus far.
[image: Posted Image]
That powdercoating makes your ass look slim!!!!! :tongue:
Timmythecop would approve:
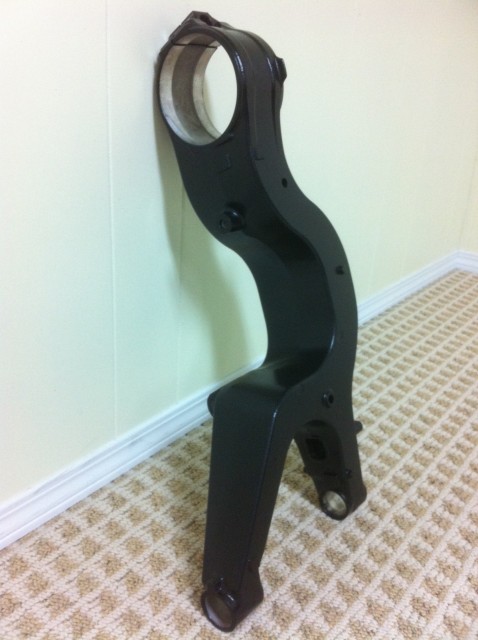 swingarm
Uh-uh, it's not FLAT black!
Phantom approval granted.
Well it IS satin, which is close, right?
Uh-uh, it's not FLAT black!
Phantom approval granted.
Well it IS satin, which is close, right?
I approve, does that count? I <3 satin black.
I see, a bunch of Satin worshipers eh? :laugh:
Satin Rulez OK!!! :fing02:
Scroll down only in not in open office or livingroom :laughing6-hehe:
[image: Posted Image]
Oh Yeah Satin Rules! :tongue:
+1
Been checking in on this tread. Nice Work. Glad to see the swing arm going black. Great looking bike.
So any thoughts on the colour of the new brake lines? (soon to come)
Red or black?
Smoked.
Silver? Gold? Guess you gotta photoshop it.... :cool:
My choices are red, blue, silver or black (smoked)
The supplier I'm going with only has those colours.
I was leaning towards red as there are already a few red accents on the bike and my textile suit is red/black.
Red for sure.
Great work.... :fing02:
Red red red
Smoked lines, red banjos. Option? You could always spray the chrome/silver banjo ends with Duplicolor red Metalcast. Personally, I think bright glossy brake lines look tacky. But that's just my opinion.
Looking good.
:smile:
Got the swingarm mounted, still have to clean the needle bearings in the rear drive hub and regrease, reinstall.
Did get the new cush drive rubbers installed though, and of course, all the swingarm and shock linkages thoroughly cleaned, and regreased/torqued.
Pardon the lousy lighting and flash flare in the garage.
[image: Posted Image]
Swingarm all prettied up, rear hub was dismantled, bearings cleaned, repacked with fresh grease, and reinstalled.
New cush drive rubbers installed, and also the cush drive housing that I had powdercoated 2 years ago went on.
The one I WAS running up till this time was only spraypainted.
Can you guess what's next?
:tour:
[image: Posted Image]
What made you decide against running the lines through the swing arm?
What made you decide against running the lines through the swing arm?
The hugger has some nifty retainers on top to hold the brake lines, and I kinda like them. If the lines went through the swingarm, there would be bare spots on top where the threaded inserts are anchored into the CF, and nothing to attach there.
aww crap!!! but at least there is a solution....
:pissed: :pissed: :pissed:
[image: index.php?app=gallery&module=images§ion=img_ctrl&img=581]
IMG 0731
Album: VFR rebuild album
Uploaded 25 Feb 2012 - 04:35
aahh that will buff out...................
but it won't keep the fluid inside :laugh:
weird
[image: View Post]SEBSPEED, on 25 February 2012 - 08:52 AM, said:
weird
The word I used did not have five letters.........
[image: View Post]Veefer800Canuck, on 25 February 2012 - 08:54 AM, said:
[image: View Post]SEBSPEED, on 25 February 2012 - 08:52 AM, said:
weird
The word I used did not have five letters.........
I believe it.
I wonder how well that piece would hold up if I welded it.
Doan worry bout it. I gots another one comin.
I can still install the rear brake lines, bleed all the hydraulics, install the rear caliper, get a new rear tire fitted, and fill the engine with fresh Mobil-1.
That's about all I can think of to do until the new housing arrives.
Besides, it's snowing like a banshee, we're getting all the precip we should have gotten between November and January.
http://m.weatheroffi...-761cweg-077400
Probably Won't be riding until mid to late April on account of the snow and ice anyhow.
[image: View Post]Veefer800Canuck, on 25 February 2012 - 09:42 AM, said:
Doan worry bout it. I gots another one comin.
Saw that, just curious is all.
Did a little work tonight, got the brake lines and rear caliper mounted, plus a couple other things you might spy. Sorry for the flash, garage lighting aint great for getting into the nooks and crannies of the bike.
Gotta put a little clear vinyl hose over the brake line hoop at the very back of the swingarm so the new braided lines don't rub on the metal hoop.
Couldn't get the throttle bodies on because I haven't gotten the new/used thermostat housing yet. Oh well.
[image: index.php?app=gallery&module=images§ion=img_ctrl&img=582]
IMG 0757
Album: VFR rebuild album
Uploaded 07 Mar 2012 - 01:06
[image: index.php?app=gallery&module=images§ion=img_ctrl&img=582]
IMG 0755
Album: VFR rebuild album
Uploaded 07 Mar 2012 - 01:05
[image: index.php?app=gallery&module=images§ion=img_ctrl&img=582]
IMG 0758
Album: VFR rebuild album
Uploaded 07 Mar 2012 - 01:06
[image: index.php?app=gallery&module=images§ion=img_ctrl&img=583]
IMG 0764
Album: VFR rebuild album
Uploaded 07 Mar 2012 - 01:08
[image: index.php?app=gallery&module=images§ion=img_ctrl&img=583]
IMG 0760
Album: VFR rebuild album
Uploaded 07 Mar 2012 - 01:07
[image: index.php?app=gallery&module=images§ion=img_ctrl&img=583]
IMG 0759
Album: VFR rebuild album
Uploaded 07 Mar 2012 - 01:06
[image: index.php?app=gallery&module=images§ion=img_ctrl&img=583]
IMG 0761
Album: VFR rebuild album
Uploaded 07 Mar 2012 - 01:07
[image: index.php?app=gallery&module=images§ion=img_ctrl&img=583]
IMG 0762
Album: VFR rebuild album
Uploaded 07 Mar 2012 - 01:08
Hey Rob, I've just caught hold of this thread (Apologies for being so slow, that's what having a stock 750 does for you :tour: )
Anyway, thought I'd just ad my compliments for some fine work you're doing there, and sorry to hear it all started with a crash. I'm interested to hear what you used for the rocker cover paint - they sure do stand out :fing02: . I'm considering repainting my whole engine so am collecting opinions as to the best paint, & technique. I was thinking of POR15, as it's highly recommended, but keen to hear your thoughts. Very nice touch with the red lines too, it's details like that, that make a bike stand out - er, and all the hundreds of hours work you've also put in probably help. :laugh: Great job - hope you & the bike are soon in perfect fettle !
There's somethIng about holding a can of spray paint that makes you wanna paint stuff. Love the anodize look that the duplicolor metalcast gives.
Hey thanks Renevator. Well Seb, it's powdercoat, not the dupli-colour MetalCast.
I sprung for the big ticket. Oops.
[image: View Post]Veefer800Canuck, on 07 March 2012 - 07:02 AM, said:
I sprung for the big ticket. Oops.
You might as well - you'll only have to spend all that extra cash on Christmas presents at the end of the year, so enjoy it now I say :smile:
That Dupli-colour stuff looks interesting - I presume you guys have used it before with good results - I will do the obligatory search and check it out.
[image: View Post]Veefer800Canuck, on 07 March 2012 - 07:02 AM, said:
Hey thanks Renevator. Well Seb, it's powdercoat, not the dupli-colour MetalCast.
I sprung for the big ticket. Oops.
Now that I see it on the big monitor instead of my phone, it's a bit more obvious.
Does your wife know you have a thing for redheads? :wink:
Haha, cash on the barrelhead old boy. :wink:
I covered the rear brake line hoop on the swingarm pinch bolt with some 5/16" clear vinyl tubing so that the metal hoop would not rub on the brake lines. Also got some 1/4" I.D. Fuel hose and covered the clutch line where it runs behind the frame and alongside the engine. The stock clutch line had a protective cover on it through those areas so I thought it best to protect the line in places one cannot see when the bike is assembled.
Reference welding the Thermostat housing (I know you've sorted it with a new item) if the material is anything like std footpegs from a yamaha (so presume Honda too), it won't weld. I got a coleague at work (top welder by trade) to fix a footpeg for a neighbour, and it couldn't be welded as the ali is a real mix of composites. Looks like that housing is too? Though you prob already know all this. :-)
Well, I do know it won't anodize, as I had my painted fuel cap stripped and took it to the anodizer, and the guy said it can't be done, won't turn out unless it's pure aluminum, not that pot metal that Honda uses that is "mostly" aluminum, and who knows what else.
But Sebastian managed to weld the engine sidecovers, I imagine they are made from a similar material?
[image: Posted Image]
[image: View Post]Veefer800Canuck, on 04 February 2012 - 01:52 AM, said:
[image: Posted Image]
So after the adventure above, which was required to fix a SLIGHT coolant weep from one of the hoses going to the thermostat housing, I cleaned and cleaned the area between the cylinders, and got adventurous and changed out the O-rings on the coolant elbows from the front and rear cylinder banks. They WERE NOT LEAKING, but I figured, what the heck, I'm in this far, and O-rings are cheap. So I replaced all the O-rings (4) on all the coolant supply/return joints on the cylinder block. 2 in the center of the vee, 2 on the left side above the water pump.
Articles 18x2 and 16 below, and there is another #16 not shown on that diagram, off to the right.
[image: index.php?app=gallery&module=images§ion=img_ctrl&img=586]
Capture
Album: Misc pics
Uploaded 25 Mar 2012 - 22:20
GUESS WHICH ONE LEAKED? :pissed: :pissed: :pissed: :pissed: :pissed: :pissed: :pissed:
Oh yeah, the one on the rear cylinders. dripping like a beeyotch. I managed to take off the airbox and get in there with a 1/4" ratchet and LONG 8mm socket, snugged them up even though they were already tight enough, and it still leaks.
So I gotta take the F.I. rack off again, this time I'm gonna leave everything MOSTLY connected, and try to pop it up, and shuffle it off to the side just enough to get under and remove the offending elbow and re-do the joint. I don't want to drain the fuel system again, etc.
At least my NEW short hoses to replace #14 and #15 are not leaking......... those were the ones that kicked this off in the first place.
Fix one leak, cause another. ARRGH!
If it had been either of #16, it would have been easy peasy to fix. Drain coolant, remove joint, clean, new O-ring, reassemble. No removing the entire F.I. rack.
At least there were no oil leaks around the valve cover gaskets or the oil cooler, all of which were removed.
Was good to hear the bike roar again, and I have 14 volts from my new stator. Win some, lose some. :rolleyes:
So is it back on the road or are you still snowed in?
Snow is almost all gone, just a little left on the lawns here and there, but the roads are clear, if a bit dirty. Have seen some bikes out already.
I just got a call from the Honda dealer that my new coolant elbow is in, so I can fix my leak.
http://www.vfrdiscus...ter-joint-help/
After that, I need to bleed all the brakes, plus the clutch, install the rear wheel and tighten/clean/lube the chain, and I think that's it.
Right now, the throttle bodies and airbox are off, as well as the side and tail fairings. As soon as the cooling system is up to snuff, all that can go back on. Probably work on it Friday of next week.
Oh, and I need to fit my blingy new aluminum brake line spacers too.
[image: Posted Image]
[image: View Post]Veefer800Canuck, on 25 March 2012 - 10:24 PM, said:
[image: View Post]Veefer800Canuck, on 04 February 2012 - 01:52 AM, said:
[image: Posted Image]
So after the adventure above, which was required to fix a SLIGHT coolant weep from one of the hoses going to the thermostat housing, I cleaned and cleaned the area between the cylinders, and got adventurous and changed out the O-rings on the coolant elbows from the front and rear cylinder banks. They WERE NOT LEAKING, but I figured, what the heck, I'm in this far, and O-rings are cheap. So I replaced all the O-rings (4) on all the coolant supply/return joints on the cylinder block. 2 in the center of the vee, 2 on the left side above the water pump.
Articles 18x2 and 16 below, and there is another #16 not shown on that diagram, off to the right.
GUESS WHICH ONE LEAKED? :pissed: :pissed: :pissed: :pissed: :pissed: :pissed: :pissed:
Oh yeah, the one on the rear cylinders. dripping like a beeyotch. I managed to take off the airbox and get in there with a 1/4" ratchet and LONG 8mm socket, snugged them up even though they were already tight enough, and it still leaks.
So I gotta take the F.I. rack off again, this time I'm gonna leave everything MOSTLY connected, and try to pop it up, and shuffle it off to the side just enough to get under and remove the offending elbow and re-do the joint. I don't want to drain the fuel system again, etc.
At least my NEW short hoses to replace #14 and #15 are not leaking......... those were the ones that kicked this off in the first place.
Fix one leak, cause another. ARRGH!
If it had been either of #16, it would have been easy peasy to fix. Drain coolant, remove joint, clean, new O-ring, reassemble. No removing the entire F.I. rack.
Don't you just hate that.... the only thing these situations are good for is inventing new vocabulary.
I'm about to jump into the same kettle of fish... have had intermitent coolant leaking somewhere in the valley of my VTEC's V4 engine...
Noticed weeping or moreso WICKING effect at the ends of almost all hoses... where the fibres from the material which is embedded in the rubber to stop them from expanding overmuch... this makes me think they've deteriorated on the internal walls...
I replaced all the easy-to-get-to ones hoping that that would fix it... only it just made whichever leak there is in the V of the motor worse (better all round presurre I guess?)
So I've bought all the remaining hoses as well and will have to remove the throttle bodies... figured I'd swap out the O-rings for new ones on all the elbows too...
Now I know you've been in there... any tips while you've got it fresh in your head??
What's this draining fuel lines bizz??
I highly suspect it's #15 in my case too... judging from what I can see through a gap in the chasis with a torchlight.
Stupid thing is I had the fuel tank and airbox off to sync the starter valves and couldn't see any leaks... sure could smell it, but couldn't see it.
To get at the thermostat, you don't have to COMPLETELY remove the throttle bodies off the motorcycle, you can just disconnect most of the vacuum lines and sensor plugs, remove the airbox, pop the throttle bodies off the cylinder boots, and cock the entire throttle body assembly 90 degrees to the left side of the bike and work with it sideways like that.
That's how mine is sitting now. That way, you don't have to drain the fuel tank or lines, but it helps if the fuel tank is less than half full. Just makes it easier.
Leave the throttle cables, fuel lines, and injector harness all connected.
Brilliant... I owe you more than one beer...
[image: View Post]Veefer800Canuck, on 22 April 2012 - 08:37 AM, said:
To get at the thermostat, you don't have to COMPLETELY remove the throttle bodies off the motorcycle, you can just disconnect most of the vacuum lines and sensor plugs, remove the airbox, pop the throttle bodies off the cylinder boots, and cock the entire throttle body assembly 90 degrees to the left side of the bike and work with it sideways like that.
That's how mine is sitting now. That way, you don't have to drain the fuel tank or lines, but it helps if the fuel tank is less than half full. Just makes it easier.
Leave the throttle cables, fuel lines, and injector harness all connected.
Remember, mine is a 99 with no wax unit.
Depending on how the coolant line is routed, you may need to drain your coolant and remove the hoses going to/from the wax unit also???
I don't know, never worked on a 6th gen.
Assembled everything this past week and went for a ride. Temps were not great, but at least in the double digits (celsius).
Coolant leaks be gone. Phew. Bleeding the brakes out after replacing all the lines was time consuming, but not all that frustrating.
I think I had about 500 ML of fluid in my bleeder jar at the end, and still some left in the 1L jug I had bought. No bubbles, no troubles.
Next Tuesday it's supposed to be sunny and 22'C out, so looking forward to that. I'll take some pics of the finished mods for this past winter and post up.
A lot of nice details! I like it (I love carbon fiber stuff). Bad the thermostat cover broke. And the frame paint jobb is complet as swing also black :fing02:
Looking really nice.
[image: View Post]Veefer800Canuck, on 22 April 2012 - 05:03 PM, said:
Remember, mine is a 99 with no wax unit.
Depending on how the coolant line is routed, you may need to drain your coolant and remove the hoses going to/from the wax unit also???
I don't know, never worked on a 6th gen.
I'll be draining the cooalnt anyways... but thanks for the thought...
This bike is like the best piece of candy in the candy store; the best choice of colors mods and awsome work I have VFR envey!!!
Thank you sir. We've got long winters here, and I got a big toolbox, so combine the two, and, well, you know the rest!!!
Went for a ride today, about 60 miles. Beautiful afternoon. Stopped at the lake and snapped a few pics to show the past winter's mods.
Iphone, so it is what it is. Oh well.
Also the only place with anything resembling scenery anywhere near this town.
[image: Posted Image]
[image: Posted Image]
[image: Posted Image]
[image: Posted Image]
[image: Posted Image]
[image: Posted Image]
[image: Posted Image]
[image: Posted Image]
[image: Posted Image]
[image: Posted Image]
[image: Posted Image]
WOW! What a gorgeous bike!!! The workmanship and attention to detail is amazing... on my top ten list for best bike!!!! Well done sir....
:fing02:
^^^ That bike is lookn damn good! Fantastic.
- I forget --- front wheel is SP-2? Stands out very nicely with the rotors your using.
2 cent idea - whadabout a quarter inch red pin stripe on the front lower fairings right where the black/white line meet? It would blend and kinda flow into the red piping on the seat.
Now, may I suggest that you immediately get that bike re-appraised to make sure that, god forbid, something else might happen to it, you are covered for your immense re-investment into that VFR.
Also. That is looking absolutely FANTASTIC! :fing02:
Rereading this thread, and as a matter of fact, the bike is currently insured for $8000 Canadian.
The ins. company has it listed as a
2010 VFR800, due to the Ubuilt VIN number being assigned to the bike in 2010.
KBB excellent condition for a 1999 is $2770, but our values north of the border are much higher than that.
There are a few 5th gens listed on CanadaTrader.com right now for $4600-$5500, mostly nearly stock.
Thats too funny! But hat's off to you , looks like the hard work is paying off! BTW, how's the rest of your injuries doing? Soon be time to ride the colourful beast! I'm thinking an Evil Kenevil racing suit might be in order....!
Bike is great, done some riding in the last month. Over 12,000 km since the rebuild.
As for me, finally getting my shoulder fixed, and having two screws taken out of my heel on Jun 15th. They rub in my footwear and give me trouble after a long day.
Why the doc didn't countersink them so they sit flush with the bone I'll never know.
Wow! A great build and like no other.
You Sir are an inspiration.
It never ends. Went to the DMV today to re-register the bike for the season, and they balked, because their records show it as a 1999, but the IBC has deemed it a 2010.
My insurance is correct, the VIN matches, but the year is wrong, and it's the DMV's fault because they did not update their records 3 years ago when I provided them with the proper documentation at that time.
So, I couldn't find the paperwork, had to call the IBC, they sent me the records via e-mail, and by the time I got back to the DMV, they were closed.
Arrgh.
Government bureaucrats everywhere suck I guess. :comp13:
I'd say join AAA, but not sure if there's a Canadian analog, eh.
I went there to renew my license tag after I was reminded by Officer Friendly that it had expired. :sleep:
Oddly enough, they had no problems registering it for 2010 and 2011 and 2012..............
Oh, and ever since I got the bike in January of 2000, the DMV insists on calling it a VFR750.
Even though I explained it's a VFR800, they don't care. It has always said that on my registration.
WHAT-ev-errrrrrrrrrrrrr
WOW, what an incredible looking bike! :cool:
Veefer800Canuck
Went for a ride today, about 60 miles. Beautiful afternoon. Stopped at the lake and snapped a few pics to show the past winter's mods.
Iphone, so it is what it is. Oh well.
Also the only place with anything resembling scenery anywhere near this town.
[image: gallery_554_5200_2220805.jpg]
Part of the winter mods must have been the gyros from a Segue to hold the bike upright when parked! :ph34r:
SEBSPEED
'Veefer800Canuck
I don't have any fancy V-blocks or such for measuring, but I was thinking of gently chucking the fork legs up into the metal lathe at work, on the topmost part of the fork where the upper triple and clipon normally mounts, then starting the lathe VERY slowly, and work it up easy to a reasonable (slow-ish) speed that would show any bend in the fork as an off-center wobble. Clamping say, a popsicle stick in the lathe's tool mount should show any runout as increasing/decreasing clearance, no?
Do you think this would work? :comp13:
You should be perfectly ok checking the fork legs in a lathe. I would think that if your work has a lathe, there should also be a dial indicator floating around somewhere. A popsicle stick would show you an obvious bend, but the tolerance on the fork tubes is .008". For reference, the hair on your head is on average .010". To know for sure, you need an accurate way of measuring deflection.
Harbor Freight has cheap & decent dial indicators, maybe Princess Auto does too?
This post is quite old so it's likely that you have resolved your farm issue. Here in BC ICBC writes off motorcycles for fun. I bought a salvage 2000 viffer that had fairing damage and one slightly bent fork. I have been told by long time viffer owners that the stops are where to look to indicate frame damage. Bottom line is I have a good 2000 VFR frame in salvage status with the reggie if interested.
I wound up buying a brand new frame from Honda and the bike has been registered and on the road since June 2010.
Thank you for the thoughts.
Finally found this bike!!!!!!!!! This is the absolute best looking VFR IMO. LOVE IT! Now do you mind if I copy the paint scheme?
It is a beautiful example of a man and his VFR...
I believe you may even find it written up in a magazine somewhere...
Tews19Finally found this bike!!!!!!!!! This is the absolute best looking VFR IMO. LOVE IT! Now do you mind if I copy the paint scheme?
Well they say that imitation is the sincerest form of flattery, so why not?
Post pics when you have some!
End of thread · 231 posts recovered Wayback Machine snapshot 24 Aug 2017
![[image: 47184929-607e-02000180-.jpg]](http://www.autoblog.com/media/2006/07/47184929-607e-02000180-.jpg)
![[image: partridgebus06.jpg]](http://telstarlogistics.typepad.com/photos/uncategorized/2008/01/24/partridgebus06.jpg)
![[image: 538923-3.jpg]](http://www.sprocketcenter.com/pictures/486/3/538923-3.jpg)
![[image: Posted Image]](http://www.xtremedecals.com/productgraphics/vf700f4colouredwings.gif)
![[image: Posted Image]](http://www.xtremedecals.com/productgraphics/straight.gif)
![[image: Posted Image]](http://www.xtremedecals.com/productgraphics/curvedhonda.gif)
![[image: Posted Image]](http://www.xtremedecals.com/productgraphics/SP-2.gif)
![[image: Posted Image]](http://www.xtremedecals.com/productgraphics/2001firepgmf1sin2c.gif)
![[image: Posted Image]](http://www.xtremedecals.com/productgraphics/hondaalone.gif)
![[image: Posted Image]](http://www.xtremedecals.com/productgraphics/VFR%20with%20Shadow.gif)
![[image: Posted Image]](http://www.xtremedecals.com/productgraphics/hondav4sinright.gif)
![[image: Posted Image]](http://farm1.staticflickr.com/3/2344697_891ab08d15.jpg)
![[image: Posted Image]](http://www.jm-gold-fashion.de/images/produkte/i12/1299-5907699442188.jpg)
![[image: Posted Image]](http://i8.photobucket.com/albums/a49/SEBSPEED2003/Weld%20Projects/6-17-11006.jpg)
![[image: Posted Image]](http://i.ebayimg.com/t/3-AN3-6-4mm-Black-Billet-Brake-Hose-Separator-/12/!Bf5mPBwCGk~$(KGrHqEH-D8Erz!3dlPLBLDF!6)-ew~~_12.JPG)