VFRDiscussion ARCHIVE / READ-ONLYREAD-ONLY

Triumph Eccentric Swap (pic heavy) (not complete)

58 posts Started 7 Jul 2012 Last recovered post 7 Oct 2019 Wayback Machine snapshot 10 Jul 2025

#1

First and foremost, want to thank Mrmatt for his post a while back that make me decide to do this for my project.

Here's the link to his thread. Now that I am finally getting around to doing it, I can verify all the measurements he took. Lots of the pictures are just of measurements, but this way it can't be questioned in the future.

*** Not finished yet. Still need to take measurements with the wheel on to get final info.

Forewarning, you are going to need either a very large snap-ring plier, or you will need to modify a pair of needle nose pliers to get the snap ring off the eccentric. This is the hardest part of the disassembly. Snap ring pliers this size are $35-$50. Otherwise you can grind down the tips of the HF 90 degree needle nose pliers with the orange grips. The VFR ring is fairly easy. The triumph one is a dog.

So lets begin. First things first. Injure yourself in such a way to make tool handling painful and difficult. As a side note, rags are not sufficient protection against 20ft long chips.

[image: IMG_2217.jpg]

-

Next, find yourself a comfortable environment. 88F and 70% humidity will do nicely.

[image: IMG_2218.jpg]

Then find the mess that someone has left behind at your work area, and clean it up.

[image: IMG_2220.jpg]

-

Wiped down and chip free surface. Grabbed some blocks, clamped the swingarm down, and got to taking measurements.

[image: IMG_2221.jpg]

-

Measurement for inside of sprocket carrier for VFR

[image: IMG_2227.jpg]

-

VFR sprocket carrier thickness.

[image: IMG_2238.jpg]

-

VFR sprocket carrier surface to surface double check.

[image: IMG_2237.jpg]

-

VFR swingarm surface to wheel mounting surface.

[image: IMG_2232.jpg]

-

VFR wheel mounting surface thickness.

[image: IMG_2229.jpg]

-

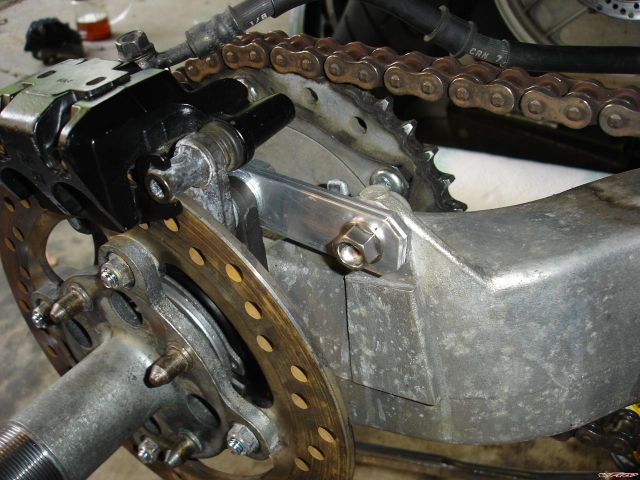
The hammer lies upon its prey. Triumph eccentric tapped out and removed. It came out nice and easy. I couldn't get the caliper hanger off, so I had to use the hammer to give it a couple of light taps to get it started. Once the caliper hanger was on the step, it came right off, so must have just been a little dirt keeping it from coming off.

[image: IMG_2230.jpg]

-

So nice of triumph to add never-seize. Probably helped with the removal.[image: IMG_2231.jpg]

-

Either Honda didn't bother putting any grease on the eccentric, or it all dried up and washed away. The honda eccentric was pretty difficult to get out. Had to use the mallet to get it to the caliper hanger, but the eccentric kept getting stuck part of the way out. Turns out that there was so much dirt and debris in there that it would get stuck between the middle of the eccentric and the swingarm and bind everything. Took lots of shaking and blowing junk out to finally get it out.

[image: IMG_2239.jpg]

-

Total height of the triumph eccentric

[image: IMG_2249.jpg]

-

Triumph eccentric swingarm section.

[image: IMG_2248.jpg]

-

VFR eccentric total height.

[image: IMG_2246.jpg]

-

VFR eccentric swingarm section.

[image: IMG_2244.jpg]

-

Just for giggles. Triumph eccentric weight.

[image: IMG_2243.jpg]

-

Honda eccentric weight.

[image: IMG_2241.jpg]

-

The VFR swingarm after removing the eccentric. You can see that the surfaces aren't very clean, and there's still some dirt in there.[image: IMG_2240.jpg]

-

Time to toss the Triumph goodies in there. Fresh new coat of never-seize on the triumph eccentric

[image: IMG_2250.jpg]

-

Sitting nice and flush

[image: IMG_2251.jpg]

-

Nice and flush on this end too

[image: IMG_2252.jpg]

-

Somehow I feel like I have just made it heavier. Also, you need to use the triumph caliper bracket to have the eccentric sitting where it is supposed to. The VFR caliper bracket has the same ID, so if you really wanted to use the VFR hangar for whatever reason, you could possibly make a spacer for it.

[image: IMG_2253.jpg]

-

Triumph rotor carrier thickness.

[image: IMG_2258.jpg]

-

Thickness of sprocket carrier for triumph bit.

[image: IMG_2257.jpg]

-

Triumph wheel mounting surface to swingarm surface

[image: IMG_2254.jpg]

-

Triumph sprocket carrier surface to swingarm surface

[image: IMG_2256.jpg]

-

VFR Wheel offset

[image: IMG_2265.jpg]

848 Wheel Offset

[image: IMG_2261.jpg]

Weights are added to the chart. I don't think anyone wants pictures of all that. You can go in the photobucket album if you really want.

So here's a chart of the differences in sizes and some weights

[image: Conversionchartrev3.png]

End result is that I gain 0.5 lbs by doing the swap for the opportunity to run a single nut wheel. I have a VFR wheel with a tire and the 848 without, and still have to consider the caliper, caliper hanger, and the rotor, and the wheel nuts, so that's not the total weight just yet.

Looks like everything is still pretty close to where it should be, unless someone finds a fault in my math and measurements.
#2
mrmatt

No, I keep intending to write it up in a separate thread but haven't yet. I think there's some more pics in my gallery and I briefly go through it on my "vfr conversion" thread, but here's a reply I made to somebody else asking about it.

"

This is the list of parts I used:

06/07 Speed Triple - (same as many of the Triumph SSSA bikes, from at least '97)

Eccentric hub

Sprocket/sprocket carrier/cush drive and nut (english thread)

Axle (needed threads cut, remember its english tread)

Axle nut (english thread)

Rear brake caliper

Rear caliper bracket

2x warped washers (can be VFR or Triumph)

Ducati S4R/Multistrada - (most if not all Ducati rims have the same offset, but they do have two different axle sizes)

Wheel

Conical wheel holder thing (goes between wheel and axle nut)

VFR

Rear brake master

Chain

Swingarm and rest of bike

Special parts

- you may want to check wheel and chain alignment, I came up with 5 and 2.5

Sprocket washer/spacer (OD 55, ID 40, T 2.5 mm)

Wheel/axle spacer (OD 44, ID 40, T 5 mm)

Dust seal spacer (OD 50, ID 45, T 5 mm)

2x Rear brake caliper spacer (OD 20, ID 10, T 5 mm)

Rear brake torque arm

Also page 2 of my 'VFR750 conversion' album pics DSC01761-1773 have pics of a few of this stuff. 1762 shows the axle/wheel spacer that fits inside of the eccentric hub and against a bearing for a tight fit, 1763 is the location of the cush drive spacer. I hope its clear enough, have any more questions let me know.

I've put about 10k miles on this, including weekend trips to WV and IN without any problems so I think its pretty good. The machinist drilled a couple of holes to wire the axle nut so its secured.

The only problem with this mod is that on the cush drive side, the axle is shorter because of the spacers, so the locking flange of the nut on that side is 1-2mm past the axle so when the flange is bent to lock the nut it does not have as much to bite into, but it still does a little. I always check it before I ride and have not noticed any slipping. If there was a way to wire the nut as well that would be the best solution.

"

I'm going to check alignment for real next time (no tires) so I'll know if my 5mm wheel offset is correct, but I haven't been working on it for a while, been distracted fitting a 748 tail to my brother's Hawk so we can sell it. If you need any more pics or info let me know

Matt

med_gallery_12942_4385_93962.jpg

More info from him can be found in the thread linked in the first post.

#3

***reserved for spacers, parts, and other modifications

#4

*** reserved for rear caliper solution.

#5

Fun project, keep it coming! :fing02:

#6

Watching this one :smile:

#7

Great job! Opens up different wheel possibilities......

#8

Great job so far! I am guessing that the Triumph front mounts for the swing arm also don't match up with the VFR engine mounting points...

#9
CornerCarver

Great job so far! I am guessing that the Triumph front mounts for the swing arm also don't match up with the VFR engine mounting points...

Not even close. You could possibly machine it down and weld some back in, but it's over an inch wider, not to mention much heavier.

#10

ok. now i need to find a 748 and a 848 swing arm to measure...good info Yoshi.

#12
CornerCarver

ok. now i need to find a 748 and a 848 swing arm to measure...good info Yoshi.

Why are you trying to swap over the entire swingarm?

#13

Because the Duc swingarm is lighter than the VFR and the rear brake wont have to be sorted when the 3 piston VFR caliper is removed to make room for the Duc wheel (also lighter).

#14

More info on this - if you want to run a Ducati wheel, the 1098 wheel won't fit, nor will the wheel off some of the more recent high-performance Monsters, and the Streetfighter. They have a larger diameter axle.

You need a 916 - 996 - 998 - 848 wheel.

#15
CornerCarver

Because the Duc swingarm is lighter than the VFR and the rear brake wont have to be sorted when the 3 piston VFR caliper is removed to make room for the Duc wheel (also lighter).

If you're really interested in going for dropping as much weight as possible, you might want to just go for a conventional swingarm. You'll lose a lot more weight that way. This should really be considered more of an extensive cosmetic mod. Heck, only reason I'm doing it is because I found a steal on that ducati wheel that I had to weld up and repair.

#16

UPDATED with weights and wheel measurements.

#17

Not interested in the lightest rear ass'y but want a single nut rear wheel. some sssa wheels are heavier than Hondas (aprilia and triumph have both been reported as such to me by eBay sellers).

The Ducati 748/848 stuff is apparently lighter.

I want to keep the 5.5" width rear so not looking at the newer stuff that is 6" wide and has the larger axle.

#19

Dude, measurements in inches? Nice. True machinist. All of our designs are done in metric, then converted to English measurements for machining in the lab I work(ed) in.

#20

g

CornerCarver

Not interested in the lightest rear ass'y but want a single nut rear wheel. some sssa wheels are heavier than Hondas (aprilia and triumph have both been reported as such to me by eBay sellers).

The Ducati 748/848 stuff is apparently lighter.

I want to keep the 5.5" width rear so not looking at the newer stuff that is 6" wide and has the larger axle.

That's about right. The Aprilia Mana front wheel I got for peanuts weights more than the 848 rear, the VFR front, and the R1 front. It's around 10.5, whereas the 848 stock rear is 9.8lbs. Only good thing about the Ape wheel is that I got Galfer wave rotors for dirt cheap as well, but now have to deal with the 22mm ID for the axle.

It would be interesting to see how much the ducati swingarm weights. If I didn't mention it before, the VFR swingarm complete was around 26.5 lbs. +/- 0.5lbs.

#21
Jmmymc750

Dude, measurements in inches? Nice. True machinist. All of our designs are done in metric, then converted to English measurements for machining in the lab I work(ed) in.

Yes. All measurements in inches and lbs. True machinist is going to be dealing with the english threads on the spindle. Not sure if it would be best to try and use a lathe to cut the thread, or just cut the OD and use a die.

#22

Fixed the problem with the updated chart not uploading properly.

The wheel is only 0.05" too far in. I should be able to water cut a spacer to push it out and still have the wheel contact the counterbore on the pins. IIRC, the step on the four pins for the wheel is 0.100". Either that, or that's the depth I cut it to in the wheel. Will have to check. If not I can always make 0.05" washers to sit on the pins and call it a day.

The sprocket is 0.072" too far in, which isn't much either. That's another water cut spacer and I can call it a day. Unless the 520 conversion throws a curve at me.

#23

I have Matt's notes in a PM. If he doesn't post up soon, I'll add them in. Right now I have to get back to getting my car fixed.

#24

Added in mrmatt's note that I had from a while ago. It seems we are going about this in two different ways, and that the wheel offsets might be different.

#25

More pictures

VFR caliper hanger thickness

[image: IMG_2287.jpg]

Triumph caliper thickness

[image: IMG_2286.jpg]

The triumph caliper also weights TWICE the VFR one. 0.5lbs vs 0.25 lbs. Tsk Tsk.

[image: IMG_2288.jpg]

[image: IMG_2294.jpg]

Plenty of room to bolt down the sprocket hub.

[image: IMG_2290.jpg]

Way too much material on the wheel side of the spindle.

[image: IMG_2291.jpg]

The step keeps the cone from touching the wheel, and the threads are too short to make the wheel nut useful.

[image: IMG_2295.jpg]

You cannot use the Triumph wheel cone either. Need to use the correct ducati cone.

[image: IMG_2298.jpg]

This is with the eccentric all the way to the rear

[image: IMG_2300.jpg]

This is with the eccentric all the way to the front.

[image: IMG_2301.jpg]

Looks like I'll have the wheel clearance no problem. Just need to start designing the spacers and send them over to get cut out.

#26
The wheel clears, but what about with a tire on it? The rubber is wider than the wheel.

What is your plan for centering the wheel? Centered to the arm? The arm is not on center of the bike, or is it?
#27

The wheel clears, but what about with a tire on it? The rubber is wider than the wheel.

What is your plan for centering the wheel? Centered to the arm? The arm is not on center of the bike, or is it?


The tire should clear. With the normal 4th gen wheel I can just get my finger between the swingarm and the tire. With just the wheel, I can get more than that. Not very scientific. I brought home the calipers to take measurements to see how close the wheel originally is to the swingarm.

I'm going to center the wheel by adding a plate to where the wheel mounts. I'll add rings to extend the length of the step on the spindle that fits in the counterbore on the wheel. The difference is only 0.05", so it's barely anything.
#30
Thanks to Matt for pointing out a major Posted Image up in my math. Here's my revised math for how far I need to offset the wheel, which is actually 0.132" to the new math.

[image: Posted Image]
#31
Just to show that this thread isn't dead just yet. Between starting a new job and rebuilding the engine in my car, other things have been pushed aside until they are done. But still have something new to show.


The rear brake is going to be a bit of a mess. I have a 675 rear caliper that came along with the 675 Sato rearsets I bought. First off, NO, they are not a direct bolt on. Close, but no cigar. So I have a 675 caliper with a ST spindle and rotor. 675 rotor diameter is 220mm vs 255 for the ST. So I'm going to have to have a custom rotor to have the same mounting as the original ST rotor with the diameter of the 675. Still have to check if it will fit.

[image: Posted Image]


My engineering department happened to have some 0.071" titanium on hand to cut the sprocket spacers I needed. Also, not many people carry a steel 520 sprocket that will work on this conversion. 2.5 month backorder on them, unless I buy the aluminum one.

[image: Posted Image]


And after working with the engineering department some more, it was decided to go a different route with the wheel spacer. Originally, I was going to have a 0.125" plate with cutouts for the drive pins, and then washers to extend the step on the pins. But since the pins are only 0.4" long before the taper, we are going to make a plate that will go between the original mounting surface and the drive pins. Two problems. The pins are either press fit or shrink fit, and the material for the bolts that hold them is pretty soft. I'm going to have to take the spindle to work and press out one of the pins to get the diameter needed for the spacer and probably find new bolts with a longer thread. Here's a 2D of what the plate might look like.

[image: Posted Image]
#32
You lucky bastages with machine shops and all the toys!!!!!!!!!
#33

[image: View Post]Metallican525, on 26 July 2012 - 06:46 PM, said:

You lucky bastages with machine shops and all the toys!!!!!!!!!

Don't get too jealous. Usual working hours are 6:30-6, Mon-Sat. Nice to have the toys, but you don't really have a lot of time either.
#34

[image: View Post]YoshiHNS, on 27 July 2012 - 04:53 PM, said:

[image: View Post]Metallican525, on 26 July 2012 - 06:46 PM, said:

You lucky bastages with machine shops and all the toys!!!!!!!!!

Don't get too jealous. Usual working hours are 6:30-6, Mon-Sat. Nice to have the toys, but you don't really have a lot of time either.

Oooof, those are rough hours I admit.  Hopefully you enjoy your job tho and it's not such a grind.
#35

Well, you could always put that shim in there like someone showed recently. Not my first choice of action though. Maybe the 1098/1198 eccentrics are larger diameter? The axles should be different diameters, so maybe the eccentrics are as well. They are a bit pricey on the ebay to just buy one and see, and it's more miss than hit on a seller that will give you dimensions.

#36

Wow. Just realized that I never measured the diameter of the eccentric. That was only a slight 'oops'. I'll have to see about getting that size today when I stop at the house.

I did find a suggestion that the 1098/1198 eccentric is 112mm diameter. The 848 is smaller, maybe 98mm.

http://www.ducati.ms/forums/56-superbikes/143980-eccentric-hub-dimensions-single-sided-swingarms-2.html

From this CF post, it looks like the 4th gen VFR is 105mm diameter, triumph is the same, and the RC45 is 117mm. If the 5th gen is the same as the RC45, then there isn't a direct swap eccentric from what we have looked at so far.

http://www.customfighters.com/forums/showthread.php?p=1610978

#37

Keith. Looks like you have to find an axle that will fit into the 5th gen eccentric correctly. I know I sent pictures showing how the VFR and one of the ducati axles won't work (I'll have to look up which one I got). I can't be too much help checking my parts as they are all buried while we finish the flooring in the attic.

#38

An actual update. After a few months, I finally have the last parts for the swap.

[image: DSCF0944.jpg]

Just have to set a weekend aside to machine the threads and press everything together.

#40

Jumping back here from Mohawk's 5th Gen single-nut topic.

Around April this year I decided to get serious about my own 848 wheel mod - I'd had all the parts sitting around for two years or so, as is usual with me. I took the 848 rim, an aftermarket aluminium one-piece 848 wheel nut, the Triumph spindle and my single sided swingarm stand pin down to my machinist and for $60 he cut down and re-threaded the spindle to take the wheel and nut (he's a bike guy himself), and turned down the stand pin so it would fit nicely into the spindle.

Then took it all home and bolted it together. Result:

[image: 22712147043_bd9875d6d9_z.jpg]

I haven't fitted the Triumph rear brake bracket, or checked the chain alignment, so that is next. Might need to make spacers etc. as you've been doing.

#41

Now that's coming together!

#43

Holy Shit Murray, the Bike who Parks is actually looking closer to completion!!!

#44

Bike who parks! Brilliant!

#45

Nice bike! Where is the subframe, tailpiece and fairing coming from? And what about the exhaust, looks like a 4-4 system?

#47

Here's a question for you Murray, since I don't know how it's supposed to exactly fit.

The 848 wheel is driven by the four pins. Does it also locate the wheel? When I repaired my wheel, I also had an 848 axle to test fit it, and the wheel is rock solid. No movement in any direction whatsoever. I took this as I did a good job re-cutting the holes for the pins in the right location.

But then there's the cone washer that sits against the wheel. Originally, the nut and cone were two different parts. I took this as the cone could shift a bit and settle into the wheel if it was slightly off. But then, that means that the wheel may not be perfectly concentric with the axle.

Aftermarket parts have the cone and nut as one piece, meaning the cone will push the wheel to be concentric with the axle. But if the drive pins or holes on the wheel for them are slightly off, then there will be an overconstrained condition. So are the holes for the pins supposed to be slightly loose to account for this? Or is everything really made to that good of a tolerance? How did your wheel fit up?

#48

Yoshi, my 848 wheel just went right onto the Triumph mounting flange - I have both the Triumph 2-piece cone/nut, and an aftermarket one-piece nut, and the latter works perfectly as far as locking the wheel to the flange.

I'll have a good look at it this week and get some pics and measurements.

#49

No pics or measurements needed, just to confirm that the wheel is supposed to fit right on the drive pins and have little to no movement on them, without putting the cone and nut on.

#50

Oldish topic, but found it while trying to find some info about the Triumph rear wheel. Unfortunately none of the pictures posted by YoshiHNS can be seen, so perhaps someone could help.

What is the offset of the Triumph (Sprint) 3 spoke wheel? I.e. the distance from the centre plane of the rim to the hub mounting surface. All the chain driven VFRs have a -19mm offset, but what offset is the Triumph wheel?

#51

Download the photobucket fix for your browser (google it)

#52
11 hours ago, SEBSPEED

Download the photobucket fix for your browser (google it)

Already done that, but they're still not showing up. Never mind, I've gone off the Triumph idea. I'll be modding a 916 wheel to fit the NC30 axle instead.

#53

@BiKenG I didn't have a Triumph wheel to measure the offset. Just the loaded swingarm. Send a PM if you still need info.

Maybe I'll make it a weekend project to fix all the picture links. I'm running my own image server so they shouldn't break in the future.

#54

Fixing picture links would be great.

#56
6 hours ago, YoshiHNS

So...looked through the thread. All the pictures are still there. Can you not see them?

Here's the link to the new album if that helps

https://jbunjevac14.piwigo.com/index?/category/36-vfr1cati

I can see them now. That wasn't the case when I first looked. I'm poring over them now. 😀

Doesn't anyone have a Triumph wheel to measure its offset?

#57

Did this get finished? 

#58

[image: giphy.gif]

It's a secret, for now.  :ph34r:

End of thread · 58 posts recovered Wayback Machine snapshot 10 Jul 2025